


Our window opening monitor will not have a screen or graphic interface, so we need a means to be able to adjust the position of the sensor in the installation or on demand.
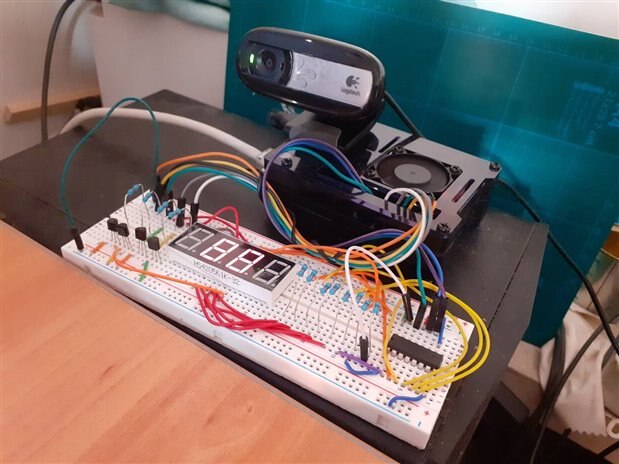
We have used a 4 digit 7 segment display to be able to monitor 4 windows at the same time. Each digit represents a window with its four corners and a moving part.
The detected marker corners are shown by turning on the LEDs corresponding to the same corner of the digit on the display. The middle segment represents the marker for the moving part of the window.
Multi-window driver 4x7 segment display
Bill of Materials
| Product Name | Manufacturer | Quantity | Buy KitBuy Kit |
|---|---|---|---|
| LDQ-N514RILDQ-N514RI 7 Segment LED Display, InfoVue, Red, 10 mA, 2 V, 3.9 mcd, 4, 14.22 mm | LUMEX | 1 | Buy NowBuy Now |
| PN2222Bipolar (BJT) Single Transistor, NPN, 40 V, 1 A, 625 mW, TO-226AA, Through Hole | ON SEMICONDUCTOR/FAIRCHILD | 4 | Buy NowBuy Now |
| 220Ω Resistor | VISHAY | 8 | Buy NowBuy Now |
| 4.7kΩ Resistor | VISHAY | 4 | Buy NowBuy Now |
| Single Board Computer, Raspberry Pi 4 Model B, BCM2711 SoC, 4GB DDR4 RAM, Bulk Pack | RASPBERRY-PI | 1 | Buy NowBuy Now |
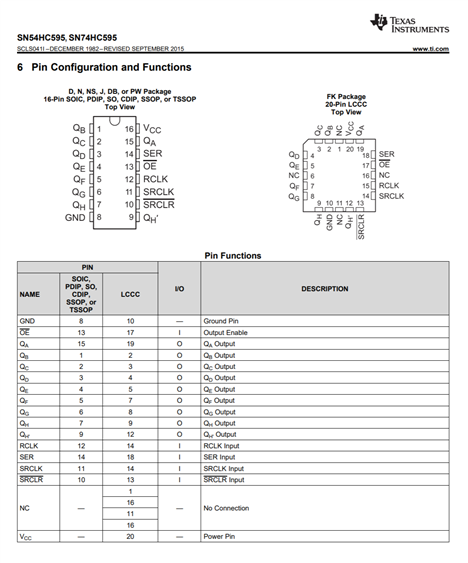
| SN74HC595NSN74HC595N | TEXAS INSTRUMENTS | 1 | Buy NowBuy Now |
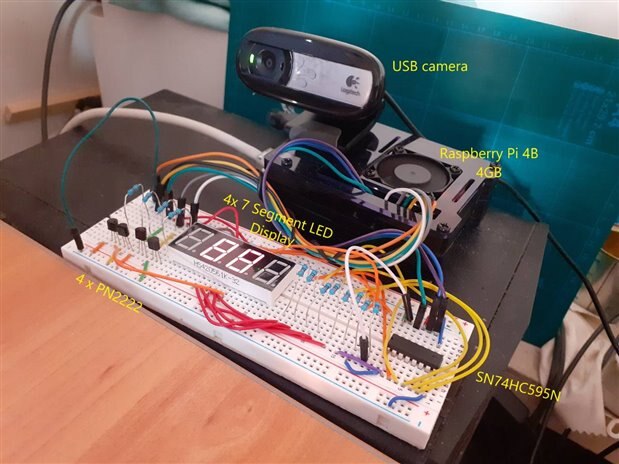
Breadboard
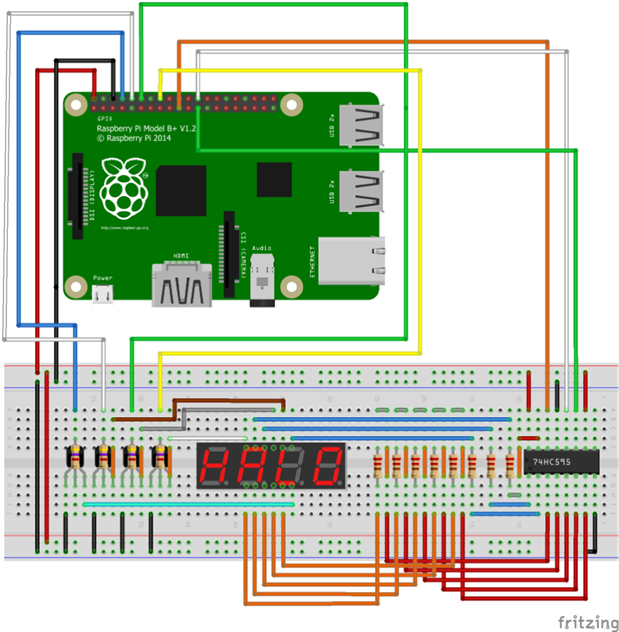
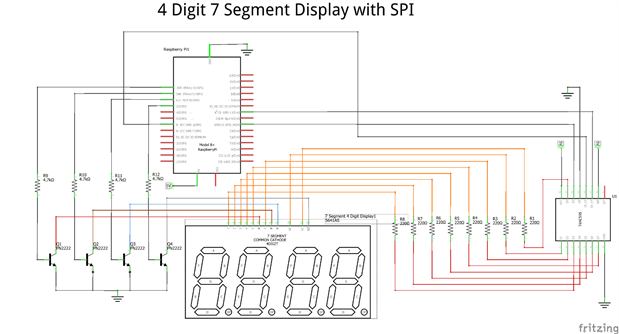
Schematic
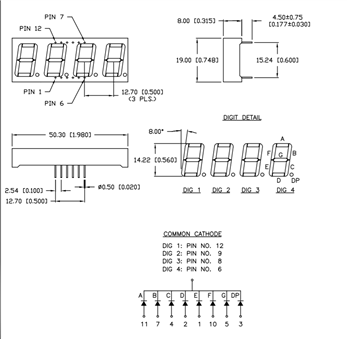
LDQ-N514RILDQ-N514RI 7 Segment LED Display
The LDQ-N514RILDQ-N514RI is a 0.56-inch quad digit 7-segment Display with 635mm red chip. Grey font/white segments. Common cathode
Multiplexed. We will use 4 Raspberry Pi digital outputs to select the digit. The four digital outputs are connected to 4 PN2222 transistors to drive the leds to ground.
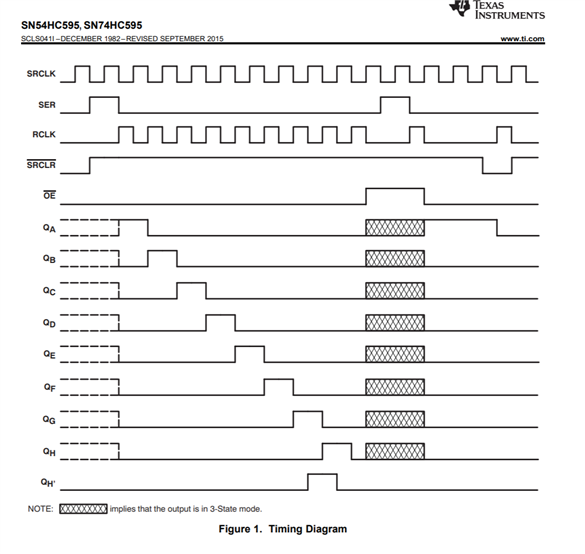
SN74HC595NSN74HC595N shift register
We will control send data to the display serially using the clocking of a Raspberry Pi SPI interface
How it works
Each digit represents a window with its four corners and a moving part.
The detected marker corners are shown by turning on the LEDs corresponding to the same corner of the digit on the display.
The middle segment represents the marker for the moving part of the window.

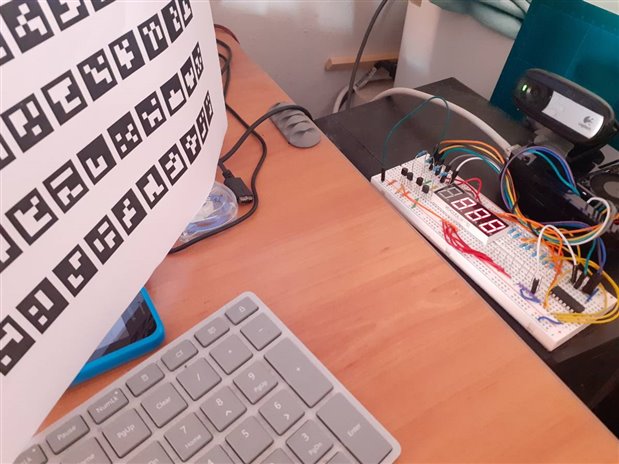
Windows 2 & 3 fully detected
Sheet with Windows ID 2 to 4.
Windows 2, 3 & 4 fully detected. Window 1 not detected
Display python code
This class drives a 4x7 segment display using an SN74HC595 shift register clocked by spi clock and 4 digital lines to switch between digits.
Works in its own thread
#!/usr/bin/env python
# -*- coding: utf-8 -*-
"""wom_display_4x7_spi.py: 4 digits x7  segment display
   drives a 4x7 segment display using an SN74HC595 shift register clocked by spi clock
   and 4 digital lines to switch digits. Works in its own thread
"""
__author__ = "Enrique Albertos"
__license__ = "GPL"


import RPi.GPIO as GPIO
import sys
import time
import threading
from threading import Thread
import spidev
import atexit


class Display4x7(threading.Thread):

    # PIN definitions GPIO.BCM
    # Connect to 74HC595 8-bit serial-in, parallel-out shift
    __bus  = 0  # MOSI GPIO 10 (PIN 21) - 74HC595 pin 14 DS
              # SCLK GPIO 11 - 74HC595 pin 11 SHCP
    __device = 0
    __spiSpeedDefault = 3900000
    __latchPinDefault = 25 # GPIO 8 (CEO) 74HC595 pin 12 STCP


    # HS42056 1K-32 digit selection
    __digit0PinDefault   = 14 # 7-Segment pin D4
    __digit1PinDefault   = 15 # 7-Segment pin D3
    __digit2PinDefault   = 18 # 7-Segment pin D2
    __digit3PinDefault   = 23 # 7-Segment pin D1


    MARKERS = ( 0x03,  # Top Left
                0x05,  # Top Right
                0x50,  # Bottom Right
                0x18,  # Bottom Left
                0x80,  # Center
                0x00   # blank
                )


    HEX_DIGITS = (0x5F, # = 0
                 0x44,  # = 1
                 0x9D,  # = 2
                 0xD5,  # = 3
                 0xC6,  # = 4
                 0xD3,  # = 5
                 0xDB,  # = 6
                 0x45,  # = 7
                 0xDF,  # = 8
                 0xC7,  # = 9
                 0xCF,  # = A
                 0xDA,  # = b
                 0x1B,  # = C
                 0xDC,  # = d
                 0x9B,  # = E
                 0x8B,  # = F
                 0x00   # blank
                 )

    def __init__(self, initialContent = (0,0,0,0), bus=0, device=0, digit0 = __digit0PinDefault, digit1 = __digit1PinDefault, digit2 = __digit2PinDefault, digit3 = __digit3PinDefault,  latchPin = __latchPinDefault, speedHz = __spiSpeedDefault):
        self.__displayContent = initialContent
        self.__latchPin = latchPin
        self.__digit3 = digit3
        self.__digit2 = digit2
        self.__digit1 = digit1
        self.__digit0 = digit0
        self.__shifRegisterPins = (latchPin)
        self.__controlDigitsPins = ( digit3, digit2, digit1, digit0 )
        self.__lock = threading.Lock()
        self.__bus = bus
        self.__device = device
        self.__speedHz = speedHz
        atexit.register(self.cleanup)
        self.__setup()
        threading.Thread.__init__(self)

    def __initPinsAsOutputs(self, pins) :
        for pin in pins:
            GPIO.setup(pin, GPIO.OUT, initial = GPIO.LOW)

    def __lowPins(self, pins) :
        for pin in pins:
            GPIO.output(pin, GPIO.LOW)

    def __setup(self):
        GPIO.setwarnings(False)
        GPIO.setmode(GPIO.BCM)
        # init display control digits pins
        self.__initPinsAsOutputs(self.__controlDigitsPins)
        # init serial *** register pins
        GPIO.setup(self.__latchPin, GPIO.OUT, initial = GPIO.LOW)

        self.__spiDisplay= spidev.SpiDev()
        self.__spiDisplay.open(self.__bus,self.__device)
        self.__spiDisplay.max_speed_hz = self.__speedHz
        self.__spiDisplay.mode = 0
        self.__spiDisplay.bits_per_word = 8
        self.__spiDisplay.no_cs = True

    def __shiftout(self, byte):
        GPIO.output(self.__latchPin, 1)
        time.sleep(0.00000005)
        GPIO.output(self.__latchPin, 0)
        self.__spiDisplay.xfer([byte])
        GPIO.output(self.__latchPin, 1)
        time.sleep(0.00000005)
        GPIO.output(self.__latchPin, 0)

    def run(self):
        # overrides thread run
        while True:
            i=0
            for pin in self.__controlDigitsPins:
                self.__lowPins(self.__controlDigitsPins)
                with self.__lock:
                    self.__shiftout(self.__displayContent[i])
                GPIO.output(pin, GPIO.HIGH)
                time.sleep(0.00000001)
                i=i+1

    def display(self, displayContent = (0,0,0,0)) :
        with self.__lock:
            self.__displayContent = displayContent

    def displayInt(self, number = 0) :
        self.display((self.HEX_DIGITS[(number // 1000)%10], self.HEX_DIGITS[(number // 100)%10],self.HEX_DIGITS[(number // 10)%10],self.HEX_DIGITS[number %10]))


    def displayWindowCorners(self, iterable) :
        content = [0,0,0,0]
        digit=0
        for element in iterable:
            for i in range(5) :
                if element[i]:
                    content[digit] |= Display4x7.MARKERS[i]
            digit = digit + 1
        self.display(content)

    def __enter__(self) :
        return self

    def __exit__(self, exc_type, exc_value, traceback) :
        self.cleanUp()


    def cleanup() :
        self.__dislay.closeSPI(self.spiDevice)
        GPIO.cleanup()


if __name__ == '__main__':
    try:


        display = Display4x7()
        display.start()
        i=0
        while True :
            display.displayWindowCorners([[True, True, True, True, True], [False, False, False, False, False], [False, False, False, False, False], [False, False, False, False, False]])
            #display.display((Display4x7.HEX_DIGITS[i%16],Display4x7.HEX_DIGITS[(i+1)%16],Display4x7.HEX_DIGITS[(i+2)%16],Display4x7.HEX_DIGITS[(i+3)%16]))
            i = i + 1
            time.sleep(.5)
    except KeyboardInterrupt:


       print('interrupted!')
       GPIO.cleanup()
    sys.exit()
Window detector python code
Window Detector as shown in the video demo
#!/usr/bin/env python
# -*- coding: utf-8 -*-
"""wom_window_detector.py: Window detector. Detects up to 4 windows
   marked with 5 ArUco markers each
   Results are sent to a 4x7 Led Display
"""
__author__ = "Enrique Albertos"
__license__ = "GPL"


from imutils.video import VideoStream
import imutils
import time
import cv2
import numpy as np
from collections import deque
from _functools import reduce
from wom_display_4x7_spi  import Display4x7
import atexit


class WindowDetector() :
    __WINDOW1_MARKERS = ( 1,  2,  3,  4,  0)
    __WINDOW2_MARKERS = (11, 12, 13, 14, 10)
    __WINDOW3_MARKERS = (21, 22, 23, 24, 20)
    __WINDOW4_MARKERS = (31, 32, 33, 34, 30)
    __WINDOW_MARKERS = (__WINDOW1_MARKERS, __WINDOW2_MARKERS, __WINDOW3_MARKERS, __WINDOW4_MARKERS)
    __NO_MARKER_DETECTED = (False,False,False,False,False)
    __NO_WINDOW_DETECTED = (__NO_MARKER_DETECTED,__NO_MARKER_DETECTED,__NO_MARKER_DETECTED,__NO_MARKER_DETECTED)
    __BUFFER_LENGTH = 40
    __FRAME_RATE = 4
    __IMAGE_SIZE = 600

    def __init__(self, display = Display4x7()):
        self.display = display
        atexit.register(self.cleanup)

    def __movingDetector (self, iterable):
        # iterates the buffer deque and ors the lists of booleans
        return (reduce(lambda x, y: np.bitwise_or(list(x),list(y)), iterable)).tolist()

    def __markersInWindow(self, windowMarkers, ids) :
        # creates a tuple of booleans correspondig to the detection of the window markers
        # top left corner, top right corner, bottom right corner, left right corner, moving part
        list = []
        for element in windowMarkers :
            list.append(element in ids)
        return tuple(list)

    def __markersIn(self, windowMarkers, ids) :
        # creates a tuple of tuples for the different markers found in window
        list = []
        for window in windowMarkers :
            list.append(self.__markersInWindow(window, ids))
        return tuple(list)


    def start(self):
        # starts the detector, grab images and display markers found
        detectorBuffer = deque((), maxlen= WindowDetector.__BUFFER_LENGTH)
        detectorBuffer.append(WindowDetector.__NO_WINDOW_DETECTED)


        self.display.start()
        arucoDict = cv2.aruco.Dictionary_get(cv2.aruco.DICT_4X4_50)
        arucoParams = cv2.aruco.DetectorParameters_create()


        vs = VideoStream(src=0, framerate=WindowDetector.__FRAME_RATE).start()
        # loop over the frames from the video stream
        while True:
            # grab the frame from the threaded video stream and resize it
            frame = vs.read()
            frame = imutils.resize(frame, width=WindowDetector.__IMAGE_SIZE)
            # detect ArUco markers in the input frame
            (mcorners, ids, rejected) = cv2.aruco.detectMarkers(frame, arucoDict, parameters=arucoParams)
            # verify *at least* one ArUco marker was detected
            if len(mcorners) > 0:
                flatid = ids.flatten();
                if len(detectorBuffer) >= WindowDetector.__BUFFER_LENGTH:
                   detectorBuffer.popleft()
                detectorBuffer.append( self.__markersIn(self.__WINDOW_MARKERS, flatid))
            else:
                detectorBuffer.append(self.__NO_WINDOW_DETECTED)
            self.display.displayWindowCorners(self.__movingDetector(detectorBuffer))

    def __enter__(self) :
        return self

    def __exit__(self, exc_type, exc_value, traceback) :
        self.cleanUp()


    def cleanup() :
        GPIO.cleanup()
        cv2.destroyAllWindows()
        vs.stop()


if __name__ == '__main__':
    try:
        windowDetector = WindowDetector()
        windowDetector.start()
    except KeyboardInterrupt:
       print('interrupted!')
        # do a bit of cleanup
    sys.exit()
| Previous | Next |
|---|---|
| Window Opening Monitor with ArUco - Tracking window movements | Window Opening Monitor with ArUco - Final device |