element14 Community
element14 Community
    Register Log In
  • Site
  • Search
  • Log In Register
  • Community Hub
    Community Hub
    • What's New on element14
    • Feedback and Support
    • Benefits of Membership
    • Personal Blogs
    • Members Area
    • Achievement Levels
  • Learn
    Learn
    • Ask an Expert
    • eBooks
    • element14 presents
    • Learning Center
    • Tech Spotlight
    • STEM Academy
    • Webinars, Training and Events
    • Learning Groups
  • Technologies
    Technologies
    • 3D Printing
    • FPGA
    • Industrial Automation
    • Internet of Things
    • Power & Energy
    • Sensors
    • Technology Groups
  • Challenges & Projects
    Challenges & Projects
    • Design Challenges
    • element14 presents Projects
    • Project14
    • Arduino Projects
    • Raspberry Pi Projects
    • Project Groups
  • Products
    Products
    • Arduino
    • Avnet & Tria Boards Community
    • Dev Tools
    • Manufacturers
    • Multicomp Pro
    • Product Groups
    • Raspberry Pi
    • RoadTests & Reviews
  • About Us
    About the element14 Community
  • Store
    Store
    • Visit Your Store
    • Choose another store...
      • Europe
      •  Austria (German)
      •  Belgium (Dutch, French)
      •  Bulgaria (Bulgarian)
      •  Czech Republic (Czech)
      •  Denmark (Danish)
      •  Estonia (Estonian)
      •  Finland (Finnish)
      •  France (French)
      •  Germany (German)
      •  Hungary (Hungarian)
      •  Ireland
      •  Israel
      •  Italy (Italian)
      •  Latvia (Latvian)
      •  
      •  Lithuania (Lithuanian)
      •  Netherlands (Dutch)
      •  Norway (Norwegian)
      •  Poland (Polish)
      •  Portugal (Portuguese)
      •  Romania (Romanian)
      •  Russia (Russian)
      •  Slovakia (Slovak)
      •  Slovenia (Slovenian)
      •  Spain (Spanish)
      •  Sweden (Swedish)
      •  Switzerland(German, French)
      •  Turkey (Turkish)
      •  United Kingdom
      • Asia Pacific
      •  Australia
      •  China
      •  Hong Kong
      •  India
      •  Japan
      •  Korea (Korean)
      •  Malaysia
      •  New Zealand
      •  Philippines
      •  Singapore
      •  Taiwan
      •  Thailand (Thai)
      •  Vietnam
      • Americas
      •  Brazil (Portuguese)
      •  Canada
      •  Mexico (Spanish)
      •  United States
      Can't find the country/region you're looking for? Visit our export site or find a local distributor.
  • Translate
  • Profile
  • Settings
Raspberry Pi
  • Products
  • More
Raspberry Pi
Blog Pi Global Shutter Camera: What's Inside the Box?
  • Blog
  • Forum
  • Documents
  • Quiz
  • Events
  • Polls
  • Files
  • Members
  • Mentions
  • Sub-Groups
  • Tags
  • More
  • Cancel
  • New
Join Raspberry Pi to participate - click to join for free!
Featured Articles
Announcing Pi
Technical Specifications
Raspberry Pi FAQs
Win a Pi
GPIO Pinout
Raspberry Pi Wishlist
Comparison Chart
Quiz
  • Share
  • More
  • Cancel
Group Actions
  • Group RSS
  • More
  • Cancel
Engagement
  • Author Author: shabaz
  • Date Created: 11 Mar 2023 4:44 PM Date Created
  • Views 7524 views
  • Likes 14 likes
  • Comments 24 comments
Related
Recommended
  • machine vision
  • raspberry_pi
  • raspberrypi
  • raspeberry_pi_accessories
  • raspberry_pi_camera
  • global shutter camera

Pi Global Shutter Camera: What's Inside the Box?

shabaz
shabaz
11 Mar 2023

The new Pi Global Shutter Camera (see the announcement) may be suitable for AI experimentation, so I decided to get one! I believe it should be electrically compatible with both the Pi as well as the NVIDIA Jetson Nano, so I think I can get some good use out of it.

The Sony IMX296LQR-C sensor (sensor PDF flyer; see page 3-4) inside the camera is of a sensible resolution (not quite Full HD, but close, at 1440 x 1080 useful pixels), and it has a 1/3" sensor size, and square 3.45 x 3.45 um pixel size, and operates up to around 60 frames per second. Unlike the older non-global-shutter camera, this new camera uses a sensor intended for machine vision use. The older product used a sensor intended for consumer cameras.

The photo below shows everything that comes inside the box, apart from a little bag of silica gel. There's no static shielding bag or any instructions, you'll have to go to the Raspberry Pi website to access the camera documentation.

The little screwdriver is used if it becomes necessary to loosen or tighten a back-focus ring for trimming the distance between the lens and sensor (ordinarily one shouldn't need to make any adjustment if the ring is fully screwed in).

image

The flat flex is 150 mm long (I separately purchased a 300 mm length flat flex, in case it becomes necessary; you can also get cable joiner adapters, but there is a finite limit on how far it can be extended! these cameras are not intended for long-distance connections via flat flex, since high-frequency signals travel down them).

The photo below shows the various elements of the camera.

image

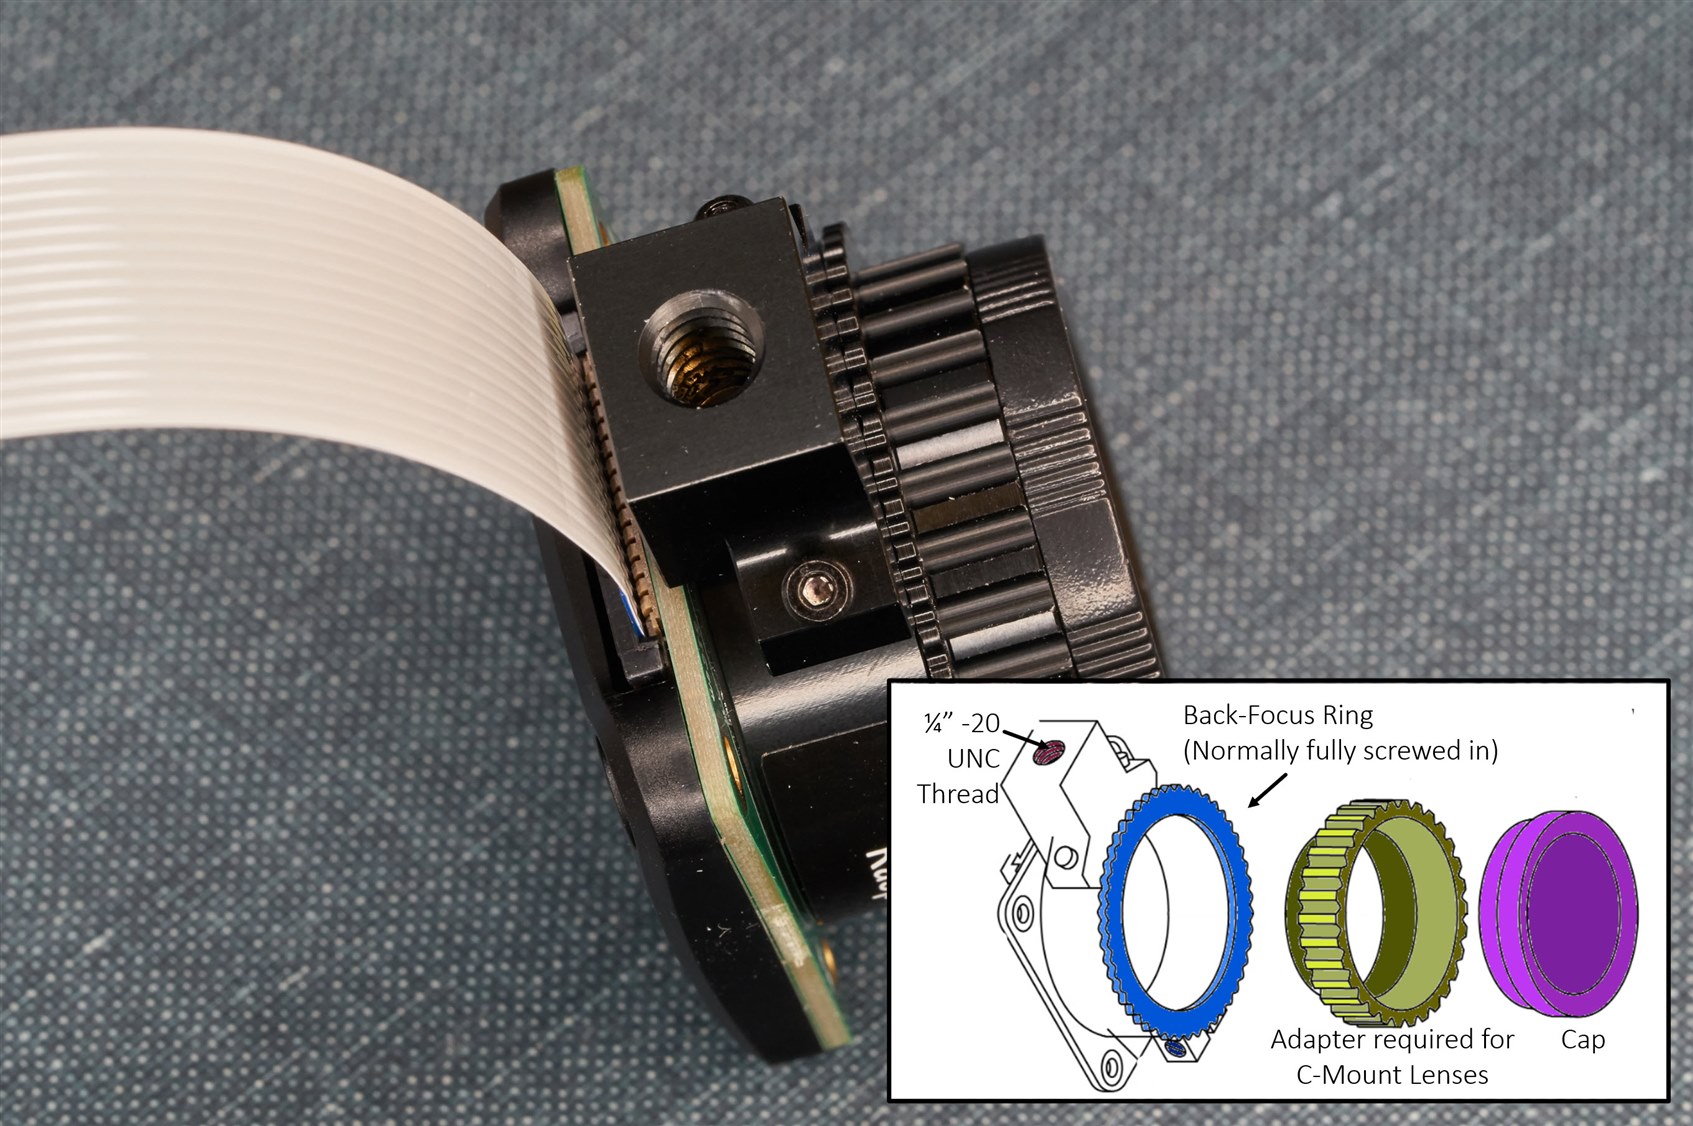
(Diagram source: The drawing is taken from the Raspberry Pi website)

The screw thread (indicated in the photo above) fits typical tripods, although the flat flex will get in the way a bit, so a bit of care is needed to be gentle when doing that.

The photo below shows there are some test points (the bottom one is labeled GND, I noticed afterward that I didn't capture that in the photo!). 

The rear cover is plastic, whereas the lens and tripod mounts on the other side are metal. The plastic is curved, it isn't used for mounting, and it seems to be acting as just a cover for the electronics. The four holes will suit M2.5 screws.

image

I don't get how this camera is supposed to be mounted; maybe I'm missing something, but it seems awkward because you won't want to screw the PCB because it may flex it (and the weight of any lens would also flex the PCB a certain amount, although I hope it would be negligible, I see no recommendation one way or another on the documentation page). That leaves just the tripod mount as a suitable mounting point, but then it seems odd to affix the enclosure and the tripod to that point. If anyone has a sensible enclosure recommendation, please share it!

In hindsight, I should have purchased a camera lens. I searched around and found a lens, but it's not going to be of high quality (it is from an old standard-definition CCTV camera). 

Note that C-mount and CS-mount lenses have the same thread, but if you have a CS-mount lens, the adapter ring (that was indicated in one of the photos above) would need to be unscrewed so that the focal plane of the lens can reach the sensor.

I fitted my temporary lens in an un-dusty location since it's not fun cleaning out a sensor when dust lands on it (rookie tip: never use a can of bottled air, even if it states it is just air, it will still definitely leave a chemical residue; instead, there are rubber-ball type air dusters that are useful if dust attaches).

image

I have not tried the camera yet, so I'll write some more once I have done that. Currently, I have no idea what the image will be like, but I can compare it with another (much older Sony IMX136LQJ [PDF flyer]) machine vision camera that I have.

The sensor in this Raspberry Pi camera is not the latest generation either, but it is a fraction of what an industrial machine vision camera would cost (although I wish more thought had been applied to enclosure mounting options instead of what seem like near-pointless plastic injection moldings!). Still, I'm excited to have what may turn out to be a fairly decent camera for machine vision and AI purposes, especially if the enclosure mounting issues are somehow worked around.

Thanks for reading!

  • Sign in to reply
  • baldengineer
    baldengineer over 3 years ago

    Unlike the older non-global-shutter camera, this new camera uses a sensor intended for machine vision use. The older product used a sensor intended for consumer cameras.

    What makes a camera/sensor more suited for machine vision versus consumer usage?

    • Cancel
    • Vote Up 0 Vote Down
    • Sign in to reply
    • More
    • Cancel
  • shabaz
    shabaz over 3 years ago in reply to beacon_dave

    Hi Dave,

    Maybe I'm over-thinking it, but to me it seems it wouldn't even need to be a rugged use-case scenario, it would take just one knock or fall to cause that PCB to bend if it is attached to the enclosure if the metalwork isn't. The idea of drilling holes into the side of the tripod is very good! That's actually very neat because that piece of metal can be unscrewed (the two screws that Jan highlighted) so that the drilling/tapping can be done without the camera anywhere near the drill too.

    With that approach, the camera can be fitted into any metal enclosure, and any accidental knock will not cause any issue.

    • Cancel
    • Vote Up 0 Vote Down
    • Sign in to reply
    • More
    • Cancel
  • shabaz
    shabaz over 3 years ago in reply to Jan Cumps

    Hi Jan,

    Using those screw holes will be difficult because they are at an angle, however I think you've hit the nail on the head that any realistic solution will need to use an attachment either at that point or using that tripod thread. 

    I might just use a bolt to screw the camera into the enclosure using the tripod thread, and then fit my own separate tripod thread to the outside of the enclosure. This is they only solution I can think of that doesn't require awkward milling or a 3D printer (which I don't have).

    It would have been a non-problem if that metalwork on the camera simply extended out a bit so that it could have been screwed onto the face of any enclosure.

    • Cancel
    • Vote Up 0 Vote Down
    • Sign in to reply
    • More
    • Cancel
  • beacon_dave
    beacon_dave over 3 years ago in reply to shabaz

    I doubt that R-Pi designed for rugged use but it looks like they at least factored in larger lenses and hence provide the tripod lens mount, like you get with the larger SLR lenses where the tripod supports the weight of the lens and the lens mounting ring supports the camera body rather than the other way around.

    You could perhaps drill and tap into the side of the tripod mount to give you some enclosure mounting points, and perhaps replace the existing two PCB mounting screws with stand-offs to use as enclosure mounting points. 

    Arducam do metal housings for their HQ alternative cameras
    https://www.arducam.com/wp-content/uploads/2020/12/Arducam_12MP_USB_IMX477_TapeA_B0280-600x600.jpg
    so perhaps you could remove the tripod mount and swap the camera modules for something a bit more rugged ?

    • Cancel
    • Vote Up 0 Vote Down
    • Sign in to reply
    • More
    • Cancel
  • Jan Cumps
    Jan Cumps over 3 years ago in reply to Jan Cumps

    image

    • Cancel
    • Vote Up 0 Vote Down
    • Sign in to reply
    • More
    • Cancel
<>
element14 Community

element14 is the first online community specifically for engineers. Connect with your peers and get expert answers to your questions.

  • Members
  • Learn
  • Technologies
  • Challenges & Projects
  • Products
  • Store
  • About Us
  • Feedback & Support
  • FAQs
  • Terms of Use
  • Privacy Policy
  • Legal and Copyright Notices
  • Sitemap
  • Cookies

An Avnet Company © 2026 Premier Farnell Limited. All Rights Reserved.

Premier Farnell Ltd, registered in England and Wales (no 00876412), registered office: Farnell House, Forge Lane, Leeds LS12 2NE.

ICP 备案号 10220084.

Follow element14

  • X
  • Facebook
  • linkedin
  • YouTube