


![]()
Hi all. Hope everyone is fine.
this is my fifth blog post of my series of the Road Test for the AMD Xilinx Kria KV260 Vision Starter Kit.
On this post I'm going to explore how to prepare a Machine Learning Model for the KV260 through Vitis-AI.
We're going from preparing the host machine to compile and quantize the model to run it on the KV260. And here's the kicker - We can run it using two modes. More later.
NOTE: The next post will show how to quantize and compile both a TensorFlow v2 model and PyTorch model (YOLOv7) using the tools and steps explained here. After that, we're ready to run inference of the models in the KV260 using PYNQ. Because this post is extensive, I've decided to split them.
One of the key features of the Xilinx Kria KV260 Vision Kit is the possibility of running accelerated inference on AI models .
AMD Xilinx provides the Vitis AI platform. It's a comprehensive AI inference development solution for AMD devices, like the Kria KV260. It consists of a rich set of AI models optimized deep learning processor unit (DPU) cores, tools, libraries, models, and example designs .

The VITIS-AI is composed of the following components:
-
DPUs - Configurable computation engines optimized for convolution neural networks. Efficient and scalable IP cores that can be customized to meet the needs of many different applications and devices.
-
Model Zoo - A comprehensive set of pre-trained and pre-optimized models that are ready to deploy on Xilinx devices.
-
Model Inspector - A tool and methodology through which developers can verify model architecture support.
-
Optimizer - An optional, commercially licensed tool that enables users to prune a model by up to 90%.
-
Quantizer - A powerful quantizer that supports model quantization, calibration, and fine tuning.
-
Compiler - Compiles the quantized model for execution on the target DPU accelerator.
-
Runtime (VART) - An inference runtime for Embedded applications.
-
Profiler - Performs an in-depth analysis of the efficiency and utilization of AI inference implementations on the DPU.
-
Library - Offers high-level C++ APIs for AI applications for embedded and data center use-cases.
The Vitis-AI has some workstation requirements - the machine that will quantize and compile the model :

I'm using Arch Linux, but let's not let it to get on the way.
Preparing the host
Let's start by installing docker.
pacman -S docker
Add my user to the docker group
gpasswd -a feiticeir0 docker
Logout and login and we're set.
To have CUDA acceleration on the VITIS-AI docker image, beside having an NVIDIA graphics card (duh) it's necessary to install the nvidia-container-toolkit
Again, having Arch Linux (all their instructions are for Ubuntu), using yay
yay nvidia-container-toolkit
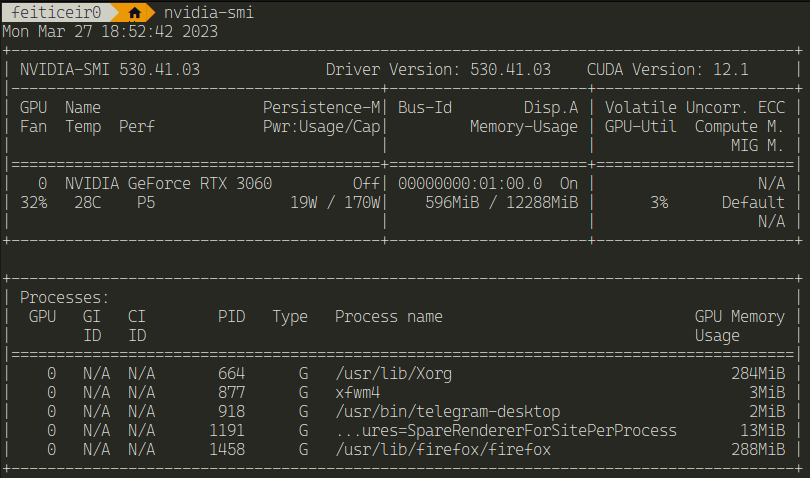
After this, just using nvidia-smi outside of the docker container and inside should show similar results
Next, we need to clone the VITIS-AI repository
git clone https://github.com/Xilinx/Vitis-AI
cd Vitis-AI
We need a docker image that comes with all the necessary software to quantize and compile the model to be able to use it for inference.
Since I have a capable GPU, I need a docker image with GPU support.
Because there are none ready, let's use the Xilinx recipes to create a docker image with TensorFlow v2 and GPU support
cd docker
Here's the possible docker images that we can create:

Let's create a TensorFlow 2 image with:
./docker_build.sh -t gpu -f opt_tf2
This means I'm going to use the GPU (-t flag) and TensorFlow2 (-f flag)
After some minutes, the docker image was finished

Now, the documentation asks to try the following command to see if docker has GPU capability:
docker run --gpus all nvidia/cuda:11.3.1-cudnn8-runtime-ubuntu20.04 nvidia-smi
and the result is:

I'm guessing that means that the GPU is enabled.
Now, let's star the docker container that we just created.
In the Vitis-AI directory
./docker_run.sh xilinx/vitis-ai-opt-tensorflow2-gpu:latest
And here we have it - a docker with TensorFlow and GPU support ready for Kria KV260 Vision Kit.

I've also build a docker container for Pytorch.
./docker_build.sh -t gpu -f opt_pytorch
After it's finished, let's run it
./docker_run.sh xilinx/vitis-ai-opt-pytorch-gpu:latest
or
./docker_run.sh xilinx/vitis-ai-opt-pytorch-gpu:3.0.0.001

Board Setup
To be able to run the models on the board, we need to prepare it by installing an SDK image.
In the Vitis-AI directory:
cd board_setup/mpsoc
Give the script execution permissions
chmod +x host_cross_compiler_setup.sh
Execute it.
./host_cross_compiler_setup.sh
And it starts doing something
Now, let's enable cross-compiling
unset LD_LIBRARY_PATHsource /home/feiticeir0/petalinux_sdk_2022.2/environment-setup-cortexa72-cortexa53-xilinx-linux
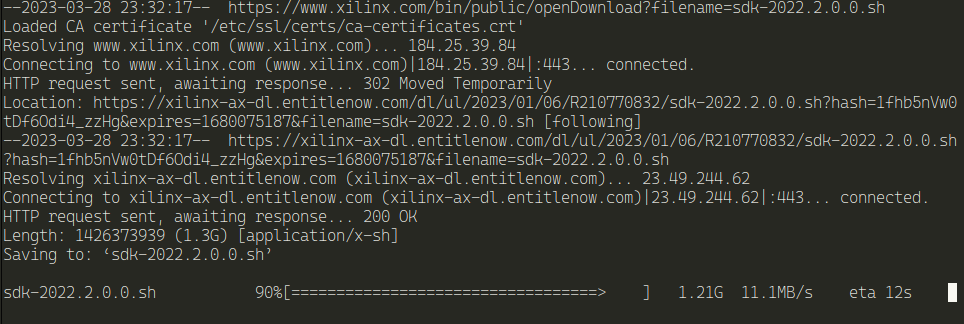
Next, we need to download an SD Card image for the KV260. Registration is required.
Let's put it on a SD Card
gunzip xilinx-kv260-dpu-v2022.2-v3.0.0.img.gz
sudo dd if=xilinx-kv260-dpu-v2022.2-v3.0.0.img of=/dev/sda bs=4M status=progress
After flashing it to the SD Card, just boot it and we now have access to a dashboard running on http://<ip_address>:5006/kria-dashboard

Using the debug port and minicom, we have this:

But we can also login using ssh with root user (default password is root)
After login in, we can optimize the system.
cd dpu_sw_optimize/zynqmp
and run the zynqmp_dpu_optimize.sh
This will:
- auto-resize ext4 partition to the max capacity
- fine-tune QoS/Outstanding settings for DPU case to achieve a better performance
- adjust pmic irps5401 current for ZCU104 board only (not this one)
./zynqmp_dpu_optimize.sh

Let's update the board
dnf upgrade
After a while (big while...), the board is updated.
Reboot the board
reboot
After it boots again, Lets now install the VITIS-AI runtime on the board
dnf install packagegroup-petalinux-vitisai
Now, let's update it
Download the files from here
decompress the file
tar -zxvf vitis-ai-runtime-3.0.0.tar.gz

Copy the files to the board
scp -r centos root@192.168.5.6:
But every time, I got this:

So, I end up using wget on the board to download the files.
decompress them - using the same command as above
Next, execute the setup
cd vitis-ai-runtime-3.0.0/2022.2/aarch64/centos/
bash setup.sh

Preparing a Model
Now, let's test a model
We're going to test the TensorFlow resnet50 - like the documentation
NOTE: Don't use this model. This is for Tensorflow v1. The quick start version of the documentation still shows this for Tensorflow v1. We need Tensorflow v2.
The tools also changed - and again, the quick start documentation still is for Tensorflow v1... Why ? Why ?
Bellow I corrected the model name for TF2 - tf2_resnet50_imagenet_224_224_7.76G_3.0
The following steps are the same, but with another model name.
Next steps are in the host machine
cd Vitis-AI (the same directory we cloned from github above)
Download the model
wget https://www.xilinx.com/bin/public/openDownload?filename=tf_resnetv1_50_imagenet_224_224_6.97G_3.0.zip -O tf_resnetv1_50_imagenet_224_224_6.97G_.0.zipunzip it
unzip tf_resnetv1_50_imagenet_224_224_6.97G_3.0.zipQuantizing the model
Before using the model in the Kria KV260, It's necessary to quantize it. Here are the steps involved by the quantizer

First, let's download the calibration images for the dataset
Xilinx offters a dataset already prepared - Imagenet_calib.tar.gz and copy it to the Vitis-AI folder
Let's launch the docker image create above for TensorFlow
/docker_run.sh xilinx/vitis-ai-tensorflow2-gpu:3.0.0.001
But wait, that's not the docker image created above
No it's not. I had to create a new one, without the optimization (the opt_ versions) . Apparently the optimizer version is just for pruning and requires license.
Why isn't this on the documentation ?
Now that we're in docker image, let's activate the conda environment
conda activate vitis-ai-tensorflow2
If you do a ls in the "workspace" folder, you'll realize is just the Vitis-AI folder.

Now, uncompress the images
tar -zxvf Imagenet_calib.tar.gz -C tf_resnetv1_50_imagenet_224_224_6.97G_3.0/data
Enter the model directory so we can start the quantization process
cd tf_resnetv1_50_imagenet_224_224_6.97G_3.0/code/quantize/
Execute the quantize process
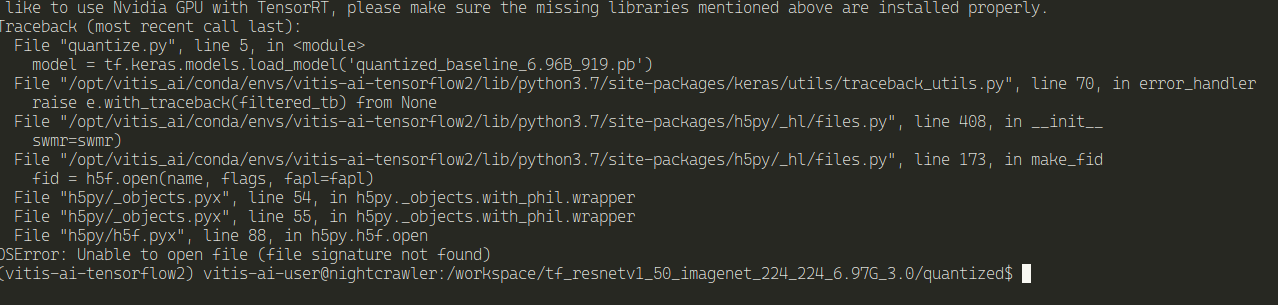
bash quantize.sh
and we get an error:
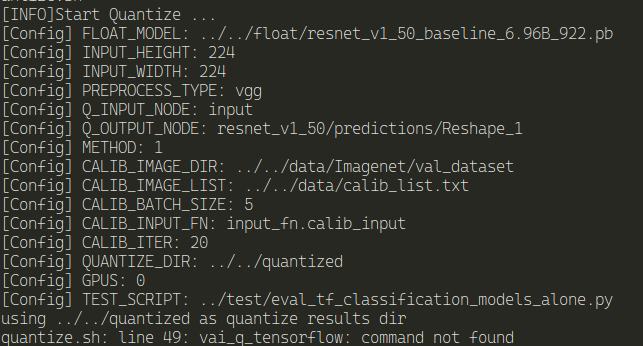
Why ? I'm certain I didn't make any mistake. This is the docker image created by the Vitis-AI scripts...
I try to find the vai_q_tensorflow program and it doesn't exists..
After a bit of digging, it turns out that that, for TensorFlow2 this is not the way to go anymore. Apparently, no one informed the quick start documentation properly.
According to the documentation for quantizing the model it's necessary to install it from source, but the instructions are.. well, crap..
They just say to run the following commands:
sh build.sh
pip install pkgs/*.whl
And where do I run this ? Must I download or clone the repo Vitis_AI_Quantizer ?
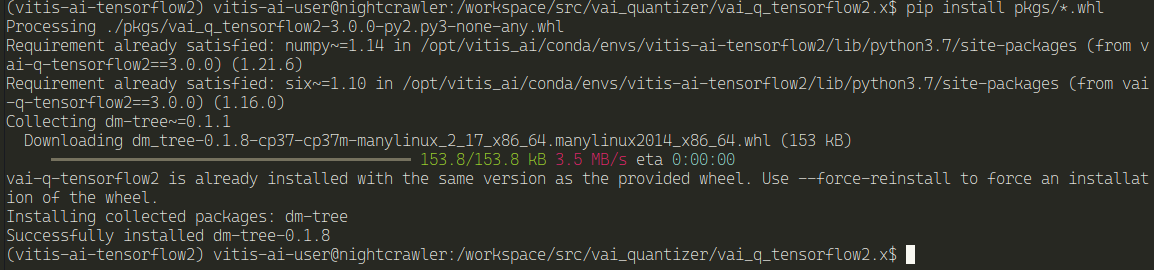
Let's try it - because this is in the Vitis-AI cloned repo.
cd src/vai_quantizer/vai_q_tensorflow2.x
Let's run the above commands
sh build.sh
It worked

Install the pkgs
pip install pkgs/*.whl
And now, we need a Python script to quantize the model
Let's get back to the directory where the model is
From the Vitis-AI directory
cd tf_resnetv1_50_imagenet_224_224_6.97G_3.0/quantized/
Let's create the python script here, like the documentation says
import tensorflow as tf

from tensorflow_model_optimization.quantization.keras.vitis.layers import vitis_activation

model = tf.keras.models.load_model('quantized_baseline_6.96B_919.pb')
quantizer = vitis_quantize.VitisQuantizer(model)
quantized_model = quantizer.quantize_model(calib_dataset=calib_dataset,
                                           calib_steps=100,
                                           calib_batch_size=10,
                                           **kwargs)
And run it:
python quantize.py
And, it didn't work...
And I'm guessing this is because the model is TensorFlow v1 and not V2...
Let's try the Resnet50 for Tensorflow2
Inside there's a model.yaml file that has the links for the model for specific cards or, like the one we're going to get, not quantized..
Vitis has a model-zoo with a lot of models to test.
It also has a downloader script that simplifies the selection and download of the model. But now, I'm going manually.
This is the model: tf2_resnet50_imagenet_224_224_7.76G_3.0
You can read more about the versions, boards and how to download here.
Download the model
wget https://www.xilinx.com/bin/public/openDownload?filename=tf2_resnet50_imagenet_224_224_7.76G_3.0.zip -O tf2_resnet50_imagenet_224_224_7.76G_3.0.zip
uncompress it
unzip tf2_resnet50_imagenet_224_224_7.76G_3.0.zip
This model is already quantized
Let's compile it
First, let's create an output directory to hold the files
mkdir tf2_resnet50_imagenet_224_224_7.76G_3.0/output
Compile the model for KV260 DPU
vai_c_tensorflow2 -m tf2_resnet50_imagenet_224_224_7.76G_3.0/quantized/quantized.h5 -a /opt/vitis_ai/compiler/arch/DPUCZDX8G/KV260/arch.json -o tf2_resnet50_imagenet_224_224_7.76G_3.0/output -n model_compiled

An explanation of the arguments
- -f : where's the model quantized
- -a : the json that describes the architecture of our board. In this case, for the KV260, is DPUCZDX8G
- -o : Where we want to save the model after compilation
- -n : the name we're going to give the saved model
And we have xmodel for our KV260.

Deploy the model
Let's deploy it and test it.
And now I have a problem... I really don't know how to deploy this on the KV260.
The documentation has only a small Python example, and It's a "Python ctypes Runner class that mirros the C++ class".
I'm going to check the examples and see if I can try and discover something. And the worst part is, this is for TensorFlow v1 . At this point, I've already discover that the examples for TensorFlow v1 do not work with v2 and some documentation needs updating.
But, since PYNQ project exists, I will try to use Python from the project.
After digging a while, I know I must use the VITIS Software platform. Using it I'm able to "compose" a program to use the model and access certain parts of the hardware, like the camera or any webcam.
It has a steep learning curve and I just don't have the time or, let's be honest, the will to do this. PYNQ is the way I'm going.
I will try to get this thing to work using C++ by modifying an already existing example.
Documentation
What I find most confusing is the extensive documentation available, that is not clear what steps to do or where do begin. There's a lot of options that you can select and get confused.
There's a lot of documentation that says exactly the same, but with other, more confusing words...
The quick start documentation is not updated for TF2 . Did no one tell AMD that when someone starts with a new piece of hardware, it usually goes for the quick start ? And that's where everything should be updated ?
The documentation webiste has some problems. Too many times I was getting this the following image. It's not my Internet Connection.

Most of the tutorials available are for older versions of Vitis-AI - This is now version 3.0 and the some of the tutorials go for version 2.5. I'm sure they still work on 3.0, but they need some updating.
Using Pytorch
I've only shown using TensorFlow2, but here's the Pytorch version. Everything is almost the same, except the Docker image to run and the scripts to use when quantizing and compiling a PyTorch model.
First, let's run the Pytorch docker container
In the Vitis-AI directory
./docker_run.sh xilinx/vitis-ai-pytorch-gpu:latest

Because we're using VITIS-AI 3.0, vai_q_pytorch is already installed, not as a program, but a Python plugin.
Let's check it out

And now we're ready to quantize and compile a Pytorch model.
References
https://www.xilinx.com/products/design-tools/vitis/vitis-ai.html
https://xilinx.github.io/Vitis-AI/
https://docs.xilinx.com/r/en-US/ug1414-vitis-ai/Docker-Setup-on-the-Host
https://xilinx.github.io/Vitis-AI/docs/board_setup/board_setup_mpsoc.html

