RoadTest: Engineers wanted to review the Red Pitaya STEMlab 125-14 PRO Gen 2 Starter Kit!
Author: colporteur
Creation date:
Evaluation Type: Test Equipment
Did you receive all parts the manufacturer stated would be included in the package?: True
What other parts do you consider comparable to this product?: What other parts do you consider comparable to this product?: An M2 screw to secure the QSPI eMCC expansion board (module) to the Red Pitaya motherboard. If the screw is missing, pressing the buttons will cause the board to detach from the connector. During operation, the board runs at 55 C. The manufacturer recommends using the metal case that doubles as a heat sink. Moreover, the open PCB is exposed to detritus on a workbench that can cause shorts if the case is not used. With the power cords and terminal console connections installed and any other cables, the chances of the bare PCB being dragged around are high.
What were the biggest problems encountered?: What were the biggest problems encountered?: Stale or lack of documentation. Installation procedures for the expansion module exist but are incomplete, either not working for this version or failing entirely. The separation between this product model and others is not clear enough to avoid using the wrong document.
Detailed Review:
Before you start, writing courses suggest, to write such that the readers don’t have to work at reading. If they find your material difficult to read, they will put it down. I write words that are not commonly used by others. Old Victorian English words especially. Many writing instructors have been critical of that, yet I refuse to give it up in my writing. I like words. I like how they sound and I especially like their meaning. A shovel and a spade are different tools. One works well for moving grain, and the other performs better when digging graves. Sorry, I digress.
I’ve tried to make this easy to read by organizing it. I arranged the sections in the order I prefer to read first. Meaning RoadTests Review can be long. I did not intend for this one to be long but it is. The material I want to read sits at the top. I will drill deeper (i.e. read more) if that piques my interest.
Numerous individuals use only Microsoft Windows. Those with Macs seemed to cope as owning an Apple device made it necessary. My computer's environment is Linux-based. My desktop is running Ubuntu 24.04. During the review, I fired up a Raspberry Pi as a test generator. *nix users will find this familiar. I did not use and Microsoft products during the review. Mentions of commands or software pertain only to Linux. This may frustrate some MS Windows-only users, so I figured I would put my cards on the table before you invest.
If you are interested in the test equipment capabilities of this device, take your reading elsewhere. One or two desperate uses of the test equipment in my RoadTest, but nothing else.
This review is based on the experience and content collected over nine blog posts.
Post almost getting started on the Red Pitaya STEMlab 125-14 PRO Gen 2 Starter Kit review.
POST 2 Road Out Ahead Red Pitaya STEMlab 125-14 PRO Gen 2 Starter Kit
POST 3 What is in the box... Red Pitaya STEMlab 125-14 PRO Gen 2 Starter Kit
POST 4 I'm done beating a dead horse...Red Pitaya STEMlab 125-14 PRO Gen 2 Starter Kit
POST 5 Looking for a win...Red Pitaya STEMlab 125-14 PRO Gen 2 Starter Kit
POST 6 I'm taking the win...Red Pitaya STEMlab 125-14 PRO Gen 2 Starter Kit
POST 7 I'm really done this time… Red Pitaya STEMlab 125-14 PRO Gen 2 Starter Kit
POST 8 A case in point...Red Pitaya STEMlab 125-14 PRO Gen 2 Starter Kit
POST 9 Partnering SDR & GNU Radio ...Red Pitaya STEMlab 125-14 PRO Gen 2 Starter Kit
This report won’t force you to look through these links to find content. I’ve listed them here for personal reference. I can locate this post whenever I need to find something as it contains the links needed to drill down. As you get older, you learn to drop bread crumbs to find your way back.
My RoadTest Review Application indicated five blog posts.
• Explore the Red Pitaya kit through unboxing
• Documentation: what is in the user manual
• Simple radio using Linux and Windows SDR applications
• Complex radio using GNU Radio on Ubuntu Linux
• Last first impressions
I generated nine blog posts for this review. The blog count nearly doubled because of a complex maze of tunnels with many entry and exit points during the review to find knowledge that might help. Notice the word “might”, not would, could, or did help.
Some tunnels ended in dead ends, resulting in backing out and starting over. I got frustrated with a rabbit warren-type review. I have tried to not let that frustration set a negative tone for the review.
I think what you pitch in an application is what you deliver for the RoadTest. I will summarize the content under the heading in my application.
Explore the Red Pitaya kit through unboxing
The manufacturer packed the unit well. The E14 Kit Contents list made it easy to find all the parts in the box. You have to have some knowledge of connector types, cables, and RF devices (i.e. 50ohm terminator). The power supply sports a USB-C connector. Reading the label, you discover it outputs 5VDC, 9VDC, & 12VDC. That surprised me.
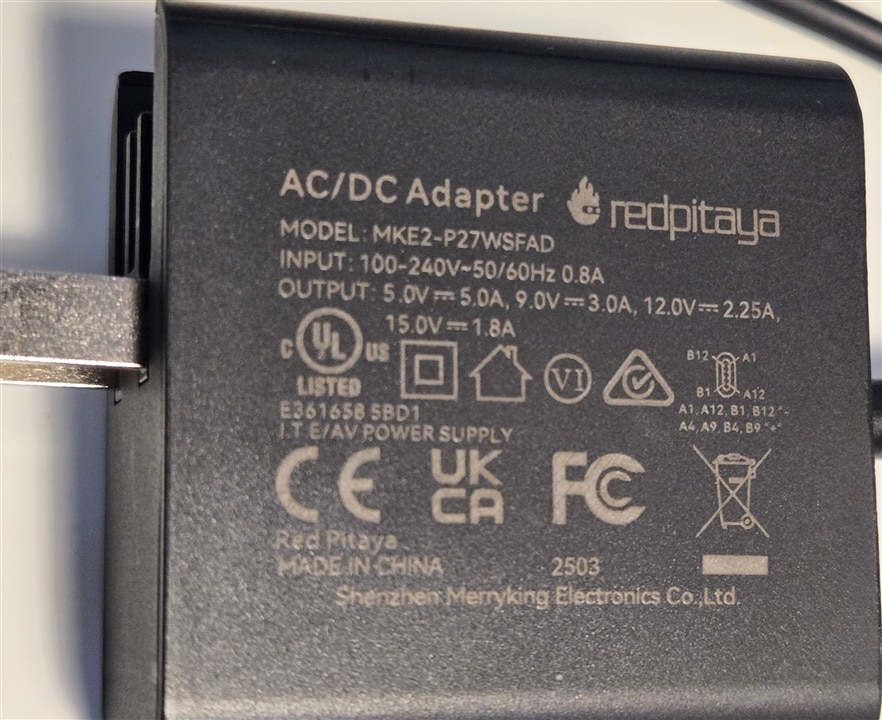
Voltage distribution might follow the pinout pattern shown on the adapter. This is my first experience with a USB-C power adapter like this. I’ve put a warning sticker on it, so it doesn’t get used elsewhere. I would assume it would work as a USB-C 5VDC power supply, but I am not sure. Also, I hate to have to replace the supply because the magic smoke was released or if the power supply itself got misplaced. The power supply is staying with the unit, for safekeeping.
I recommend not using any software/SD card supplied for the install. Start fresh with what is available from the website. My thought was I will use the one they provide to get it working and then upgrade. The software provided is unreliable and the upgrade doesn’t work. Honestly, the new software didn’t work either.
Getting connected to a network was a challenge. Even my post on the Red Pitaya forum produced little return of value for me. After getting it working, I updated my forum post to include the fix. No sense leaving a poor bugger trashing around with what the forum suggests is the problem when it is nowhere in the ballpark for a solution.
I did venture into the calibration option of the unit, thinking maybe this would be the path to a reliable setup. Not so much. I feel you need some authoritative voltage reference source, to complete this task. I tried using 5VDC from the Red Pitaya pinouts when it asked for a 5VDC reference. It gave me a red icon indicating not acceptable. When I connected the 3VDC output, it went green and completed the task. Not sure why, I didn’t pursue.
I later learned that calibration and the two input jumper pins have a great impact on results. Since I wasn’t using the test equipment, I confess the calibration wasn’t my best work. After installing the case, users lose access to the two jumper pins used to switch between LV and HV input.
Besides the four connectors on the front and back and the two on top, you must open the case to access anything else. You will find there is a five-pin connector that you cannot use for programming.
Documentation: what is in the user manual
The manual organizes its content in a clear and accessible way. I soon moved to having my AI assistant look through the manual, then me personally. After spending hours combing the manual trying to configure the QSPI eMCC model to allow booting with an SD card and discovering that it just doesn’t work, yet! I gave up manually looking for information and gave finding resources to my AI research assistant. I claim no credit for finding resource links in the posts.
The “yet” part mentioned in the last sentence is an attempt at pursuing a working solution to booting from the module, eliminating the SD card. I reached the point of locating a firmware change on the module, though the documentation described the process for the old hardware. In addition, the support team replied to my ticket indicating that the firmware I found is in development and may not be fully tested. I walked away without completing the task because of unreliable firmware and a loading process that did not work.
This is where I broke from my mantra of “do what you promised in the application.” I dabbled a little with the signal generator and oscilloscope. The kit comes with two coax cables that allow you to connect inputs to outputs. I ran a small test here to actually get the feeling I could accomplish something in the RoadTest. I had great fear I would never see the SDR part I had promised.
The icons on the browser screen allow users to access the software.

I couldn’t understand why you could create a label across multiple lines for one label but there was only enough room to write Oscilloscope and not Oscilloscope & Generator. Recall I mentioned frustration. The manual states that the Generator is located under the oscilloscope icon. Makes sense they are complementary pieces of test equipment. I didn’t use the manual. I also didn’t use any reasoning. I figure, heck, you can write a paragraph of labeling for SDR. Why couldn’t you include the word generator?
Simple radio using Linux and Windows SDR applications
At this stage in the RoadTest, I lacked confidence in achieving my goal of building a radio receiver with GNU Radio and the device’s SRD features. My AI assistant found a document from ControlPath that showed inputting a signal and having it output after digital processing. AI butchered the write-up to give a cut, to input a 5kHz signal and output a 5kHz tone after the Red Pitaya SDR FPGA processed the signal programming.
I didn’t have a signal generator. No, you can’t use the signal generator on the Red Pitaya while it is in SDR mode. That is where I learned about FPGA, coding and software application combinations for the Red Pitaya. When the screen shows an icon selected, Red Pitaya is performing that action. Opening another browser window to access the Red Pitaya and have it perform a second function only generates a Red X.
Complex radio using GNU Radio on Ubuntu Linux.
The Red Pitaya accepts and input from 0-60Mz. That is different than having a bandwidth of 60Mhz. FM radio broadcasts are outside the input range of the Red Pitaya. FM radio receive was not possible but AM radio broadcasts just might work.
I feel this is where I fell down. Maybe I read what I wanted to hear in the documentation. My AI assistant found posts that suggest FM radio reception might be possible but not success. Projects that succeeded were in the HF band. I also glossed over terms like bandwidth. What Red Pitaya calls bandwidth, I would refer to as input range. I had AI discover the bandwidth of an RTL-SDR dongle and it returned the answer I expect. I then as for input range and got what I expected. I've noticed other posts that speak to this 60Mz bandwidth disappointment on the Red Pitaya. I don't think I am alone.
I did assemble an AM receiver using the Red Pitaya and GNU Radio. I can say it was easy but I would be lying. It had it challenges but Red Pitaya delivered for it to work. The Source and Sink code blocks needed by GNU Radio work as advertised. I trust there development and support will be put under the stewardship of Red Pitaya. If you want to play with SDR those blocks you need in GNU Radio.
Last first impressions
Some have to haves you have to have if you plan on acquiring this product.
Some have to haves, you have to have, if you plan on acquiring this product. These are not in any order. As i reread my posts I created the note.
That completes the five objectives I pitch in my application. The word Review that follow the word RoadTest cause me consternation. I would consider this post more of a shared experience. Both good and bad. If you find the post don't provide sufficient information or you would like some of the material developed (i.e. the full GNU sketches) leave a note and I can package them up.
I would like to thank the vendor and the review committee for selecting my application. RoadTest reviews are a community activity that I look forward to participating in. I've completed nine reviews since joining the community. My last review was in 2022. The challenges of this one made me think maybe I'm getting to old to be doing this. I hope not.
The project kit has improved since my last foray into RoadTest. The content checklist is ideal. Checking what was in the box against the checklist was the first thing I did after receiving the package. It gave me confidence everything was in the box.
My other reason for checking. The review kit arrived a week after the review was suppose to be completed. I was unable to commit to completing the review after missing the original schedule. If anything was missing, how would I get it? I checked the box to ensure everything was there. I then put it aside until another day. It sat wallowing in a corner until I started pecking at it. Four weeks open on my desk being moved around other projects is not something I want to do.
I recommend some improvement be made around scheduling. When I pitch my application I check off box that commits to delivering. It mean something. If something changes on my end I will notify you. Sending a review kit and ignoring the schedule is not respectful of the people who are participating. My post appealing for a new schedule failed to get a response.


