


An exploration of accelerating the MediaPipe models with MemryX’s MX3 AI Accelerator.
Introduction
This project is part of a series on the subject of deploying the MediaPipe models to the edge on embedded platforms.
If you have not already seen the previous projects in this series, I recommend to start with the following projects:
- [Hackster] Blazing Fast Models
- [Hackster] Accelerating the MediaPipe models with Hailo-8
- [Hackster] Accelerating the MediaPipe models on Raspberry Pi 5
In this project, I start by giving a recap of the challenges that can be expected when deploying the MediaPipe models.
Then I will address these challenges one by one, before deploying the models with the MemryX flow.
Finally, I will perform profiling to determine if our goal of acceleration was achieved.
TLDR :)
In summary, the user experience with the MemryX solution has been absolutely wonderful:
- The technical support is world class, at a level I have never seen before
- The on-line documentation and provided examples have been very clear and useful
Thanks to MemryX’s use of floating-point (BF16) in the feature maps, there is no need for quantization, which leads to several additional advantages:
- There is no need for calibration data, since quantization is not required
- There is no need for a GPU, since quantization is not required
When compared to other AI flows, MemryX finished the crossing line in first place for the following reasons:
- Successfully compiled all the mediapipe models I threw at it
- Best performance overall for these mediapipe models
If you want to try out the demo example I have put together with the MemoryX offering, you can skip directly to the “Installing…” and “Launching…” sections below.
MemryX Flow Overview
MemryX’s Software Suite allows users to deploy models to the MemoryXAccelerators (MXA), specifically their PCIe Gen 3.0 compatible M.2 AI accelerator modules:

 : AlbertaBeef)
The MemryX Software Suite supports the following frameworks:
- TensorFlow Lite
- TensorFlow
- Keras
- ONNX
Other frameworks such as PyTorch are indirectly supported by exporting to the ONNX format.
The deployment is handled by the Neural Compiler and involves the following tasks:
- Framework I/F
- Graph Processing
- Mapper
- Assembler
 : MemryX)
The FrameworkI/F task translates models from industry-standard frameworks to an internal graph representation.
The Graph Processing task performs model optimizations (layer fusing, layer splitting, breaking complex layers into simpler ones, activation layer conversion) for execution on the MXA hardware.
The Mapper task allocates resources to the available MXA devices.
 : MemryX)
The Assember task converts the mapped model to micro-code as a single DFP file, that can be run on the MemryX MX3 acceleration module.
In this project, we will be using for following versions of the MemryX tools:
- Neural Compiler (mx_nc) : 1.1.0
More information on versions and compatibility can be found on the MemryX Developer Hub.
The following article describes the Memryx software-hardware’s architecture:
A Note about GPUs
Thanks to MemryX’s use of floating-point (BF16) in the feature maps, there is no need for quantization, which leads to several additional advantages:
- There is no need for calibration data, since quantization is not required
- There is no need for a GPU, since quantization is not required
Installing the MemryX SDK
The following Getting Started guide provides all the details to install the MemryX runtime and drivers (for local execution), and the MemryX SDK (for model compilation):
The MemryX runtime and driver installation can be validated as follows:
$ lspci -k
...
2e:00.0 Processing accelerators: Device 1fe9:0100
	Subsystem: Device 1fe9:0000
	Flags: bus master, fast devsel, latency 0, IRQ 46, NUMA node 0
	Memory at a0000000 (32-bit, non-prefetchable) [size=256M]
	Memory at b0000000 (32-bit, non-prefetchable) [size=1M]
	Expansion ROM at <ignored> [disabled]
	Capabilities: <access denied>
	Kernel driver in use: memx_pcie_ai_chip
	Kernel modules: memx_cascade_plus_pcie
...
------------
$ apt policy memx-drivers
memx-drivers:
  Installed: 1.1.1-1.1
  Candidate: 1.1.1-1.1
  Version table:
 *** 1.1.1-1.1 500
        500 https://developer.memryx.com/deb stable/main amd64 Packages
        100 /var/lib/dpkg/status
     1.1.0-10.1 500
        500 https://developer.memryx.com/deb stable/main amd64 Packages
     1.0.1-1.1 500
        500 https://developer.memryx.com/deb stable/main amd64 Packages
     1.0.0-6.1 500
        500 https://developer.memryx.com/deb stable/main amd64 Packages
The MemryX SDK installation can be validated as follows:
mx_bench --hello
Hello from MXA!
Group: 0
Number of chips: 4
Interface: PCIe 3.0
Installing the blaze_tutorial files
In addition of the MemryX SDK installed previously, we will also need to clone the “mx3” branch of my “blaze_tutorial” repository:
$ git clone --branch mx3 --recursive https://github.com/AlbertaBeef/blaze_tutorial blaze_tutorial.mx3
Then navigate to the “blaze_tutorial.mx3/memryx” directory:
$ cd blaze_tutorial.mx/memryx
Inside the MemryX SDK virtual environment, download the TFLite models to the “models” sub-directory:
$ cd models
$ source ./get_tflite_models.sh
$ ..
Challenges of deploying MediaPipe models
The first challenge that I encountered, in part 1, was the reality that the performance of the MediaPipe models significantly degrades when run on embedded platforms, compared to modern computers. This is the reason I am attempting to accelerate the models with the MemryX MX3 accelerator.
The second challenge is the fact that Google does not provide the dataset that was used to train the MediaPipe models. Since quantization usually requires a subset of this training data, this presents us with the challenge of coming up with this data ourselves. With the MemryX flow, however, this is not required !
Creating a Calibration Dataset for Quantization
Contrary to all the other flows I have covered, we do not need a calibration data set for MemryX’s Neural Compiler.
Thanks to MemryX’s use of floating-point (BF16) in the feature maps, there is no need for quantization, which leads to several additional advantages:
- There is no need for calibration data, since quantization is not required
- There is no need for a GPU, since quantization is not required
A Deeper Dive into the Palm Detection model
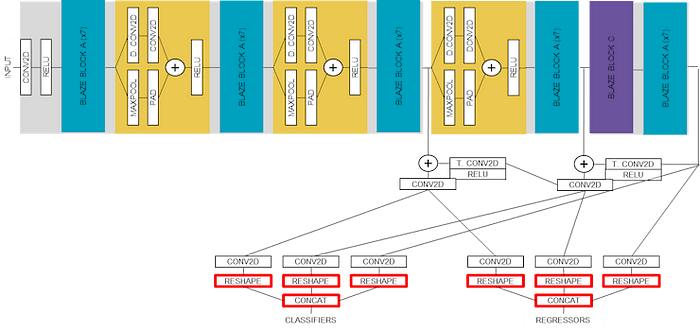
Before we tackle the deployment flow with the MemryX SDK, it is worth taking a deeper dive into the models we will be working with. For this purpose, I will highlight the architecture of the palm detection model.
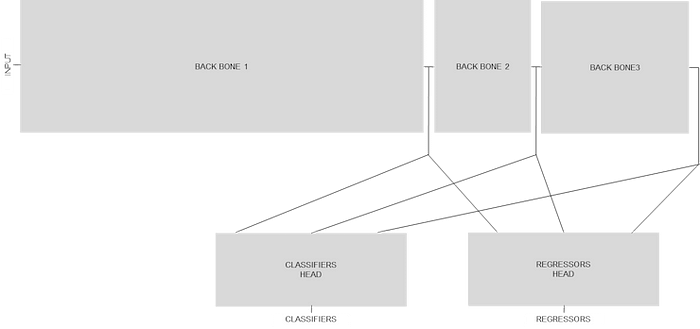
At a very high level, there are three convolutional neural network backbones that are used to extract features at three different scales. The outputs of these three backbones are combined together to feed two different heads : classifiers (containing score) and regressors (containing bounding box and additional keypoints).
 : AlbertaBeef)
The input to this model is a 256x256 RGB image, while the outputs of the model are 2944 candidate results, each containing:
- score
- bounding box (normalized to pre-determined anchor boxes)
- keypoints (7 keypoints for palm detector)
 : AlbertaBeef)
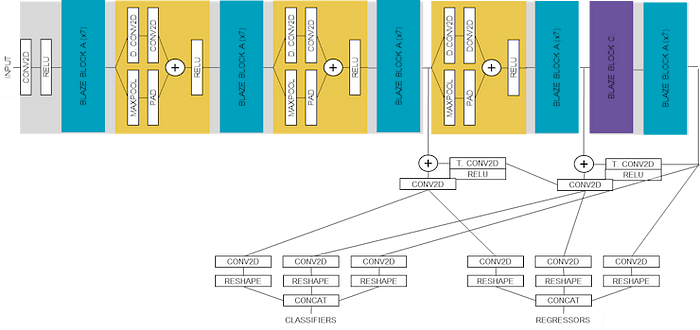
The following block diagram illustrates details of the layers for the model. I have grouped together repeating patterns as “BLAZE BLOCK A”, “BLAZE BLOCK B”, and “BLAZE BLOCK C”, showing the details only for the first occurrence.
 : AlbertaBeef)
The following block diagram is the same as the previous one, but this time showing details of the “BLAZE BLOCK B” patterns, which will required further discussion during the deployment phase.
 : AlbertaBeef)
Model Inspection
The MemryX SDK’s Neural Compiler is able to automatically identify unsupported layers, and isolate them with the “ — autocrop” feature. This feature will crop the part of the model that is supported for inference on the MX3 acceleration module (ie. “crop”), and isolate the initial layers (ie. “pre”) and/or final layers (ie. “post”) that are not supported:
 : AlbertaBeef)
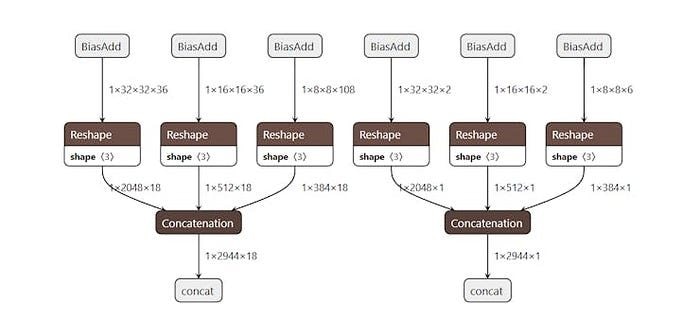
Initial exploration of the palm detection model reveals that the final reshape/concatenation layers of the model are not supported. This is reported as shown below for the 0.07 version of the palm detection model.
This script must be executed in the “mx” virtual environment. In not already done so, launch the “mx” virtual environment as follows:
$ . ~/mx/bin/activate
Then navigate to the “blaze_tutorial/memryx” directory:
$ cd blaze_tutorial.mx/memryx
Finally, launch the memryx_flow.py script with the following arguments:
$ python3 memryx_flow.py --arch mx3 --name palm_detection_v0_07 --model models/palm_detection_without_custom_op.tflite --resolution 256 --process inspect
Command line options:
--arch : mx3
--blaze : hand
--name : palm_detection_v0_07
--model : models/palm_detection_without_custom_op.tflite
--resolution : 256
--process : inspect
[INFO] Targetting arch : mx3 ( 4 )
[INFO] TensorFlow-lite model : models/palm_detection_without_custom_op.tflite
════════════════════════════════════════
Converting Model: (Done)
Optimizing Graph: (Done)
Cores optimization: (Done)
Flow optimization: (Done)
. . . . . . . . . . . . . . . . . . . .
Ports mapping: (Done)
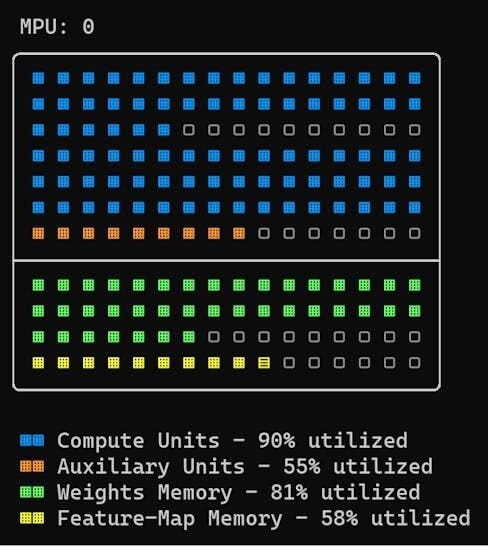
MPU 0 input port 0: {'model_index': 0, 'layer_name': 'input_1', 'shape': [256, 256, 1, 3]}
MPU 3 output port 0: {'model_index': 0, 'layer_name': 'classificator_8/BiasAdd', 'shape': [32, 32, 1, 2]}
MPU 3 output port 1: {'model_index': 0, 'layer_name': 'classificator_16/BiasAdd', 'shape': [16, 16, 1, 2]}
MPU 3 output port 2: {'model_index': 0, 'layer_name': 'classificator_32/BiasAdd', 'shape': [8, 8, 1, 6]}
MPU 3 output port 3: {'model_index': 0, 'layer_name': 'regressor_8/BiasAdd', 'shape': [32, 32, 1, 36]}
MPU 3 output port 4: {'model_index': 0, 'layer_name': 'regressor_16/BiasAdd', 'shape': [16, 16, 1, 36]}
MPU 3 output port 5: {'model_index': 0, 'layer_name': 'regressor_32/BiasAdd', 'shape': [8, 8, 1, 108]}
────────────────────────────────────────
Assembling DFP: (Done)
════════════════════════════════════════
In the case of the 0.07 version of the palm detection model, the autocrop generated the following models, indicating that there were unsupported layers at the end of the model:
- {model}_crop.tfl
- {model}_post.tfl
We can use netron.app to visualizethese unsupported layers:
 : netron.app)
If we trace this back to our block diagram, these are the final layers of the model, as shown in red below:
 : AlbertaBeef)
These unsupported layers are in an ideal location (first or last layers), since the bulk of the model can execute entirely on the MX3 acceleration module.
Although we do not need to explicitly provide the names of these layers to the Neural Compiler, I chose to do so, in order to guarantee they were always in certain order in the compiled model. This is shown below for the 0.07 version of the palm detection model:
python3 memryx_flow.py --arch mx3 --name palm_detection_v0_07 --model models/palm_detection_without_custom_op.tflite --resolution 256 --process all
Command line options:
 --arch        :  mx3
 --blaze       :  hand
 --name        :  palm_detection_v0_07
 --model       :  models/palm_detection_without_custom_op.tflite
 --resolution  :  256
 --process     :  all
[INFO] Targetting arch :  mx3  ( 4 )
[INFO] TensorFlow-lite model :  models/palm_detection_without_custom_op.tflite
[INFO] inputs :  input_1
[INFO] outputs :  classificator_8/BiasAdd,classificator_16/BiasAdd,classificator_32/BiasAdd,regressor_8/BiasAdd,regressor_16/BiasAdd,regressor_32/BiasAdd
════════════════════════════════════════
Converting Model: (Done)
Optimizing Graphs: (Done)
Cores optimization: (Done)
Flow optimization: (Done)
. . . . . . . . . . . . . . . . . . . .
Ports mapping: (Done)
MPU 0 input port 0: {'model_index': 0, 'layer_name': 'input_1', 'shape': [256, 256, 1, 3]}
MPU 3 output port 0: {'model_index': 0, 'layer_name': 'classificator_8/BiasAdd', 'shape': [32, 32, 1, 2]}
MPU 3 output port 1: {'model_index': 0, 'layer_name': 'classificator_16/BiasAdd', 'shape': [16, 16, 1, 2]}
MPU 3 output port 2: {'model_index': 0, 'layer_name': 'classificator_32/BiasAdd', 'shape': [8, 8, 1, 6]}
MPU 3 output port 3: {'model_index': 0, 'layer_name': 'regressor_8/BiasAdd', 'shape': [32, 32, 1, 36]}
MPU 3 output port 4: {'model_index': 0, 'layer_name': 'regressor_16/BiasAdd', 'shape': [16, 16, 1, 36]}
MPU 3 output port 5: {'model_index': 0, 'layer_name': 'regressor_32/BiasAdd', 'shape': [8, 8, 1, 108]}
────────────────────────────────────────
Assembling DFP: (Done)
════════════════════════════════════════
Model Deployment
Now that we know which layers are supported by our models, and know which input and output layers to specify for the MemryX Neural Compiler, we can deploy them using scripting.
I have prepared a script for this purpose:
This script takes five (5) arguments when invoked:
- arch : architecture (ie. mx3)
- name : name of the compiled model (palm_detection_v0_07)
- model : TF-Lite model (palm_detection_without_custom_op.tflite)
- resolution : input size (ie. 256)
- process : inspect, compile, all
The model argument specifies the TF-Lite model, whereas the name argument indicates the name of the compiled model. The resolution indicates the input size to the model.
The process argument indicates which task to run. I have implemented two tasks:
- inspect : with — autocrop, to analyze which layers are supported
- compile : without — autcrop, and manually specifying input/output layers
By default specify “all” to compile the model. We saw the inspect task in the previous section when we analyzed our models.
I have provided a second script which will call the hailo_flow.py script to parse, optimize, and compile the models to be deployed:.
You will want to modify the following list before execution:
- model_list : specify which model(s) you want to deploy
Below is a modified version of the script that will deploy the 0.07 versions of the palm detection and hand landmarks models.
# TFLite models
model_palm_detector_v0_07=("palm_detection_v0_07","models/palm_detection_without_custom_op.tflite",256)
model_hand_landmark_v0_07=("hand_landmark_v0_07","models/hand_landmark_v0_07.tflite",256)

...
model_list=(
 model_palm_detector_v0_07[@]
 model_hand_landmark_v0_07[@]
)

model_count=${#model_list[@]}
#echo $model_count

# Convert to TensorFlow-Keras
for ((i=0; i<$model_count; i++))
do
 model=${!model_list[i]}
 model_array=(${model//,/ })
 model_name=${model_array[0]}
 model_file=${model_array[1]}
 input_resolution=${model_array[2]}
 echo python3 memryx_flow.py --arch mx3 --name ${model_name} --model ${model_file} --resolution ${input_resolution} --process all
 python3 memryx_flow.py --arch mx3 --name ${model_name} --model ${model_file} --resolution ${input_resolution} --process all | tee deploy_${model_name}.log
done
This script must be executed in the “mx” virtual environment. In not already done so, launch the “mx” virtual environment as follows:
$ . ~/mx/bin/activate
Then navigate to the “blaze_tutorial/memryx” directory:
$ cd blaze_tutorial.mx/memryx
Then launch the deploy_models.sh script as follows:
$ source ./deploy_models.sh

python3 memryx_flow.py --arch mx3 --name palm_detection_v0_07 --model models/palm_detection_without_custom_op.tflite --resolution 256 --process all
Command line options:
 --arch        :  mx3
 --blaze       :  hand
 --name        :  palm_detection_v0_07
 --model       :  models/palm_detection_without_custom_op.tflite
 --resolution  :  256
 --process     :  all
[INFO] Targetting arch :  mx3  ( 4 )
[INFO] TensorFlow-lite model :  models/palm_detection_without_custom_op.tflite
[INFO] inputs :  input_1
[INFO] outputs :  classificator_8/BiasAdd,classificator_16/BiasAdd,classificator_32/BiasAdd,regressor_8/BiasAdd,regressor_16/BiasAdd,regressor_32/BiasAdd
════════════════════════════════════════
Converting Model: (Done)
Optimizing Graphs: (Done)
Cores optimization: (Done)
Flow optimization: (Done)
. . . . . . . . . . . . . . . . . . . .
Ports mapping: (Done)
MPU 0 input port 0: {'model_index': 0, 'layer_name': 'input_1', 'shape': [256, 256, 1, 3]}
MPU 3 output port 0: {'model_index': 0, 'layer_name': 'classificator_8/BiasAdd', 'shape': [32, 32, 1, 2]}
MPU 3 output port 1: {'model_index': 0, 'layer_name': 'classificator_16/BiasAdd', 'shape': [16, 16, 1, 2]}
MPU 3 output port 2: {'model_index': 0, 'layer_name': 'classificator_32/BiasAdd', 'shape': [8, 8, 1, 6]}
MPU 3 output port 3: {'model_index': 0, 'layer_name': 'regressor_8/BiasAdd', 'shape': [32, 32, 1, 36]}
MPU 3 output port 4: {'model_index': 0, 'layer_name': 'regressor_16/BiasAdd', 'shape': [16, 16, 1, 36]}
MPU 3 output port 5: {'model_index': 0, 'layer_name': 'regressor_32/BiasAdd', 'shape': [8, 8, 1, 108]}
────────────────────────────────────────
Assembling DFP: (Done)
════════════════════════════════════════
When complete, the following compiled models will be located in the current directory:
- palm_detection_v0_07.dfp
- hand_landmarks_v0_07.dfp
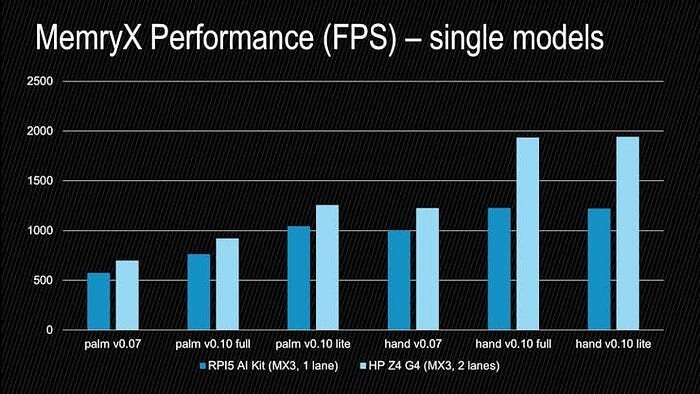
Here is the performance of these individual models, as well as the 0.10 versions:
 : AlbertaBeef)
For convenience, I have archived the compiled single models for MX3 in the following archive:
- MX3 single models : blaze_mx3_single_models.zip (compiled with mx_nc version 1.1.0)
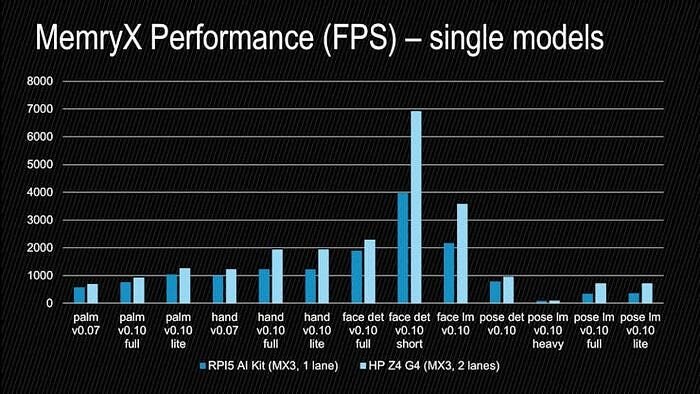
This archive also contains the 0.10 versions of the face detection + landmarks, and pose detection + landmarks models. Here is the performance achieved for each individual model on the RPI5 and on a HP Z4 G4 workstation:
 : AlbertaBeef)
A Note about Context Switching
MemryX does not yet deal with context switching. If a model does not fit in the available resources (ie. 4 MXA devices), then it will not be supported. Another option is to use multiple accelerator modules.
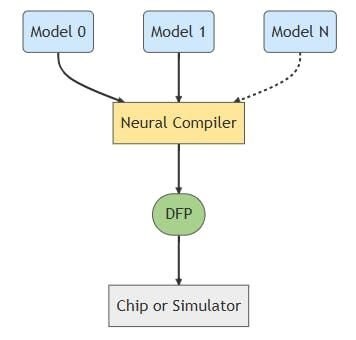
MemryX does support multiple models, which can be specified directly at compile time:
 : MemryX)
Dual Inference Model Deployment
Since we want to run two (2) models for our application, we need to re-compile our models for this use case.
I have prepared a script for this purpose:
This script takes nine (9) arguments when invoked:
- arch : architecture (ie. mx3)
- dfp : name of combined compiled model (hand_v0_07.dfp)
- name1 : name of the detection model (palm_detection_v0_07)
- model1 : TF-Lite detection model (palm_detection_without_custom_op.tflite)
- resolution1 : input size of the detection model (ie. 256)
- name2 : name of the landmark model (hand_landmark_v0_07)
- model2 : TF-Lite landmark model (hand_landmark_v0_07.tflite)
- resolution2 : input size of the landmark model (ie. 256)
- process : inspect, compile, all
The name1, model1, resolution1 arguments are used to specify the detection model, whereas the name2, model2, resolution2 arguments are used to specify the landmark model.
I have provided a second script which will call the hailo_flow.py script to parse, optimize, and compile the models to be deployed:.
You will want to modify the following list before execution:
- model_list : specify which models you want to deploy
Below is a modified version of the script that will deploy the 0.07 versions of the palm detection and hand landmarks models.
# TFLite models
models_hand_v0_07=("palm_detection_v0_07","models/palm_detection_without_custom_op.tflite",256, "hand_landmark_v0_07","models/hand_landmark_v0_07.tflite",256, "hand_v0_07")

...
models_list=(
 models_hand_v0_07[@]
)
models_count=${#models_list[@]}
#echo $models_count

# Convert to TensorFlow-Keras
for ((i=0; i<$models_count; i++))
do
 models=${!models_list[i]}
 models_array=(${models//,/ })
 model1_name=${models_array[0]}
 model1_file=${models_array[1]}
 model1_size=${models_array[2]}
 model2_name=${models_array[3]}
 model2_file=${models_array[4]}
 model2_size=${models_array[5]}
 dfp_name=${models_array[6]}
 echo python3 memryx_flow_dual.py --arch mx3 --dfp ${dfp_name} --name1 ${model1_name} --model1 ${model1_file} --resolution1 ${model1_size} --name2 ${model2_name} --model2 ${model2_file} --resolution2 ${model2_size} --process all
 python3 memryx_flow_dual.py --arch mx3 --dfp ${dfp_name} --name1 ${model1_name} --model1 ${model1_file} --resolution1 ${model1_size} --name2 ${model2_name} --model2 ${model2_file} --resolution2 ${model2_size} --process all | tee deploy_${dfp_name}.log
done
Inside the MemryX SDK virtual environment, download the TFLite models to the “models” sub-directory, then launch the deploy_models_dual.sh script as follows:
$ source ./deploy_models_dual.sh

python3 memryx_flow_dual.py --arch mx3 --dfp hand_v0_07 --name1 palm_detection_v0_07 --model1 models/palm_detection_without_custom_op.tflite --resolution1 256 --name2 hand_landmark_v0_07 --model2 models/hand_landmark_v0_07.tflite --resolution2 256 --process all
Command line options:
 --arch        :  mx3
 --blaze       :  hand
 --dfp         :  hand_v0_07
 --name1       :  palm_detection_v0_07
 --model1      :  models/palm_detection_without_custom_op.tflite
 --resolution1 :  256
 --name2       :  hand_landmark_v0_07
 --model2      :  models/hand_landmark_v0_07.tflite
 --resolution2 :  256
 --process     :  all
[INFO] Targetting arch :  mx3  ( 4 )
[INFO] TensorFlow-lite model :  models/palm_detection_without_custom_op.tflite
[INFO] model1_inputs  :  input_1
[INFO] model1_outputs :  classificator_8/BiasAdd,classificator_16/BiasAdd,classificator_32/BiasAdd,regressor_8/BiasAdd,regressor_16/BiasAdd,regressor_32/BiasAdd
[INFO] TensorFlow-lite model :  models/hand_landmark_v0_07.tflite
[INFO] model2_inputs  :  input_1
[INFO] model2_outputs :  convld_21_3d,conv_handflag,conv_handedness
[INFO] Generating DFP :  hand_v0_07
[INFO] models_inputs  :  input_1|input_1
[INFO] models_outputs :  classificator_8/BiasAdd,classificator_16/BiasAdd,classificator_32/BiasAdd,regressor_8/BiasAdd,regressor_16/BiasAdd,regressor_32/BiasAdd|convld_21_3d,conv_handflag,conv_handedness
════════════════════════════════════════
Converting Model (2/2): (Done)
Optimizing Graphs: (Done)
Cores optimization: (Done)
Flow optimization: (Done)
. . . . . . . . . . . . . . . . . . . .
Ports mapping: (Done)
MPU 0 input port 0: {'model_index': 0, 'layer_name': 'input_1', 'shape': [256, 256, 1, 3]}
MPU 0 input port 1: {'model_index': 1, 'layer_name': 'input_1', 'shape': [256, 256, 1, 3]}
MPU 3 output port 0: {'model_index': 0, 'layer_name': 'classificator_8/BiasAdd', 'shape': [32, 32, 1, 2]}
MPU 3 output port 1: {'model_index': 0, 'layer_name': 'classificator_16/BiasAdd', 'shape': [16, 16, 1, 2]}
MPU 3 output port 2: {'model_index': 0, 'layer_name': 'classificator_32/BiasAdd', 'shape': [8, 8, 1, 6]}
MPU 3 output port 3: {'model_index': 0, 'layer_name': 'regressor_8/BiasAdd', 'shape': [32, 32, 1, 36]}
MPU 3 output port 4: {'model_index': 0, 'layer_name': 'regressor_16/BiasAdd', 'shape': [16, 16, 1, 36]}
MPU 3 output port 5: {'model_index': 0, 'layer_name': 'regressor_32/BiasAdd', 'shape': [8, 8, 1, 108]}
MPU 3 output port 6: {'model_index': 1, 'layer_name': 'convld_21_3d', 'shape': [1, 1, 1, 63]}
MPU 3 output port 7: {'model_index': 1, 'layer_name': 'conv_handflag', 'shape': [1, 1, 1, 1]}
MPU 3 output port 8: {'model_index': 1, 'layer_name': 'conv_handedness', 'shape': [1, 1, 1, 1]}
────────────────────────────────────────
Assembling DFP: (Done)
════════════════════════════════════════
When complete, the following DFP file containing the two compiled models will be located in the current directory:
- hand_v0_07.dfp
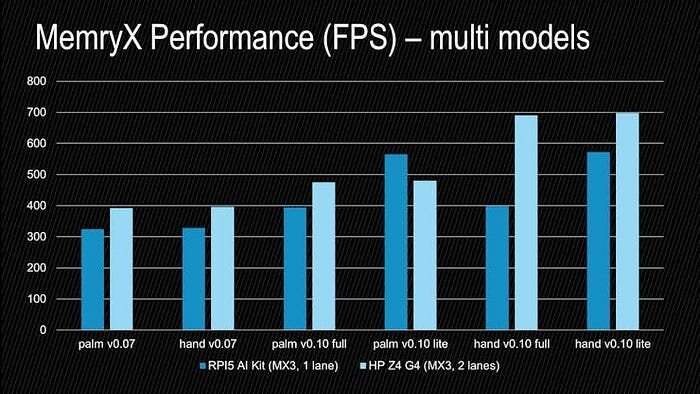
Here is the performance of these palm detection + hand landmark multi-models, as well as the 0.10 versions:
 : AlbertaBeef)
Note that the performance of each model has changed, compared to its individual performance. However, these have the advantage of being supported in a dual-inference pipeline.
For convenience, I have archived the compiled multi models for MX3 in the following archive:
- MX3 multi models : blaze_mx3_dual_models.zip (compiled with mx_nc version 1.1.0)
Model Execution
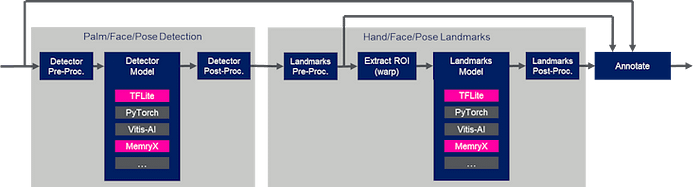
In order to support the MemryX models, the “blaze_app_python” application was augmented with the following inference targets:
 : AlbertaBeef)
My final inference code for the MemryX models can be found in the “blaze_app_python” repository, under the blaze_memryx sub-directory:
Note that today, the MemryX inference can only be run on a computer (with a M.2 socket, populated with a MX3 module). This includes the Raspberry Pi 5, which I will cover in more detail in the next sections.
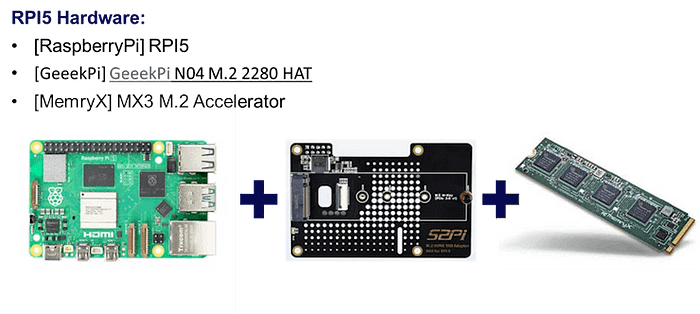
Setting up the Raspberry Pi 5 with the MemryX AI Accelerator
The following components were used to create the Raspberry Pi 5 setup:
- [RaspberryPi] Raspberry Pi 5
- [GeeekPi] GeeekPi N04 M.2 2280 HAT
- [MemryX] MX3 M.2 Accelerator
 : AlbertaBeef)
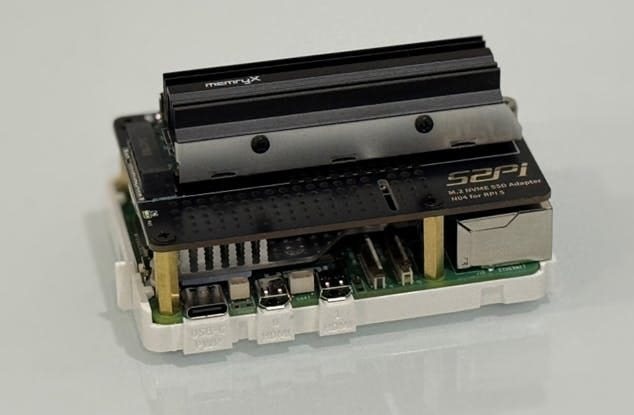
Once assembled, our MX3-enabled RPI5 AI Kit looks like this:
 : AlbertaBeef)
Installing the python application on the Raspberry Pi 5
We start by working in the “mx” virtual environment we setup ealier:
rpi5m2@raspberrypi:~# . ~/mx/bin/activate
The python application can be accessed from the following github repository, using the “mx3” branch:
(mx) rpi5m2@raspberrypi:~# git clone --branch mx3 https://github.com/AlbertaBeef/blaze_app_python blaze_app_python.mx3
(mx) rpi5m2@raspberrypi:~# cd blaze_app_python.mx3
The python demo application requires certain packages which can be installed as follows:
(mx) rpi5m2@raspberrypi:~# pip3 install opencv-python matplotlib plotly kaleido
In order to successfully use the python demo with the original TFLite models, they need to be downloaded from the google web site:
(mx) rpi5m2@raspberrypi:~/blaze_app_python.mx3# cd blaze_tflite/models
(mx) rpi5m2@raspberrypi:~/blaze_app_python.mx3/blaze_tflite/models# source ./get_tflite_models.sh
(mx) rpi5m2@raspberrypi:~/blaze_app_python.mx3/blaze_tflite/models# cd ../..
(mx) rpi5m2@raspberrypi:~/blaze_app_python.mx3#
In order to successfully use the python demo with the MX3 models, they need to be downloaded as follows:
(mx) rpi5m2@raspberrypi:~/blaze_app_python.mx3# cd blaze_memryx/models
(mx) rpi5m2@raspberrypi:~/blaze_app_python.mx3/blaze_memryx/models# source ./get_mx3_dual_models.sh
(mx) rpi5m2@raspberrypi:~/blaze_app_python.mx3/blaze_memryx/models# unzip -o blaze_mx3_dual_models.zip
(mx) rpi5m2@raspberrypi:~/blaze_app_python.mx3/blaze_memryx/models# cp blaze_mx3_dual_models/*.dfp .
(mx) rpi5m2@raspberrypi:~/blaze_app_python.mx3/blaze_memryx/models# cd ../..
(mx) rpi5m2@raspberrypi:~/blaze_app_python.mx3#
You are all set !
Launching the python application on the Raspberry Pi 5 AI Kit
The python application can launch many variations of the dual-inference pipeline, which can be filtered with the following arguments:
- — blaze : hand | face | pose
- — target : blaze_tflite |… | blaze_memryx
- — pipeline : specific name of pipeline (can be queried with — list argument)
In order to display the complete list of supported pipelines, launch the python script as follows:
(mx) rpi5m2@raspberrypi:~/blaze_app_python.mx3# python3 blaze_detect_live.py --list
[INFO] user@hosthame :  rpi5m2@raspberrypi
[INFO] blaze_tflite supported ...
...
[INFO] blaze_memryx supported ...
...
Command line options:
 --input       :
 --image       :  False
 --blaze       :  hand,face,pose
 --target      :  blaze_tflite,blaze_pytorch,blaze_vitisai,blaze_hailo,blaze_memryx
 --pipeline    :  all
 --list        :  True
 --debug       :  False
 --withoutview :  False
 --profilelog  :  False
 --profileview :  False
 --fps         :  False

List of target pipelines:
...
22 mx3_hand_v0_07       blaze_memryx/models/hand_v0_07.dfp:0
                        blaze_memryx/models/hand_v0_07.dfp:1
23 mx3_hand_v0_10_lite  blaze_memryx/models/hand_v0_10_lite.dfp:1
                        blaze_memryx/models/hand_v0_10_lite.dfp:0
24 mx3_hand_v0_10_full  blaze_memryx/models/hand_v0_10_full.dfp:1
                        blaze_memryx/models/hand_v0_10_full.dfp:0
25 mx3_face_v0_10_short blaze_memryx/models/face_v0_10_short.dfp:0
                        blaze_memryx/models/face_v0_10_short.dfp:1
26 mx3_face_v0_10_full  blaze_memryx/models/face_v0_10_full.dfp:0
                        blaze_memryx/models/face_v0_10_full.dfp:1
27 mx3_pose_v0_10_lite  blaze_memryx/models/pose_v0_10_lite.dfp:0
                        blaze_memryx/models/pose_v0_10_lite.dfp:1
28 mx3_pose_v0_10_full  blaze_memryx/models/pose_v0_10_full.dfp:0
                        blaze_memryx/models/pose_v0_10_full.dfp:1
29 mx3_pose_v0_10_heavy blaze_memryx/models/pose_v0_10_heavy.dfp:0
                        blaze_memryx/models/pose_v0_10_heavy.dfp:1
...
In order to launch the MX3 pipeline for hand detection and landmarks on the rpi’s desktop, use the python script as follows::
(mx) rpi5m2@raspberrypi:~/blaze_app_python.mx3# python3 blaze_detect_live.py --pipeline=mx3_hand_v0_10_lite
This will launch the lite 0.10 version of the model, compiled for MX3, as shown below:

 : AlbertaBeef)
The previous video has not been accelerated. It shows the frame rate to be the maximum 30 fps when no hands are detected (one model running : palm detection), approximately 26–28 fps when one hand has been detected (two models running : palm detection and hand landmarks), and approximately 22–25 fps when two hands have been detected (three models running : palm detection and 2 hand landmarks).
It is worth noting that this is running with a single-threaded python script. There is an opportunity for increased performance with a multi-threaded implementation.
There is also an opportunity to accelerate the rest of the pipeline with C++ code…
Viewing the Detection Scores
Still the demo code provides some useful features for debugging the pipeline. For example, pressing the ‘e’ key will display the detection scores for each anchor point. Also shown is the detection threshold, which can be changed using the slider in the main video window.
 : AlbertaBeef)
Notice that there are more Detection Scores above the threshold than hands present in the scene. These are multiple detections of the same hands, which is dealt with by the non-maxima suppression (NMS) algorithm in the post-processing.
Viewing the extractedROIs
Pressing the ‘d’ key will display a “Debug” window with ROIs that are used as inputs to the palm detection (first ROI) and hand landmark (second, third ROIs) models.
 : AlbertaBeef)
Notice how the ROIs for the hand landmarks model provide the hands in a consistent size and orientation.
Comparing the MX3 accelerated model to the original TFLite model
Also, the demo application can be used to compare the original TFLite model with the MX3 accelerated model, as follows:
(mx) rpi5m2@raspberrypi:~/blaze_app_python.mx3# python3 blaze_detect_live.py --pipeline=tfl_hand_v0_10_lite,mx3_hand_v0_10_lite
 : AlbertaBeef)
Benchmarking the models on the Raspberry Pi 5 AI Kit
For reasons which I have not resolved, the “ — profileview” argument does not work well on the Raspberry Pi, so we will use the “ — profilelog” argument instead.
The profiling functionality uses a test image that can be downloaded from Google as follows:
source ./get_test_images.sh
The following commands can be used to generate profile results for the mx3_hand_v0_07 pipeline using the MX3 models, and the test image:
rm blaze_detect_live.csv
python3 blaze_detect_live.py --pipeline=mx3_hand_v0_07 --image --withoutview --profilelog
mv blaze_detect_live.csv blaze_detect_live_rpi5m2_mx3_hand_v0_07.csv
The following commands can be used to generate profile results for the tfl_hand_v0_07 pipeline using the TFLite models, and the test image:
rm blaze_detect_live.csv
python3 blaze_detect_live.py --pipeline=tfl_hand_v0_07 --image --withoutview --profilelog
mv blaze_detect_live.csv blaze_detect_live_rpi5m2_tfl_hand_v0_07.csv
The same is done for the 0.10 versions of the palm+hand pipelines.
The results of all.csv files were averaged, then plotted using Excel.
Here are the profiling results for the 0.07 and 0.10 versions of the models deployed with MX3, in comparison to the reference TFLite models:
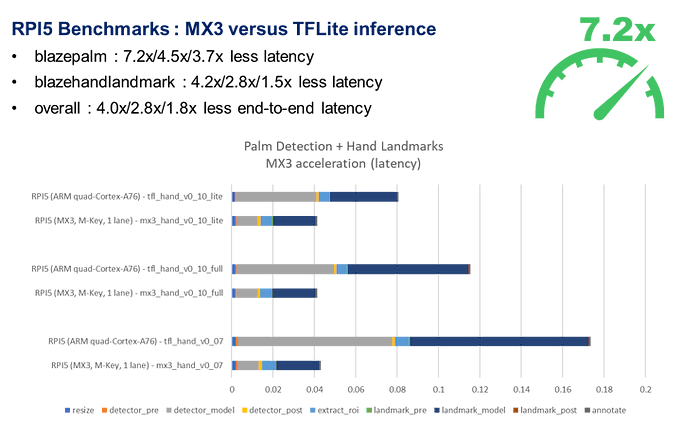 : AlbertaBeef)
If we plot the acceleration ratios of the execution times for the MX3 models with respect to the TFLite models, we get the following results:
 : AlbertaBeef)
The models were accelerated by a factor of 7.2x and 4.2x, and the full palm+hand pipeline was accelerated by a factor of 4.0x.
Again, it is worth noting that these benchmarks have been taken with a single-threaded python script. There is additional opportunity for acceleration with a multi-threaded implementation. A better reference implementation for such a multi-threaded implementation would be MemryX’s very own implementation of the palm detection + hand landmarks example:
- [MemryX] Multi-Threaded Example : mediapipe_hands
Also note that in their example, they use the more efficient AsyncAccel API, instead of the SyncAccel API, which I used.
Known Issues
The following issues were encountered when compiling the pose_detection (v0.10) model:
- segmentation fault (core dumped)
The issue was caused by the MemryX SDK’s tensorflow version, 2.17, when loading the model.
This issue was resolved by creating a separate virtual environment, and downgrading the tensorflow version, as follows:
$ python3 -m venv ~/mx_tf_2_16
$ . ~/mx_tf_2_16/bin/activate
(mx_tf_2_16) $

(mx_tf_2_16) $ pip3 install --extra-index-url https://developer.memryx.com/pip memryx
(mx_tf_2_16) $ pip3 install --upgrade "tensorflow==2.16.2"
The following issues were encountered when compiling version 0.10 of the palm/hand models:
- memryx.errors.ResourceError: Resource Mapping failed: (BaseFail:013).Please try autocrop ( — autocrop) or using more chips (-c, — num_chips).
The issue was resolved by inverting the order of models (ie. palm, hand => hand, palm).
Thanks to MemryX’s excellent support, I was able to compile models for the following pipelines:
- palm detection + hand landmarks (v0.07) : working
- palm detection + hand landmarks (v0.10) : working
- face detection + face landmarks (v0.10) : working
- pose detection + pose landmarks (v0.10) : working
In addition, I was able to validate the compiled models on the following platforms:
- Raspberry Pi 5 + M.2 Hat, with MX3 (M Key, 1 lane) : working
- HP Z4 G4 workstation, with MX3 (M Key, 2 lanes) : working
Competitive Comparison
At the start of this article I mentioned:
- Best performance overall for these mediapipe models
It is only fair to share what I mean by this statement. Overall, the MX3 M.2 accelerator is outperforming the Hailo-8L M.2 accelerator module and sometimes even the Hailo-8 M.2 accelerator module.
Here is a comparison of the complete line-up of mediapipe models that I have benchmarked, using the vendor’s own benchmarking tools:
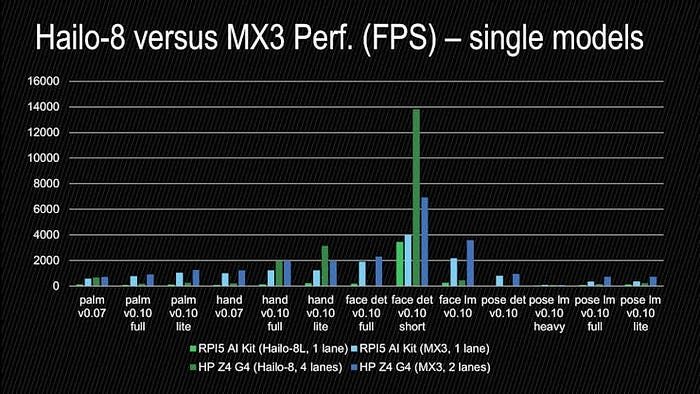 : AlbertaBeef)
The first thing to note is that:
- MX3 is outperforming Hailo-8L for all models
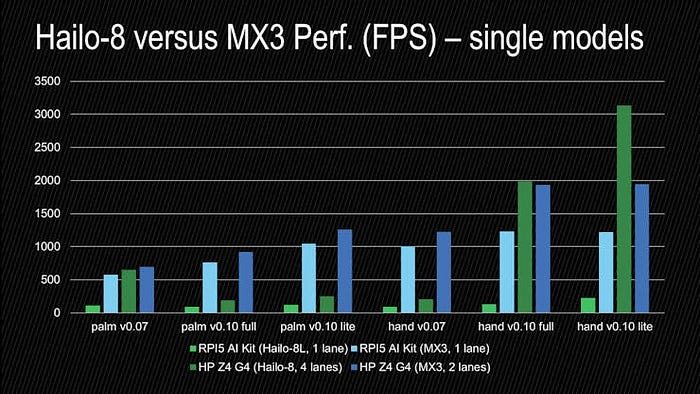
If we zoom in the palm+hand models, we can observe:
- MX3 is outperforming Hailo-8 for the 0.07 models
- MX3 is outperforming Hailo-8 for the 0.10 palm detection models
- Hailo-8 is outperforming MX3 for the 0.10 hand landmark models
 : AlbertaBeef)
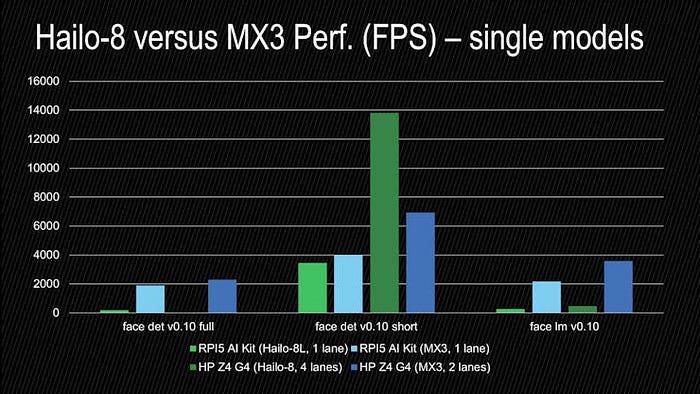
If we zoom in on the face models:
- MX3 is outperforming Hailo-8 for face landmark model
- Hailo-8 it is outperforming MX3 for the face detection short range model
 : AlbertaBeef)
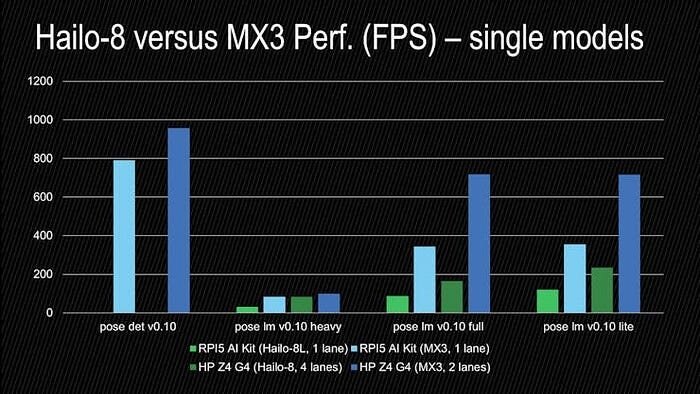
If we zoom in on the pose models:
- MX3 is outperforming Hailo-8 for all the pose models
 : AlbertaBeef)
Conclusion
I hope this project will inspire you to implement your own custom application.
What applications would you like to see built on top of these foundational MediaPipe models ?
Let me know if the comments…
Acknowledgements
I want to thank Sam Fuller for providing me the MemryX MX3 acceleration module, which made this project possible.
Version History
- 2025/02/24 — Initial Version
References
- [Google] MediaPipe Solutions Guide : https://ai.google.dev/edge/mediapipe/solutions/guide
- [MemryX] Getting Started : https://developer.memryx.com/get_started/index.html
- [MemryX] MemryX Developer Hub : https://developer.memryx.com
- [MemryX] Architecture Overview : Architecture Overview
- [MemryX] Multi-Threaded Example : mediapipe_hands
- [RaspberryPi] Raspberry Pi 5
- [GeeekPi] GeeekPi N04 M.2 2280 HAT
- [MemryX] MX3 M.2 Accelerator
- [AlbertaBeef] blaze_app_python : AlbertaBeef/blaze_app_python
- [AlbertaBeef] blaze_tutorial : AlbertaBeef/blaze_tutorial
-

DAB
-
Cancel
-
Vote Up
0
Vote Down
-
-
Sign in to reply
-
More
-
Cancel
Comment-

DAB
-
Cancel
-
Vote Up
0
Vote Down
-
-
Sign in to reply
-
More
-
Cancel
Children