element14 Community
element14 Community
    Register Log In
  • Site
  • Search
  • Log In Register
  • Community Hub
    Community Hub
    • What's New on element14
    • Feedback and Support
    • Benefits of Membership
    • Personal Blogs
    • Members Area
    • Achievement Levels
  • Learn
    Learn
    • Ask an Expert
    • eBooks
    • element14 presents
    • Learning Center
    • Tech Spotlight
    • STEM Academy
    • Webinars, Training and Events
    • Learning Groups
  • Technologies
    Technologies
    • 3D Printing
    • FPGA
    • Industrial Automation
    • Internet of Things
    • Power & Energy
    • Sensors
    • Technology Groups
  • Challenges & Projects
    Challenges & Projects
    • Design Challenges
    • element14 presents Projects
    • Project14
    • Arduino Projects
    • Raspberry Pi Projects
    • Project Groups
  • Products & Partners
    Products & Partners
    • Arduino
    • Avnet & Tria Boards Community
    • Dev Tools
    • Manufacturers
    • Multicomp Pro
    • Product Groups
    • Raspberry Pi
    • RoadTests & Reviews
  • About Us
    About the element14 Community
  • Store
    Store
    • Visit Your Store
    • Choose another store...
      • Europe
      •  Austria (German)
      •  Belgium (Dutch, French)
      •  Bulgaria (Bulgarian)
      •  Czech Republic (Czech)
      •  Denmark (Danish)
      •  Estonia (Estonian)
      •  Finland (Finnish)
      •  France (French)
      •  Germany (German)
      •  Hungary (Hungarian)
      •  Ireland
      •  Israel
      •  Italy (Italian)
      •  Latvia (Latvian)
      •  
      •  Lithuania (Lithuanian)
      •  Netherlands (Dutch)
      •  Norway (Norwegian)
      •  Poland (Polish)
      •  Portugal (Portuguese)
      •  Romania (Romanian)
      •  Russia (Russian)
      •  Slovakia (Slovak)
      •  Slovenia (Slovenian)
      •  Spain (Spanish)
      •  Sweden (Swedish)
      •  Switzerland(German, French)
      •  Turkey (Turkish)
      •  United Kingdom
      • Asia Pacific
      •  Australia
      •  China
      •  Hong Kong
      •  India
      •  Japan
      •  Korea (Korean)
      •  Malaysia
      •  New Zealand
      •  Philippines
      •  Singapore
      •  Taiwan
      •  Thailand (Thai)
      •  Vietnam
      • Americas
      •  Brazil (Portuguese)
      •  Canada
      •  Mexico (Spanish)
      •  United States
      Can't find the country/region you're looking for? Visit our export site or find a local distributor.
  • Translate
  • Profile
  • Settings
Embedded and Microcontrollers
  • Technologies
  • More
Embedded and Microcontrollers
Blog EZ-MCXN: Simple Dev Board for NXP MCX N-Series Microcontrollers!
  • Blog
  • Forum
  • Documents
  • Quiz
  • Polls
  • Files
  • Members
  • Mentions
  • Sub-Groups
  • Tags
  • More
  • Cancel
  • New
Join Embedded and Microcontrollers to participate - click to join for free!
  • Share
  • More
  • Cancel
Group Actions
  • Group RSS
  • More
  • Cancel
Engagement
  • Author Author: shabaz
  • Date Created: 30 Sep 2026 5:40 PM Date Created
  • Views 683 views
  • Likes 11 likes
  • Comments 51 comments
  • MCX
  • mcuxpresso
  • audio
  • Cortex-M
  • EZ-MCXN
  • MCXN
  • i2s
  • MCXN547
  • cortex-m33
  • nxp
  • pdm
  • arm
  • FRDM-MCXN236
  • MCXN236
  • MCXN235
Related
Recommended

EZ-MCXN: Simple Dev Board for NXP MCX N-Series Microcontrollers!

shabaz
shabaz
30 Sep 2026

Table of Contents

  • Introduction
  • MCX Overview
    • MCXN236
  • Circuit Diagram
    • Supply Decoupling
    • USB and Boot
    • Audio Interfaces
    • SPI, TFT, LEDs and Buttons: User Interface
    • I2C and more SPI: microSD Card
    • ADC and Spare GPIO Pins
  • Board Layout and Parts List
  • Summary

Introduction

Recently, I wanted to play a little bit with audio projects, and noticed that NXP has some interesting new microcontrollers with just the interfaces I was hoping for. There are low-cost ready-made development boards for the MCXN range, but not for the particular package I was interested in, so I decided to make my own of sorts. In addition, I find I make less errors in future projects, if I take the time to produce a little test board for the microcontroller I plan to use. It’s a great opportunity to test out the CAD footprint, and decide what pins and peripherals to use, and determine the minimal viable circuit to bring up the part and program it.

This blog post details the test board I plan to make, in case anyone else is interested in this particular microcontroller too, and wishes to follow along. The KiCad project, footprint and other relevant files are all in an ez_mcxn project repository. Please note I have not tested this board yet, I have yet to receive the PCBs. The PCBs have arrived and have been assembled.

In a follow-up blog post I’ll explore how to build and run a demo app, assuming the hardware works!

image

MCX Overview

According to NXP, MCX microcontrollers are intended for “simplified system design”. The MCX N-Series (which I plan to use; specifically the N23 series) offers high-performance, but there are other options, such as the general A-series, low-cost C-series, and wireless W-series. There are even some ultra-tiny 3 x 3 mm sized (QFN16 0.5 mm pitch) microcontrollers offered; the part I was interested in comes in a 100-pin QFP package.

The MCX parts have been around for just a year or two; I believe they contain a blend of older NXP LPC microcontroller features, along with Kinetis features from the Freescale acquisition (I’m basing this on the fact that I see lots of Freescale copyright notices in the SDK source code).

By “simplified system design” NXP may mean that the software development environment is a bit more modern (the old Eclipse platform is still offered, plus the usual IAR and Keil development environments, but now users can download and run using a VS Code plugin I believe; I decided to do things via the command line for now (apart from microcontroller configuration, for which I prefer the desktop graphical app from NXP, called MCUXpresso Config Tools. The app auto-generates source and header files which can be included within project builds.

Freescale microcontroller reference manuals used to be top notch, so I suspect that amount of documentation excellence may have been carried over onto the MCX series.

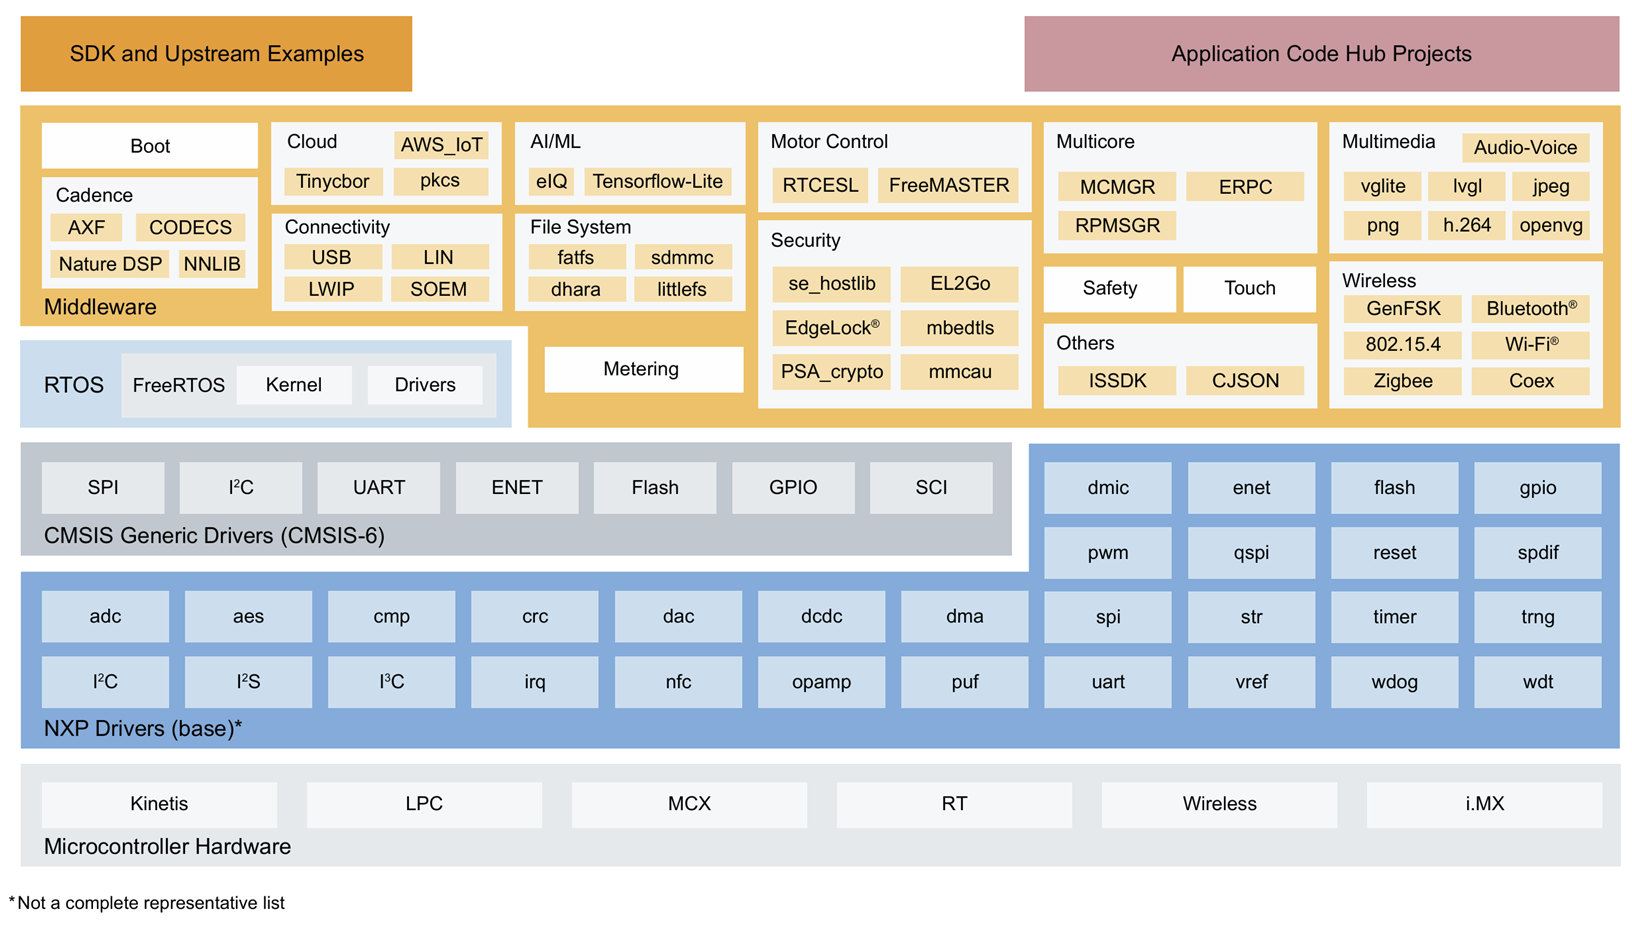
The SDK from NXP is called MCUXpresso SDK (HTML API Guide), and seems fine at first glance, I cannot comment much so far (I have built a blinky and a UART transmit project, but I have not explored further until I have hardware to try these things on). The NXP diagram below shows the functionality provided within the SDK.
image

Image source: NXP

Since I was not interested in downloading a complete development environment, I just installed the MCUXpresso SDK using manual installation, and the MCUXpresso Config Tools app. I already had a compiler installed on my PC previously (called the ARM GNU Toolchain, downloadable from the ARM website).

My initial coding experiments are in the project GitHub repo, but have not been tested on real hardware currently. I plan to use a SWD CMSIS-DAP debug probe for firmware uploading/debugging, but direct upload is possible using the built-in bootloader within the microcontroller ROM. If you’re new to ARM devices, for an introduction to SWD and debug probes, see here:  Using SWD with ARM Microcontrollers: An Introduction to Firmware Programming and Debugging! 


MCXN236

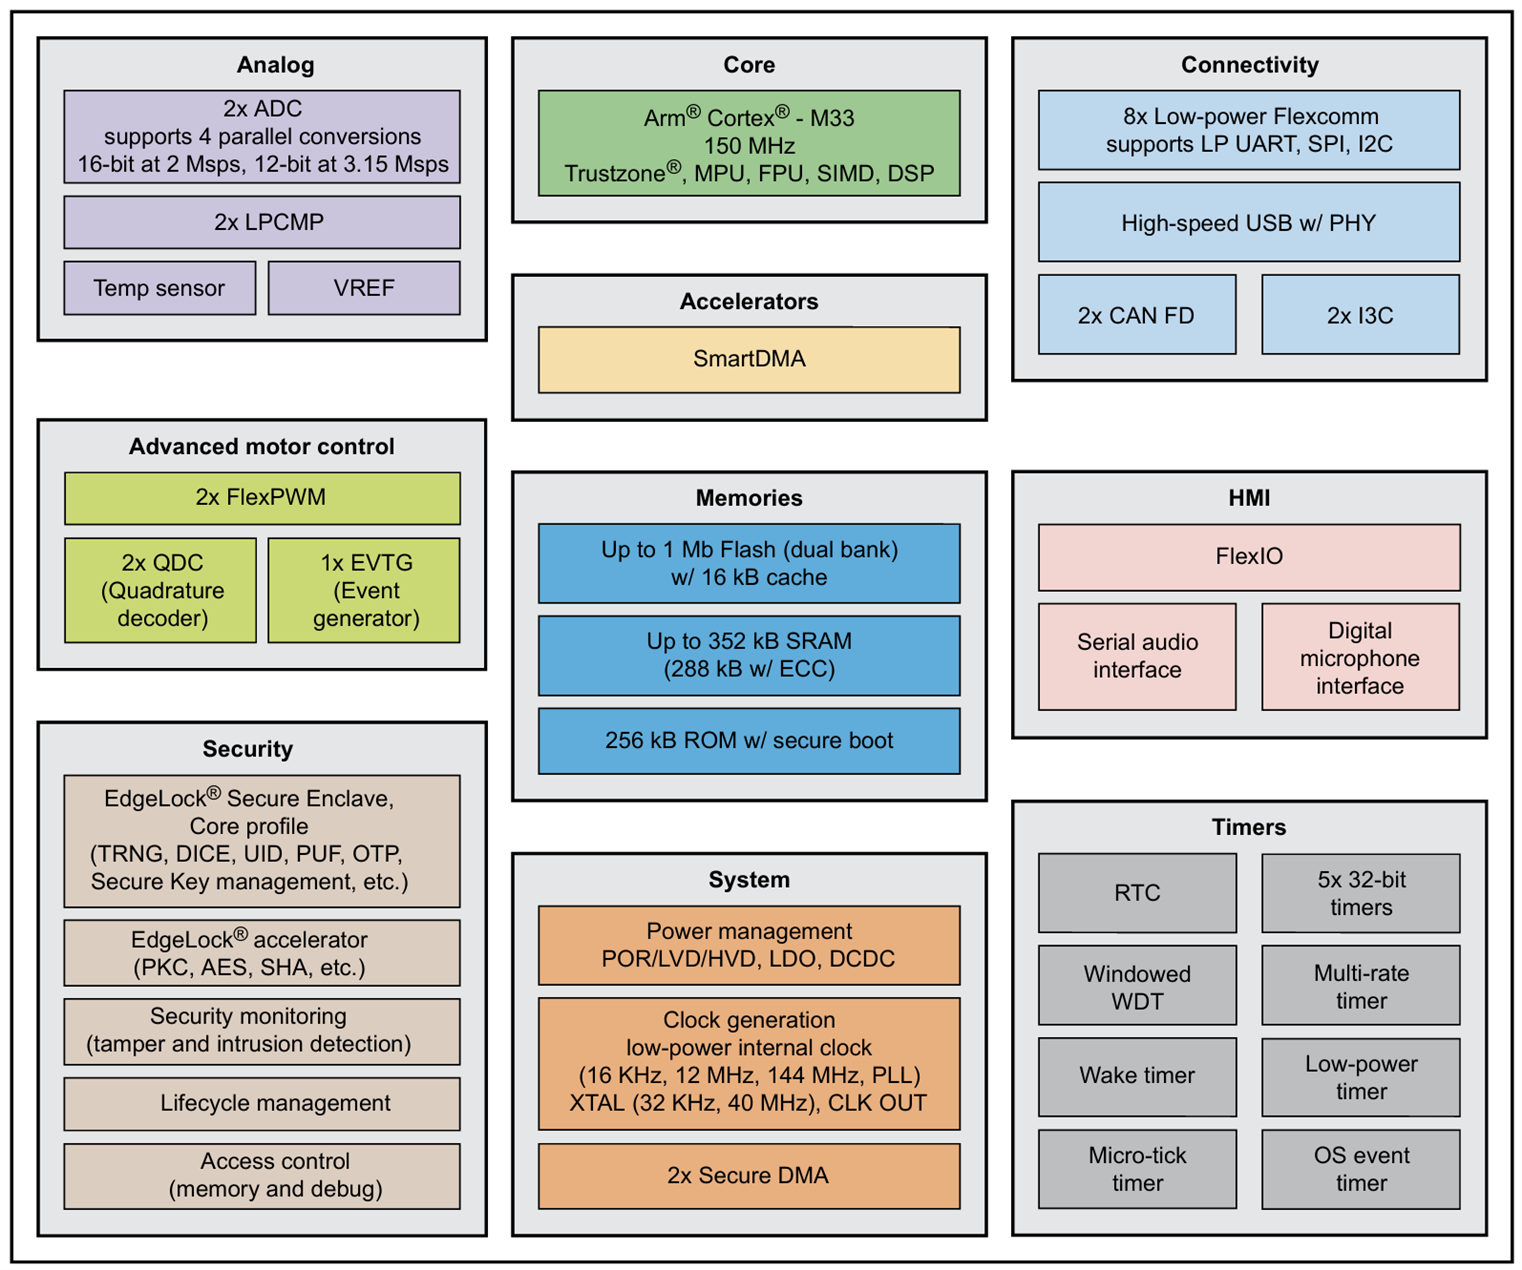
The particular part I went for contains a Cortex-M33 core that runs at 150 MHz, 1 Mbyte Flash (their diagram below has a typo, it’s not 1 Mbit!), and RAM space totalling 352 Kbyte.
image

Image source: NXP

Many of the integrated features look very useful for a lot of projects. There is High Speed USB (480 Mbps), two simultaneous-sampling ADCs (great for measuring instruments, or even software-defined radio!), CAN FD interfaces, plus lots of audio interfaces (simultaneous I2S receive and transmit, plus up to 4 PDM MEMs mics). For more info, download the MCXN236 PDF Data Sheet, or the huge PDF Reference Manual. There is also a higher-end MCXN547 part that is (I believe) pin-compatible, with double the Flash, extra RAM, Ethernet, and dual-core.

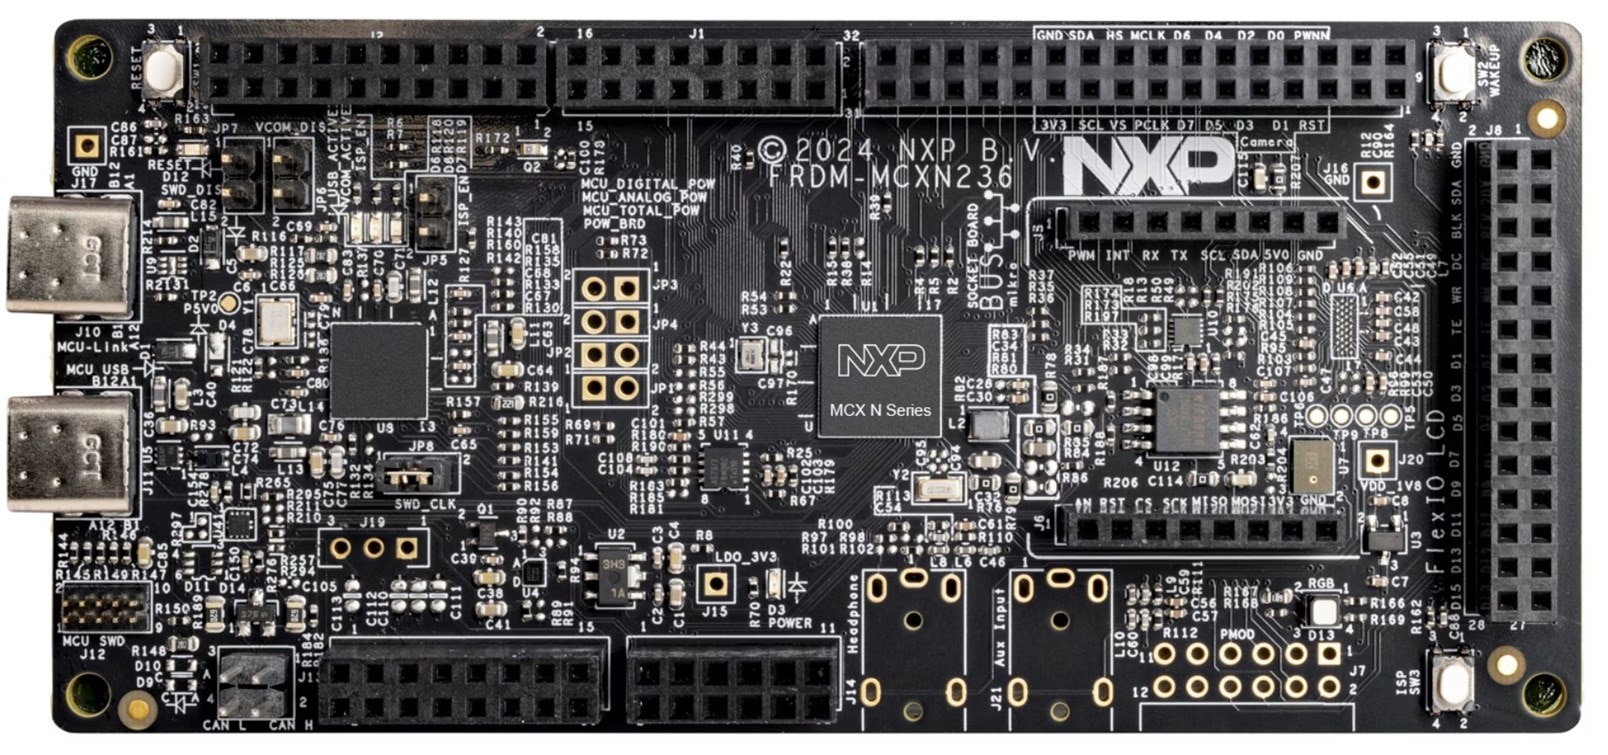
The NXP development board for the MCXN236 (but in a different package) is called FRDM-MCXN236, and is quite low-cost in case anyone wants to immediately experiment with this part!
image

Image source: NXP

Circuit Diagram

The entire circuit diagram follows, but in bite-size pieces with explanation (the full KiCad source file is within the project repository).

Supply Decoupling

I decided to supply the microcontroller with a 3.3V source.

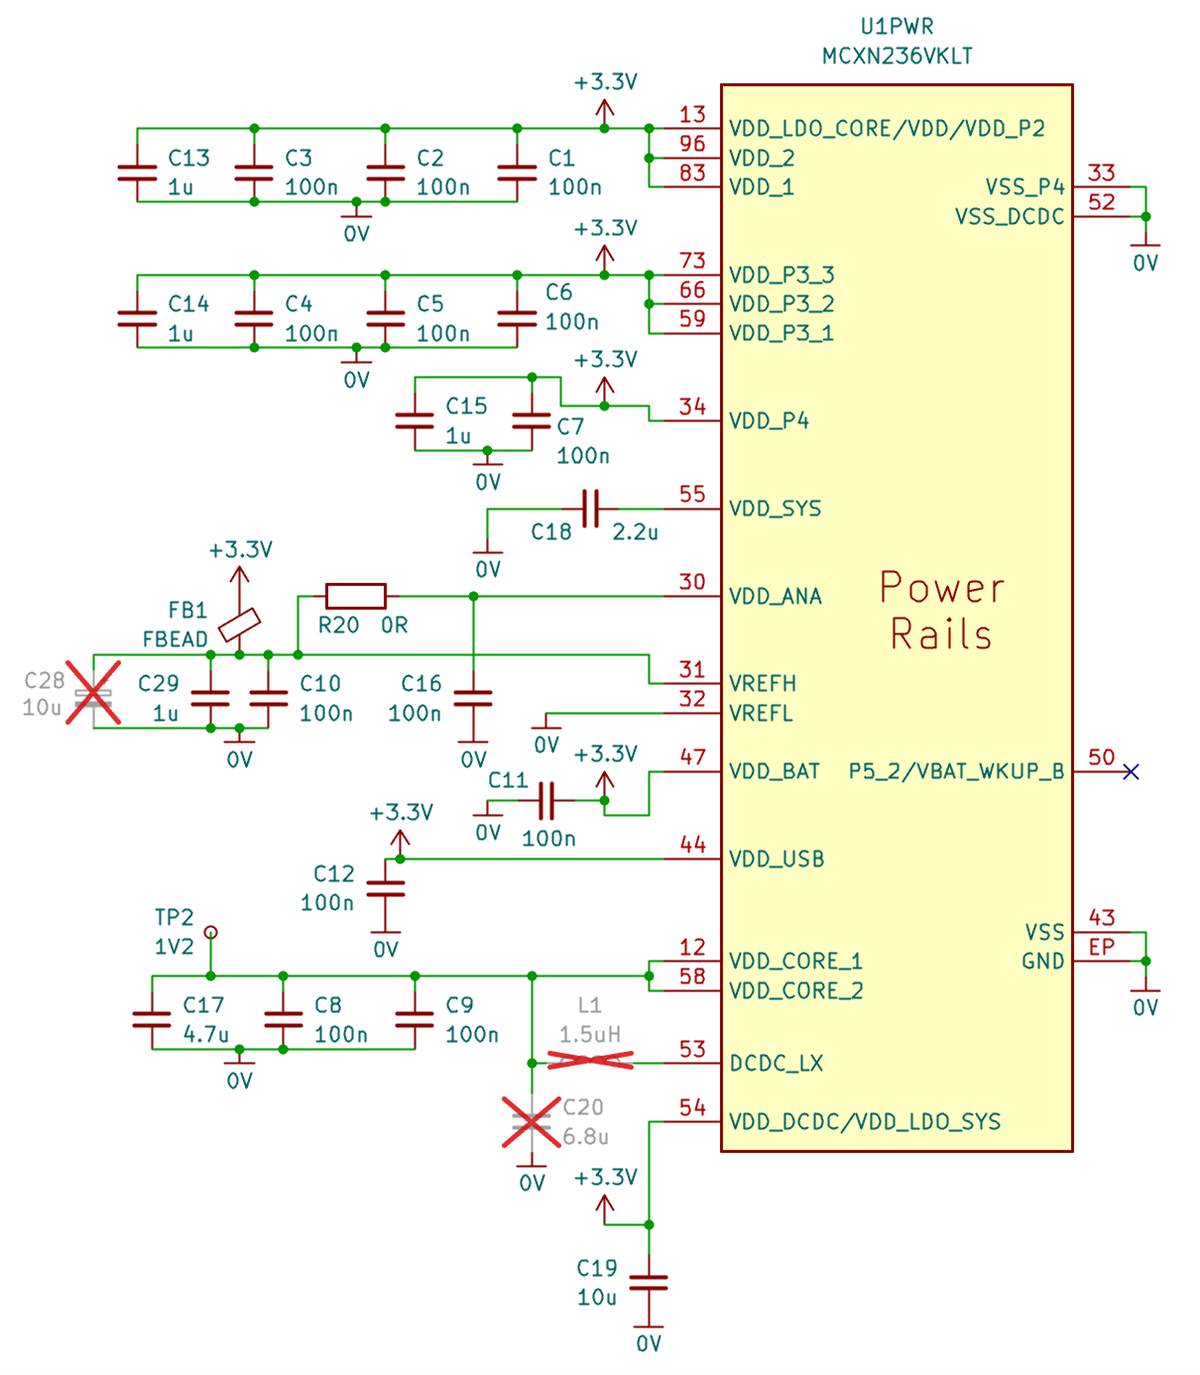
The package has 100 pins, and quite a lot of capacitors for power supply decoupling are needed, for some of the microcontroller internally generated rails as well as the 3.3V supply. Most of the 100nF capacitors are 0402-sized, to squeeze close to the microcontroller. There is an exposed ground pad on the underside of the package incidentally.

Some components are crossed out in red in the circuit below, for instance, L1 and C20 at pin 53 are omitted, they enable a DC-DC converter for greater efficiency, but I left those unpopulated to reduce noise since I may wish to experiment with the built-in ADC channels one day.
image

USB and Boot

The 3.3V microcontroller supply comes from a USB socket (which provides about 5V), followed by a 3.3V LDO. Optionally, the 5V power entry can come from the screw-terminal connector J14, so it's not essential to power via USB.

The debug probe attaches to the SWD connector. If there is no debug probe, it is possible to upload firmware to the device via USB or UART [a USB-UART adapter would be used], by holding down the BOOT button while pressing RESET; there is NXP software to perform the firmware transfer from the PC in that case.

image

Audio Interfaces

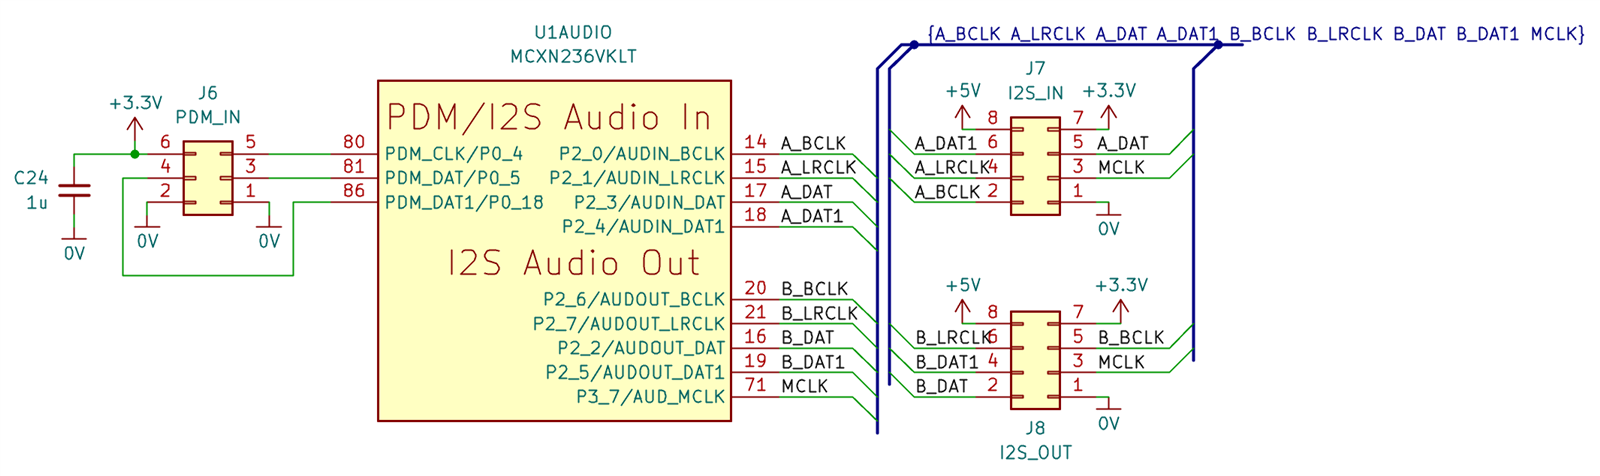
I used three connectors for the audio; PDM, and I2S (PDF I2S specification document) input and output. There is a second data line on each of the three connectors, i.e. the microcontroller supports up to four channels of audio (stereo per data signal) on each connector.
image

SPI, TFT, LEDs and Buttons: User Interface

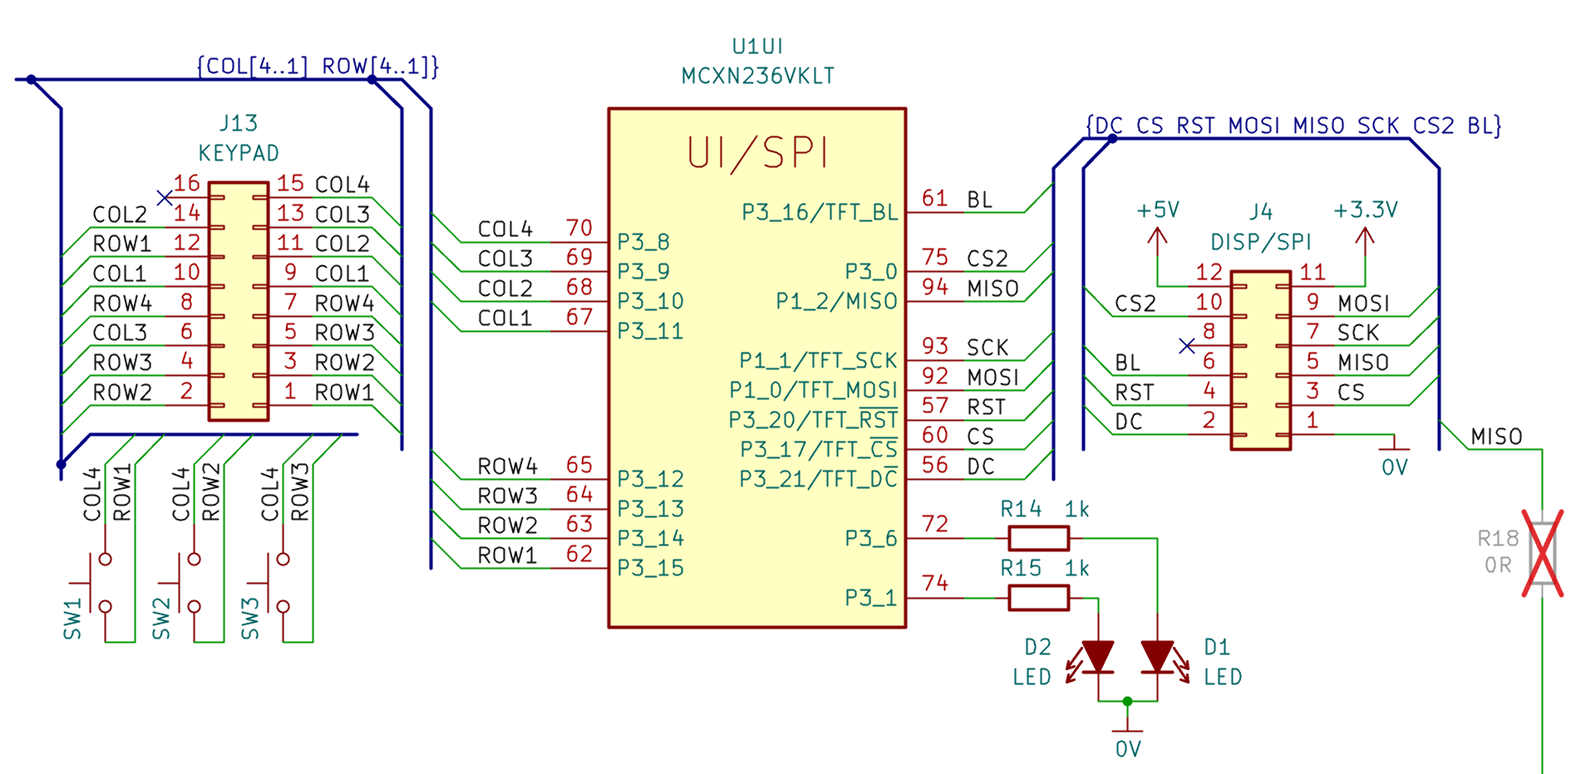
I wired the J13 header so that up to eight of the GPIO on port 3 could be used for keypad scanning. The pins are arranged so that typical 4x3 or 4x4 keypads should be able to easily connect, and there are three buttons on the PCB if no external keypad is used, and the GPIO could be used for other purposes if a keypad is not needed.

The SPI interface could be used to drive a TFT screen, or used for interfacing other devices. At the lower-right of the circuit in the diagram here, it can be seen that the MISO connection can optionally be routed elsewhere; that’s for making the board easier to use with the MCXN547 microcontroller, if Ethernet was required (unfortunately then the MISO line is no longer usable due to the particular set of pins chosen for the rest of the SPI interface; that won’t affect things if the SPI interface was used just for a display of course, as that would only require MOSI and not MISO).

There are two LEDs on the PCB attached to a couple of GPIO pins.
image

I2C and more SPI: microSD Card

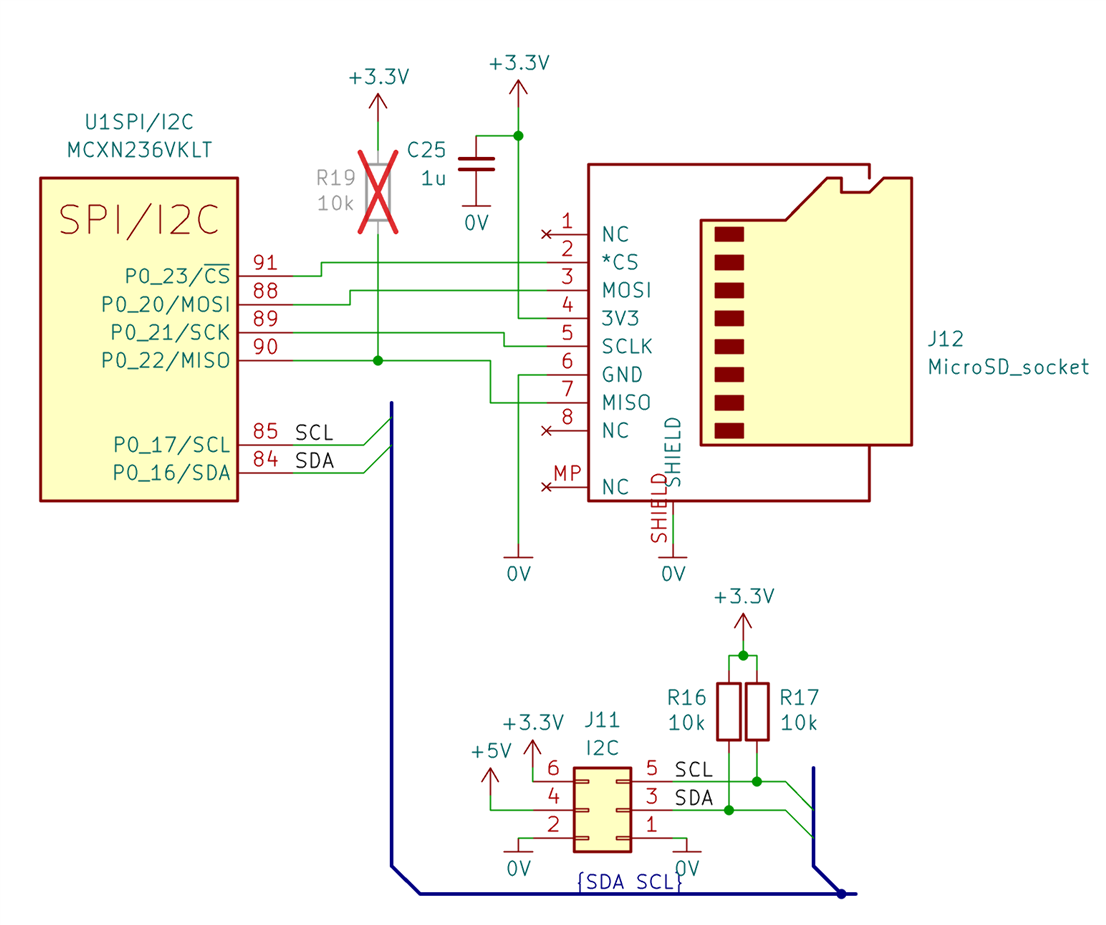
Another SPI interface was wired up to a microSD card socket, perhaps useful for audio file storage and so on (in the block diagram earlier, it can be seen that the SDK contains file system capabilities, so this should be straightforward to include into projects hopefully).
image

ADC and Spare GPIO Pins

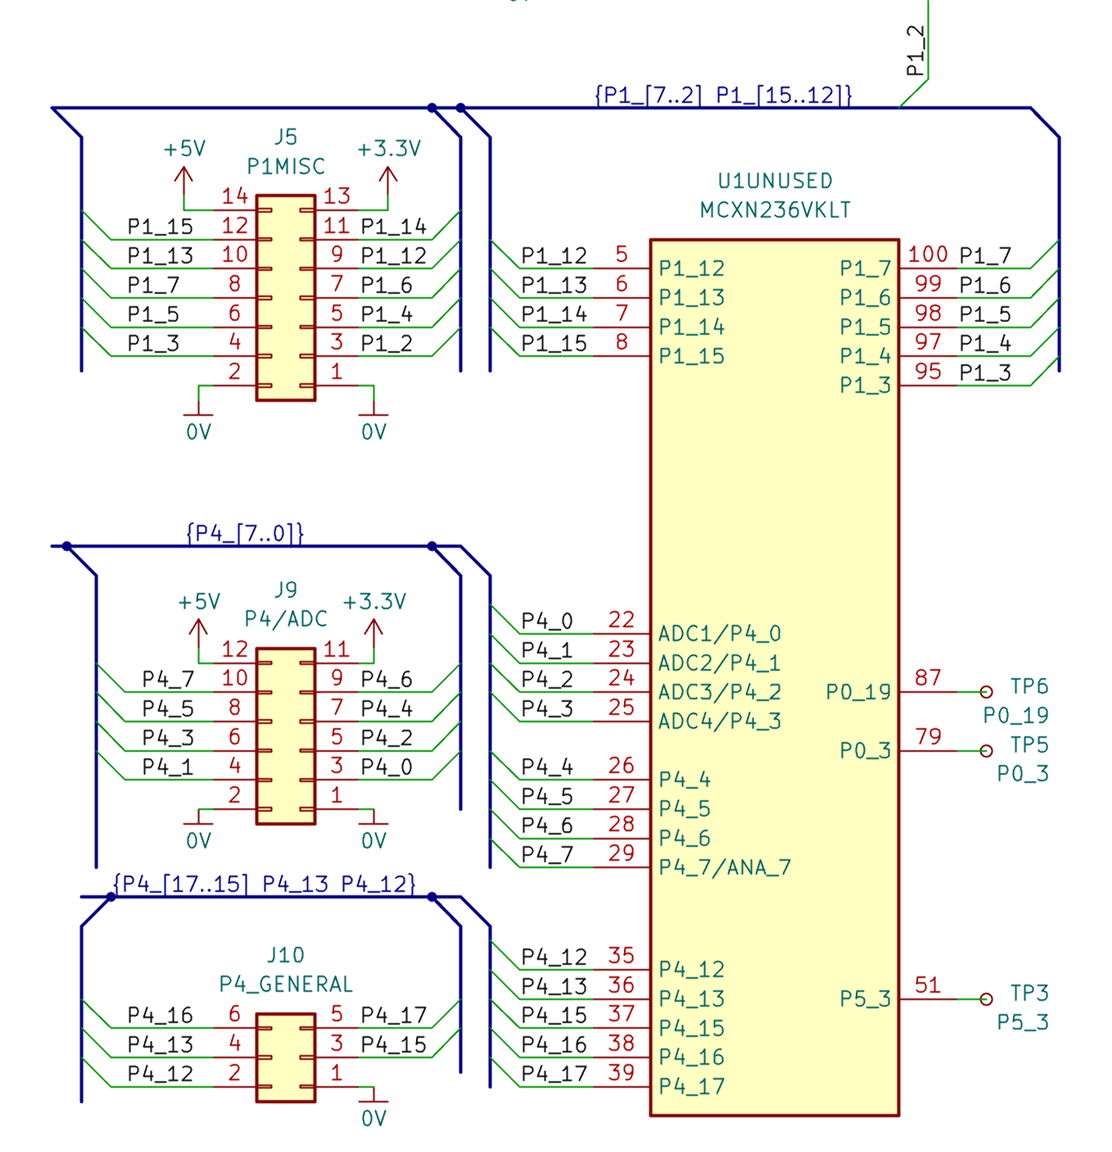
Nearly all remaining connections on the GPIO were wired to header pins. Header J9 (labelled P4/ADC) could be particularly useful, since a lot of the ADC inputs are available there. The P1MISC header J5 can be used for attaching an Ethernet PHY if desired, when using the MCX547 microcontroller. The P1_2 signal shown at the top-right of the disgram is wired (via a normally unpopulated zero-ohm resistor) to the SPI MISO connection mentioned earlier (that signal is repurposed for the Ethernet capability).
image

Board Layout and Parts List

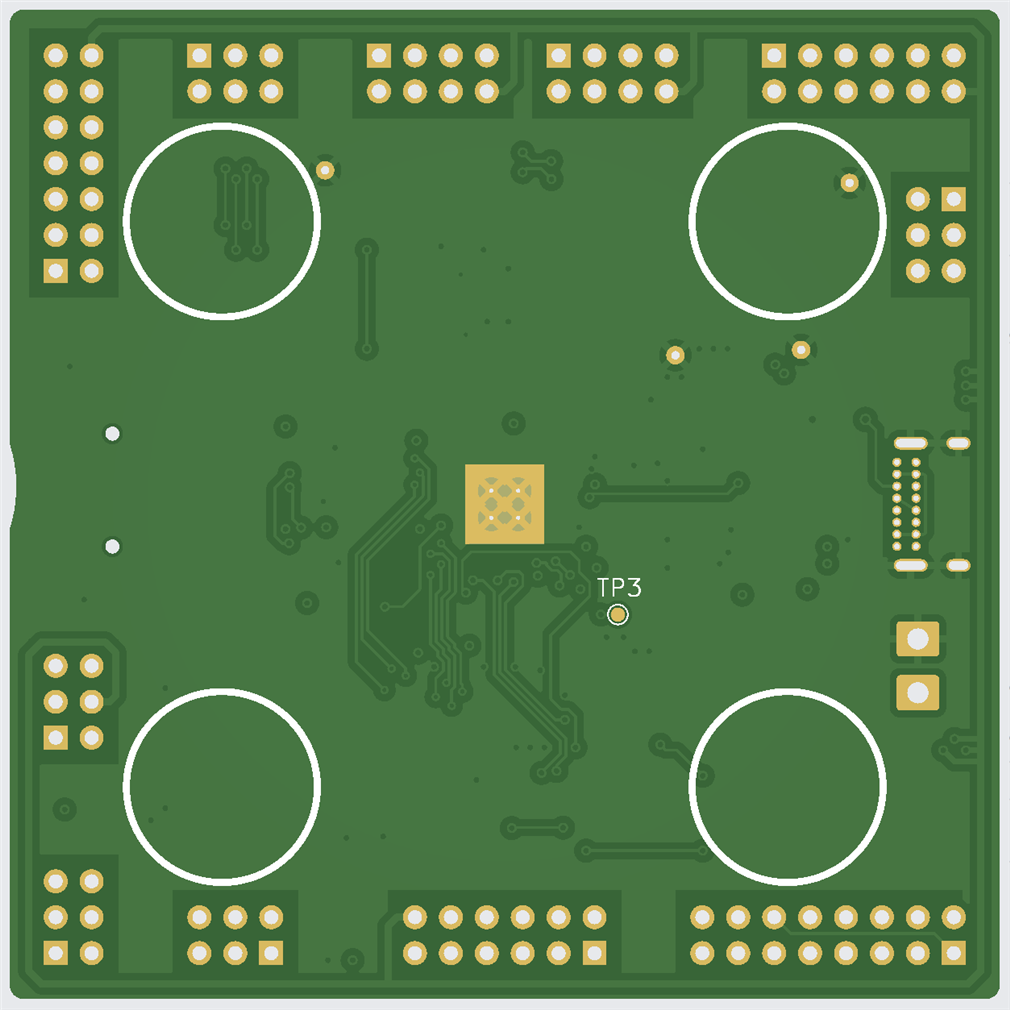
The board is 4-layer 70x70 mm, with mostly 0603-sized passives, but there are a few 0402-sized ones where space was constrained (particularly the many 100 nF decoupling capacitors are 0402-sized). I placed some bare SMD pads near the ADC header, in case small additions are required, for instance to supply power to the microcontroller ADC pin from a separate LDO.

For the parts list, see the Readme file in the project GitHub repo.
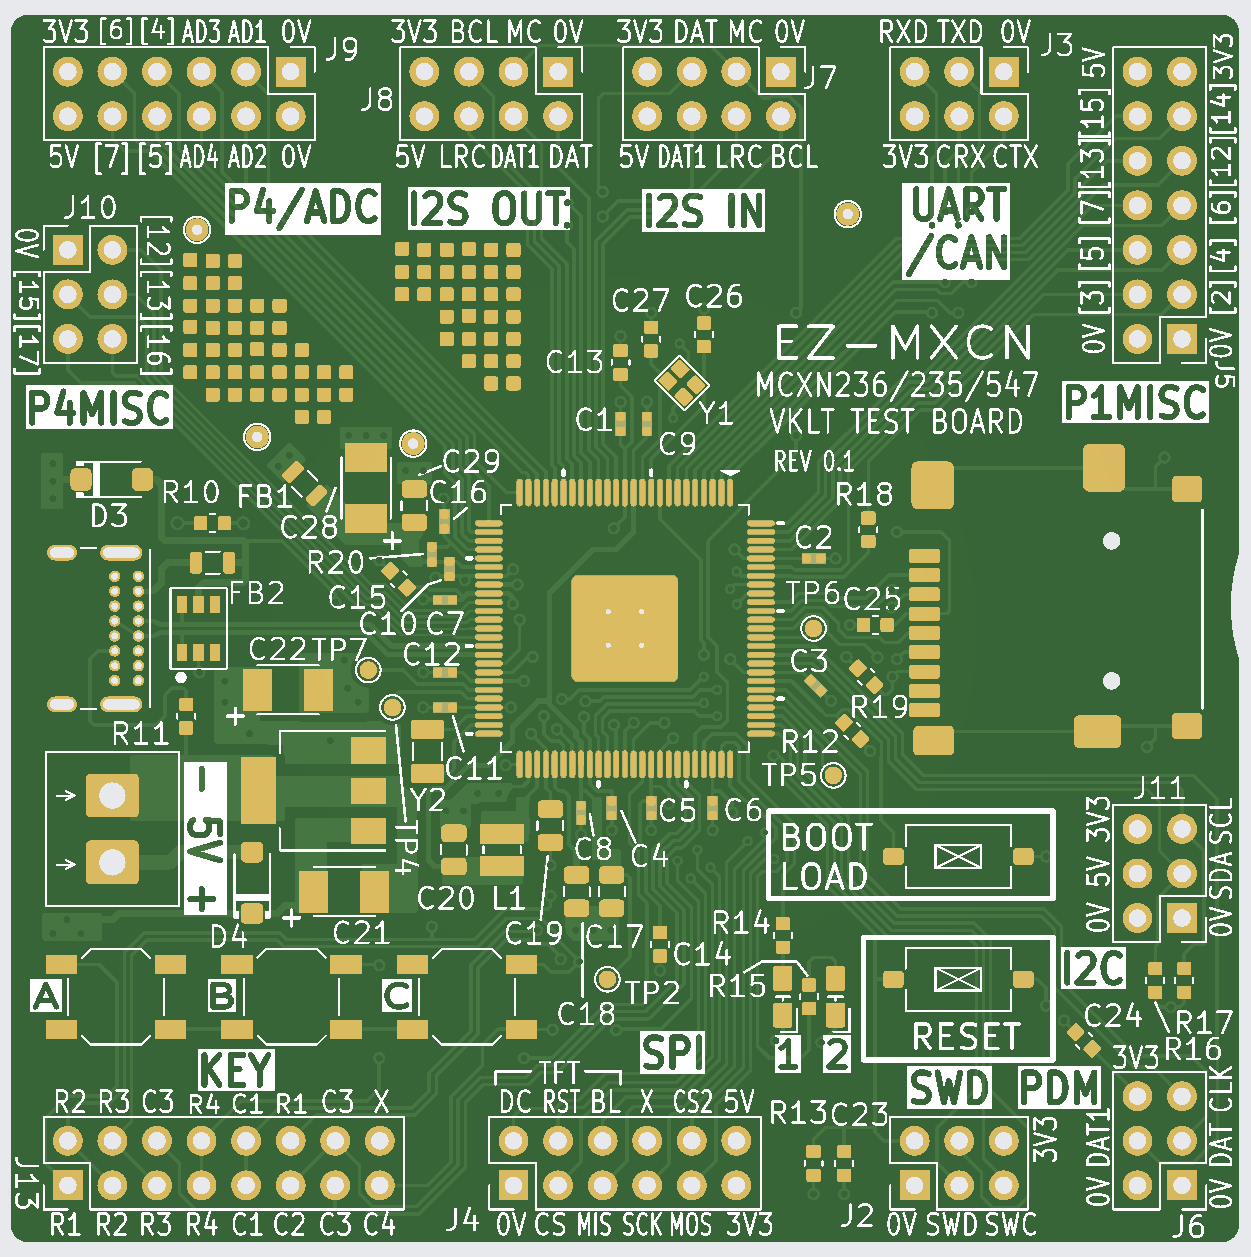
image

The underside has exposed copper to hopefully make it easier to hand-solder the microcontroller center pad. The inner layers are not shown, but they don't contain anything apart from 0V (layer 2) and 3.3V (layer 3).
image

Summary

The MCX series N microcontroller MCXN236 looks very useful for a lot of projects, so a little test board was designed, that brings out most of the connections to 2.54mm pin headers, and the project files (including Gerber files) are in the project GitHub repo. 

If things don't go wrong, the next blog post, hopefully in a few weeks time, will cover board bring-up and a bit of coding.

Thanks for reading!

  • Sign in to reply

Top Comments

  • shabaz
    shabaz 1 month ago in reply to michaelkellett +1
    Unfortunately that's an older screenshot (it's the usual problem, the more recent updates get hidden by the site : ( I'd made it a solid pad, but didn't enlarge the holes further (I have made them larger…
  • shabaz
    shabaz 18 days ago in reply to shabaz +1
    The drag soldering eventually got easier.. just one or two bridges to fix per chip by the end. But, I needed to use preheater+hot-air later anyway, because the crystals looked impossible otherwise. This…
  • shabaz
    shabaz 15 days ago in reply to Jan Cumps +1
    Interesting video! If cleaning doesn't work, I think maybe TL59 could be a close match: Or possibly this from AliExpress comes in 6x6x4.3 and 6x6x5 variants but I couldn't tell the precise spacing…
Parents
  • Jan Cumps
    Jan Cumps 13 days ago

     shabaz , can you show a screen capture of your configurator's Clocks Table?

    When I use NXP's SDK builder it sets the clock to 48. I'm trying to set the right positions to config it for a 24 MHz crystal

    I'm trying to make an online SDK, and pins config seems to be straightforward:
    image

    The clock configurator is more complex.

    • Cancel
    • Vote Up 0 Vote Down
    • Sign in to reply
    • More
    • Cancel
  • shabaz
    shabaz 13 days ago in reply to Jan Cumps

    I see the following for Tools->Clocks, I cannot seem to get the same display as you have with the online version.

    Does the online version allow opening a .mex file? If so, the one I'm using is this one: ez_mcxn/mcx_projects/_boards/ez_mcxn/EZ_MCXN.mex at main · shabaz123/ez_mcxn

    image

    image

    • Cancel
    • Vote Up 0 Vote Down
    • Sign in to reply
    • More
    • Cancel
  • Jan Cumps
    Jan Cumps 12 days ago in reply to shabaz

    This view is what I was looking for. 

    I downloaded the config tool, so I'll be able to check the .mex file.

    • Cancel
    • Vote Up 0 Vote Down
    • Sign in to reply
    • More
    • Cancel
  • Jan Cumps
    Jan Cumps 12 days ago in reply to shabaz

    I created a downloadable SDK, with the same PIN and Clock settings as your .mex:

    https://mcuxpresso.nxp.com/download/f6f77f03cd2c195953272c1bb73481d5

    Now checking if I can make a project from it ...

    • Cancel
    • Vote Up 0 Vote Down
    • Sign in to reply
    • More
    • Cancel
  • shabaz
    shabaz 12 days ago in reply to Jan Cumps

    Interesting.. I just downloaded it, it creates an entire custom SDK?

    • Cancel
    • Vote Up 0 Vote Down
    • Sign in to reply
    • More
    • Cancel
Comment
  • shabaz
    shabaz 12 days ago in reply to Jan Cumps

    Interesting.. I just downloaded it, it creates an entire custom SDK?

    • Cancel
    • Vote Up 0 Vote Down
    • Sign in to reply
    • More
    • Cancel
Children
  • Jan Cumps
    Jan Cumps 12 days ago in reply to shabaz

    Yes, you can import it in the IDE (I use VS Code + extension) and you can create projects based on it.

    I have it working, but not perfect. It takes some pin and clock definitions, but not all.

    The example I created for it, builds:

    image

    • Cancel
    • Vote Up 0 Vote Down
    • Sign in to reply
    • More
    • Cancel
  • Jan Cumps
    Jan Cumps 12 days ago in reply to Jan Cumps

    That custom SDK doesn't do what I was expecting. It doesn't actually add the config settings I made online.

    I'm studying further to understand how to create a project that doesn't use example code settings / artifacts.

    • Cancel
    • Vote Up 0 Vote Down
    • Sign in to reply
    • More
    • Cancel
  • shabaz
    shabaz 12 days ago in reply to Jan Cumps

    They made it very hard to follow and I couldn't figure that out. I unfortunately didn't make a record of what I did the first time, but I believe I resorted to copying one of their example board folders, and then deleted files one-by-one to see what was used, and then used the GUI to create the autogenerated files to put there. But I kept one unused header file (just renamed it so it wouldn't be included in the build) since it might be useful if ever using FreeRTOS one day. Also the NXP examples use "west" which I had never heard of and it's another annoyance, because I found it very slow, the simplest of builds were taking 10 seconds. So for my build.ps1 I got AI to only use west for the first build, and then for all non-clean builds it skips that and just directly uses ninja. That made the simple builds occur within a second. But it did make me wonder, was west even necessary, probably not. But again perhaps the RTOS benefits from that, no idea, so I didn't completely get rid of west.

    • Cancel
    • Vote Up 0 Vote Down
    • Sign in to reply
    • More
    • Cancel
  • Jan Cumps
    Jan Cumps 12 days ago in reply to shabaz

    I 'm going to try and build a little project, using :

    • the SDK where needed
    • the output from a clean .mex, using your clocl settings
    • CMake
    • CMake and bash settings from your repo

    and then, when a compile fails, look one step further to see what's missing ...

    • Cancel
    • Vote Up 0 Vote Down
    • Sign in to reply
    • More
    • Cancel
  • Jan Cumps
    Jan Cumps 12 days ago in reply to Jan Cumps

    I got the build part working. 4 hours of sweat and anger:

    cmake_minimum_required(VERSION 3.29)
    
    set(CMAKE_VERBOSE_MAKEFILE OF)
    
    set(CMAKE_C_STANDARD 11)
    set(CMAKE_CXX_STANDARD 26)
    set(CMAKE_CXX_STANDARD_REQUIRED ON)
    
    # SDK_ROOT set externally
    set(SDK_ROOT $ENV{SDK_ROOT})
    message(STATUS "SDK_ROOT: ${SDK_ROOT}")
    
    set(CMAKE_SYSTEM_NAME Generic)
    set(CMAKE_EXE_LINKER_FLAGS "${CMAKE_EXE_LINKER_FLAGS} --specs=nosys.specs") # else CMake throws toolchain error when using an embedded GCC
    
    add_compile_definitions(
        CPU_MCXN236VKL
        MCXN236
    )
    
    
    project(ez_mcxn_minimal LANGUAGES C CXX ASM)
    
    include_directories(
        ${SDK_ROOT}/mcxn236/mcuxsdk/drivers/common
        ${SDK_ROOT}/mcxn236/mcuxsdk/drivers/gpio
        ${SDK_ROOT}/mcxn236/mcuxsdk/drivers/mcx_spc
        ${SDK_ROOT}/mcxn236/mcuxsdk/drivers/port
        ${SDK_ROOT}/mcxn236/mcuxsdk/devices/MCX/MCXN/MCXN236
        ${SDK_ROOT}/mcxn236/mcuxsdk/devices/MCX/MCXN/MCXN236/drivers
        ${SDK_ROOT}/mcxn236/mcuxsdk/devices/MCX/MCXN/periph1
        ${SDK_ROOT}/mcxn236/mcuxsdk/arch/arm/CMSIS/Core/Include
        ${SDK_ROOT}/mcxn236/mcuxsdk/arch/arm/CMSIS/Core/Include/m-profile
        # project includes
        ${CMAKE_SOURCE_DIR}/board
    )
    
    add_executable( ${CMAKE_PROJECT_NAME})
    
    set(MCXN_FLAGS
        -mcpu=cortex-m33
        -mthumb
        -mfloat-abi=hard
        -mfpu=fpv5-sp-d16
        --specs=nano.specs
    )
    
    target_sources(${CMAKE_PROJECT_NAME}
            PRIVATE
            ${SDK_ROOT}/mcxn236/mcuxsdk/devices/MCX/MCXN/MCXN236/gcc/startup_MCXN236.S
            ${SDK_ROOT}/mcxn236/mcuxsdk/devices/MCX/MCXN/MCXN236/system_MCXN236.c
            ${SDK_ROOT}/mcxn236/mcuxsdk/devices/MCX/MCXN/MCXN236/drivers/fsl_clock.c
            ${SDK_ROOT}/mcxn236/mcuxsdk/devices/MCX/MCXN/MCXN236/drivers/fsl_reset.c 
            ${SDK_ROOT}/mcxn236/mcuxsdk/drivers/mcx_spc/fsl_spc.c
            ${SDK_ROOT}/mcxn236/mcuxsdk/drivers/common/fsl_common.c
            ${SDK_ROOT}/mcxn236/mcuxsdk/drivers/gpio/fsl_gpio.c
            # project sources
            # MCUXpresso Cfg generated:
            ${CMAKE_SOURCE_DIR}/board/clock_config.c
            ${CMAKE_SOURCE_DIR}/board/pin_mux.c
            # stubs for functions not implemented in nano c lib
            ${CMAKE_SOURCE_DIR}/stub.c
            # application sources
            ${CMAKE_SOURCE_DIR}/main.c
    )
    
    target_compile_options(${CMAKE_PROJECT_NAME} PRIVATE
        $<$<COMPILE_LANGUAGE:CXX>:-fno-use-cxa-atexit>
        $<$<COMPILE_LANGUAGE:CXX>:-fno-exceptions>
        $<$<COMPILE_LANGUAGE:CXX>:-fno-rtti>
        $<$<COMPILE_LANGUAGE:CXX>:-fcommon>
        $<$<COMPILE_LANGUAGE:CXX>:-fmodules-ts>
        ${MCXN_FLAGS}
        -Wall
        -ffunction-sections 
        -fdata-sections
    )
    
    target_link_options(${CMAKE_PROJECT_NAME} PRIVATE
        ${MCXN_FLAGS}
        --specs=nano.specs
        -Wl,--gc-sections
        -Wl,--no-warn-rwx-segments
        -T ${SDK_ROOT}/mcxn236/mcuxsdk/devices/MCX/MCXN/MCXN236/gcc/MCXN236_flash.ld
    )
    
    add_custom_command(TARGET ${CMAKE_PROJECT_NAME} POST_BUILD
        COMMAND ${CMAKE_OBJCOPY} -O binary $<TARGET_FILE:${CMAKE_PROJECT_NAME}> ${CMAKE_BINARY_DIR}/${CMAKE_PROJECT_NAME}.bin
        COMMENT "create  bin executable: ${CMAKE_PROJECT_NAME}.bin"
    )

    I needed to provide stub definitions (stub.c) for some functions that aren't implemented by GCC nano lib (similar as for MSPM0):

    #include <sys/stat.h>
    
    // bare-metal stubs to eliminate Newlib-nano noise and errors
    int _close(int file) { (void)file; return -1; }
    int _fstat(int file, struct stat *st) { (void)file; st->st_mode = S_IFCHR; return 0; }
    int _isatty(int file) { (void)file; return 1; }
    int _lseek(int file, int ptr, int dir) { (void)file; (void)ptr; (void)dir; return 0; }
    int _read(int file, char *ptr, int len) { (void)file; (void)ptr; (void)len; return 0; }
    int _write(int file, char *ptr, int len) { (void)file; (void)ptr; (void)len; return 0; }
    void _exit(int status) { (void)status; while(1); }
    int _kill(pid_t pid, int sig) { (void)pid; (void)sig; return -1; }
    pid_t _getpid(void) { return 1; }

    It builds without using West, MCUXpresso VS Extensions. 
    I need to have an SDK on the develop PC, and point to it with a variable:

    In my case, I defined a CMake environment variable SDK_ROOT, pointing to C:/Users/jancu/Documents/elektronica/nxp/sdk/mcxn236_noboard

    Results:

    [main] Building folder: c:/Users/jancu/workspace_vscode_nxp/ez-mcxn_hello_world/ez_mcxn_minimal/build 
    [build] Starting build
    [proc] Executing command: C:/Users/jancu/.pico-sdk/cmake/v4.2.1/bin/cmake.exe --build c:/Users/jancu/workspace_vscode_nxp/ez-mcxn_hello_world/ez_mcxn_minimal/build --config Debug --target all --
    [build] [11/12 8% :: 0.221] Building ASM object CMakeFiles/ez_mcxn_minimal.dir/C_/Users/jancu/Documents/elektronica/nxp/sdk/mcxn236_noboard/mcxn236/mcuxsdk/devices/MCX/MCXN/MCXN236/gcc/startup_MCXN236.S.obj
    [build] [11/12 16% :: 0.341] Building C object CMakeFiles/ez_mcxn_minimal.dir/stub.c.obj
    [build] [11/12 25% :: 0.449] Building C object CMakeFiles/ez_mcxn_minimal.dir/C_/Users/jancu/Documents/elektronica/nxp/sdk/mcxn236_noboard/mcxn236/mcuxsdk/drivers/common/fsl_common.c.obj
    [build] [11/12 33% :: 0.450] Building C object CMakeFiles/ez_mcxn_minimal.dir/C_/Users/jancu/Documents/elektronica/nxp/sdk/mcxn236_noboard/mcxn236/mcuxsdk/devices/MCX/MCXN/MCXN236/system_MCXN236.c.obj
    [build] [11/12 41% :: 0.451] Building C object CMakeFiles/ez_mcxn_minimal.dir/C_/Users/jancu/Documents/elektronica/nxp/sdk/mcxn236_noboard/mcxn236/mcuxsdk/devices/MCX/MCXN/MCXN236/drivers/fsl_reset.c.obj
    [build] [11/12 50% :: 0.481] Building C object CMakeFiles/ez_mcxn_minimal.dir/C_/Users/jancu/Documents/elektronica/nxp/sdk/mcxn236_noboard/mcxn236/mcuxsdk/drivers/gpio/fsl_gpio.c.obj
    [build] [11/12 58% :: 0.491] Building C object CMakeFiles/ez_mcxn_minimal.dir/main.c.obj
    [build] [11/12 66% :: 0.499] Building C object CMakeFiles/ez_mcxn_minimal.dir/board/pin_mux.c.obj
    [build] [11/12 75% :: 0.510] Building C object CMakeFiles/ez_mcxn_minimal.dir/board/clock_config.c.obj
    [build] [11/12 83% :: 0.523] Building C object CMakeFiles/ez_mcxn_minimal.dir/C_/Users/jancu/Documents/elektronica/nxp/sdk/mcxn236_noboard/mcxn236/mcuxsdk/drivers/mcx_spc/fsl_spc.c.obj
    [build] [11/12 91% :: 0.581] Building C object CMakeFiles/ez_mcxn_minimal.dir/C_/Users/jancu/Documents/elektronica/nxp/sdk/mcxn236_noboard/mcxn236/mcuxsdk/devices/MCX/MCXN/MCXN236/drivers/fsl_clock.c.obj
    [build] [12/12 100% :: 0.769] Linking C executable ez_mcxn_minimal; create bin executable: ez_mcxn_minimal.bin
    [driver] Build completed: 00:00:00.830
    [build] Build finished with exit code 0
    • Cancel
    • Vote Up 0 Vote Down
    • Sign in to reply
    • More
    • Cancel
element14 Community

element14 is the first online community specifically for engineers. Connect with your peers and get expert answers to your questions.

  • Members
  • Learn
  • Technologies
  • Challenges & Projects
  • Products
  • Store
  • About Us
  • Feedback & Support
  • FAQs
  • Terms of Use
  • Privacy Policy
  • Legal and Copyright Notices
  • Sitemap
  • Cookies

An Avnet Company © 2026 Premier Farnell Limited. All Rights Reserved.

Premier Farnell Ltd, registered in England and Wales (no 00876412), registered office: Farnell House, Forge Lane, Leeds LS12 2NE.

Follow element14

  • X
  • Facebook
  • linkedin
  • YouTube