element14 Community
element14 Community
    Register Log In
  • Site
  • Search
  • Log In Register
  • Community Hub
    Community Hub
    • What's New on element14
    • Feedback and Support
    • Benefits of Membership
    • Personal Blogs
    • Members Area
    • Achievement Levels
  • Learn
    Learn
    • Ask an Expert
    • eBooks
    • element14 presents
    • Learning Center
    • Tech Spotlight
    • STEM Academy
    • Webinars, Training and Events
    • Learning Groups
  • Technologies
    Technologies
    • 3D Printing
    • FPGA
    • Industrial Automation
    • Internet of Things
    • Power & Energy
    • Sensors
    • Technology Groups
  • Challenges & Projects
    Challenges & Projects
    • Design Challenges
    • element14 presents Projects
    • Project14
    • Arduino Projects
    • Raspberry Pi Projects
    • Project Groups
  • Products
    Products
    • Arduino
    • Avnet & Tria Boards Community
    • Dev Tools
    • Manufacturers
    • Multicomp Pro
    • Product Groups
    • Raspberry Pi
    • RoadTests & Reviews
  • About Us
  • Store
    Store
    • Visit Your Store
    • Choose another store...
      • Europe
      •  Austria (German)
      •  Belgium (Dutch, French)
      •  Bulgaria (Bulgarian)
      •  Czech Republic (Czech)
      •  Denmark (Danish)
      •  Estonia (Estonian)
      •  Finland (Finnish)
      •  France (French)
      •  Germany (German)
      •  Hungary (Hungarian)
      •  Ireland
      •  Israel
      •  Italy (Italian)
      •  Latvia (Latvian)
      •  
      •  Lithuania (Lithuanian)
      •  Netherlands (Dutch)
      •  Norway (Norwegian)
      •  Poland (Polish)
      •  Portugal (Portuguese)
      •  Romania (Romanian)
      •  Russia (Russian)
      •  Slovakia (Slovak)
      •  Slovenia (Slovenian)
      •  Spain (Spanish)
      •  Sweden (Swedish)
      •  Switzerland(German, French)
      •  Turkey (Turkish)
      •  United Kingdom
      • Asia Pacific
      •  Australia
      •  China
      •  Hong Kong
      •  India
      • Japan
      •  Korea (Korean)
      •  Malaysia
      •  New Zealand
      •  Philippines
      •  Singapore
      •  Taiwan
      •  Thailand (Thai)
      • Vietnam
      • Americas
      •  Brazil (Portuguese)
      •  Canada
      •  Mexico (Spanish)
      •  United States
      Can't find the country/region you're looking for? Visit our export site or find a local distributor.
  • Translate
  • Profile
  • Settings
Embedded and Microcontrollers
  • Technologies
  • More
Embedded and Microcontrollers
Blog PID temperature controller for the EasyL1105 MSPM0 board - Pt. 3: PWM
  • Blog
  • Forum
  • Documents
  • Quiz
  • Polls
  • Files
  • Members
  • Mentions
  • Sub-Groups
  • Tags
  • More
  • Cancel
  • New
Join Embedded and Microcontrollers to participate - click to join for free!
  • Share
  • More
  • Cancel
Group Actions
  • Group RSS
  • More
  • Cancel
Engagement
  • Author Author: Jan Cumps
  • Date Created: 2 Oct 2025 6:27 PM Date Created
  • Views 707 views
  • Likes 5 likes
  • Comments 25 comments
  • MSPM0L1105
  • MSPM0
  • easyL1105
  • texas instruments
Related
Recommended

PID temperature controller for the EasyL1105 MSPM0 board - Pt. 3: PWM

Jan Cumps
Jan Cumps
2 Oct 2025
PID temperature controller for the EasyL1105 MSPM0 board - Pt. 3: PWM

 shabaz designed a development kit for the recent Texas Instruments MSPM0 microcontroller series. 
This 4 part blog series documents the steps to design a PID temperature controller. Part 3: add PWM to generate a PID controlled output.

image
(post that introduces the kit)

Goal of this 3nd post

  • add PWM generation logic, based on  PWM example for the EasyL1105 MSPM0 board 
  • drive duty cycle from PID's output signal

not a goal of this post: have the PID regulation working 100%.

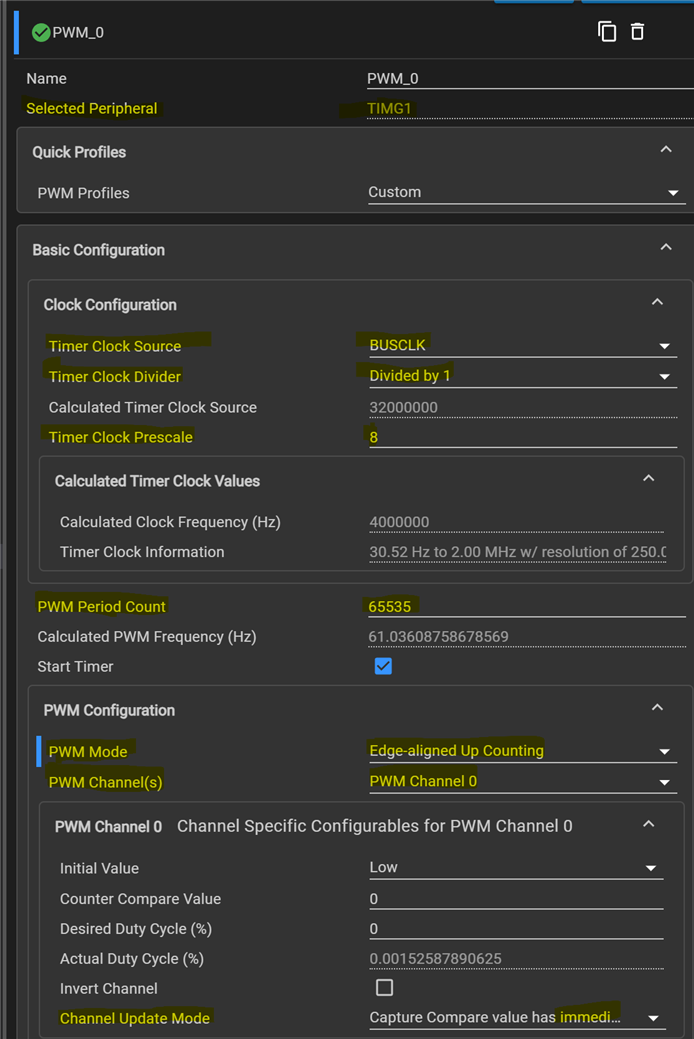
Set up PWM SysConfig

The code uses timer TIMG1, channel 0, to drive PA26. There's no interrupt involved. The duty cycle gets adjusted in the regulation loop.

At this point, I have set the PWM period count to 65535, in an attempt to have the output range identical (but 32768 offset) to the input. 

image

image

Code

note: this design doesn't regulate perfectly yet. At this point in the blog series, all modules are in place and they are tied to the PID. But finetuning PID parameters, input, output, ADC and PWM settings is for post 4.

void perform_pwm() {
    DL_TimerG_setCaptureCompareValue(PWM_0_INST, i32_Output_PID + 32768,
        DL_TIMER_CC_0_INDEX); // update ccr0 value  
}


int main(void) {
    SYSCFG_DL_init();

    // /* timer 5 interrupt ticks per second */ 
    // /* Enable Timer0 NVIC */
    NVIC_EnableIRQ(TIMER_0_INST_INT_IRQN);

    NVIC_EnableIRQ(ADC12_0_INST_INT_IRQN);
    gCheckADC = false;

	/* Initialize the parameters of PID */
	Initialize_PID_Parameter();

    /* Start PWM */
    DL_TimerG_startCounter(PWM_0_INST);

    /* Start Timer counting */
    DL_TimerG_startCounter(TIMER_0_INST);    

    while (1) {
        if (perform) {
            perform = false;
            DL_GPIO_setPins(GPIO_GRP_LEDS_PORT,
                GPIO_GRP_LEDS_PIN_LED_GREEN_PIN);

            perform_adc();
            
            perform_pid();

            perform_pwm();

            DL_GPIO_clearPins(GPIO_GRP_LEDS_PORT,
                GPIO_GRP_LEDS_PIN_LED_GREEN_PIN);
        }
    }
}

void perform_pid() {
    /* Execute PID control in every TM0 interrupt. */
    i32_Output_PID = PID(&PID_Var, i32_Target_Command, gAdcResult);
}

If you compare the perform_pid() with the one from the previous post, you 'll see that it now uses ADC as feedback, and output to drive the PWM.

Demo circuit

I used the same (random) low pass filter as in  MSP432 and TI-RTOS: PID Library Part 2 - Real World Example , to turn the PWM into a DC signal.

image

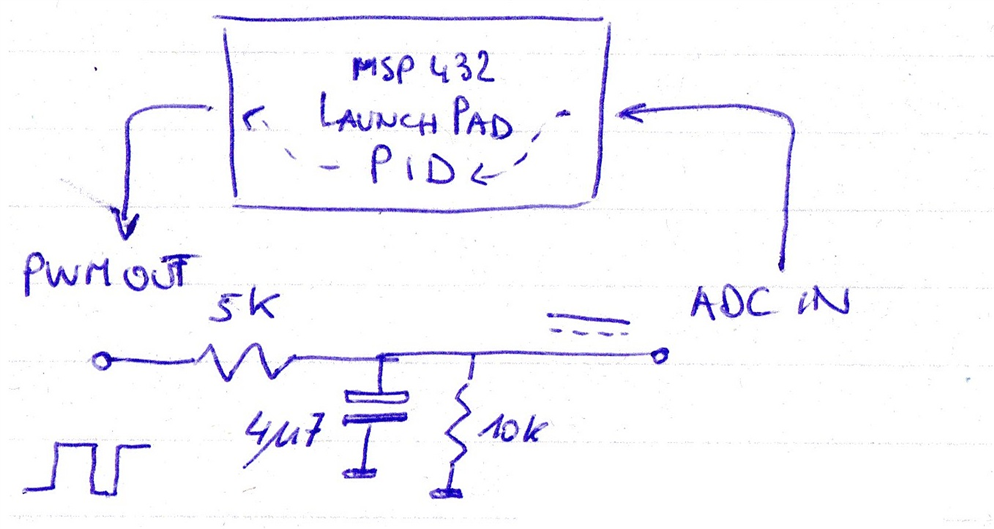
The filter sits between PWM out  (P26) and ADC in (PA25).

You don't have permission to edit metadata of this video.
Edit media
x
image
Upload Preview
image

ccs project for EasyL1105: pid_EasyL1105_20251002_02.zip

Related posts

  • Sign in to reply

Top Comments

  • Jan Cumps
    Jan Cumps 4 months ago in reply to colporteur +1
    It's a Control Technique algorithm. A function that will try to regulate a process' output, in relation to a desired setting. First used in 1911. It requires that you give it feedback on the current…
Parents
  • shabaz
    shabaz 4 months ago

    Good news!

    I added the PWM code and was getting a lot of overshoot which I couldn't seem to correct, plus it seemed to flip between extremes. I tried tuning things by experimenting, but I didn't get far. Eventually I asked chat GPT for help, and it proposed doing something interesting to the PID, namely, only enable the "I" portion when it's within a few degrees of target. Don't know why. Also it made quite a few modifications, to sort out some inconsistencies I had concerning the ranges of values I was expecting to use for the inputs and the PWM range I wanted. I'll tidy up the code and post it, since currently there are two PIDs in parallel, the one where I'd been experimenting, and the one proposed by ChatGPT, and it's confusing until I delete the old one.

    Here's a run of 11 minutes, the initial set temperature was 45 degC, and then I moved the potentiometer to 55 degC. The vertical axis shows the temperature (blue is potentiometer, orange is thermistor), and the horizontal axis shows sample number, but basically it is about 11 minutes 20 seconds across the chart.

    As can be seen from the orange line, there is some oscillation, but it's not more than about 1.5 degrees C, and then it does dampen down. You can see it takes several minutes to dampen down fully, but doesn't seem too bad.

    The little glitches in the ADC measurements only seem to be from the thermistor measurement, not the potentiometer, so I'm not sure what to make of that. Maybe it's just the bad prototyping, and might disappear if it were done properly on a PCB.

    image

    In summary, all the little modules of code all fitted together, and  I think it's all functioning, but I still need to test at a much higher temperature like 150 degC. Plus I need to refresh myself on Excel, and make a more decent chart with time in minutes on the x-axis.

    I think we managed a lot.. within a week or two, a whole load of integrated peripherals on the MSPM0 chip were used to pull this project together!

    I'm really looking forward to assembling this on a PCB.

    • Cancel
    • Vote Up 0 Vote Down
    • Sign in to reply
    • More
    • Cancel
  • Jan Cumps
    Jan Cumps 4 months ago in reply to shabaz

    > The little glitches in the ADC measurements only seem to be from the thermistor measurement

    If the thermistor needs buffering, that's possible. The output of the internal general purpose opamp (GPAMP) can be routed to an ADC channel.
    And if you're looking for a pure buffer, no opamp feedback resistor needed. That can be set in firmware.

    image

    • Cancel
    • Vote Up 0 Vote Down
    • Sign in to reply
    • More
    • Cancel
Comment
  • Jan Cumps
    Jan Cumps 4 months ago in reply to shabaz

    > The little glitches in the ADC measurements only seem to be from the thermistor measurement

    If the thermistor needs buffering, that's possible. The output of the internal general purpose opamp (GPAMP) can be routed to an ADC channel.
    And if you're looking for a pure buffer, no opamp feedback resistor needed. That can be set in firmware.

    image

    • Cancel
    • Vote Up 0 Vote Down
    • Sign in to reply
    • More
    • Cancel
Children
  • Jan Cumps
    Jan Cumps 4 months ago in reply to Jan Cumps

    how that GPAMP can be configured:

    image

    Technical Reference Manual

    • Cancel
    • Vote Up 0 Vote Down
    • Sign in to reply
    • More
    • Cancel
  • shabaz
    shabaz 4 months ago in reply to Jan Cumps

    That solved it : )

    This is the result, zoomed-in, the visible noise on the chart is approx +- 0.1 degC, no large excursions any more.

    image

    GPAMP config I used (this needs the blue LED, LED2 removed as you've mentioned in another post, to get access to the non-inverting input):

    image

    The "Mode 2" in the screenshot above indicates rail-to-rail mode (needed since the input is very close to the rail at the lower temperatures).

    The ADC config was then modified to reroute it's input to Channel 14, which is the op-amp (as shown in thre ADC0 Channel Mapping table in your screenshot earlier).

    image

    No application code changes, it was rebuilt and it worked.

    • Cancel
    • Vote Up 0 Vote Down
    • Sign in to reply
    • More
    • Cancel
element14 Community

element14 is the first online community specifically for engineers. Connect with your peers and get expert answers to your questions.

  • Members
  • Learn
  • Technologies
  • Challenges & Projects
  • Products
  • Store
  • About Us
  • Feedback & Support
  • FAQs
  • Terms of Use
  • Privacy Policy
  • Legal and Copyright Notices
  • Sitemap
  • Cookies

An Avnet Company © 2026 Premier Farnell Limited. All Rights Reserved.

Premier Farnell Ltd, registered in England and Wales (no 00876412), registered office: Farnell House, Forge Lane, Leeds LS12 2NE.

ICP 备案号 10220084.

Follow element14

  • X
  • Facebook
  • linkedin
  • YouTube