


The port of the MBED InterruptIn is complete.
In this blog you can see the internals of this class and how to set up configuration and handling.
My port is for a Hercules TMS570LC43. I use the HAL utility and api for that controller where possible. |
The MBED InterruptIn class allows you to handle interrupts with objects. You can set what object and what method of that object gets called when the interrupt fires.
The SemTech SX1276 LoRa library uses the InterruptIn class to handle the digital signals DIO0 -> DIO5.

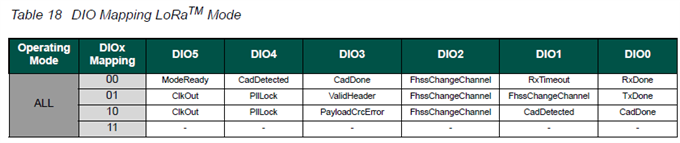
The pins DIO0 to 5 are used by the radio to flag changes within the system. These are configurable.
In the example that comes with the SX1276 shield, the first line in the below table is used.
DIO0 switching from high to low flags thet receiving is finished, etc ...
Each of the six pins have unique flagging function and the SX1276 library handles them in an object oriented way.
(note: Pin DIO5 is ignored in this example. There's a handler that's never called. Interrupts are not generated for it.
How does MBED and the SemTech example do this?
The library has a class that abstracts the SemTech chip, called SM1276.
This class has a method for each of the 6 digital signals.
void SX1276::OnDio0Irq( void ) {
// ...
}

void SX1276::OnDio1Irq( void ) {
// ...
}


void SX1276::OnDio2Irq( void ) {
// ...
}


void SX1276::OnDio3Irq( void )
{
    switch( this->settings.Modem )
    {
    case MODEM_FSK:
        break;
    case MODEM_LORA:
        if( ( Read( REG_LR_IRQFLAGS ) & RFLR_IRQFLAGS_CADDETECTED ) == RFLR_IRQFLAGS_CADDETECTED )
        {
            // Clear Irq
            Write( REG_LR_IRQFLAGS, RFLR_IRQFLAGS_CADDETECTED | RFLR_IRQFLAGS_CADDONE );
            if( ( this->RadioEvents != nullptr ) && ( this->RadioEvents->CadDone != nullptr ) )
            {
                this->RadioEvents->CadDone( true );
            }
        }
        else
        {
            // Clear Irq
            Write( REG_LR_IRQFLAGS, RFLR_IRQFLAGS_CADDONE );
            if( ( this->RadioEvents != nullptr ) && ( this->RadioEvents->CadDone != nullptr ) )
            {
                this->RadioEvents->CadDone( false );
            }
        }
        break;
    default:
        break;
    }
}


void SX1276::OnDio4Irq( void )
{
    switch( this->settings.Modem )
    {
    case MODEM_FSK:
        {
            if( this->settings.FskPacketHandler.PreambleDetected == false )
            {
                this->settings.FskPacketHandler.PreambleDetected = true;
            }
        }
        break;
    case MODEM_LORA:
        break;
    default:
        break;
    }
}


void SX1276::OnDio5Irq( void )
{
// ...
}
The 6 SX1276 DIO pins are connected to 6 gpio pins of the Hercules. I have to choose pins that support interrupts for the first 5.
The SX1276 class defines the logic for the handlers.
SX1276::SX1276( RadioEvents_t *events,
                PinName mosi, PinName miso, PinName sclk, PinName nss, PinName reset,
                PinName dio0, PinName dio1, PinName dio2, PinName dio3, PinName dio4, PinName dio5 )
            :   Radio( events ),
                spi( mosi, miso, sclk ),
                nss( nss ),
                reset( reset ),
                dio0( dio0 ), dio1( dio1 ), dio2( dio2 ), dio3( dio3 ), dio4( dio4 ), dio5( dio5 ),
                isRadioActive( false )
{

// ...
    this->dioIrq = new DioIrqHandler[6];

    this->dioIrq[0] = &SX1276::OnDio0Irq;
    this->dioIrq[1] = &SX1276::OnDio1Irq;
    this->dioIrq[2] = &SX1276::OnDio2Irq;
    this->dioIrq[3] = &SX1276::OnDio3Irq;
    this->dioIrq[4] = &SX1276::OnDio4Irq;
    this->dioIrq[5] = nullptr;

    this->settings.State = RF_IDLE;
}

// ..
The SX1276 class has data members for these interrupts.
class SX1276 : public Radio
{
protected:
// ...
    InterruptIn dio0;
    InterruptIn dio1;
    InterruptIn dio2;
    InterruptIn dio3;
    InterruptIn dio4;
    DigitalIn dio5;
// ...
In the class that represents the evaluation board (a subclass of the SX1276 class) the hardware specific things are done,
like assigning the hardware pins and set rise time triggers.
SX1276MB1xAS::SX1276MB1xAS( RadioEvents_t *events ) :   SX1276( events, D11, D12, D13, D10, A0, D2, D3, D4, D5, D8, D9 ),
                            AntSwitch( A4 ),
                            Fake( A3 ) {
// ...
    IoIrqInit( dioIrq );
// ...
}

void SX1276MB1xAS::IoIrqInit( DioIrqHandler *irqHandlers ) {
// ...

    dio0.rise( mbed::callback( this, static_cast< TriggerMB1xAS > ( irqHandlers[0] ) ) );
    dio1.rise( mbed::callback( this, static_cast< TriggerMB1xAS > ( irqHandlers[1] ) ) );
    dio2.rise( mbed::callback( this, static_cast< TriggerMB1xAS > ( irqHandlers[2] ) ) );
    dio3.rise( mbed::callback( this, static_cast< TriggerMB1xAS > ( irqHandlers[3] ) ) );
    dio4.rise( mbed::callback( this, static_cast< TriggerMB1xAS > ( irqHandlers[4] ) ) );
}
The effect of all this is that we have the pins defined and have defined the object and method that will be called in rising edge.
The Port for InterruptIn
I was able to keep the InterruptIn class device independent. I just had to provide gpio_api and gpio_irq_api functions specific to the Hercules.
I'm highlighting a few of those below.
uint32_t uInts = 0U;

typedef struct {
  uint64_t pin;
  gpio_irq_t *obj;
  gpio_irq_handler handler;
  uint32_t id;
} irqarray;

static irqarray __irq_ids [MAXINTERRUPTS] = {0};

int gpio_irq_init(gpio_irq_t *obj, PinName pin, gpio_irq_handler handler, uint32_t id)
{
  if (pin == NC) {
    return -1;
  }
  __irq_ids[uInts].pin = pin;
  __irq_ids[uInts].obj = obj;
  __irq_ids[uInts].handler = handler;
  __irq_ids[uInts].id = id;
  uInts++;
  return 0;
}

void gpio_irq_set(gpio_irq_t *obj, gpio_irq_event event, uint32_t enable) {
  // Hercules: not applicable, done in HALCoGen, if this is constant throughout the run
  // when you want to change this in runtime, implementation is needed
}

void interruptfired(uint32_t port, uint32_t bit, uint32_t edge) {
  uint64_t pin = port;
  pin = pin << 32;
  pin = pin |= bit;

  uint32_t i;
  bool  bFound = false;
  for (i = 0; i < uInts; i++) {
    if(pin == __irq_ids[i].pin) {
      bFound = true;
      break;  // found, no need to continue
    }
  }
  if (bFound) {
    gpio_irq_event derivedEdge = edge ? IRQ_RISE : IRQ_FALL;
    __irq_ids[i].handler(__irq_ids[i].id, derivedEdge);
  }
  return;
}
Here's how I defined them in the Hercules specific HAL configuration utility HALCoGen:
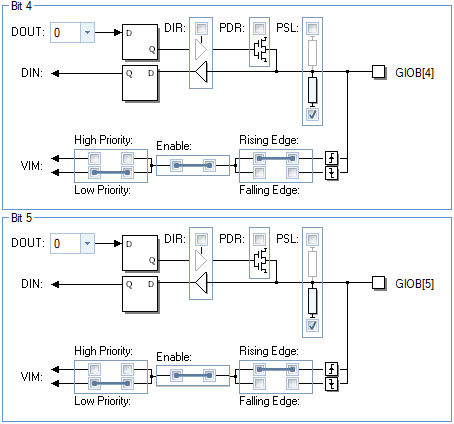
and
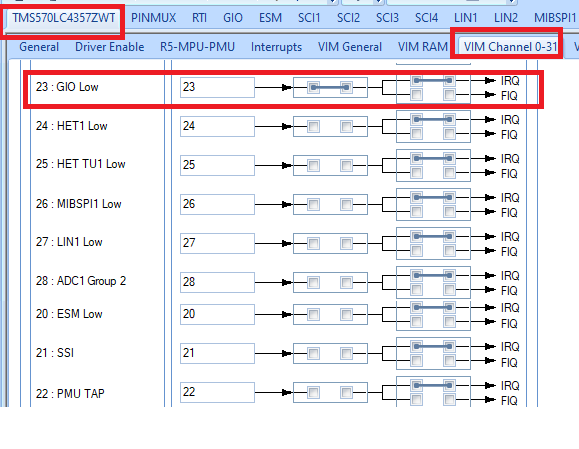
The effect of this configuration (Hercules specific) is that a low level handler (a single one, called for any of the pins) will be called on the rising edge of these pins.
I implemented it as below. It will call the function I created in my port interruptfired(), documented above) that will act as bridge between HALCoGen's low level API and the higher level C++ objects.
void gioNotification(gioPORT_t *port, uint32 bit) {
  uint32 bitInNotificationRegister = bit;
  if(port == gioPORTB) {
    bitInNotificationRegister += 8;
  }
  uint32 edge = (gioREG->POL >> bitInNotificationRegister) & 1U;
  interruptfired((uint32_t)port, bit, edge);
}
The first part of the code inspects the Hercules registers to find out if the trigger cause was a rising edge or falling edge event.
Then it calls my bridge function with the port, pin and the edge info.
Result
The result of an interrupt firing can be seen in the stack trace below.
In this example, the pin DIO0 lipped from low to high.
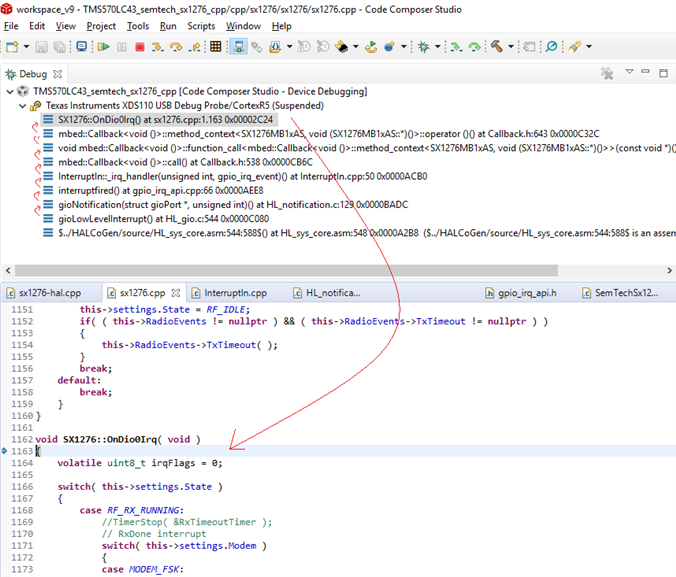
From bottom to top, the first 3 functions in the stack are from the Hercules low level HALCoGen layer.
Level 0: An assembler function (that I did not write  - it's generated by the utility) that looks in the interrupt table and calls the low low level handler.
Level 1: That low low level handler does some bookkeeping that's not supposed to be altered, then calls the user changeable handler gioNotification().
Level 3: In this handler (documented above) I query the edge that triggered the interrupt and hand over to my ported MBED interrupt code.
Level 4: My bridge function looks up which handler reference is linked to this pin and edge.
Level 5 and above: This is the default MBED ported code that will then call the method of the correct object. In this case the OnDio0Irq() method of my radio object.
It's easier to understand this by looking at the full code (the MBED code is published on Github, I will upload my port together with the SX1276 example when it works).
Explaining it is harder.
If there's a part of the mechanism that you want to dig into, just ask.
