element14 Community
element14 Community
    Register Log In
  • Site
  • Search
  • Log In Register
  • Community Hub
    Community Hub
    • What's New on element14
    • Feedback and Support
    • Benefits of Membership
    • Personal Blogs
    • Members Area
    • Achievement Levels
  • Learn
    Learn
    • Ask an Expert
    • eBooks
    • element14 presents
    • Learning Center
    • Tech Spotlight
    • STEM Academy
    • Webinars, Training and Events
    • Learning Groups
  • Technologies
    Technologies
    • 3D Printing
    • FPGA
    • Industrial Automation
    • Internet of Things
    • Power & Energy
    • Sensors
    • Technology Groups
  • Challenges & Projects
    Challenges & Projects
    • Design Challenges
    • element14 presents Projects
    • Project14
    • Arduino Projects
    • Raspberry Pi Projects
    • Project Groups
  • Products
    Products
    • Arduino
    • Avnet Boards Community
    • Dev Tools
    • Manufacturers
    • Multicomp Pro
    • Product Groups
    • Raspberry Pi
    • RoadTests & Reviews
  • Store
    Store
    • Visit Your Store
    • Choose another store...
      • Europe
      •  Austria (German)
      •  Belgium (Dutch, French)
      •  Bulgaria (Bulgarian)
      •  Czech Republic (Czech)
      •  Denmark (Danish)
      •  Estonia (Estonian)
      •  Finland (Finnish)
      •  France (French)
      •  Germany (German)
      •  Hungary (Hungarian)
      •  Ireland
      •  Israel
      •  Italy (Italian)
      •  Latvia (Latvian)
      •  
      •  Lithuania (Lithuanian)
      •  Netherlands (Dutch)
      •  Norway (Norwegian)
      •  Poland (Polish)
      •  Portugal (Portuguese)
      •  Romania (Romanian)
      •  Russia (Russian)
      •  Slovakia (Slovak)
      •  Slovenia (Slovenian)
      •  Spain (Spanish)
      •  Sweden (Swedish)
      •  Switzerland(German, French)
      •  Turkey (Turkish)
      •  United Kingdom
      • Asia Pacific
      •  Australia
      •  China
      •  Hong Kong
      •  India
      •  Korea (Korean)
      •  Malaysia
      •  New Zealand
      •  Philippines
      •  Singapore
      •  Taiwan
      •  Thailand (Thai)
      • Americas
      •  Brazil (Portuguese)
      •  Canada
      •  Mexico (Spanish)
      •  United States
      Can't find the country/region you're looking for? Visit our export site or find a local distributor.
  • Translate
  • Profile
  • Settings
Experts, Learning and Guidance
  • Technologies
  • More
Experts, Learning and Guidance
Ask an Expert Forum What is the correct replacement?
  • Blog
  • Forum
  • Documents
  • Leaderboard
  • Files
  • Members
  • Mentions
  • Sub-Groups
  • Tags
  • More
  • Cancel
  • New
Join Experts, Learning and Guidance to participate - click to join for free!
Actions
  • Share
  • More
  • Cancel
Forum Thread Details
  • State Verified Answer
  • Replies 19 replies
  • Answers 8 answers
  • Subscribers 280 subscribers
  • Views 2489 views
  • Users 0 members are here
  • thermal switch
  • dehydrator
Related
See a helpful answer?

Be sure to click 'more' and select 'suggest as answer'!

If you're the thread creator, be sure to click 'more' then 'Verify as Answer'!

What is the correct replacement?

hafcanadian
hafcanadian over 6 years ago

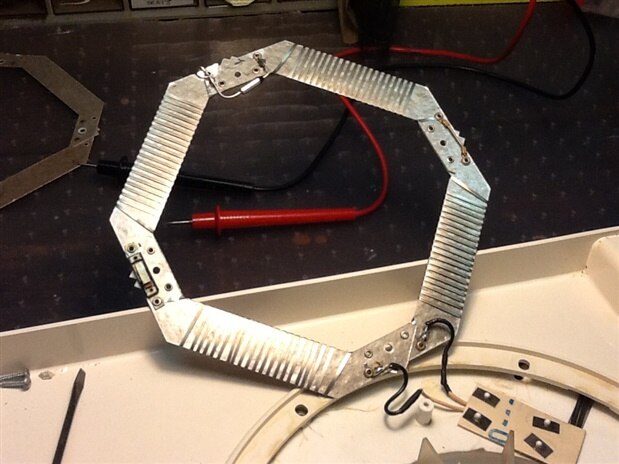
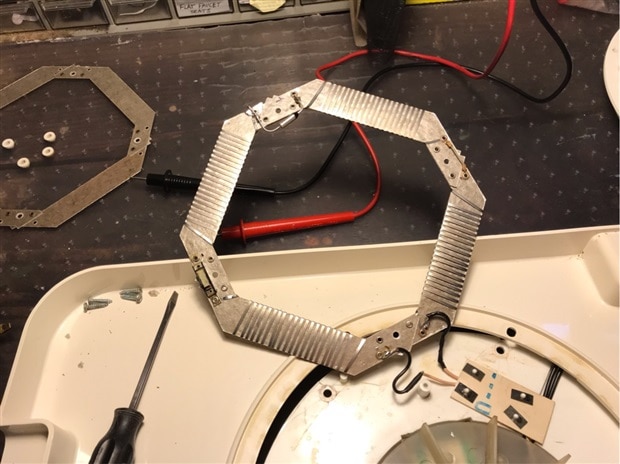
The thermal fuse on our old Magic Aire II dehydrator failed.  I ordered and installed what appeared to be a correct replacement, and did some soldering to reinforce and repair some connections on the heater board.  All original connections were rivets, so I don't know if solder will survive but am trying to save the device.


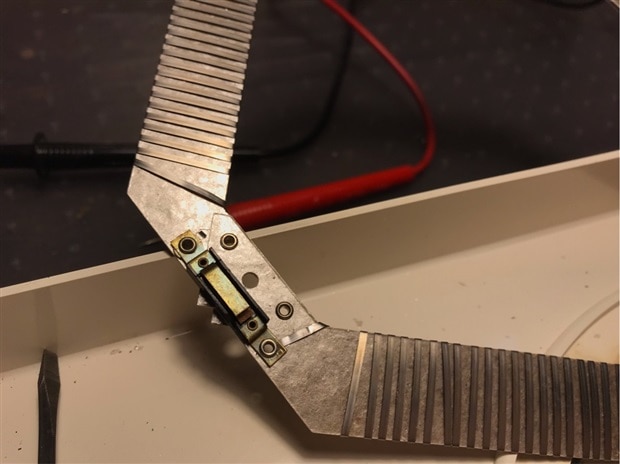
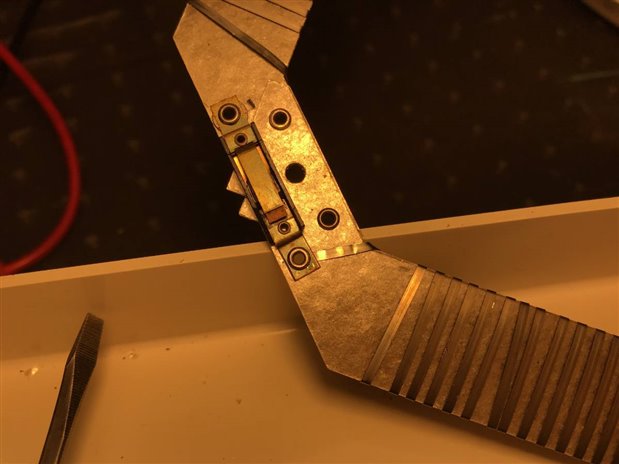
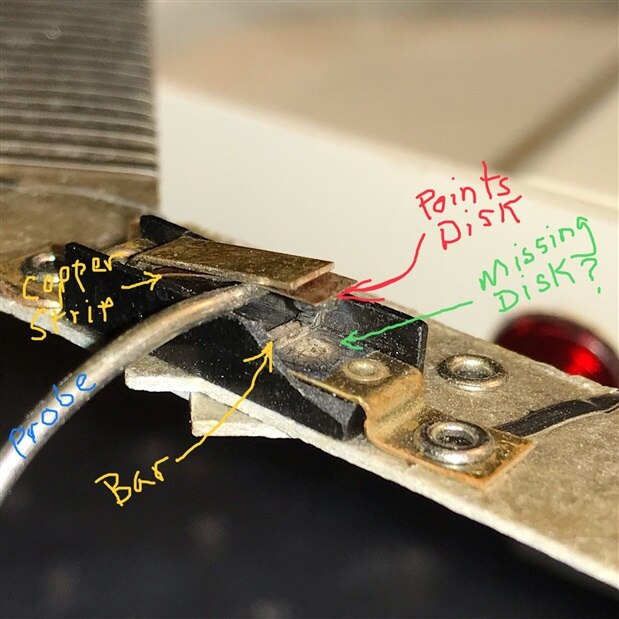
Everything seems to work except there's still no heat.  The one bad component yet seems to be a switch of some sort built into the heater circuit.  It is rectangular black, riveted to the board (asbestos(?) ring) with heat bands contacting the rivets, with brass connection arms in between, and a copper tongue inside that may have points on it, it's too hard to see very well inside.  Another dark blade is loose inside and I cannot tell how it fits, nor maneuver it very easily.  The switch is one and a quarter inch long overall and a quarter inch wide.


Is it a thermal switch of some sort, to keep the heater from getting too hot?  Perhaps it's failure caused the thermal fuse to fail?  After the time and effort so far, I'd like to see if I can get a replacement switch and probably a couple new rivets for it, since I'll try to drill out the old ones without destroying the fragile asbestos(?) board.  Or has my resurrection effort all been a waste of time?  There's a lot of extra trays and other accessories we've bought over the years for it... not crazy about tossing it all if I don't have to.  A new one is $120 and just the base unit is $90.


Thanks for any advice.


image

  • Sign in to reply
  • Cancel

Top Replies

  • hafcanadian
    hafcanadian over 6 years ago in reply to jw0752 +4 suggested
    Note where I had to notch out the end so it straddled the rivet hole and screw, and add a wide washer for the lower screw to effectively clamp the cutout. This particular device was 2mm shorter than the…
  • jw0752
    jw0752 over 6 years ago +3 suggested
    Hi Joel, I could not get your pictures to load. Try replying to your own post and use the picture icon on the tool bar to insert your pictures into the text. In my experience the thermal fuses blow for…
  • jw0752
    jw0752 over 6 years ago in reply to hafcanadian +3 suggested
    Hi Joel, The pictured switch is the Auto Setting thermal cut out. It will open up if the element gets too hot due to lack of air flow and automatically close again when it cools down.. It should test with…
  • jw0752
    0 jw0752 over 6 years ago

    Hi Joel,


    I could not get your pictures to load. Try replying to your own post and use the picture icon on the tool bar to insert your pictures into the text. In my experience the thermal fuses blow for two reasons. First of all if there is an over heat situation and the second is if their leads do not have a good mechanical connection (Rivets) A bad connection produces heat and this travels up the wires and fuses the thermal link. Typically there are three ways to break the circuit. #1 is the thermostat which controls the temperature. The back up for this is usually a self resetting thermal cut out and the final protection is a thermal fuse. If the part you describe is the thermal cut out its failure could have caused the unit to over heat and take out the thermal fuse. Soldering will not usually work as the heat will eventually cause the solder to crystallize and make a bad connection. It is probably too late but the best way is to cut the original thermal fuse leads and use metal crimp splices to hook the new thermal fuse to the old leads. I look forward to seeing your pictures. While I have never worked on a dehydrator it sounds very similar to some of the dental lab heaters and sterilizers that I used to work on.


    John

    • Cancel
    • Vote Up +3 Vote Down
    • Sign in to reply
    • Verify Answer
    • Reject Answer
    • Cancel
  • hafcanadian
    0 hafcanadian over 6 years ago

    image

    • Cancel
    • Vote Up +1 Vote Down
    • Sign in to reply
    • Verify Answer
    • Cancel
  • hafcanadian
    0 hafcanadian over 6 years ago in reply to hafcanadian

    image

    • Cancel
    • Vote Up +2 Vote Down
    • Sign in to reply
    • Verify Answer
    • Cancel
  • jw0752
    0 jw0752 over 6 years ago in reply to hafcanadian

    Hi Joel, The pictured switch is the Auto Setting thermal cut out. It will open up if the element gets too hot due to lack of air flow and automatically close again when it cools down.. It should test with low ohms when it is cool all the way up to cut off temperature. Unless you know what you are doing do not try to test it with power applied. I would suspect clogged filters or fan problems if this were cutting out during use. The thermostat sensor is probably located in the air passage somewhere. You have already located the thermal fuse which may be close to the thermal cut out or at least somewhere near the heater. The material that you are dealing with in the picture is Mica as opposed to asbestos.


    John

    • Cancel
    • Vote Up +3 Vote Down
    • Sign in to reply
    • Verify Answer
    • Reject Answer
    • Cancel
  • crystalray9
    0 crystalray9 over 6 years ago in reply to jw0752

    try a magnet in where on opposite said of the coils

    • Cancel
    • Vote Up +1 Vote Down
    • Sign in to reply
    • Verify Answer
    • Cancel
  • jw0752
    0 jw0752 over 6 years ago in reply to crystalray9

    Hi Crystal,

    Thank you for your input. Can you give me more information on your idea. I do not see a connection between magnetism and Joel's problem as described.

    John

    • Cancel
    • Vote Up +1 Vote Down
    • Sign in to reply
    • Verify Answer
    • Cancel
  • hafcanadian
    0 hafcanadian over 6 years ago in reply to jw0752

    Not sure how a magnet would factor into this... it is not a motor coil.


    In the original post’s photo you can see the entire heat ring made of mica, not asbestos (thanks John).  To the cutout’s right along the ring is the power source connections, to its left and up around the ring is the thermal fuse (which I carefully soldered in using multiple heat sinks so the fuse is still contiguous), and directly across the ring from the cutout is a simple copper? wire jumper bridge.image


    Attached below find (hopefully) a closeup of the cutout.  A probe is seen holding the copper strip up so the contact points disk can be seen attached to it underneath.  In my experience points come in pairs, but no twin disk is seen on the brass bottom section.


    My take now is that a point set here is normally closed allowing continuity through the heater unit.  The dark metal strip buried deep inside may be a heat spring material designed to change when overheated and pry the points apart until things cool to an acceptable temp.  There is some sort of short and narrow raised bar transversing the bottom brass behind where a disk would be if it wasn’t missing.  The bar appears made of cast material like a disk is.  Perhaps one end of the spring strip is supposed to ride on that, supporting the copper strip, I don’t know.  Regardless, the spring strip (if that’s what it is) seems to be laying loose on the “floor” of the cutout behind the bar.


    My reasoning is that the unit won’t heat because the cutout has a missing contact disk and the dark metal strip is mispositioned somehow.  That is why I was asking if a replacement cutout could be found.  But it hinges on my interpretation of the device’s construction being in the ball park.  Not being familiar with such things, I have to guess at how they are supposed to look vs. what I’m seeing now.  Perhaps there’s not supposed to be a second disk, and the bar serves to support the copper strip behind.  Maybe my trying to probe in there just deformed the copper strip so it no longer lays down where it should.


    i think the closest modern device might be a TH21?   GVZ Components - KlixonRegistered TH11, TH21


      image

    • Cancel
    • Vote Up +3 Vote Down
    • Sign in to reply
    • Verify Answer
    • Reject Answer
    • Cancel
  • jw0752
    0 jw0752 over 6 years ago in reply to hafcanadian

    Hi Joel,

    You definitely need to replace the cut out. Unless there is another sensor for a thermostat it is possible that it was being used as a thermostat. Are there any temperatures marked on it?

    John

    • Cancel
    • Vote Up +1 Vote Down
    • Sign in to reply
    • Verify Answer
    • Reject Answer
    • Cancel
  • jw0752
    0 jw0752 over 6 years ago

    Hi Joel,

    I found this switch on ebay that cuts out at 105C. I do not know if this is going to work but it is the closest replacement that I have seen. If you have to replace rivets do it with screws, washers and nuts as this will make a good connection that is not susceptible to heat failure like solder is.


    https://www.ebay.com/itm/Bimetalic-Switch-Thermostat-Over-Temperature-Switch-221-Deg-F-in-USA/172517131295?hash=item282ad2841f:g:bkIAAOSwnHZYl5Px


    John

    • Cancel
    • Vote Up +2 Vote Down
    • Sign in to reply
    • Verify Answer
    • Reject Answer
    • Cancel
  • hafcanadian
    0 hafcanadian over 6 years ago in reply to jw0752

    I was considering getting a Klixon TH21 but now believe from its specs and description at carbonbrush.com that it doesn’t self-reset.  It’s dimensions are exactly the same as the old one’s, and it’s 20v, but each time it got hot enough to pop it’s points I’d have to shut the unit off and on to get them to close again and keep heat to the dehydrator.  When you let the unit run overnight that’s not going to be particularly convenient, and unless checked often you wouldn’t know when the heat was off because you hear the fan running regardless.  I’ve sent an email to carbonbrush.com inquiring as to a proper replacement “thermostat”.  No, I can see no identifying writing on the faulty cutout, but it may be on the underside, which cutting it off the board might reveal.


    John, re your comments on heat and solder, I didn’t think of using crimp connectors on the thermal fuse and power source repairs I made.  I’ve believed since my 30’s that solder joints are more complete contact-wise than manual crimping.  Before than I crimped most wiring, but they often loosened or corroded.  I originally tried prying open the eyelet-wire connectors on the mica board, but they didn’t cooperate and I only damaged the mica board in the process.  So I opted to solder wires to the crimps, kind of in iffy solution.  I may desolder them all and see if I can get crimp connectors to fit both over the crimp on one end and smaller wire on the other.  The crimps I have are different sizes of automotive-type;  hopefully they’d suffice, or are their some better suited for higher voltage alternating current?


    Rather than try drilling out the holddown/contact rivets and look for new ones, probably destroying the mica board in the process of replacing them, my thoughts go to cutting off the brass ends of the cutout with my Drexel to remove it, leaving the rivets and their crimps to the heater coil ends intact.  Then simply placing the replacement cutout’s holed ends over the rivets and bolting them down to the board with small brass nuts and screws through the rivet holes.  Is that a plausible idea?

    • Cancel
    • Vote Up +1 Vote Down
    • Sign in to reply
    • Verify Answer
    • Cancel
>
element14 Community

element14 is the first online community specifically for engineers. Connect with your peers and get expert answers to your questions.

  • Members
  • Learn
  • Technologies
  • Challenges & Projects
  • Products
  • Store
  • About Us
  • Feedback & Support
  • FAQs
  • Terms of Use
  • Privacy Policy
  • Legal and Copyright Notices
  • Sitemap
  • Cookies

An Avnet Company © 2025 Premier Farnell Limited. All Rights Reserved.

Premier Farnell Ltd, registered in England and Wales (no 00876412), registered office: Farnell House, Forge Lane, Leeds LS12 2NE.

ICP 备案号 10220084.

Follow element14

  • X
  • Facebook
  • linkedin
  • YouTube