


This blog is part of a series of blogs which describe the development steps for an in-depth project tutorial.
This part of the tutorial describes how to perform final installation and execution of the custom Kria app.

Booting and Login
During first boot, you will be prompted for login credentials.
Start by login in as “petalinux” user, and specify “root” as password.
Next, switch to the “root” user, as shown below:
xilinx-k26-starterkit-2021_1 login: petalinux
You are required to change your password immediately (administrator enforced)
New password:
Retype new password:
xilinx-k26-starterkit-2021_1:~$ sudo su -l root
We trust you have received the usual lecture from the local System
Administrator. It usually boils down to these three things:
#1) Respect the privacy of others.
#2) Think before you type.
#3) With great power comes great responsibility.
Password:
Updating the KV260 Firmware (optional)
If the SD card image does not boot, you may need to update the KV26 boot firmware (BOOT.BIN), as described in the following wiki page:
Run-time Installation
After first boot, the following components need to be installed on the system:
- Install rpm packages
Before installing the rpm packages, the ext4 partition needs to be extended with the following commands:
# parted /dev/mmcblk1 resizepart 2
Warning: Partition /dev/mmcblk1p2 is being used. Are you sure you want to continue?
Yes/No? yes
End? [6442MB]? 100%
Information: You may need to update /etc/fstab.
# resize2fs /dev/mmcblk1p2
resize2fs 1.45.6 (20-Mar-2020)
Filesystem at /dev/mmcblk1p2 is mounted on /; on-line resizing required
old_desc_blocks = 1, new_desc_blocks = 4
The filesystem on /dev/mmcblk1p2 is now 7267455 (4k) blocks long.
#
To install the rpm packages, perform the following commands:
# cd ~/kv260-vvas-sms-2021-1/rpm
# dnf install kv260-vvas-sms-1.0-r0.0.zynqmp_generic.rpm
# dnf install kv260-vvas-sms-models-1.0-r0.0.cortexa72-cortexa53.rpm
# dnf install kv260-vvas-sms-app-1.0-r0.0.cortexa72-cortexa53.rpm
# dnf install packagegroup-kv260-vvas-sms-1.0-r0.0.noarch.rpm
This will take a significant amount of time, as several hundreds (900+) of dependencies will be installed.
Modify the contents of the /etc/vart.conf file:
# echo firmware: /lib/firmware/xilinx/kv260-vvas-sms/kv260-vvas-sms.xclbin > /etc/vart.conf
Loading the Custom App
After each boot, the KV260 Vision AI starter kit will be running the default app:
- kv260-dp
This can be queried with the "xmutil listapps" command.
# xmutil listapps
Accelerator Base Type #slots Active_slot
kv260-dp kv260-dp XRT_FLAT 0 0,
kv260-vvas-sms kv260-vvas-sms XRT_FLAT 0 -1
Socket 9 closed by client
Before we can load our custom app, we first need to unload the kv260-dp app with the "xmutil unloadapp {app}" command:
# xmutil unloadapp kv260-dp
DFX-MGRD> daemon removing accel at slot 0
DFX-MGRD> Removing accel kv260-dp from slot 0
Accelerator successfully removed.
Socket 9 closed by client
# xmutil listapps
Accelerator Base Type #slots Active_slot
kv260-dp kv260-dp XRT_FLAT 0 -1
kv260-vvas-sms kv260-vvas-sms XRT_FLAT 0 -1
Socket 9 closed by client
We then load the custom app with the "xmutil loadapp {app}" command:
# xmutil loadapp kv260-vvas-sms
DFX-MGRD> daemon loading accel kv260-vvas-sms
DFX-MGRD> Successfully loaded base design.
Accelerator loaded to slot 0
Socket 6 closed by client
# xmutil listapps
Accelerator Base Type #slots Active_slot
kv260-dp kv260-dp XRT_FLAT 0 -1
kv260-vvas-sms kv260-vvas-sms XRT_FLAT 0 0,
Socket 9 closed by client
Launching the smart_model_select example
With the kv260-vvas-sms app loaded, we can run the smart_model_select example application.
The application is located in the "/opt/avnet/kv260-vvas-sms/app" directory:
# cd /opt/avnet/kv260-vvas-sms/app
First, we need to configure our monitor for 1080P resolution:
# source ./setup.sh
setting mode 1920x1080-60.00Hz on connectors 43, crtc 41
testing 1920x1080@NV12 overlay plane 39
[1]+ Stopped(SIGTTIN) modetest -M xlnx -s 43@41:1920x1080-60@AR24 -P 39@41:1920x1080@NV12 -w 40:alpha:0
This will display a diagonal color bar pattern on the monitor as show below:

With our monitor configured for 1080P resolution, we can launch the application:
# ./smart_model_select
############################################
################## WELCOME #################
############################################
DEBUG: Got the cmd: gst-launch-1.0 multifilesrc location=templates/welcome_1080.jpg ! \
jpegparse ! jpegdec ! \
queue ! fpsdisplaysink video-sink="kmssink driver-name=xlnx sync=false" text-overlay=false sync=false
Setting pipeline to PAUSED ...
Pipeline is PREROLLING ...
Pipeline is PREROLLED ...
Setting pipeline to PLAYING ...
New clock: GstSystemClock
XXXXXXXXXXXXXXXXXXXXXXXXXXXXXXXXXXXXXXXXXXXXXXXXXXXXXXXXXXXXX
Menu displayed on the monitor shows various options available
for input source, ML model, output sink. Each option carry an
index number along side.
Select elements to be used in the pipeline in the sequence of
"input source, ML model, output sink and performance
mode flag" seperated by commas.
eg: 1,1,3,0
Above input will run "filesrc" input, "resnet50" model
"kmssink" used as output sink and performance mode disabled.
Enter 'q' to exit
XXXXXXXXXXXXXXXXXXXXXXXXXXXXXXXXXXXXXXXXXXXXXXXXXXXXXXXXXXX
This will display the following image on the monitor, which only acts as a visual reference for the choices that can be made on the command line:
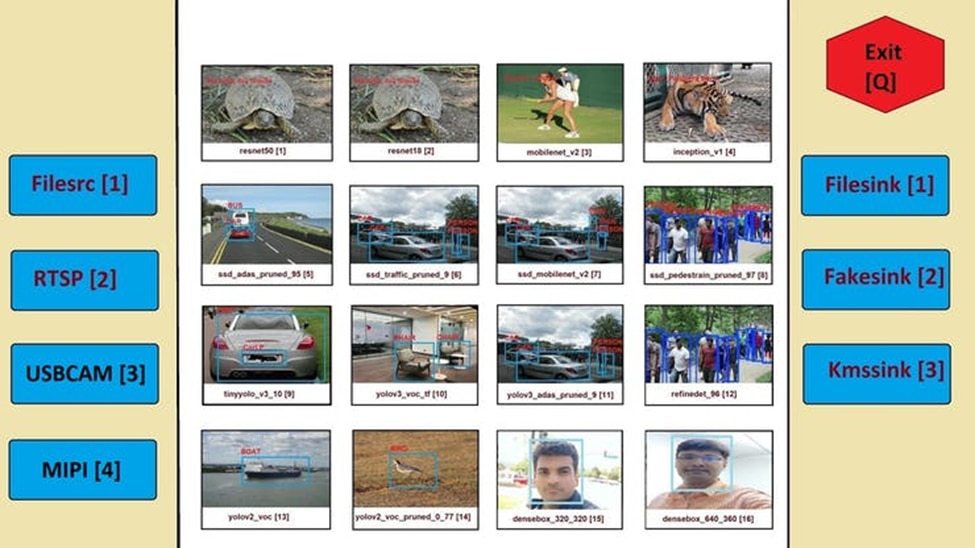
Note that the original image was modified to reflect the two additional input sources that were added to the application:
- USB camera
- MIPI sensor
Hardware Setup
The examples described below were performed with the following setup:

I do not have the very cool stand that was provided with some of the initial KV260 units, so simply placed the KV260 against the monitor.
In addition to the video files, I have the following two input sources connected to the board:
- USB camera - Logitech BRIO (with NV12 support)
- MIPI sensor - IAS AR1335 module (http://avnet.me/ias-ar1335-datasheet)
Running the application with video file input
The SD card image comes with the following video files pre-installed:
videos
├── CLASSIFICATION.mp4
├── FACEDETECT.mp4
├── REFINEDET.mp4
├── SSD.mp4
├── YOLOV2.mp4
└── YOLOV3.mp4
In order to apply a model to the video files, use the "1, #, 3, 0" syntax, where # is a value from 1-16, representing one of the supported models.
For example, to apply model #6 to a video file, launch the example as follows:
XXXXXXXXXXXXXXXXXXXXXXXXXXXXXXXXXXXXXXXXXXXXXXXXXXXXXXXXXXXXX
Menu displayed on the monitor shows various options available
for input source, ML model, output sink. Each option carry an
index number along side.
Select elements to be used in the pipeline in the sequence of
"input source, ML model, output sink and performance
mode flag" seperated by commas.
eg: 1,1,3,0
Above input will run "filesrc" input, "resnet50" model
"kmssink" used as output sink and performance mode disabled.
Enter 'q' to exit
XXXXXXXXXXXXXXXXXXXXXXXXXXXXXXXXXXXXXXXXXXXXXXXXXXXXXXXXXXX
1,6,3,0
...
>>>>> Enter any key to return to main menu <<<<<
The following animated image shows the expected output for this above example:
This launches the following GStreamer pipeline:

Running the application with USB camera input
In order to apply a model to a USB camera input, use the "3, #, 3, 0" syntax, where # is a value from 1-16, representing one of the supported models.
For example, to apply model #16 to the USB camera, launch the example as follows:
XXXXXXXXXXXXXXXXXXXXXXXXXXXXXXXXXXXXXXXXXXXXXXXXXXXXXXXXXXXXX
Menu displayed on the monitor shows various options available
for input source, ML model, output sink. Each option carry an
index number along side.
Select elements to be used in the pipeline in the sequence of
"input source, ML model, output sink and performance
mode flag" seperated by commas.
eg: 1,1,3,0
Above input will run "filesrc" input, "resnet50" model
"kmssink" used as output sink and performance mode disabled.
Enter 'q' to exit
XXXXXXXXXXXXXXXXXXXXXXXXXXXXXXXXXXXXXXXXXXXXXXXXXXXXXXXXXXX
3,16,3,0
...
>>>>> Enter any key to return to main menu <<<<<
The following animated image shows the expected output for this above example:
Note that for real-time execution, the USB camera must support NV12 format. For this reason, I recommend to use the following USB camera:
- Logitech BRIO

Other USB cameras that do not support NV12 format, will require software color space conversion, which will prevent achieving real-time performance.

It is possible to accelerate this conversion, but this is beyond the scope of this project.
NOTE : If you get a green screen after a certain period, I found that stopping and re-starting the example will resolve this issue.
Running the application with MIPI sensor input
In order to apply a model to the MIPI sensor input, use the "4, #, 3, 0" syntax, where # is a value from 1-16, representing one of the supported models.
For example, to apply model #14 to the MIPI sensor, launch the example as follows:
XXXXXXXXXXXXXXXXXXXXXXXXXXXXXXXXXXXXXXXXXXXXXXXXXXXXXXXXXXXXX
Menu displayed on the monitor shows various options available
for input source, ML model, output sink. Each option carry an
index number along side.
Select elements to be used in the pipeline in the sequence of
"input source, ML model, output sink and performance
mode flag" seperated by commas.
eg: 1,1,3,0
Above input will run "filesrc" input, "resnet50" model
"kmssink" used as output sink and performance mode disabled.
Enter 'q' to exit
XXXXXXXXXXXXXXXXXXXXXXXXXXXXXXXXXXXXXXXXXXXXXXXXXXXXXXXXXXX
4,14,3,0
...
>>>>> Enter any key to return to main menu <<<<<
The following animated image shows the expected output for this above example:
This example launches the following GStreamer pipeline:

Deployment Fow
Using the pre-built package that we created in the previous sections, we can also deploy our custom Kria app, like any other Kria app, as shown below.
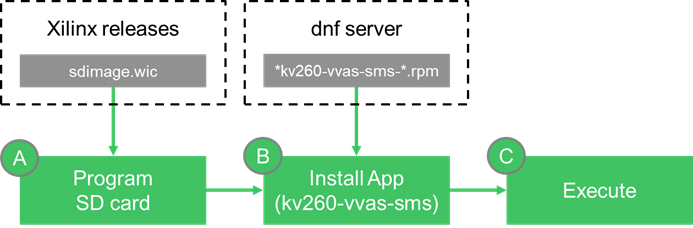
Recall that we created rpm packages for our custom Kria app:
- kv260-vvas-sms
- kv260-vvas-sms-models
- kv260-vvas-sms-app
- packagegroup-kv260-vvas-sms
These rpm packages would have to be hosted to a server, and their location specified the /etc/yum.repos.d/*.repo
This has not been completed for this project tutorial, but may be in the near future 
Next Steps
The following blogs cover the previous development steps for this in-depth project tutorial.