


Zynq controllers can run Linux.
Xilinx uses Vitis - an Eclipse derivate - as the development platform for the ARM part of the Zynq.
We'll use it to build - and debug! - a native Linux program.
Vitis knows how to program for the ARM processors (all Zynq types) and controllers (UltraScale only) inside the Zynq.
It also knows how to program for MicroBlaze controllers you generate inside your FPGA fabric.
It can build apps that target bare metal, RTOS and Linux. It can also build a Linux SD Card image for your design.
In my case, where I'm running PYNQ on my Zynq board, there is already an OS and SD Card. I'll use Vitis to generate a Linux executable.
Prerequisites
Except for the Xilinx development environments Vivado and Vitis, you'll need a Zynq hardware design (this is your Vivado project), a petalinux sysroot (more later) and a Linux host to build the sysroot.
I'm using PYNQ 2.7. That defines what version of the tools you should use:
- Vivado and Vitis 2020.2
- petalinux sysroot 2020.2
- a Vivado design for your board, exported via File -> Export Hardware
The petalinux sysroot is something you have to build yourself. It's not difficult.
petalinux sysroot
Download, configure an build part A
It has to be done on a Linux host. Because my development PC is a Windows 10 laptop, I used the Windows Linux Subsystem to host an Ubuntu 16.04.
I followed these instructions, up until the pentalinux configuration steps: Petalinux on Windows (via WSL and Git).
I downloaded the petalinux version that matches my PYNQ distro. Where needed, I replaced Thom's commands with petalinux-v2020.2-final-installer.run.
I stopped at Step 6, because I wanted to use a different how-to from that moment on.
Configure and build part B
I used Xilinx steps to actually build the sysroot .
For my first project, that just wants to check if I can create a "Linux/ARM A9" native Hello World executable, the sysroot should be enough.
So I only did the Linux Image part of that how-to.
Vitis Linux Platform and Application Project
Once the sysroot is made and available to Vitis, we can start making a project.
I will finetune this in future articles, once I start using FPGA fabric blocks. For now, my goal is to get the program to run and log something to the console.
Platform Project
To get started, create a New Platform Project. Select the hardware design you built and exported from Vivado.
Select Linux as OS, and your rootfs that you made before.

That's it for the platform. You don't need more at this point in time.
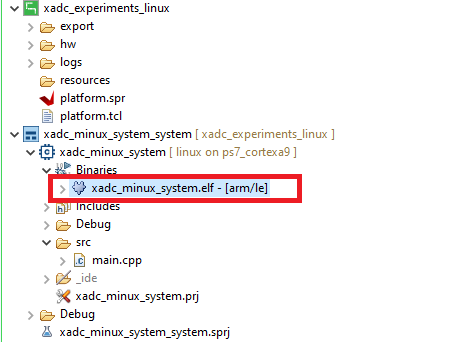
Application Project
This is the project for your application.
Create a New Application Project. Select Hello World.
Build it. You will now have an executable in your Debug folder.
You can move this binary to your PYNQ board, make it executable (chmod +x <your binary>) and run it:

Debug in Vitis
You can interactively load and debug the program, while you're developing.
Vitis will run on your development PC, but the program will be loaded, started and remotely debugged on the ZYNQ device.
We're using GDB and GDB Server for that. The server is already installed on your PYNQ. It comes with the OS.
Watchout: PYNQ 2.7, based on petalinux 2020.2/Ubuntu 20, comes with GDBSERVER 9.1.
The Vitis GCC comes with version 8.1 of the GDB client. They don't work together.
I installed Linaro gcc-arm-9.2-2019.12-mingw-w64-i686-arm-none-linux-gnueabihf on my development PC, and used its GDB client for debugging the PYNQ.
| PYNQ GDBSERVER version | Vitis GDB client version |
|
|
 |

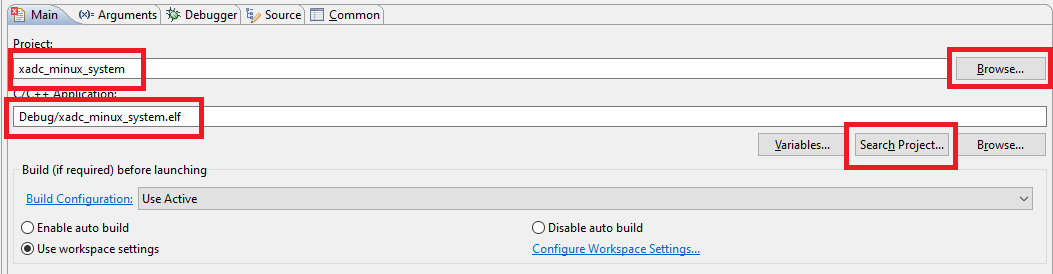
Set up Debug Launch Configuration.
Select the Platform Project root, right click, then select Debug As -> Debug Configurations.
Remove Filter Configuration Types. Vitis by default does not show Remote Application.
Select Remote Application, and click New Launch Configuration
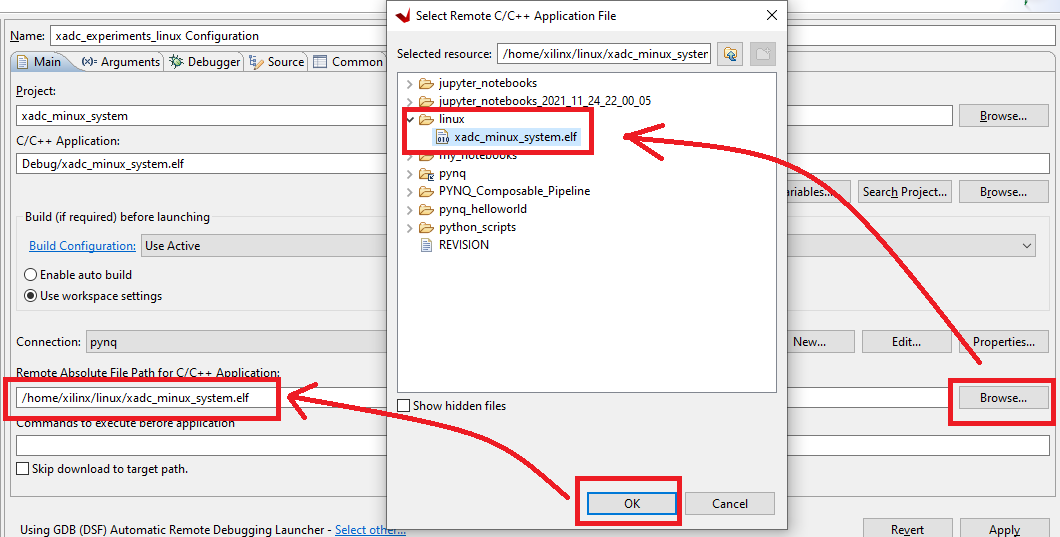
Select the Application Project, then Executable, via the Browse and Search buttons:
Set up the connectivity to the PYNQ board, by selecting Connection -> New -> SSH:

The IP address I entered is for the PYNQ board.
I tried pynq and pynq.local, but it didn't want to resolve in my case, so I used the IP address. To investigate...
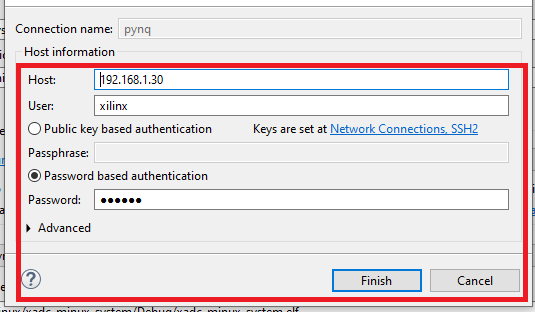
I used user/pwd authentication. I have set up my board to authenticate with certificates, but first want to test the basics.
You can then click Properties to enter the working dir for this project on the PYNQ board:
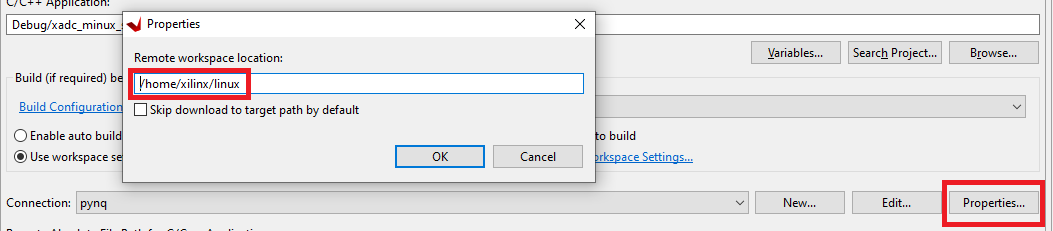
This folder has to exist. Vitis/Eclipse does not generate it for you, and the connection will fail during debug if it's not there.
Then enter the filename of the executable on Linux. This is defaulted by the wizard.
I changed it to where I had put the file for testing in the previous section.
Vitis / Eclipse proposal:
My choice:
I used the Browse button to get there. That's an excellent test to see if the connection to the PYNQ board works.
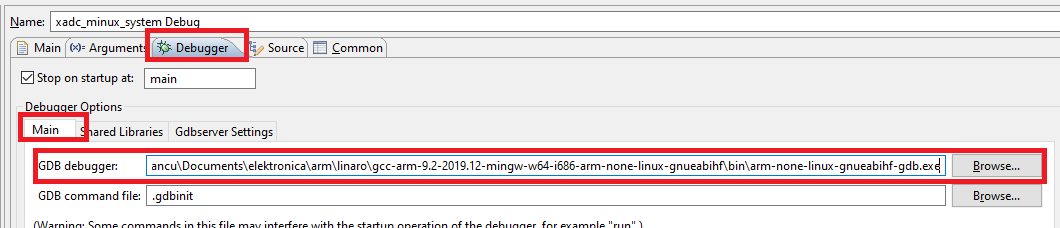
As last, change the GDB client. At the start of this section, I flagged that the version that's installed with Vitis doesn't work with the GDB server that's available on the PYNQ OS.
So replace the standard "gdb" in the debug's main tab with a 9.x version you install on your PC.
I installed mine on D:\users\jancu\Documents\elektronica\arm\linaro\gcc-arm-9.2-2019.12-mingw-w64-i686-arm-none-linux-gnueabihf\bin\arm-none-linux-gnueabihf-gdb.exe.
Now it's time to DEBUG: Press the Debug button on the Wizard.
- Vitis will, if needed, build your project again.
- Then it will upload your file to the PYNQ board, in the location you indicated.
- It will start the debug server (gdbserver) on the PYNQ board and load that executable. The debug server will then sit and wait.
- Vitis will start the GDB client on your development laptop. The client will connect to the GDB server on the PYNQ.
- The Debug window will open, and execution halts at the first line of code in your program's main().
- You can now step through the code, view variables and output.
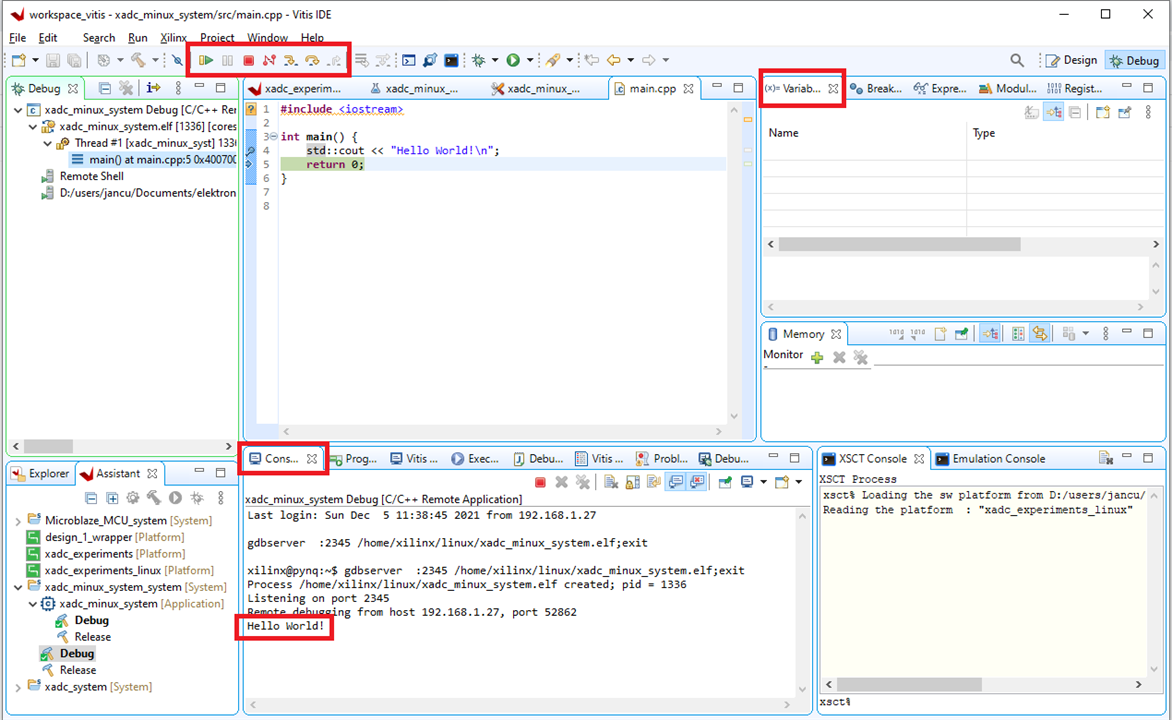
That's the goal of this post: can I build a Linux executable for a PYNQ board, load and debug, with Vitis.
Answer: yes. Next step on the learning path is to make a program that talks to FPGA Fabric assets from the Linux side.