


Arch Linux is a simple, versatile, and easily customizable GNU/Linux distribution that adheres to the principle of simplicity. And, Arch Linux can run on a Genesys ZU-5EV development board, and this project will show you how to implement the hardware and software side of such a project. For the hardware design, you can use Vivado, Xilinx software suite for HDL (Hardware Description Language) designs, and we used version 2021.1 for this project. The instructions on its installation and the various licensing options can be found here. You can do the hardware development under Windows, but you will need a working Linux installation to compile the Arm Trusted Firmware, the u-boot bootloader, and the Linux kernel.
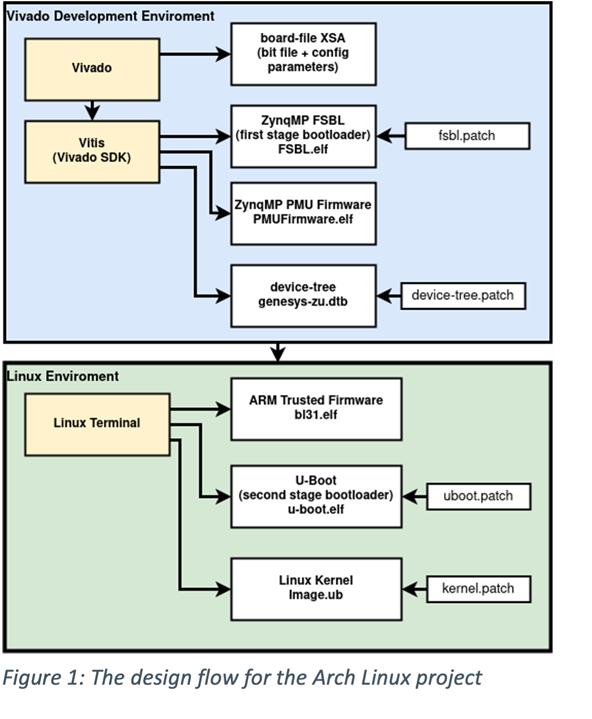
This project comprises two major marts: the hardware platform which you will create in Vivado, and the software, which is partially generated by Vivado or Vitis, and partially compiled under a Linux operating system using an Arm64 compiler. Figure 1 shows the split between the Vivado and the Linux environment.
Build Your Hardware Design
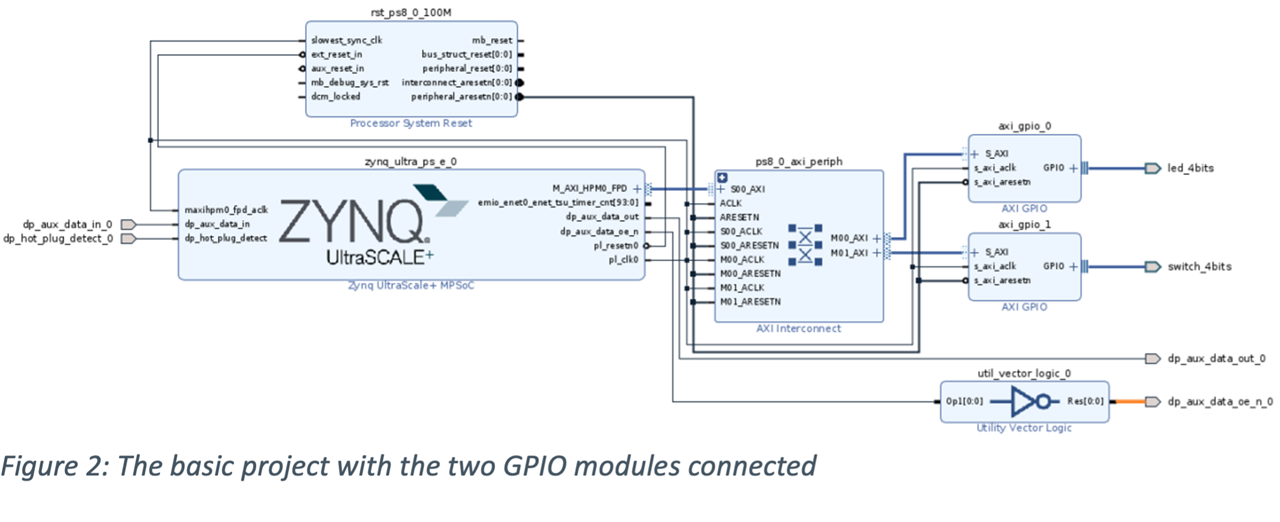
First, we will construct the hardware. For this, set up a new RTL project in Vivado, but do not forget to set the environment variables first. When asked for the board file in the Xilinx parts selector, select the Genesys ZU-5EV. If it is not listed, download it from https://github.com/Digilent/vivado-boards. Set up a new block design and include a Zynq UltraScale+ MPSoC core. Configure this core with the presets included in the board specification files. If you plan to use the LEDs and the switches on the Genesys board, add and connect two AXI-GPIO modules (AXI = Advanced eXtensible Interface). Figure 2 shows this basic setup. Add the display ports needed accordingly.
Once you have all your modules placed and configured, generate the HDL wrapper for the block and the bitstream. Now your hardware is all set.
Create and Compile the Software
As the hardware is ready, move on to the software design. Here, you will generate the First Stage Boot Loader (FSBL), the Platform Management Unit (PMU), and the device tree either through Vivado or through the Vitis IDE. This depends on your development environment. For this project, generate a Xilinx Support Archive (XSA) in Vivado and then open it in Vitis.
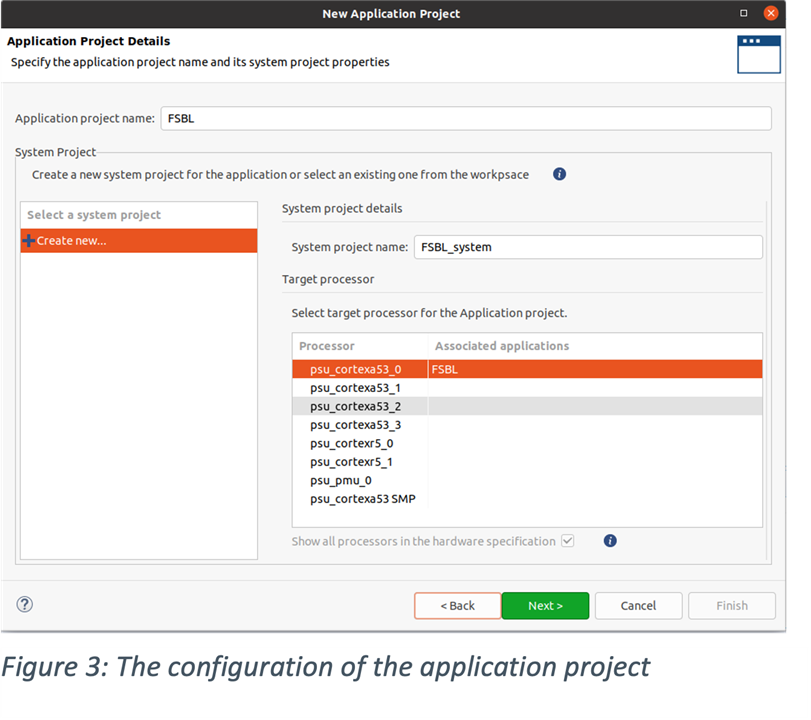
It is possible to build the FSBL and PMU firmware automatically, but for this tutorial, we will do it manually. For this, set up a new domain, keep the default values, name the application project FSBL, and select the psu_cortexa53_0 as target processor (Figure 3). Now, create another domain and choose the Zynq MP FSBL template. Change it to include the board’s Wi-Fi module. Also, add the files spi_gpio.h and spi_gpio.c, as well as xfsbl_board.h and xfsbl_board.c. Patch the latter ones with the file fsbl.patch from here: https://digilent.s3.us-west-2.amazonaws.com/resources/programmable-logic/genesys+ZU+5+EV+tutorial/Attachments/patch/fsbl.patch.
Once this is done, build the FSBL.elf file. If the FSBL does not fit into the on-chip memory (OCM), modify the file xfsbl_config.h and remove any unused modules. This should address the problem.
The next step is to generate the PMU firmware. For this, create a new application project, name it, and select the platform we developed. Then create a new application using the psu_pmu_0 processor and choose the Zynq MP PMU Firmware template to set up the PSU firmware.

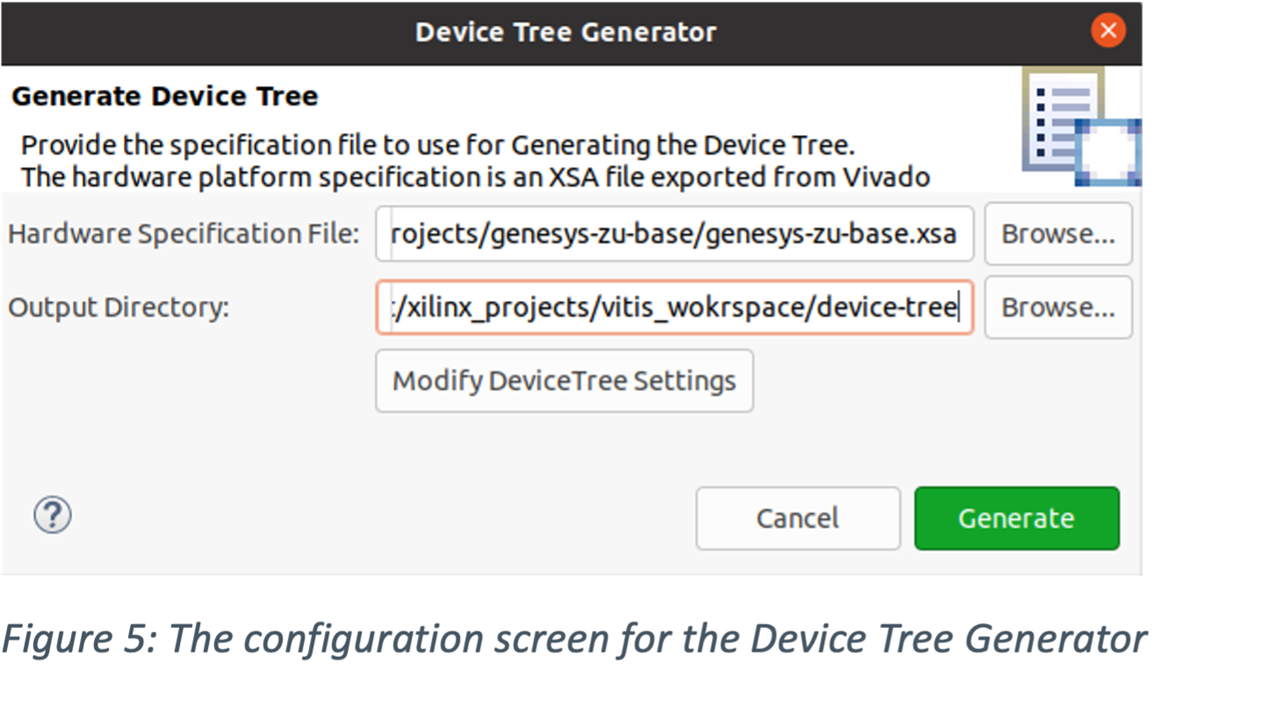
For the device tree, download the Xilinx Device Tree Generator from Xilinx’s GitHub repository and generate the device tree from the Vitis environment. As the board files created do not include board-specific blobs, download the patch for the device tree to the folder holding the generated files and create the binary formatted device tree.
A couple of modules remain, and you can clone them completely from the Xilinx GitHub repository. These modules include the Arm Trusted Firmware, the u-boot bootloader, and the Linux kernel.
But, before you can compile the u-boot bootloader, you need to do some configuration and generate a base configuration file for the default Zynq MP. Once done, apply the patch found here and compile the u-boot bootloader.
Now move to the Linux kernel. Before you clone it, you need to install additional packages. The file changes.rst in the Documentation/process/ folder of the repository will tell you the dependencies. Create a Zynq-MP-based default configuration and apply the patch found here.
Finally, put everything together to generate the boot image of the device, the BOOT.BIN file. You can create it from a terminal using the FSBL_system.bif file, which describes the boot image format.
Once ready, copy the BOOT.BIN file to the first – FAT32 formatted – partition of an SD card. Then download the Arch Linux files from here and extract it to a second partition on the SD card, which should be in ext4 format.
Will all this done, insert the SD card into the Genesys ZU board and connect a USB cable to port JP8. Arch Linux will now boot and display a login terminal.
This concludes the project. If you want a step-by-step description for it, you can find it on Digilent’s Blog: https://digilent.com/blog/building-an-arch-linux-based-project-on-the-genesys-zu-5ev/.