Introduction
This project is part 5 of a 5 part series of projects, where we will progressively create AI enabled platforms for the following Tria development boards:
- ZUBoard
- Ultra96-V2
- UltraZed-7EV
These projects can be rebuilt using the source code on github.com:
The following series of Hackster projects describe how the above github repository was created and serves as documentation:
- Part 1 : Tria Vitis Platforms — Building the Foundational Designs
- Part 2 : Tria Vitis Platforms — Creating a Common Platform
- Part 3 : Tria Vitis Platforms — Adding support for Vitis-AI
- Part 4 : Tria Vitis Platforms — Adding support for Hailo-8
- Part 5 : Tria Vitis Platforms — Adding support for ROS2
The motivation of this series of projects is to enable users to create their own custom AI applications.
Introduction Part V
In the previous projects ( Part 2, Part 3, Part 4 ), we progressively created AI enabled Vitis platforms.
This project provides instructions on how to add support for ROS2 to our platforms.
A Brief History of ROS
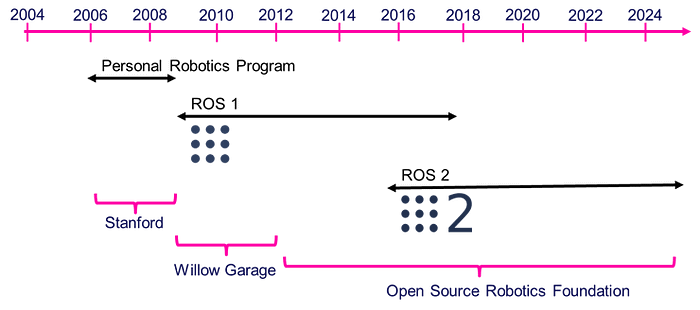
The Robot Operating System (ROS) started at Stanford University as the Stanford Personal Robotics Program. Initiated as a personal project by Keenan Wyrobek and Eric Berger, the motivation was to define a common re-usable infrastructure for robotics, in an effort to stop re-inventing the wheel.

Willow Garage took ownership of this initiative and started releasing distributions called ROS (Robot Operating System). In 2012, Willow Garage passed to torch to Open Source Robotics Foundation.
Open Source Robotics Foundation (OSRF), has been maintaining the ROS distributions since then. As ROS matured, known limitations prevented its widespread adoption for commercial use.
- single point of failure
- lack of security
- no real-time support
ROS2 was initiated in 2015 specifically to address those issues. ROS2 distributions started in 2018, and have been proliferating into commercial applications.

As can be seen, Foxy and Iron have reached their end of life (EOL). The current active versions are Humble and Jazzy.
Another thing to notice is that the previous long-term distribution, Foxy, had a life-cycle of 3 years, whereas Humble and Jazzy have planned life-cycles of 5 years.
Whereas Jazzy has just started its active status, Humble has been active for over 2 years now.
An even Briefer History of meta-ros
Although the ROS2 documentation mentions installation on Ubuntu distributions, it is also possible to install ROS2 in a petalinux project with the meta-ros yocto layer.
Up until the ROS2 foxy distribution, LG Electronics has been maintaining the meta-ros layer. In January 2020, they unfortunately resigned:
https://discourse.ros.org/t/ros-2-tsc-meeting-january-20th-2022/23986
“LG has made a difficult decision to suspend our activities on SVL Simulator and Embedded Robotics. Hence, our engineering team has been directed to focus on other areas which are more strategically important to LG’s business and that unfortunately means that we will not be able to continue working on meta-rosand meta-ros-webos. Because of this, we are resigning from ROS 2 TSC for 2022.”
We thank them for their effort through all these years :)
Although, there is no new “official” maintainer of the meta-ros layer, there are many forks of the meta-ros repo, with a lot of work being done by the community in order to support humble.
Xilinx have a fork of this meta-ros layer that builds in petalinux 2023.2.
This meta-ros layer was automatically generated in the following location when the petalinux project was created:
components/yocto/layers/meta-ros
Adding support for ROS2
Adding support for ROS2 in Petalinux 2023.2 is as simple as adding the following packages:
- packagegroup-petalinux-ros
- packagegroup-petalinux-ros-dev
These packagegroups are for runtime and development, and their exact contents can be discovered here:
We notice that some packages are not included, so we will want to install those as well.
- cv-bridge
- cv-bridge-dev
- v4l2-camera
- v4l2-camera-dev
- turtlesim
- turtlesim-dev
In my previous ROS2 integration with 2022.2, I had to create a patch for the “v4l2-camera” recipe in a local fork of AMD’s meta-ros repository:
- ZUBoard 2022.2 — Adding Support for ROS2
- https://github.com/AlbertaBeef/meta-ros/blob/rel-v2022.2/meta-ros2-humble/recipes-bbappends/v4l2-camera/v4l2-camera_%25.bbappend
I made a pull request for this modification, it was accepted, and is now part of AMD’s meta-ros repository:
How cool is that ! A little tap on the back for being part of the open source community movement :)
The above packages can be declared in the following config file:
project-spec/meta-user/conf/user-rootfsconfig
...
CONFIG_packagegroup-petalinux-ros
CONFIG_packagegroup-petalinux-ros-dev
CONFIG_cv-bridge
CONFIG_cv-bridge-dev
CONFIG_v4l2-camera
CONFIG_v4l2-camera-dev
CONFIG_turtlesim
CONFIG_turtlesim-dev
The packages can then be enabled in the following config file:
project-spec/configs/rootfs_config
#
# user packages
#
...
CONFIG_packagegroup-petalinux-ros=y
CONFIG_packagegroup-petalinux-ros-dev=y
CONFIG_cv-bridge=y
CONFIG_cv-bridge-dev=y
CONFIG_v4l2-camera=y
CONFIG_v4l2-camera-dev=y
CONFIG_turtlesim=y
CONFIG_turtlesim-dev=y
Implementing a video passthrough as a publisher subscriber
In ROS2, an application is called a graph.
This graph consists of several actors called nodes, which communicate with topics, using publisher-subscriber communication.
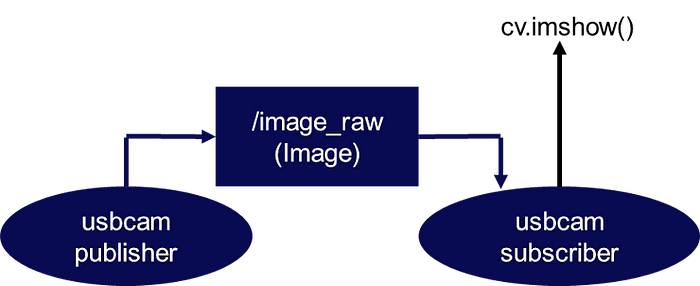
A simple ROS2 graph could consist of a publisher node and a subscriber node, as shown below:

The publisher node publishes messages to a defined topic, and the subscriber node subscribes to this topic, in order to receive these messages.
In order to implement a video passthrough, we will use the following pre-defined message:
https://docs.ros2.org/foxy/api/sensor_msgs/msg/Image.html
We will also be using the OpenCV library, along with the cv-bridge package to convert from OpenCV images to ROS2 messages.
Creating a workspace
We start by initializing our ROS2 environment variables:
root@zub1cg-sbc-2023-2:~# source /usr/bin/ros_setup.sh
Notice which environment variables were defined:
root@zub1cg-sbc-2023-2:~# set | grep ROS
ROS_DISTRO=humble
ROS_LOCALHOST_ONLY=0
ROS_PYTHON_VERSION=3
ROS_VERSION=2
We start by creating a workspace for our new package:
root@zub1cg-sbc-2023-2:~# mkdir -p ~/vision_ws/src
root@zub1cg-sbc-2023-2:~# cd ~/vision_ws/src
Then we create a package using the python template:
root@zub1cg-sbc-2023-2:~/vision_ws/src# ros2 pkg create --build-type ament_python py_vision
going to create a new package
package name: py_vision
destination directory: /home/root/vision_ws/src
package format: 3
version: 0.0.0
description: TODO: Package description
maintainer: ['root <root@todo.todo>']
licenses: ['TODO: License declaration']
build type: ament_python
dependencies: []
creating folder ./py_vision
creating ./py_vision/package.xml
creating source folder
creating folder ./py_vision/py_vision
creating ./py_vision/setup.py
creating ./py_vision/setup.cfg
creating folder ./py_vision/resource
creating ./py_vision/resource/py_vision
creating ./py_vision/py_vision/__init__.py
creating folder ./py_vision/test
creating ./py_vision/test/test_copyright.py
creating ./py_vision/test/test_flake8.py
creating ./py_vision/test/test_pep257.py
[WARNING]: Unknown license 'TODO: License declaration'. This has been set in the package.xml, but no LICENSE file has been created.
It is recommended to use one of the ament license identitifers:
Apache-2.0
BSL-1.0
BSD-2.0
BSD-2-Clause
BSD-3-Clause
GPL-3.0-only
LGPL-3.0-only
MIT
MIT-0
Before proceeding, you can edit the recommended content, such as:
- description
- maintainer
- licenses
Creating a publisher for video
The first node we will create is our publisher node.
Create a new python script in the following location:
~/vision_sw/src/py_vision/py_vision/usbcam_publisher.py
With the following content:
import rclpy
from rclpy.node import Node
from sensor_msgs.msg import Image
from cv_bridge import CvBridge
import cv2

class USBImagePublisher(Node):
    def __init__(self):
        super().__init__('usbcam_publisher')
        self.publisher_ = self.create_publisher(Image, 'usb_camera/image', 10)
        self.timer_ = self.create_timer(0.1, self.publish_image)
        self.bridge_ = CvBridge()

        # Open the camera
        self.cap = cv2.VideoCapture(0)
        # Check if the camera is opened correctly
        if not self.cap.isOpened():
            self.get_logger().error('Could not open USB camera')
            return
        # Set the resolution
        self.cap.set(cv2.CAP_PROP_FRAME_WIDTH, 640)
        self.cap.set(cv2.CAP_PROP_FRAME_HEIGHT, 480)
    def publish_image(self):
        # Read an image from the camera
        ret, frame = self.cap.read()
        # Convert the image to a ROS2 message
        msg = self.bridge_.cv2_to_imgmsg(frame, encoding='bgr8')
        msg.header.stamp = self.get_clock().now().to_msg()
        # Publish the message
        self.publisher_.publish(msg)
def main(args=None):
    rclpy.init(args=args)
    node = USBImagePublisher()
    rclpy.spin(node)
    node.destroy_node()
    rclpy.shutdown()
if __name__ == '__main__':
    main()py
NOTE : This code was initiallygenerated by ChatGPT with the following prompt : “write python code for a ROS2 publisher for usb camera”, However, the code was not using cv-bridge, and was calling cv2.VideoCapture(0) at each iteration, so I modified it.
Make certain that the declared name is ‘usbcam_publisher’ in the python script:
super().__init__('usbcam_publisher')
We need to explicitly add this python script as a node in our py_vision package, by modifying the following setup script:
~/vision_ws/src/py_vision/setup.py
from setuptools import setup

package_name = 'py_vision'
setup(
    ...
    entry_points={
        'console_scripts': [
            'usbcam_publisher = py_vision.usbcam_publisher:main',
        ],
    },
)
We can see that the code is using the opencv and sensor_msgs python libraries, so we need to make our package aware of this by editing the following file:
~/vision_ws/src/py_vision/package.xml
...
<package format="3">
  <name>py_vision</name>
  ...
  <exec_depend>rclpy</exec_depend>
  <exec_depend>std_msgs</exec_depend>
  <exec_depend>sensor_msgs</exec_depend>
  <exec_depend>cv_bridge</exec_depend>
  <exec_depend>opencv</exec_depend>
  ...
</package>
We can build our package using the colcon build utility:
root@zub1cg-sbc-2023-2:~/vision_ws# colcon build
Starting >>> py_vision

Finished <<< py_vision [6.50s]
Summary: 1 package finished [7.51s]
Finally, we can query our system for this new package (executable). Note that we need to run the local_setup.sh script, as shown below:
root@zub1cg-sbc-2023-2:~/vision_ws# ros2 pkg executables | grep py_vision

root@zub1cg-sbc-2023-2:~/vision_ws# source ./install/local_setup.sh
root@zub1cg-sbc-2023-2:~/vision_ws# ros2 pkg executables | grep py_vision
py_vision ubcam_publisher
Running the node is as simple as invoking it with “ros2 run…”:
root@zub1cg-sbc-2023-2:~/vision_ws# ros2 run py_vision usbcam_publisher
Creating a subscriber for video
The second node we will create is our subscriber node.
Create a new python script in the following location:
~/vision_sw/src/py_vision/py_vision/usbcam_subscriber.py
With the following content:
import rclpy
from rclpy.node import Node
from sensor_msgs.msg import Image
from cv_bridge import CvBridge
import cv2

class VideoSubscriber(Node):
    def __init__(self):
        super().__init__('usbcam_subscriber')
        self.subscription_ = self.create_subscription(Image, 'usb_camera/image', self.callback, 10)
        self.cv_bridge_ = CvBridge()
    def callback(self, msg):
        # Convert the ROS2 message to an OpenCV image
        frame = self.cv_bridge_.imgmsg_to_cv2(msg, 'bgr8')
        # Display the image
        cv2.imshow('Video Stream', frame)
        cv2.waitKey(1)
def main(args=None):
    rclpy.init(args=args)
    node = VideoSubscriber()
    rclpy.spin(node)
    node.destroy_node()
    rclpy.shutdown()
if __name__ == '__main__':
    main()
NOTE : This code was generated by ChatGPT with the following prompt : “write python code for a ROS2 subscriber for video”
Make certain that the declared name is ‘usbcam_subscriber’, and the topic name is “usb_camera/image” in the python script:
super().__init__('usbcam_subscriber')
        self.subscription_ = self.create_subscription(Image, 'usb_camera/image', self.callback, 10)
We need to explicitly add this python script as a node in our py_vision package, by modifying the following setup script:
~/vision_ws/src/py_vision/setup.py
from setuptools import setup

package_name = 'py_vision'
setup(
    ...
    entry_points={
        'console_scripts': [
            'usbcam_publisher = py_vision.usbcam_publisher:main',
            'usbcam_subscriber = py_vision.usbcam_subscriber:main',
        ],
    },
)
We can see that the code is using the opencv, cv-bridge, and sensor_msgs python libraries, so we need to make our package aware of this by editing the following file:
~/vision_ws/src/py_vision/package.xml
...
<package format="3">
  <name>py_vision</name>
  ...
  <exec_depend>rclpy</exec_depend>
  <exec_depend>std_msgs</exec_depend>
  <exec_depend>sensor_msgs</exec_depend>
  <exec_depend>cv_bridge</exec_depend>
  <exec_depend>opencv</exec_depend>
  ...
</package>
We can build our package using the colcon build utility:
root@zub1cg-sbc-2023-2:~/vision_ws# colcon build
Starting >>> py_vision

Finished <<< py_vision [6.50s]
Summary: 1 package finished [7.51s]
Finally, we can query our system for this new package (executable).
root@zub1cg-sbc-2023-2:~/vision_ws# source ./install/local_setup.sh
root@zub1cg-sbc-2023-2:~/vision_ws# ros2 pkg executables | grep py_vision
py_vision ubcam_publisher
py_vision ubcam_subscriber
Running the node is as simple as invoking it with “ros2 run…”:
root@zub1cg-sbc-2023-2:~/vision_ws# ros2 run py_vision usbcam_subscriber
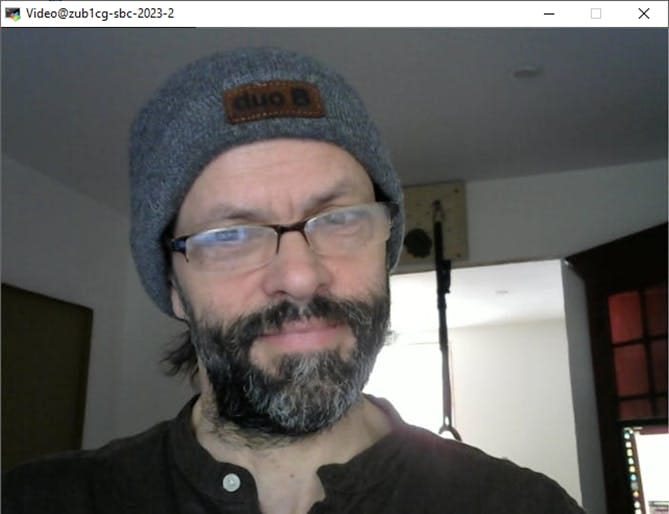
If the usbcam_publisher node is running in parallel, you will get the following output on MobaXterm.


Next Steps
The next step would be to add some kind of processing to our video pipeline. If you want to continue to explore ROS2 on the Tria Vitis Platforms, I encourage you to watch the following webinar series:
On May 23rd 2023, World Turtle Day, together with Bryan Fletcher, I gave a webinar on how to control a robot with hand signs with ZUBoard.

These webinars will help you quickly get up and running with the ROS2 demonstration on your ROS2 enabled Tria Zynq-UltraScale+ platform.
The first webinar described how to train and deploy an American Sign Language (ASL) classification model, and deploy it to the ZUBoard.
The second webinar described how to build a ROS2 graph that incorporated the ASL classification model in order to control a simulated robot.
Using American Sign Language (ASL) to control the ROS2 turtlesim robot. (song credit : Il y a tant à faire, Daniel Bélanger)
A great update of this demonstration would be to integrate the accelerated mediapipe models I explored earlier this year.
Conclusion
I hope this tutorial helped to understand how to add ROS2 functionality to your custom platform.
If you have any ideas you would like to explore or suggest, let me know in the comments.
If you would like to have the pre-built SD card image for this project, please let me know in the comments below.
Revision History
2023/11/25 — Preliminary Version

