


This project details how to build a stereo depth camera with AI capabilities on a ZYNQ MPSOC platform.
This time we'll see how to use the Vitis Vison layer L1 libraries and PYNQ framework to implement a complete stereo depth pipeline.
There are a number of past and existing bugs on Vitis Vision libraries so this procedure has not been smooth.
In addition the PYNQ framework is in a state of flux (from 2.5.1 to 2.6) so there are some API changes.
1. Setting up the environment
First , install Vitis on Ubuntu 18.04. This is not strictly supported so you'll need to modify /etc/release with the 18.04.4
sudo nano /etc/os-release
Now clone the Vitis libraries from this link:
git clone https://github.com/Xilinx/Vitis_Libraries.git
Install cmake :
sudo apt-get install cmake
2. Install Open CV
Then install OpenCV 3.4.4.
This is needed in order to compile and simulate the Vitis Vision libraries. Note the exact version above.
mkdir ~/opencv_build && cd ~/opencv_build
git clone https://github.com/opencv/opencv.git
git clone https://github.com/opencv/opencv_contrib.git

unzip opencv.zip
unzip opencv_contrib.zip
mv opencv-3.4.4 opencv
mv opencv_contrib-3.4.4 opencv_contrib
cd ~/opencv
ls
cd opencv
mkdir build
cd build

cd ~/opencv_build/opencv
mkdir build && cd build


make -j4
sudo make install
sudo ldconfig
pkg-config --modversion opencv
ls /usr/local/python/cv2/python-3.6
cd /usr/local/python/cv2/python-3.6
sudo mv cv2.cpython-36m-x86_64-linux-gnu.so cv2.so
cd ~/.virtualenvs/cv/lib/python3.6/site-packages/
3. Setup Vitis Vision IP core
The Vitis vision cores uses AXI for data transfer and AXI lite for parameter configuration.
To minimize energy consumtion and implement these algorithms on the fly for incoming imaging data we'll have to re-write the interfaces in streaming format.
Before we do that , test the IP by performing C simulation and COSIM.
There are some additional steps that have to be defined either in a settings.tcl file or added to the same tcl file as shown below in order to give the location of the opencv
library we installed before.
This is needed for co-simulation and synthesis.
#source settings.tcl

set PROJ "erosion.prj"
set SOLN "sol1"


set XF_PROJ_ROOT "/home/user/Documents/Vitis_Libraries/vision/"
set OPENCV_INCLUDE "/usr/local/include/opencv2"
set OPENCV_LIB "/usr/local/lib"
set XPART "xczu9eg-ffvb1156-2-i"
set CSIM "1"
set CSYNTH "1"
set COSIM "1"
set VIVADO_SYN "0"
set VIVADO_IMPL "0"
One can use either Vitis_HLS or Vivado HLS . There are minor differences between the two so the user has to be aware that once you create a project with Vitis HLS you won't be able to open the project on Vivado HLS.
To generate the core issue:
Vitis_Libraries/vision/L1/examplest/stereolbm
and issue:
vivado_hls -f script.tcl
Depending on the flags this will be used to synthesize , simulate and co-simulate the IP core.
There are two stereo vision IP cores a) stereolbm and b) stereo block matching.
When simulating the global block matgcing IP I was not able to get a proper output so that left the stereo local block matching algorithm.
3. Vitis Vision IP With PYNQ
Initially the following IP core was tested
git clone --recursive https://github.com/Xilinx/PYNQ-HelloWorld.git
The problem is that is uses an old version of Vitis Vision with bugs and implements custom conversion functions from xf::MAT to axi stream that are not part of the API.
So here one is left with two choices, a) implement the algorithm on your own or b) find a way to get the Vitis vison cores working in streaming mode.
Another issue is the bugs present on Vitis vision
https://github.com/Xilinx/Vitis_Libraries/issues/28
And the same issues when trying to interface these IPs with PYNQ framework.
https://discuss.pynq.io/t/vitis-vision-core-fails-on-pynq-v2-5-1/1822/17
So bottom line is that one has to re-write the interfaces with custom data types.
template <int W>
struct axis_t {
    ap_uint<W> data;
    ap_int<1> last;
};


/*
Unpack a AXI video stream into a xf::cv::Mat<> object
 *input: AXI_video_strm
 *output: img
 */

template <int TYPE, int ROWS, int COLS, int NPPC>
int AXIstream2xfMat(hls::stream<axis_t<8>>& AXI_video_strm, xf::cv::Mat<TYPE, ROWS, COLS, NPPC>& img) {
    axis_t<8> pixelpacket;
    int res = 0;

    int rows = img.rows;
    int cols = img.cols;
    int idx = 0;

    assert(img.rows <= ROWS);
    assert(img.cols <= COLS);

    loop_row_axi2mat:   for (int i = 0; i < rows; i++) {
        loop_col_axi2mat:     for (int j = 0; j < cols; j++) {
            // clang-format off
                #pragma HLS loop_flatten off
                #pragma HLS pipeline II=1
            // clang-format on
            AXI_video_strm >> pixelpacket;
                img.write(idx++, pixelpacket.data);
        }
       }
    return res;
}

// Pack the data of a xf::cv::Mat<> object into an AXI Video stream
/*
 *  input: img
 *  output: AXI_video_strm
 */
template <int TYPE, int ROWS, int COLS, int NPPC>
int xfMat2AXIstream(xf::cv::Mat<TYPE, ROWS, COLS, NPPC>& img, hls::stream<axis_t<8>>& AXI_video_strm) {

    axis_t<8> pixelpacket;
    int res = 0;

    int rows = img.rows;
    int cols = img.cols;
    int idx = 0;

    assert(img.rows <= ROWS);
    assert(img.cols <= COLS);

    bool sof = true; // Indicates start of frame

    loop_row_mat2axi: for (int i = 0; i < rows; i++) {
        loop_col_mat2axi: for (int j = 0; j < cols; j++) {
            // clang-format off
            #pragma HLS loop_flatten off
            #pragma HLS pipeline II=1
            // clang-format on

                ap_uint<1> tmp = 0;
                if ((i==rows-1) && (j== cols-1)) {
                    tmp = 1;
                }

                pixelpacket.last = tmp;
                pixelpacket.data = img.read(idx++);

                AXI_video_strm << pixelpacket;

            }
        }

    return res;
}
.
4.Simulating stereo IP core
There are a couple of algorithms for stereo depth perception. It's important to note that these algorithms require a lot of resources so image resolution needs to be modified for implementation,.
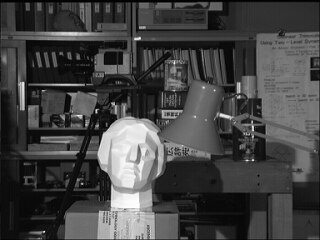
We will use the cones images from the Middlebury dataset, however the images will be downsized to 320x240 pixels and converted to grayscale before hand.
This is done in order to preserve resources as the stereo core uses a lot of fabric logic resources.
void stereolbm_accel(stream_t& stream_inL,stream_t& stream_inR, streamwide_t& stream_out, int height, int width) {

    #pragma HLS INTERFACE s_axilite port=height
    #pragma HLS INTERFACE s_axilite port=width
    #pragma HLS INTERFACE s_axilite port=return
    #pragma HLS INTERFACE axis port=stream_inL
    #pragma HLS INTERFACE axis port=stream_inR
    #pragma HLS INTERFACE axis port=stream_out
    xf::cv::Mat<IN_TYPE, HEIGHT, WIDTH, NPCC> imgInputL(height, width);
    xf::cv::Mat<IN_TYPE, HEIGHT, WIDTH, NPCC> imgInputR(height, width);
    xf::cv::Mat<OUT_TYPE, HEIGHT, WIDTH, NPCC> imgOutput(height, width);
    //xf::cv::Mat<IN_TYPE, HEIGHT, WIDTH, NPCC> imgOutputStream(height, width);
    xf::cv::xFSBMState<SAD_WINDOW_SIZE, NO_OF_DISPARITIES, PARALLEL_UNITS> bmState;

    // Initialize SBM State:

    bmState.preFilterCap = 31;
    bmState.uniquenessRatio = 15;
    bmState.textureThreshold = 20;
    bmState.minDisparity =  0;
// clang-format off
    #pragma HLS DATAFLOW
    // clang-format on
    // Retrieve xf::Mat objects from img_in data:
    AXIstream2xfMat<IN_TYPE,HEIGHT,WIDTH,NPCC>(stream_inL, imgInputL);
    AXIstream2xfMat<IN_TYPE,HEIGHT,WIDTH,NPCC>(stream_inR, imgInputR);
    // Run xfOpenCV kernel:
    xf::cv::StereoBM<SAD_WINDOW_SIZE, NO_OF_DISPARITIES, PARALLEL_UNITS, IN_TYPE, OUT_TYPE, HEIGHT, WIDTH, NPCC,XF_USE_URAM>(imgInputL, imgInputR, imgOutput, bmState);
    // Convert _dst xf::Mat object to output array:
    xfMat2AXIstreamwide<OUT_TYPE,HEIGHT,WIDTH,NPCC>(imgOutput, stream_out);
}

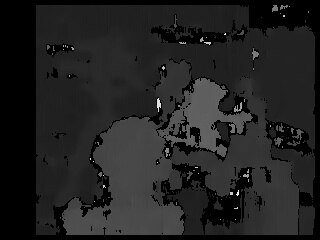
The output from CSIM and COSIM is the depth disparity map

5. Testing on device
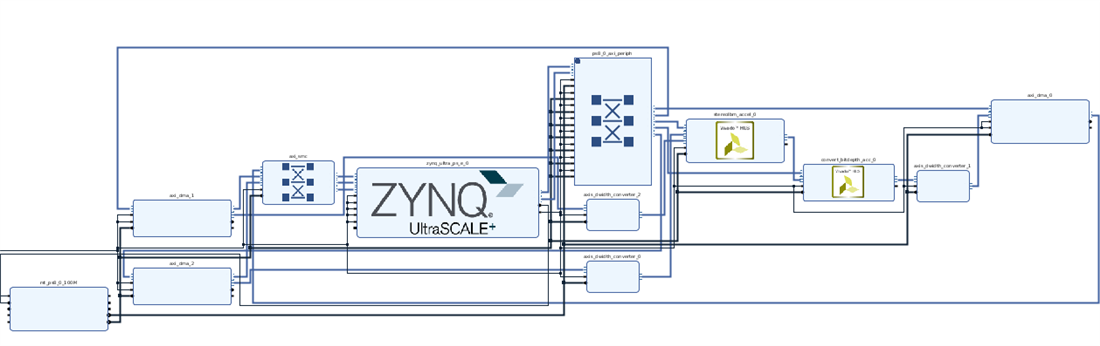
To test on the device a stereo camera mezzanine is needed with camera sources. I opted to simulate this using two DMA to write the stereo pair and one DMA to read the stereo output.
The input to the stereo core are 8bit grayscale images however the output is 16 bit grayscale image.
PYNQ uses 8 and 32 bit for the DMA datatype. Hence in order to deal with the 16 bit output one has either to use the convertbit depth IP and modify it into streaming mode or convert the data width of the streaming output.
The Vivado hardware block design is shown below.
The Python jupyter notebook together with the IP cores is given on the github repo link below:
https://github.com/Q-point/StereoIPcores_MPSOC
Next step is to accelerate the RGB to grayscale and grayscale resize IP on HW following the same procedure as above and DPU image segmentation to the original color input in order to implement a depth camera with AI capabilities.