This is my final blog post for the Experimenting With Thermistors challenge.
After experimenting with thermistors for over a month, it is time to put all of the things I’ve learned into practice: It’s time to add a thermistor to my hummingbird feeder monitoring setup!
I’ve decided to focus on just using Thermistor 7, the 10k thermistor. For my specific application, I wasn’t able to find a significant difference between the various values of thermistors that element14 and Molex so kindly provided me, so it makes sense to stick with the one in the middle that seems to have a fairly standard nominal resistance.
I’m using an ESP8266-based Wemos D1 Mini to monitor my hummingbird feeder, as it is inexpensive and gives me easy WiFi capabilities in an Arduino based project. The main drawback, however, is that it only supports one analog input. This means that, without some fancy magic, it is limited to having only one thermistor. But that's actually not a bad thing in this case - I have a few digital sensors I can also hook up to the same controller, which then allows a bit of comparison between the different sensors.
I had a few DS18B20 temperature sensors already available, in a waterproof probe format, so I hooked one up alongside the thermistor, to allow us to compare the temperature values that are reported - they should be the same, but I am aware that both the DS18B20 as well as the thermistor will have variations in their accuracy.
A person with a watch knows what time it is. A person with two watches is never sure ;)
The difficult part is that I don’t know how accurate any of my temperature sensors are, including those in my weather stations and thermostats. I think, as long as the results are in the ballpark, it should be fine for my purposes.
For the outside temperature I decided to continue to use the BME280 sensor, as it also gives humidity and atmospheric pressure information.
This is what my original setup looked like, before I learned how to use thermistors:
The next picture shows the problem with the DS18B20 waterproof sensor: it's a little bit awkward in shape so it doesn't align well with the glass hummingbird feeder to get good contact.
On the other hand, a tiny thermistor is very easy to place:
The ESP8266 only has one ADC, so it’s nice to be able to use a couple of digital sensors alongside the analog thermistor sensor. In the future I may switch to an ESP32-based board, which would allow me to use just two inexpensive thermistors instead of the digital sensors.
Creating the new Arduino sketch turned out to be very simple: I used my existing hummingbird feeder monitoring sketch and added the Thermistor Object I had created for earlier thermistor testing. I was then able to just add a few lines to the main sketch to be able to read the temperature and send it up along with the data from the digital sensors. The sketch, including the Thermistor Object are attached to this blog post (see below).
Here is my new hummingbird feeder monitoring sensor setup:
I used foam tape to connect them to the glass feeder bottle, which provides a solid connection while also insulating the sensor from the air around, hopefully giving a better reading of the actual nectar temperature.
As you can see, the tiny thermistor very easiliy sits up against the glass to make really good contact, while the DS18B20 sensor probe is MUCH bigger and sticks out a lot.
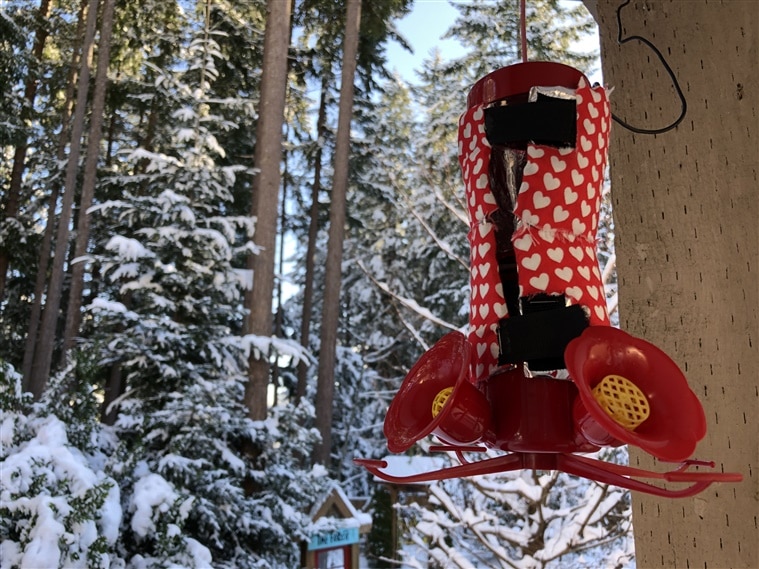
In the winter I’ll add an insulating sleeve and a USB-powered hand-warmer for a heater, to ensure that the nectar stays warm and liquid so that the hummingbirds will always be able to get a fill-up even during the coldest days. This will likely also help give better sensor readings for the nectar, as it will then fully cover the large sensor probe of the DS18B20.
Here is an example of one of the insulating sleeves I made out of silvery bubblewrap, with a bit of fabric to make it look better. The other feeder just uses a neoprene bottle cover, which works great too.

I 3D-printed a case using some wood-coloured filament, and then mounted the controller up on the post near the feeder using some double-sided foam tape and a push pin. Turns out the tape by itself wasn't enough to hold it up overnight. :D
The second picture also shows how the case (not my design, available on Thingiverse) was cleverly designed to separate the BME280 sensor from the Wemos D1 Mini controller, so that any heat coming from the controller shouldn't affect the BME280 readings. The case is also vented on all sides, as well as through the lid. If actually blends quite nicely onto the post... now if only all those wires could do a better job of blending in, that would be great :D
After mounting it on the post, I put the cover on. The 3D print wasn't quite precise enough for the lid to have a good fit, so I had to use some sticky tape to hold it in place.
I have a Raspberry Pi server set up with Node-Red, Mosquitto (MQTT), and InfluxDB. The Wemos sensor sends the temperature and weather information to the server using MQTT, and Node-Red then receives it, stores it, and displays the results. As I already had a sensors database created, InfluxDB automatically added the new series data as soon as Node-Red started saving it.
This is what the Node-Red flow looks like:

I've attached the exported flow, where you can see the details of each node.
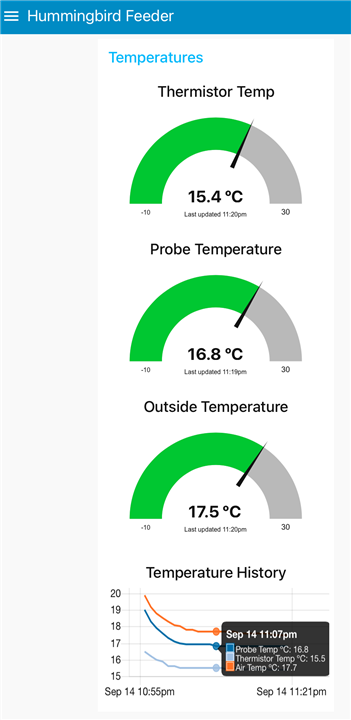
Here is a screenshot of the Node-Red UI showing the current weather information after the first half hour of collecting data:

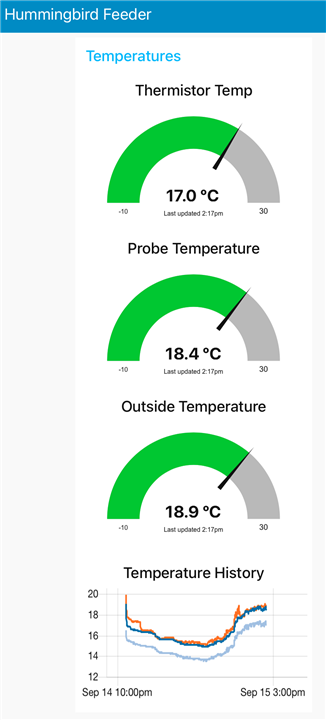
After data logging for just over half a day, this is what the charts look like:

It is interesting to see that the DS18B20 "Probe temperature" tends to fall between the thermistor temperature and the outside temperature - this might be because of the way it sticks out and doesn't make full contact with the bottle. More insulation might help for that. However, it's interesting to see how the three probes follow the same patterns.
Right now we only have just a half day worth of data, but the chart will show a full day of history once that data is backfilled in the database. All of the data is currently being stored, which I admit is not very efficient, but InfluxDB does allow automatic resampling of older data to reduce overall storage requirements.
Conclusion:
I’ve really enjoyed experimenting with thermistors over the last few months!
I’ve learned a lot about thermistors and I was happy to find out that they can be a useful part of my ongoing hummingbird feeder monitoring project.
For my hummingbird feeder monitoring project, thermistors seem to be a better choice than the digital probe sensor I was using: their tiny size makes them much easier to mount onto a bottle or tuck into an insulating sleeve to monitor nectar temperature.
Things I have learned:
- Thermistors are easy to use, affordable, compact, and convenient - I will definitely be using them for my projects going forward
- Thermistors can be very accurate! Keep in mind that it does require a fair bit of extra effort to get higher accuracy like that.
- It can be difficult to find a good reference to determine what the "correct" temperature is, because most consumer devices potentially have inaccuracies of several degrees. Even ice baths and boiling water require scientific levels of precision work to be used as a trustworthy reference.
- Using a specific value of fixed resistor in the required voltage divider allows accuracy to be tuned significantly - using the geometric mean of the max and min thermistor resistance for the desired sensing range makes it easy to select the best resistor value.
- Thermistors are analog sensors and require an ADC in order to be read by a microcontroller.
- ESP8266 microcontrollers only have one ADC. This means extra work, and hardware, may be required if more than one thermistor is to be used in a project.
- It appears that most of the standard boards (Arduino Uno, Nano, ESP8266) have 10-bit ADC resolution, allowing input resolution from 0 to 1023
- ESP32 microcontrollers have many (18, I think) ADCs that are also more accurate: 0-4095 instead of 0-1023
- The accuracy of a thermistor is limited by the ADC resolution as well as by the chosen fixed resistor used in the voltage divider, as well as the reference voltage used. Some boards can have noisy ADC that also affects accuracy.
- It’s a good idea to take multiple thermistor readings in order to get a more reliable result. In my code I have chosen to throw out the maximum and minimum readings: these are most likely to be the two worst readings in the set.
- Thermistors that are properly sealed are water proof. The thermistors in the kit from Molex and element14 are epoxy coated and can easily withstand the weather by my hummingbird feeder.
Above all, I have learned to be flexible when experimenting!
As I progressed, learning about thermistors, I had several times where I needed to adjust my path according to the new knowledge and possibilities that revealed itself. I also had to work around a few things I had assumed, but was wrong about, including the single-ADC limitation of the ESP8266 chip in the Wemos D1 Mini I am using as my IoT controller.
Previous Blogs:
Blog 1 - Thermistors for Hummingbird Feeder Heating and Monitoring - Intro (blog 1)
Blog 2 - Thermistors and Their Resistance Ratings
Blog 3 - Limited ADC on ESP8266, and possible options.
Blog 4 - Thermistor Easy Quick Start - Using Molex Thermistors The Easy Way.
Side Notes - Breadboard Friendly Connections
Blog 5 - Using Multiple Thermistors
Blog 6 - Choosing The Right Thermistor
Attachments:
Wemos_Triple_temp_sensor_MQTT.zip - contains the Arduino Sketch folder with the 3 files needed to build the Wemos D1 based sensor.
NodeRed flow.json - this is an export of the NodeRed flow I used to receive the sensor data, organize it, display it, and store it

