


Introduction
Two months backs I took part in the Eye on Intelligence Challenge. My project is to create a sign language interpreter which will use ML on the Arty Z7 board to do real time classification on hand signs and classify those into characters. Having very little prior knowledge on ML and PYNQ, I started working on it and learning about it. I have shared my learning journey in the below blogs:
-
Sign Language Interpreter Blog 1: Project Overview and Kit Unboxing
-
Sign Language Interpreter Blog 2: Hands on with Arty Z7
-
Sign Language Interpreter Blog 3: Running PYNQ on Arty Z7
-
Sign Language Interpreter Blog 4: Using PYNQ overlays with HDMI and USB webcam on Arty Z7
-
Sign Language Interpreter Blog 5: Running CNN image classification on Arty Z7 using PYNQ
In this blog, I will put together whatever I have learned till now.
ASL Dataset
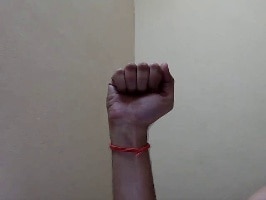
First of all we are going to need the dataset. For that I plan to use python to capture a 30 sec video of my hand with the webcam and randomly select 200 frames from that as training data and 40 frames as test data. The image resolution will 266x200.
Getting the video
- Creating capture object
#Imports and create capture object import cv2 import time # Define the desired resolution desired_width = 640 desired_height = 480 # Initialize webcam cap = cv2.VideoCapture(1) # Check if the webcam is opened correctly if not cap.isOpened(): print("Error: Could not open webcam.") exit() # Set the desired resolution cap.set(cv2.CAP_PROP_FRAME_WIDTH, desired_width) cap.set(cv2.CAP_PROP_FRAME_HEIGHT, desired_height) - Recording video and saving in a file
# Define the codec and create VideoWriter object fourcc = cv2.VideoWriter_fourcc(*'XVID') output_path = 'train_video/Z_video.avi' # Specify the file path out = cv2.VideoWriter(output_path, fourcc, 20.0, (desired_width, desired_height)) recording = False start_time = None while True: ret, frame = cap.read() if not ret: break # Display the resulting frame cv2.imshow('Webcam Video', frame) # Check for key press key = cv2.waitKey(1) & 0xFF if key == ord('r'): # Press 'r' to start recording recording = True start_time = time.time() print("Recording started...") # Record video if 'r' was pressed if recording: out.write(frame) # Stop recording after 30 seconds if time.time() - start_time >= 30: recording = False print("Recording stopped after 30 seconds.") # Press 'q' to exit the loop if key == ord('q'): break out.release() cv2.destroyAllWindows() - Closing the image capture object.
# Release everything when the job is finished
cap.release()
out.release()
cv2.destroyAllWindows()
Saving images
- The below code randomly collects 240 frames from each video and saves it in folders with names same as the class. The frames are split into train and test dataset (200 for training and 40 for testing). The directory structure is shown below:
[current dir] > train > A > A_1.jpg, A_3.jpg, A_9.jpg ... 200 images
B > B_2.jpg, B_5.jpg ... 200 images
[current dir] > test > A > A_5.jpg, A_10.jpg ... 40 images
B > B_1.jpg, B_6.jpg ... 40 imagesimport cv2 import random import os count = 0 # Function to resize and save a frame def save_frame(frame, frame_index, label): resized_frame = cv2.resize(frame, (266, 200)) global count count = count + 1 if count <= 200: output_path = os.path.join(output_train_dir, f'{label}_{frame_index}.jpg') else: output_path = os.path.join(output_test_dir, f'{label}_{frame_index}.jpg') cv2.imwrite(output_path, resized_frame) labels = ['A','B','C','D','E','F','G','H','I','J','K','L','M','N','O','P','Q','R','S','T','U','V','W','X','Y','Z'] for label in labels: # Define the video file path video_path = 'train_video/' + label + '_video.avi' output_train_dir = 'train/' + label output_test_dir = 'test/' + label # Create the output directory if it doesn't exist if not os.path.exists(output_train_dir): os.makedirs(output_train_dir) if not os.path.exists(output_test_dir): os.makedirs(output_test_dir) # Open the video file cap = cv2.VideoCapture(video_path) # Get the total number of frames in the video total_frames = int(cap.get(cv2.CAP_PROP_FRAME_COUNT)) print(total_frames) # Select 240 random frame indices random_frames = random.sample(range(total_frames), 240) # Read and save selected frames for frame_index in random_frames: cap.set(cv2.CAP_PROP_POS_FRAMES, frame_index) ret, frame = cap.read() if ret: save_frame(frame, frame_index, label) # Release the video capture object cap.release() count = 0 print("Saved 240 randomly selected frames as JPEG files.") - Some example images are shown below


Training the model
So, now we have our train and test dataset. Now we need to train the model. I am using my laptop for the training part and saving the model. I created a custom tinier yolo classifier with some help from internet. I followed the below steps.
- Import
#Set up the environment
import torch
import torch.nn as nn
import torch.optim as optim
from torchvision import datasets, transforms
- Define the model architecture
#Define the model architecture class TinierYOLO(nn.Module): def __init__(self): super(TinierYOLO, self).__init__() self.features = nn.Sequential( nn.Conv2d(3, 8, kernel_size=3, stride=1, padding=1), nn.ReLU(), nn.MaxPool2d(kernel_size=2, stride=2), nn.Conv2d(8, 16, kernel_size=3, stride=1, padding=1), nn.ReLU(), nn.MaxPool2d(kernel_size=2, stride=2), # Additional layers can be added as needed ) self.classifier = nn.Sequential( nn.Linear(16 * 50 * 66, 128), # Adjust dimensions based on input size nn.ReLU(), nn.Linear(128, 26), # Number of classes (26 classes) ) def forward(self, x): x = self.features(x) x = x.view(x.size(0), -1) x = self.classifier(x) return x # Initialize the model model = TinierYOLO() - Preparing the dataset. My dataset is 266x200 images.
#Prepare the dataset # Define transformations for your dataset transform = transforms.Compose([ transforms.Resize((200, 266)), transforms.ToTensor(), ]) # Load your custom dataset # Replace 'YourDatasetClass' with your custom dataset class if you have one train_dataset = datasets.ImageFolder(root='train', transform=transform) train_loader = torch.utils.data.DataLoader(train_dataset, batch_size=32, shuffle=True) test_dataset = datasets.ImageFolder(root='test', transform=transform) test_loader = torch.utils.data.DataLoader(test_dataset, batch_size=32, shuffle=False) - Training and saving the weights.
#Train the model
# Initialize the model, loss function, and optimizer
model = TinierYOLO()
criterion = nn.CrossEntropyLoss()
optimizer = optim.Adam(model.parameters(), lr=0.001)

# Training loop
for epoch in range(10):  # Number of epochs
    model.train()
    running_loss = 0.0
    for inputs, labels in train_loader:
        optimizer.zero_grad()
        outputs = model(inputs)
        loss = criterion(outputs, labels)
        loss.backward()
        optimizer.step()
        running_loss += loss.item()
    print(f'Epoch {epoch+1}, Loss: {running_loss / len(train_loader)}')

# Save the trained model
torch.save(model.state_dict(), 'tinier_yolo_weights.pth')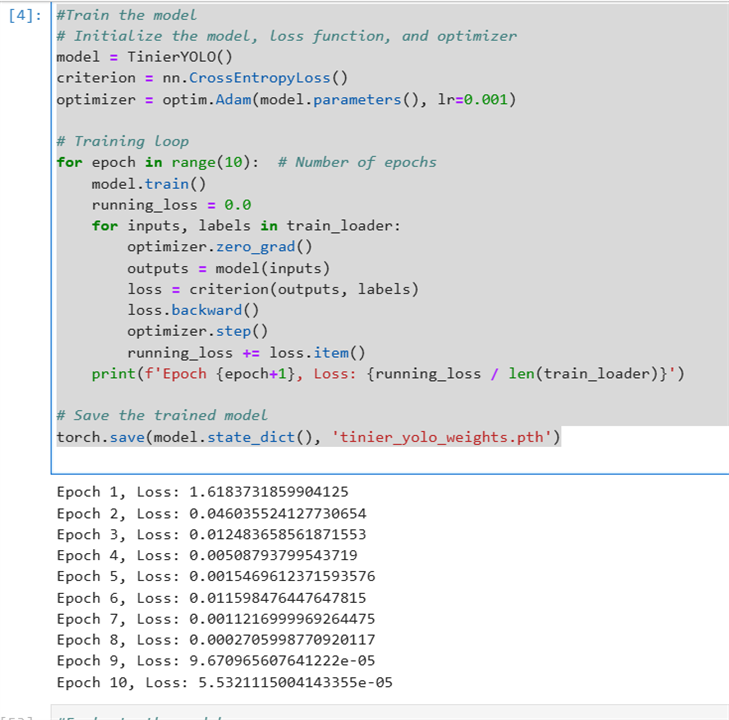
- Evaluating the mode
#Evaluate the model
# Evaluation loop
model.eval()
correct = 0
total = 0
with torch.no_grad():
    for inputs, labels in test_loader:
        outputs = model(inputs)
        _, predicted = torch.max(outputs.data, 1)
        total += labels.size(0)
        correct += (predicted == labels).sum().item()

print('Total: ' + str(total))
print(f'Accuracy: {100 * correct / total}%')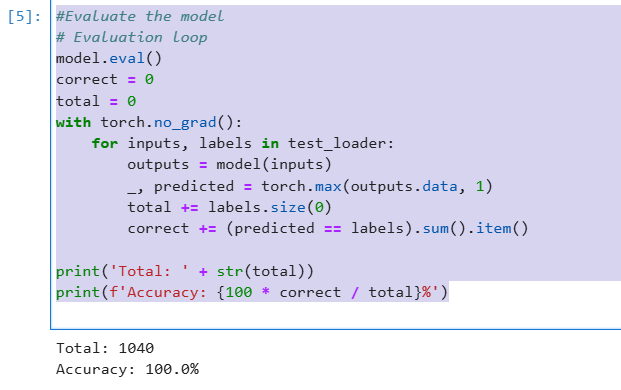
- Deploy the model
#Deploy the model
# Save the model for deployment
torch.save(model.state_dict(), 'tinier_yolo_deployment.pth')
Performing classification on real time video
Now lets perform image classification on real time video in the laptop before running it on the FPGA board.
- Load the model and weights
#Perform classification on real time video. import cv2 import PIL # Load the model model = TinierYOLO() model.load_state_dict(torch.load('tinier_yolo_weights.pth', weights_only=True)) model.eval() # Define the classes (change as per your dataset) classes = ['A','B','C','D','E','F','G','H','I','J','K','L','M','N','O','P','Q','R','S','T','U','V','W','X','Y','Z'] # Define image transformations transform = transforms.Compose([ transforms.Resize((200, 266)), transforms.ToTensor(), ]) - Run classification
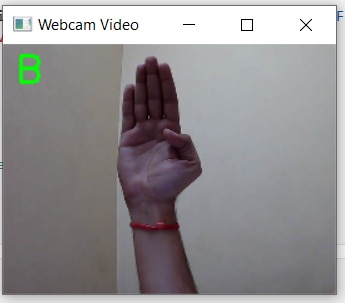
def classify_frame(frame, model, transform, classes, threshold=0.8): # Preprocess the frame frame_rgb = cv2.cvtColor(frame, cv2.COLOR_BGR2RGB) pil_frame = PIL.Image.fromarray(frame_rgb) input_tensor = transform(pil_frame).unsqueeze(0) # Perform the classification with torch.no_grad(): output = model(input_tensor) # Get confidence scores scores = nn.functional.softmax(output, dim=1) max_score, predicted = torch.max(scores, 1) # Check if confidence score is above threshold if max_score.item() >= threshold: class_name = classes[predicted.item()] else: class_name = None return class_name # Initialize webcam cap = cv2.VideoCapture(1) # Check if the webcam is opened correctly if not cap.isOpened(): print("Error: Could not open webcam.") exit() while True: ret, frame = cap.read() if not ret: break # Resize the frame to 200x200 before classification resized_frame = cv2.resize(frame, (266, 200)) # Perform classification class_name = classify_frame(resized_frame, model, transform, classes) # Display the resulting frame with the class name if a match is found if class_name: cv2.putText(resized_frame, class_name, (10, 30), cv2.FONT_HERSHEY_SIMPLEX, 1, (0, 255, 0), 2) cv2.imshow('Webcam Video', resized_frame) # Press 'q' to exit the loop if cv2.waitKey(1) & 0xFF == ord('q'): break # Release everything when done cap.release() cv2.destroyAllWindows() - Here is a video of the live classification happening. I think its not that accurate. It is able to correctly classify B, D and W only. For now, I will move forward with this.
Saving the network architecture and weights
Now, we must save the network architecture in json format and the weights to run the classification on on pynq.
- To dump the network architecture, I followed the below code.
import json def model_to_json(model): model_json = { "network": "tinier-yolo", "input_image": "../../tests/Test_image/tinier-yolo/input.bin", "verification_image": "../../tests/Test_image/tinier-yolo/verification.bin", "binparam": "binparam-tinier-yolo-nopool", "use_binparams": True, "binparam_skip": 1, "layer_skip": 0, "layers": [] } for name, module in model.named_modules(): if name == "": continue # Skip the top-level module itself layer = { "name": name, "func": "", "input_bits": 3, "output_bits": 3, "weight_bits": 1, "threshold_bits": 16, "kernel_shape": None, "kernel_stride": None, "input_channels": None, "input": None, "output_channels": None, "output": None, "padding": None } if isinstance(module, nn.Conv2d): layer["func"] = "conv_layer" layer["kernel_shape"] = module.kernel_size[0] layer["kernel_stride"] = module.stride[0] layer["input_channels"] = module.in_channels layer["input"] = [module.in_channels, None, None] # Example placeholder layer["output_channels"] = module.out_channels layer["output"] = [module.out_channels, None, None] # Example placeholder layer["padding"] = module.padding[0] elif isinstance(module, nn.MaxPool2d): layer["func"] = "maxpool_layer" layer["kernel_shape"] = module.kernel_size layer["kernel_stride"] = module.stride layer["input_channels"] = None # Example placeholder layer["input"] = [None, None, None] # Example placeholder layer["output_channels"] = None # Example placeholder layer["output"] = [None, None, None] # Example placeholder layer["padding"] = module.padding elif isinstance(module, nn.Linear): layer["func"] = "fc_layer" layer["input_channels"] = module.in_features layer["input"] = [module.in_features] layer["output_channels"] = module.out_features layer["output"] = [module.out_features] model_json["layers"].append(layer) return model_json # Initialize the model model = TinierYOLO() # Convert the model to JSON model_json = model_to_json(model) # Save the JSON to a file with open('tinier_yolo_layers.json', 'w') as json_file: json.dump(model_json, json_file, indent=4) - To dump the weights and biases, I followed below code.
import os
import numpy as np

# Create directory to save weights
os.makedirs('tinier_yolo_weights', exist_ok=True)

# Extract and save weights and biases
for name, param in model.named_parameters():
    if 'weight' in name:
        weight_np = param.data.cpu().numpy()
        np.save(f'tinier_yolo_weights/{name.replace(".", "-")}-W.npy', weight_np)
    elif 'bias' in name:
        bias_np = param.data.cpu().numpy()
        np.save(f'tinier_yolo_weights/{name.replace(".", "-")}-bias.npy', bias_np)

print("Weights and biases have been saved in NumPy format.")
Unfortunately, after this point I couldn't complete my project. I am still stuck with how to use my custom network architecture on arty z7 and use the overlays to run it and there is no more time.
Summary
Although, I couldn't complete my project on time due to some unforeseen reasons, I had a very good time working on it and I learned a lot. It seems there is still much more to learn and I will be continuing on the project.