


In this post I continue with the initial setup of the Command Center. I will focus on how to boot from a USB drive and avoid card corruption (EDIT: the openHAB installation will be done in an addtional post with the Mosquitto installation as well). But first, the links to previous posts and the project status.
Previous Posts
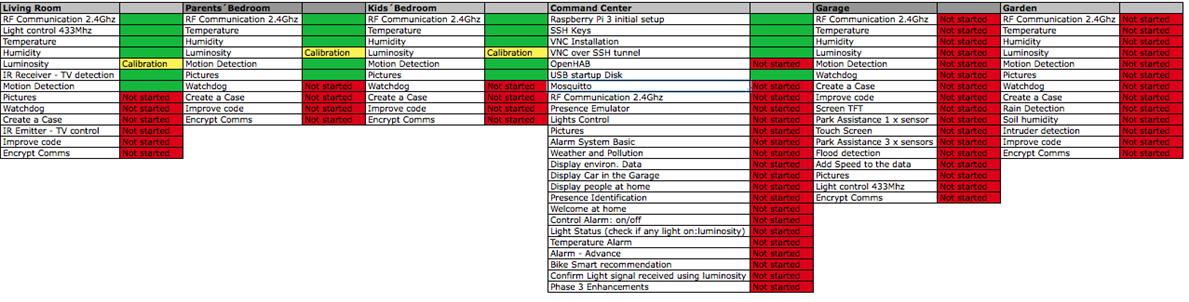
Project Status

Setting up the RPI3 to boot from a USB Drive
The first question to answer is, why would I want to boot from a USB Drive?? Well, as many nice things, you come across them via the hard way... The SD cards are very good for quickly storing and accessing data, however, they are not designed to write on them constantly. There is a physical limitation and after some hundreds or thousands of times that you write on the same physical part of the card, this part loses its capability to store data. The effect is that whatever you write there, you lose it, producing SD card corruption. The effect? you will need to get another SD card and if you were cautious enough, recover any backup you did in the past - hopefully recent past...
There are different approaches to avoid SD corruption or at least to minimize its effect, making the SD card last longer: avoid the graphical interface and use only the command line, move to RAM parts of the OS storage, reduce the number of logs and how frequent they are updated, allow plenty of free space, etc, etc. All this has some disadvantages. I have come across another solution, to move most of the OS to a USB Hard Disk. Since the HD are prepared to frequently writing, they last longer. So far I have had 2-3 SD cards corrupted by no HD corruption.
A couple of notes. For the RPI2, technically speaking you don't boot from a USB Drive. The RPI would always require a SD card with the boot partition to actually boot. By modifying a line in the configuration, then it'd refer to the USB drive to continue with the OS boot up. So in fact you still required the SD card and the USB drive, being the advantage that the SD card wouldn't get corrupted since the heavy writing process performed by the OS happens on the USB drive. The second note is about the RPI3. It seems that the hardware does allow direct booting from a USB drive as well as from the network, however, there is not yet support for doing so. More info here. So all in all, the SD card is still required for the RPI3 but this may change in the coming months.
The process looks as follows:
- Flash the USB Hard Drive. In my case I don´t currently have any HDD free at home so I will be flashing a 32GB USB pendrive. The pendrives suffer the same as the SD cards with continuous rewrites, but hope that being 32GB it won´t suffer that much and in any case I will move the data to a HDD as soon as I can.
- Modify the SD card file to redirect to the USB once the RPI has booted up
- Test and clean up
Flashing the USB
Two things to note. Your USB drive will be completely deleted and you will lose any info it was on it as well as any partition it had. The second is that, since I will be flashing a 16GB image, I will need to extend the partition once finished to recover the 16GB remaining until the 32GB size of the pendrive.
I will follow the same steps as when I did the initial back up in PiIoT - DomPi 06: Setting up the Command Center - RPI3. And then I will flash the newly created image to the USB. Before flashing the USB you will probably need to unmount the partition - if there was any there. I did so by using the Mac "Disk Utility" app and clicking on the partition: on the left hand side menu you will find the drive "USB Flash Drive Media" in my case, and hanging from it the existing partition(s). Click on them and then click on unmount.
The commands for backing up and flashing are, as a reminder:
sudo dd if=/dev/rdisk1 bs=1m | gzip > ~/Desktop/pi.gz
gzip -dc ~/Desktop/pi.gz | sudo dd of=/dev/rdisk2 bs=1m
The second line points at /dev/rdisk2 that is the destination device where I have the pendrive. These lines will take loooong.
Modify the SD card
In order to tell the bootup process where to find the required filesystem to continue launching Raspbian, I need to modify a file. Before plugging the SD card into my Mac, let's identify what is the USB folder in the RPI. To do so, plug the pen drive to the RPI now and run the command:
pi@dompi:~ $ df
Filesystem     1K-blocks    Used Available Use% Mounted on
...                  ...
tmpfs               5120       4      5116   1% /run/lock
tmpfs             474028       0    474028   0% /sys/fs/cgroup
/dev/mmcblk0p6     64366   19980     44386  32% /boot
tmpfs              94808       0     94808   0% /run/user/1000
/dev/sda7       13801392 3494756   9582568  27% /media/pi/root
/dev/sda6          64366   19962     44404  32% /media/pi/boot
/dev/sda5          30701     449     27959   2% /media/pi/SETTINGS
/dev/mmcblk0p5     30701     449     27959   2% /media/pi/SETTINGS1
you can see there that /media/pi/root is under /dev/sda7. We will add this to the cmdline file later. If you plan to have more USB drives connected, the approach I'm sharing here probably won't work and you need to look for the UUID to specify it. More info here. This "quick" approach shall be ok for DomPi though.
So I plug the SD card into my Mac. The SD card has three partitions, the boot, Recovery and the actual partition with the files. In the boot partition I will modify the /boot/cmdline.txt. Currently it has this single line
dwc_otg.lpm_enable=0 console=ttyAMA0,115200 console=tty1 root=/dev/mmcblk0p7 rootfstype=ext4 elevator=deadline fsck.repair=yes rootwait
And replace what says "/dev/mmcblk0p7" by "/dev/sda7". Note that sda7 is what I found out using the df commandMore details here and here.
Test and clean-up
I put both the SD card and the USB pendrive into the RPI and power it on. If all goes fine, this still may not be working  it may happen we did not change the cmdline.txt file. So if it works, then you turn it off, take out the USB and power it on again and it does not work... You can be sure that it is booting from the USB! Congratulations. Now, we can clean up the drives. The USB contains a partition called /boot that we can just delete - it is just 66MB but... In the SD card, you can as well delete any partitions that are not the /boot one.
The last part would be to resize the main partition so that I don't lose the 16GB as said before. I will postpone this action to focus on DomPi and work on more features. In any case, the resizing can be done with GParted or via the command line.
Node´s Dashboard
Top Comments