


Table of Contents
- Project Introduction
- Getting Started
- Calibrating the MPX2050DP Pressure Sensor
- Calculations and Noise Reduction
- Using Vivado and Testing the System
- Project Report Updated
**********************************************************************************************************************
Using Vivado
Here I have used the same project from the third blog, that is: "Cmod S7-25 XADC Demo"
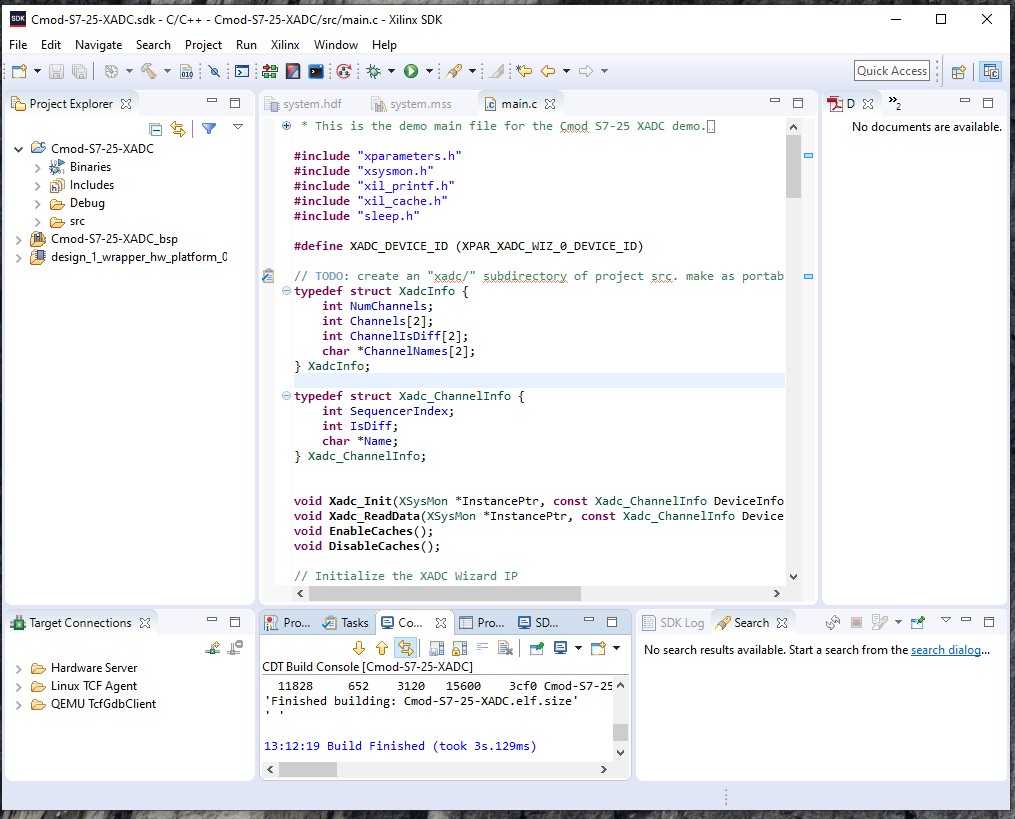
I have used and modified the "Cmod S7-25 XADC Demo" example. So the main.c looks as shown below:
/*
 * This is the demo main file for the Cmod S7-25 XADC demo.
 *
 * Changelog:
 * 06/07/2018 (ArtVVB): Created
 *
 * */

#include "xparameters.h"
#include "xsysmon.h"
#include "xil_printf.h"
#include "xil_cache.h"
#include "sleep.h"

#define XADC_DEVICE_ID (XPAR_XADC_WIZ_0_DEVICE_ID)

// TODO: create an "xadc/" subdirectory of project src. make as portable to other boards/xadc configs as possible
typedef struct XadcInfo {
	int NumChannels;
	int Channels[2];
	int ChannelIsDiff[2];
	char *ChannelNames[2];
} XadcInfo;

typedef struct Xadc_ChannelInfo {
	int SequencerIndex;
	int IsDiff;
	char *Name;
} Xadc_ChannelInfo;


void Xadc_Init(XSysMon *InstancePtr, const Xadc_ChannelInfo DeviceInfo[], const int NumChannels, const u32 DeviceId);
void Xadc_ReadData(XSysMon *InstancePtr, const Xadc_ChannelInfo DeviceInfo[], const int NumChannels, u16 RawData[]);
void EnableCaches();
void DisableCaches();

// Initialize the XADC Wizard IP
void Xadc_Init(XSysMon *InstancePtr, const Xadc_ChannelInfo DeviceInfo[], const int NumChannels, const u32 DeviceId) {
	u32 ChannelsMask;
	u32 InputModeMask;
	int i;
	XSysMon_Config *xadc_cfg_ptr;
	xadc_cfg_ptr = XSysMon_LookupConfig(DeviceId);
	XSysMon_CfgInitialize(InstancePtr, xadc_cfg_ptr, xadc_cfg_ptr->BaseAddress);

	ChannelsMask = 0;
	InputModeMask = 0;
	for (i = 0; i < NumChannels; i++) {
		ChannelsMask |= 1 << DeviceInfo[i].SequencerIndex;
		if (DeviceInfo[i].IsDiff)
			InputModeMask |= 1 << DeviceInfo[i].SequencerIndex;
	}
	// Disable the Channel Sequencer before configuring the Sequence registers.
	XSysMon_SetSequencerMode(InstancePtr, XSM_SEQ_MODE_SAFE);

	// Leave alarm enables default
	// Leave channel averaging default

	// Set single-ended input mode for all channels
	XSysMon_SetSeqInputMode(InstancePtr, InputModeMask);

	// Leave acquisition time default
	XSysMon_SetSeqAcqTime(InstancePtr, ChannelsMask);
	// Enable all channels
	XSysMon_SetSeqChEnables(InstancePtr, ChannelsMask);

	// Leave the ADCCLK frequency default
	// Leave calibration default

	// Enable the Channel Sequencer in continuous sequencer cycling mode
	XSysMon_SetSequencerMode(InstancePtr, XSM_SEQ_MODE_CONTINPASS);
}

// Captures Data from each XADC Channel
void Xadc_ReadData(XSysMon *InstancePtr, const Xadc_ChannelInfo DeviceInfo[], const int NumChannels, u16 RawData[]) {
	//TODO: implement timeout on status check
	int i;

	// Clear the Status
	XSysMon_GetStatus(InstancePtr);

	// Wait until the End of Sequence occurs
	while ((XSysMon_GetStatus(InstancePtr) & XSM_SR_EOS_MASK) != XSM_SR_EOS_MASK);

	//Capture data from each channel, return via RawData
	for (i = 0; i < NumChannels; i++) {
		RawData[i] = XSysMon_GetAdcData(InstancePtr, DeviceInfo[i].SequencerIndex);
	}

	return;
}

int main() {
	const int NumChannels = 2;
	const Xadc_ChannelInfo CmodS7_XadcInfo[2] = {
		{21, 0, "AIN_32"}, // VAUX_5
		{28, 0, "AIN_33"}  // VAUX_12
	};
	const int Xadc_VoltageScaler_SingleEnded = (0xFFFF) / (1000 * 3.3);   // FROM 0 TO 3300 mv

	XSysMon Xadc_Ctrl;
	u16 Xadc_RawData[2];
	int Xadc_Voltage; // x100 from actual value. Two decimal point precision.
	int Xadc_VoltageRemainder;
	//float X_test;
	int i;

	EnableCaches();
	xil_printf("Initializing Cmod S7-25 XADC Demo...\n\r");
	Xadc_Init(&Xadc_Ctrl, CmodS7_XadcInfo, NumChannels, XADC_DEVICE_ID);
	xil_printf("Demo Initialized\n\r");

	while (1) {
		Xadc_ReadData(&Xadc_Ctrl, CmodS7_XadcInfo, NumChannels, Xadc_RawData);
		for (i = 0; i < NumChannels; i++) {
			// Convert raw data in this channel to an int in the range 0 to 330, representing
			// the voltage on that input channel multiplied by 100
			Xadc_Voltage = ((int)Xadc_RawData[i] / Xadc_VoltageScaler_SingleEnded);
			if ((Xadc_Voltage == 1890)) {
				xil_printf("%s h->00cm ");
			}
			if ((Xadc_Voltage >= 1891 && Xadc_Voltage <= 1894)) {
				xil_printf("%s h->01a05cm ");
			}
			if ((Xadc_Voltage >= 1895 && Xadc_Voltage <= 1898)) {
				xil_printf("%s h->06a10cm ");
			}
			if ((Xadc_Voltage >= 1899 && Xadc_Voltage <= 1902)) {
				xil_printf("%s h->11a15cm ");
			}
			if ((Xadc_Voltage >= 1903 && Xadc_Voltage <= 1906)) {
				xil_printf("%s h->16a20cm ");
			}
			if ((Xadc_Voltage >= 1907)) {
				xil_printf("%s h->21cm ");
			}

			Xadc_VoltageRemainder = Xadc_Voltage % 1000;
			Xadc_Voltage = (Xadc_Voltage/1000) % 100;

			// Print the name of the channel, followed by the voltage
			xil_printf("%s: %01d.%03dV    ",
					CmodS7_XadcInfo[i].Name,
					Xadc_Voltage,
					Xadc_VoltageRemainder
			);
		}
		xil_printf("\n\r");
		usleep(500000); // wait 500ms
	}
	DisableCaches();

	return 0;
}

void EnableCaches() {
#ifdef __MICROBLAZE__
#ifdef XPAR_MICROBLAZE_USE_DCACHE
   Xil_DCacheEnable();
#endif
#ifdef XPAR_MICROBLAZE_USE_ICACHE
   Xil_ICacheEnable();
#endif
#endif
}

void DisableCaches() {
#ifdef __MICROBLAZE__
#ifdef XPAR_MICROBLAZE_USE_DCACHE
   Xil_DCacheDisable();
#endif
#ifdef XPAR_MICROBLAZE_USE_ICACHE
   Xil_ICacheDisable();
#endif
#endif
}
Main modifications:
- Voltage range from 0 to 3300 millivolts
const int Xadc_VoltageScaler_SingleEnded = (0xFFFF) / (1000 * 3.3); // FROM 0 TO 3300 mv
- Height readings range was 5 centimeters
if ((Xadc_Voltage == 1890)) {
xil_printf("%s h->00cm ");
}
if ((Xadc_Voltage >= 1891 && Xadc_Voltage <= 1894)) {
xil_printf("%s h->01a05cm ");
}
if ((Xadc_Voltage >= 1895 && Xadc_Voltage <= 1898)) {
xil_printf("%s h->06a10cm ");
}
if ((Xadc_Voltage >= 1899 && Xadc_Voltage <= 1902)) {
xil_printf("%s h->11a15cm ");
}
if ((Xadc_Voltage >= 1903 && Xadc_Voltage <= 1906)) {
xil_printf("%s h->16a20cm ");
}
if ((Xadc_Voltage >= 1907)) {
xil_printf("%s h->21cm ");
}
- Print readings with thousandths of voltage
Xadc_VoltageRemainder = Xadc_Voltage % 1000;
Xadc_Voltage = (Xadc_Voltage/1000) % 100;
- Take readings every 500 milliseconds
usleep(500000); // wait 500ms
Testing the System
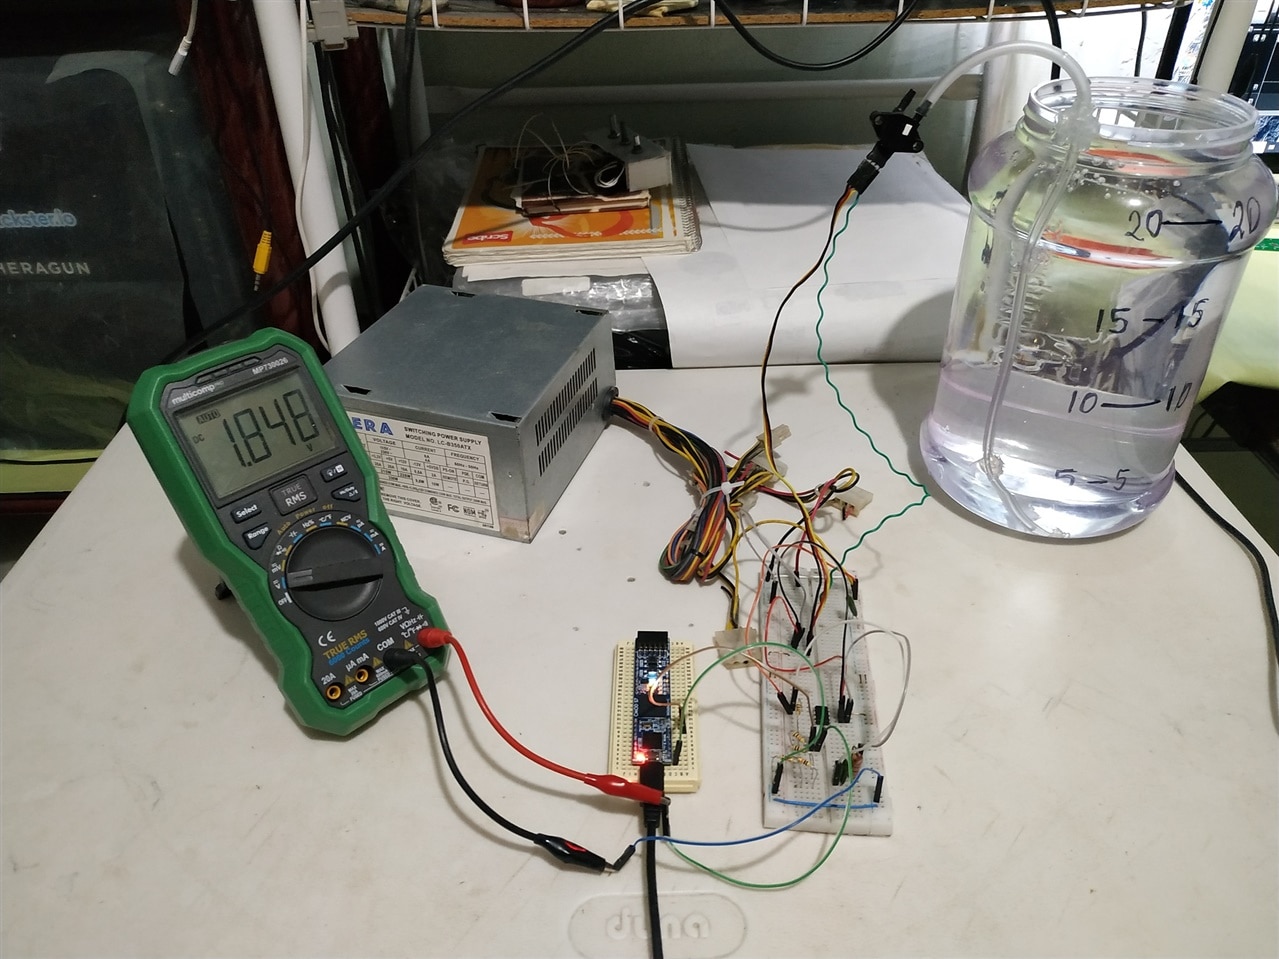
First, it is necessary to glue the hose with silicone on the water container. Below you see a simple tour of this project before putting it to the test.
The tests performed are shown below.
Conclusion
- At the end of this project I can say that it is possible to use a pressure sensor to measure the water level in a container.
- In my case the MPX2050DP pressure sensor handles small voltages from 0 to 50 millivolts. Even with the op amp I only managed to increase it a gain of 200 millivolts.
- In my experiment, I was able to measure distances of 5 centimeters, equivalent to 1 liter of water in the used container. This would be very useful to measure the water level of a tank in which you could measure from 0 to 200 liters.
- If I want to improve the resolution, for example to measure centimeter distances, then it is necessary to use a smaller and more sensitive sensor, for example the MPX5010, which has an output of 0 to 5 volts and without using an operational amplifier.