element14 Community
element14 Community
    Register Log In
  • Site
  • Search
  • Log In Register
  • Community Hub
    Community Hub
    • What's New on element14
    • Feedback and Support
    • Benefits of Membership
    • Personal Blogs
    • Members Area
    • Achievement Levels
  • Learn
    Learn
    • Ask an Expert
    • eBooks
    • element14 presents
    • Learning Center
    • Tech Spotlight
    • STEM Academy
    • Webinars, Training and Events
    • Learning Groups
  • Technologies
    Technologies
    • 3D Printing
    • FPGA
    • Industrial Automation
    • Internet of Things
    • Power & Energy
    • Sensors
    • Technology Groups
  • Challenges & Projects
    Challenges & Projects
    • Design Challenges
    • element14 presents Projects
    • Project14
    • Arduino Projects
    • Raspberry Pi Projects
    • Project Groups
  • Products
    Products
    • Arduino
    • Avnet & Tria Boards Community
    • Dev Tools
    • Manufacturers
    • Multicomp Pro
    • Product Groups
    • Raspberry Pi
    • RoadTests & Reviews
  • About Us
  • Store
    Store
    • Visit Your Store
    • Choose another store...
      • Europe
      •  Austria (German)
      •  Belgium (Dutch, French)
      •  Bulgaria (Bulgarian)
      •  Czech Republic (Czech)
      •  Denmark (Danish)
      •  Estonia (Estonian)
      •  Finland (Finnish)
      •  France (French)
      •  Germany (German)
      •  Hungary (Hungarian)
      •  Ireland
      •  Israel
      •  Italy (Italian)
      •  Latvia (Latvian)
      •  
      •  Lithuania (Lithuanian)
      •  Netherlands (Dutch)
      •  Norway (Norwegian)
      •  Poland (Polish)
      •  Portugal (Portuguese)
      •  Romania (Romanian)
      •  Russia (Russian)
      •  Slovakia (Slovak)
      •  Slovenia (Slovenian)
      •  Spain (Spanish)
      •  Sweden (Swedish)
      •  Switzerland(German, French)
      •  Turkey (Turkish)
      •  United Kingdom
      • Asia Pacific
      •  Australia
      •  China
      •  Hong Kong
      •  India
      •  Korea (Korean)
      •  Malaysia
      •  New Zealand
      •  Philippines
      •  Singapore
      •  Taiwan
      •  Thailand (Thai)
      • Americas
      •  Brazil (Portuguese)
      •  Canada
      •  Mexico (Spanish)
      •  United States
      Can't find the country/region you're looking for? Visit our export site or find a local distributor.
  • Translate
  • Profile
  • Settings
Upcycle It
  • Challenges & Projects
  • Design Challenges
  • Upcycle It
  • More
  • Cancel
Upcycle It
Blog [Upcycle It] Interactive Race Car Driver - Drive Motor Testing
  • Blog
  • Forum
  • Documents
  • Polls
  • Files
  • Events
  • Mentions
  • Sub-Groups
  • Tags
  • More
  • Cancel
  • New
  • Share
  • More
  • Cancel
Group Actions
  • Group RSS
  • More
  • Cancel
Engagement
  • Author Author: Workshopshed
  • Date Created: 7 Apr 2017 9:32 PM Date Created
  • Views 585 views
  • Likes 3 likes
  • Comments 3 comments
  • interactiveracecardriver
  • upcycle_it
  • upcycled_interactiveracecardriver
Related
Recommended

[Upcycle It] Interactive Race Car Driver - Drive Motor Testing

Workshopshed
Workshopshed
7 Apr 2017

Motor investigation

Before committing too much time to the car, I wanted to check over the motors. The key things to look at were ensuring they rotate freely and to determine the correct motor voltage. Because the motors are sealed it's not possible to check much else such as brushes or bearings. I have taken these kind of motors apart before but I did not want to risk being in the situation of not being able to put them back together.

image

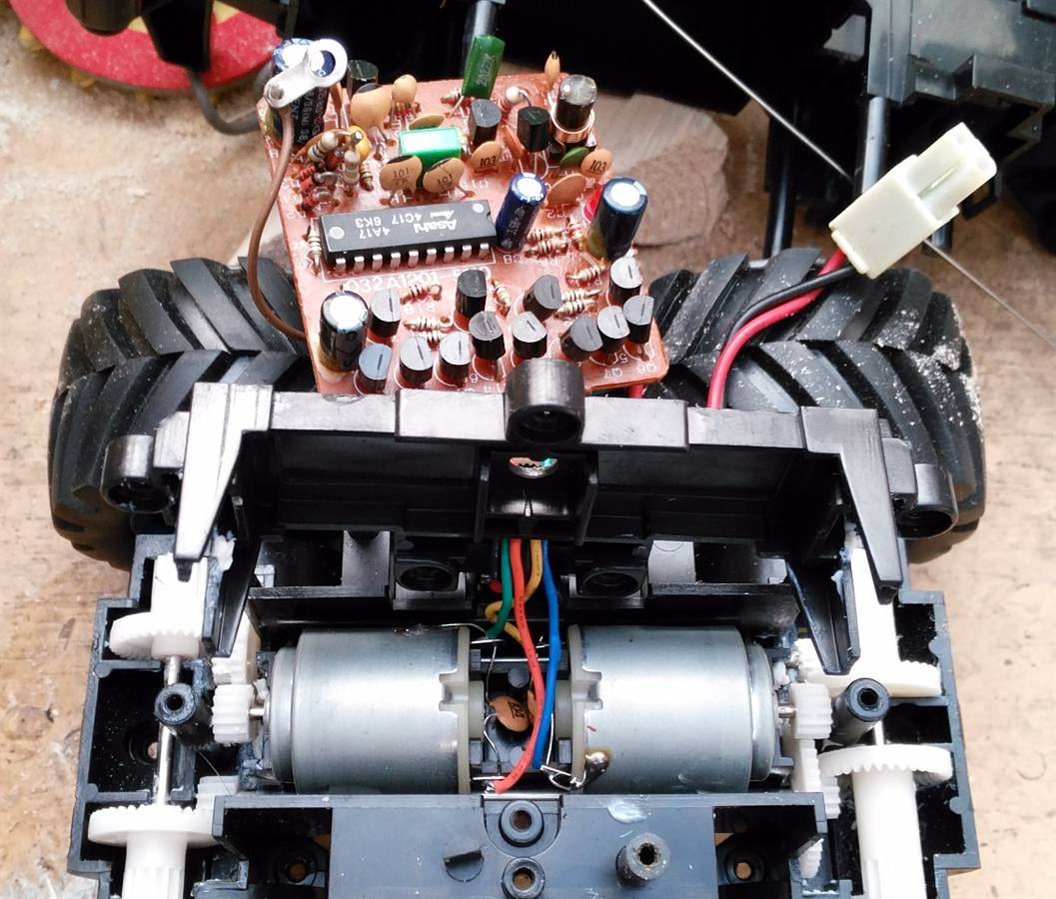
I started by disconnecting the RC controller board so the motors could be tested. The coil resistance was approx 4Ω so I knew I'd need to be careful about limiting the current. Looking at the board the capacitors were all rated at 10v so I suspected this was powered from two or three old style  batteries e.g. 3v or 4.5v. So I started with my power supply set to 2v and 300mA. The motor turned and did not take a lot of current so I increased to 3v and took a reading.

image

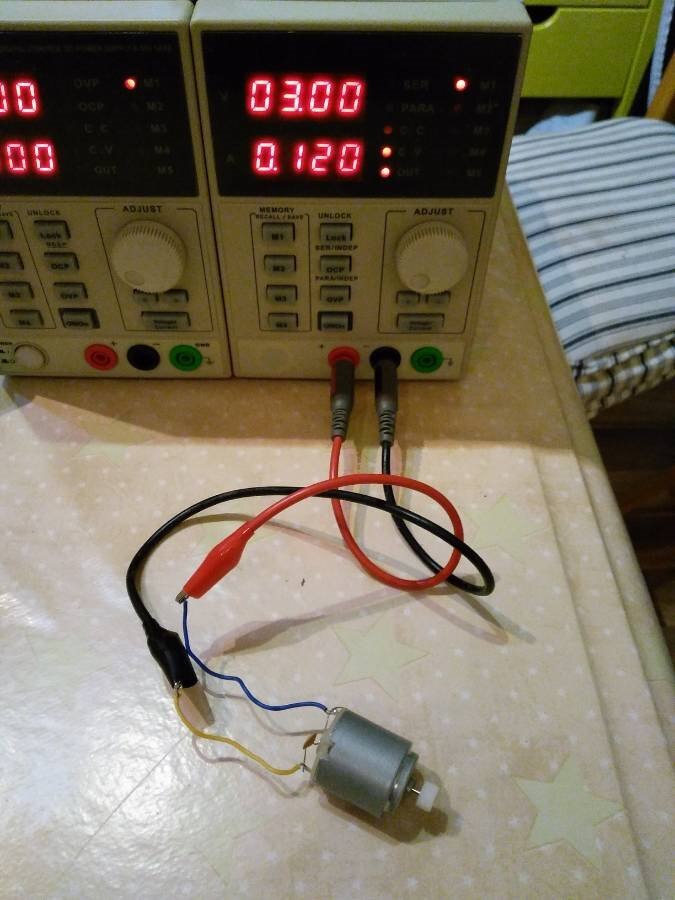
I tried to measure the stall current of the motor but it went over 1A and I was not comfortable setting my current limit any higher as I did not want to burn out the motors. I did, however, measure the motor under load and it took 600mA. This will be important when I look at the supply as I'll need to have something that can provide these kinds of currents.


After re-assembling the car I ensured that both motors worked in both directions and the wheels turned. I'll likely open up the car chassis a little so that I can get to the wiring without having to keep unscrewing everything.


Driving the motor

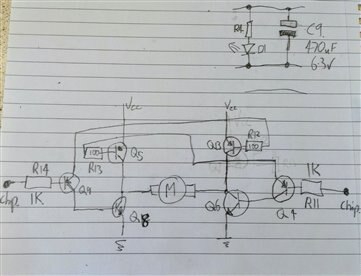
I had thought about using an off the shelf H-Bridge module based on the L298. However looking at the RC board it divides easily into 2 halves for the radio and the power to the motors. I guessed that the latter is two, 6 transistor based H-Bridges.


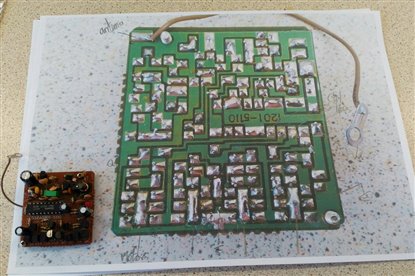
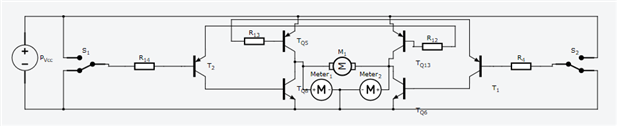
RC Board Reverse Engineering

To reverse engineer the board, took a photo and blew up the print. Normally I would use any chip on the board to determine where the power supply lines are located but the numbers drew a blank, the name on the top is a toy manufacturer. So I followed the electrolytic capacitors instead, also the screws are typically in the ground plane. The transistors were easily identifiable as C3279 (NPN), A1015 (PNP) and A1300 (PNP) the resistors were mostly 1K and 100R. I had big pads for the motors.

imageimage

Simulation

The circuit seems to have promise but I was a little concerned that I did not fully understand the circuit, so I opened up Circuits.io to simulate it.

image

imageimage

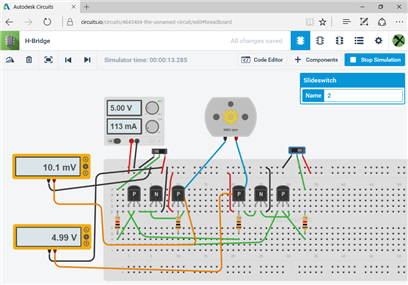
With one input high and the other low the circuit worked as I wanted it to. The motor turned in each direction.

If I took both inputs high then it seemed not to switch off, staying with which ever direction had previously been selected.

If I turned both low then my worst fears were confirmed in that the circuit did not properly turn off the transistors resulting in the current limit being hit and the supply voltage dropping.

image

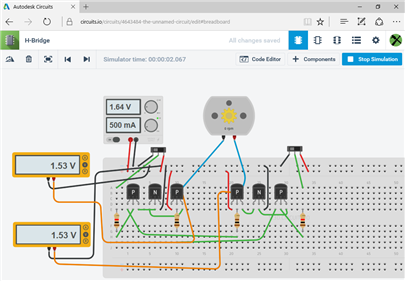
I wondered if there was anything specific about the combination of my transistors that might cause it to work differently to the simulation. My final experiment with the simulated circuit was to drop the supply voltage down to 1.5v. This worked better but the current draw for both inputs low was still quite large at 350mA.


Simulated circuit - https://circuits.io/circuits/4643484-h-bridge


Testing

image

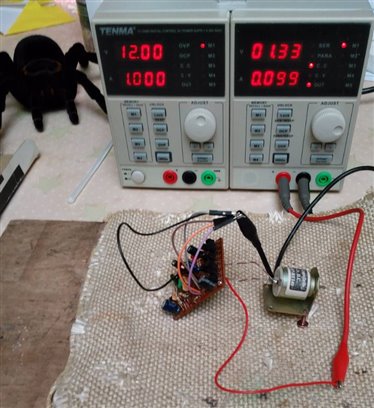
I removed the RC chip and wired up a spare motor to the H-Bridge. I set the voltage to 3v and the current limit to 100mA. It behaved exactly the same as the simulation, when the motor was running it was fine, when the inputs were all low then the current limiter kicked in.


My conclusion is that the motors perhaps never stopped, the controller could have kept them running all of the time. I'd like to be able to stop my motors so it's back to my initial plan of using an off the shelf module, I've got a L298 with a big heat sink and a smaller TB6612FNG module. Both of these will run from 3-5v and logic levels at similar levels. The motors and gearboxes seem to be fine so otherwise the car is good to use.


Reference

https://www.sparkfun.com/datasheets/Robotics/TB6612FNG.pdf

https://www.sparkfun.com/datasheets/Robotics/L298_H_Bridge.pdf

http://www.micromo.com/technical-library/dc-motor-tutorials/motor-calculations


Previous Posts

[Upcycle It] Interactive Race Car Driver - Plan of action

[Upcycle It] Interactive Race Car Driver - Software

[Upcycle It] Interactive Race Car Driver - Lights

[Upcycle It] Interactive Race Car Driver - Detailed Plan

[Upcycle It] Interactive Race Car Driver - Edison

  • Sign in to reply

Top Comments

  • DAB
    DAB over 8 years ago +1
    Nice post. I wonder if you are getting some back EMF from the motor coils. Have you thought of adding some bypass diodes to capture the spikes? DAB
  • Workshopshed
    Workshopshed over 8 years ago in reply to DAB +1
    I wonder if the simulation would include that?
  • mcb1
    mcb1 over 8 years ago in reply to Workshopshed +1
    I wonder if the simulation would include that? I've always wondered if in a virtual world, when you bump into the couch, do you get a virtual bruise? I'd be expecting to see some resistors across the Base…
  • mcb1
    mcb1 over 8 years ago in reply to Workshopshed

    I wonder if the simulation would include that?

    I've always wondered if in a virtual world, when you bump into the couch, do you get a virtual bruise?


    I'd be expecting to see some resistors across the Base-Emitter of Q6 and Q8.


    I'm stuggling to see how it can turn on Q6 and Q8 given that they require 0.6v B-E. This voltage is on the Collector of Q4, Q9 but yet somehow there is enough to turn them on through a 1k resistor.??


    Are you sure that Q4 and Q9 aren't NPN.??

    The numbers certainly line up, but I'd be thinking an NPN would work better.


    mark

    • Cancel
    • Vote Up +1 Vote Down
    • Sign in to reply
    • More
    • Cancel
  • Workshopshed
    Workshopshed over 8 years ago in reply to DAB

    I wonder if the simulation would include that?

    • Cancel
    • Vote Up +1 Vote Down
    • Sign in to reply
    • More
    • Cancel
  • DAB
    DAB over 8 years ago

    Nice post.


    I wonder if you are getting some back EMF from the motor coils.


    Have you thought of adding some bypass diodes to capture the spikes?


    DAB

    • Cancel
    • Vote Up +1 Vote Down
    • Sign in to reply
    • More
    • Cancel
element14 Community

element14 is the first online community specifically for engineers. Connect with your peers and get expert answers to your questions.

  • Members
  • Learn
  • Technologies
  • Challenges & Projects
  • Products
  • Store
  • About Us
  • Feedback & Support
  • FAQs
  • Terms of Use
  • Privacy Policy
  • Legal and Copyright Notices
  • Sitemap
  • Cookies

An Avnet Company © 2025 Premier Farnell Limited. All Rights Reserved.

Premier Farnell Ltd, registered in England and Wales (no 00876412), registered office: Farnell House, Forge Lane, Leeds LS12 2NE.

ICP 备案号 10220084.

Follow element14

  • X
  • Facebook
  • linkedin
  • YouTube