element14 Community
element14 Community
    Register Log In
  • Site
  • Search
  • Log In Register
  • About Us
  • Community Hub
    Community Hub
    • What's New on element14
    • Feedback and Support
    • Benefits of Membership
    • Personal Blogs
    • Members Area
    • Achievement Levels
  • Learn
    Learn
    • Ask an Expert
    • eBooks
    • element14 presents
    • Learning Center
    • Tech Spotlight
    • STEM Academy
    • Webinars, Training and Events
    • Learning Groups
  • Technologies
    Technologies
    • 3D Printing
    • FPGA
    • Industrial Automation
    • Internet of Things
    • Power & Energy
    • Sensors
    • Technology Groups
  • Challenges & Projects
    Challenges & Projects
    • Design Challenges
    • element14 presents Projects
    • Project14
    • Arduino Projects
    • Raspberry Pi Projects
    • Project Groups
  • Products
    Products
    • Arduino
    • Avnet Boards Community
    • Dev Tools
    • Manufacturers
    • Multicomp Pro
    • Product Groups
    • Raspberry Pi
    • RoadTests & Reviews
  • Store
    Store
    • Visit Your Store
    • Choose another store...
      • Europe
      •  Austria (German)
      •  Belgium (Dutch, French)
      •  Bulgaria (Bulgarian)
      •  Czech Republic (Czech)
      •  Denmark (Danish)
      •  Estonia (Estonian)
      •  Finland (Finnish)
      •  France (French)
      •  Germany (German)
      •  Hungary (Hungarian)
      •  Ireland
      •  Israel
      •  Italy (Italian)
      •  Latvia (Latvian)
      •  
      •  Lithuania (Lithuanian)
      •  Netherlands (Dutch)
      •  Norway (Norwegian)
      •  Poland (Polish)
      •  Portugal (Portuguese)
      •  Romania (Romanian)
      •  Russia (Russian)
      •  Slovakia (Slovak)
      •  Slovenia (Slovenian)
      •  Spain (Spanish)
      •  Sweden (Swedish)
      •  Switzerland(German, French)
      •  Turkey (Turkish)
      •  United Kingdom
      • Asia Pacific
      •  Australia
      •  China
      •  Hong Kong
      •  India
      •  Korea (Korean)
      •  Malaysia
      •  New Zealand
      •  Philippines
      •  Singapore
      •  Taiwan
      •  Thailand (Thai)
      • Americas
      •  Brazil (Portuguese)
      •  Canada
      •  Mexico (Spanish)
      •  United States
      Can't find the country/region you're looking for? Visit our export site or find a local distributor.
  • Translate
  • Profile
  • Settings
Open Arduino
  • Challenges & Projects
  • Project14
  • Open Arduino
  • More
  • Cancel
Open Arduino
Blog Arduino in Test Instrumentation - Outro: LabVIEW Example
  • Blog
  • Forum
  • Documents
  • Events
  • Polls
  • Files
  • Members
  • Mentions
  • Sub-Groups
  • Tags
  • More
  • Cancel
  • New
Join Open Arduino to participate - click to join for free!
  • Share
  • More
  • Cancel
Group Actions
  • Group RSS
  • More
  • Cancel
Engagement
  • Author Author: Jan Cumps
  • Date Created: 13 Apr 2018 7:34 PM Date Created
  • Views 2267 views
  • Likes 8 likes
  • Comments 1 comment
  • diytestequipch
  • openarduinoch
  • labview
  • project 14
  • scpi
  • arduino
  • arduino_test_instrumentation
Related
Recommended

Arduino in Test Instrumentation - Outro: LabVIEW Example

Jan Cumps
Jan Cumps
13 Apr 2018

Arduino in Test Instrumentation


To celebrate Project 14's birthday, I made a programmable switch with an Arduino UNO.

This final post shows a complete LabVIEW example with the instrument.

image


The LabView Example


This example runs a continuous loop that switches the relays on and off. It also shows the status on a dashboard.

You can set the speed of the switching, and can choose which of the two relays is switched.

The LabVIEW driver, including this example, is available on the first blog post of this series.


image


The settings can be changed at runtime. When you enter a new switch delay value, it becomes active immediately.

The same for the Channel selection. You can real-time switch between relay 1 and 2.

The LED shows the status that the Arduino reports for the selected channel.

Pushing the STOP button exits the loop and lets the workflow execute the closing sequence, where resources are cleaned up.


The LabVIEW process


You'll recognise the controls of the dashboard above as inputs and outputs in the workflow. You'll also see the driver blocks made for this instrument.


image


The left side shows the initialisation parameters for the device, such as COM port, do you want to reset the status at the start, how long the device should wait by default between sending a SCPI command and reading the reply from the Arduino.

Then the initialize block is called. It establishes the serial communication and, because we asked it, resets the status.


The remainder is a loop, with 3 activities on each run: set the status, read and show the status, wait for a given time.

The loop runs until the STOP button is pushed or an error happens (e.g. the device stops replying, USB cable removed).

The loop counter is used to toggle the status between ON and OFF. If the counter is even, we turn the switch OFF. If it's uneven, the switch is set on.

image

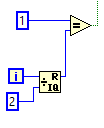
The above construct is used for this. It's a modulus 2 calculation. i is the loop counter and given as the numerator, and the constant 2 is given as the denominator.

The remainder is then compared for equality to 1.  The result of that comparison is a boolean, true when the remainder is 1, else false.


Because the Channel, Switch Delay and LED controls are inside the loop, they are polled and set at each loop cycle.

That's why you can change the channel and switching speed at runtime, and the status change is reflected at each cycle.

This is different than the controls for the initial setup. They are placed outside of the loop. They are read once when the flow is started.


When the STOP button is clicked, the loop exits. The closing part of the flow is now run.

I placed a reset block to take care that both relays are switched off. Then the communication link with the Arduino is closed.


And with that, I'm also closing this blog series. Thank you for reading.


Related Blog
Arduino in Test Instrumentation - Intro: SCPI Programmable Switch
Arduino in Test Instrumentation - Part 1: SCPI Lib
Arduino in Test Instrumentation - Part 2: Firmware
Arduino in Test Instrumentation - Part 3a: LabVIEW Driver Intitialisation Block
Arduino in Test Instrumentation - Part 3b: LabVIEW Driver Switch Control Block
Arduino in Test Instrumentation - Part 3c: LabVIEW Driver Read Status Block
Arduino in Test Instrumentation - Outro: LabVIEW Example
  • Sign in to reply

Top Comments

  • genebren
    genebren over 7 years ago +1
    Nicely done! This was a very informative and enjoying blog series. Your project seems useful and solid. Gene
Parents
  • genebren
    genebren over 7 years ago

    Nicely done!  This was a very informative and enjoying blog series.  Your project seems useful and solid.

    Gene

    • Cancel
    • Vote Up +1 Vote Down
    • Sign in to reply
    • More
    • Cancel
Comment
  • genebren
    genebren over 7 years ago

    Nicely done!  This was a very informative and enjoying blog series.  Your project seems useful and solid.

    Gene

    • Cancel
    • Vote Up +1 Vote Down
    • Sign in to reply
    • More
    • Cancel
Children
No Data
element14 Community

element14 is the first online community specifically for engineers. Connect with your peers and get expert answers to your questions.

  • Members
  • Learn
  • Technologies
  • Challenges & Projects
  • Products
  • Store
  • About Us
  • Feedback & Support
  • FAQs
  • Terms of Use
  • Privacy Policy
  • Legal and Copyright Notices
  • Sitemap
  • Cookies

An Avnet Company © 2025 Premier Farnell Limited. All Rights Reserved.

Premier Farnell Ltd, registered in England and Wales (no 00876412), registered office: Farnell House, Forge Lane, Leeds LS12 2NE.

ICP 备案号 10220084.

Follow element14

  • X
  • Facebook
  • linkedin
  • YouTube