element14 Community
element14 Community
    Register Log In
  • Site
  • Search
  • Log In Register
  • About Us
  • Community Hub
    Community Hub
    • What's New on element14
    • Feedback and Support
    • Benefits of Membership
    • Personal Blogs
    • Members Area
    • Achievement Levels
  • Learn
    Learn
    • Ask an Expert
    • eBooks
    • element14 presents
    • Learning Center
    • Tech Spotlight
    • STEM Academy
    • Webinars, Training and Events
    • Learning Groups
  • Technologies
    Technologies
    • 3D Printing
    • FPGA
    • Industrial Automation
    • Internet of Things
    • Power & Energy
    • Sensors
    • Technology Groups
  • Challenges & Projects
    Challenges & Projects
    • Design Challenges
    • element14 presents Projects
    • Project14
    • Arduino Projects
    • Raspberry Pi Projects
    • Project Groups
  • Products
    Products
    • Arduino
    • Avnet Boards Community
    • Dev Tools
    • Manufacturers
    • Multicomp Pro
    • Product Groups
    • Raspberry Pi
    • RoadTests & Reviews
  • Store
    Store
    • Visit Your Store
    • Choose another store...
      • Europe
      •  Austria (German)
      •  Belgium (Dutch, French)
      •  Bulgaria (Bulgarian)
      •  Czech Republic (Czech)
      •  Denmark (Danish)
      •  Estonia (Estonian)
      •  Finland (Finnish)
      •  France (French)
      •  Germany (German)
      •  Hungary (Hungarian)
      •  Ireland
      •  Israel
      •  Italy (Italian)
      •  Latvia (Latvian)
      •  
      •  Lithuania (Lithuanian)
      •  Netherlands (Dutch)
      •  Norway (Norwegian)
      •  Poland (Polish)
      •  Portugal (Portuguese)
      •  Romania (Romanian)
      •  Russia (Russian)
      •  Slovakia (Slovak)
      •  Slovenia (Slovenian)
      •  Spain (Spanish)
      •  Sweden (Swedish)
      •  Switzerland(German, French)
      •  Turkey (Turkish)
      •  United Kingdom
      • Asia Pacific
      •  Australia
      •  China
      •  Hong Kong
      •  India
      •  Korea (Korean)
      •  Malaysia
      •  New Zealand
      •  Philippines
      •  Singapore
      •  Taiwan
      •  Thailand (Thai)
      • Americas
      •  Brazil (Portuguese)
      •  Canada
      •  Mexico (Spanish)
      •  United States
      Can't find the country/region you're looking for? Visit our export site or find a local distributor.
  • Translate
  • Profile
  • Settings
Open Arduino
  • Challenges & Projects
  • Project14
  • Open Arduino
  • More
  • Cancel
Open Arduino
Blog Arduino in Test Instrumentation - Part 3a: LabVIEW Driver Intitialisation Block
  • Blog
  • Forum
  • Documents
  • Events
  • Polls
  • Files
  • Members
  • Mentions
  • Sub-Groups
  • Tags
  • More
  • Cancel
  • New
Join Open Arduino to participate - click to join for free!
  • Share
  • More
  • Cancel
Group Actions
  • Group RSS
  • More
  • Cancel
Engagement
  • Author Author: Jan Cumps
  • Date Created: 8 Apr 2018 6:31 PM Date Created
  • Views 2701 views
  • Likes 8 likes
  • Comments 4 comments
  • diytestequipch
  • ardexpert
  • openarduinoch
  • labview
  • project 14
  • scpi
  • arduino_test_instrumentation
Related
Recommended

Arduino in Test Instrumentation - Part 3a: LabVIEW Driver Intitialisation Block

Jan Cumps
Jan Cumps
8 Apr 2018
image

Open Arduino

Enter Your Project for a chance to win a grand prize for the most innovative use of Arduino or a $200 shopping cart! The Birthday Special: Arduino Projects for Arduino Day!

Back to The Project14 homepage image

Project14 Home
Monthly Themes
Monthly Theme Poll


Arduino in Test Instrumentation


To celebrate Project 14's birthday, I'm going to make a programmable switch with an Arduino UNO.

This post describes the first block for the LabVIEW driver: Initialisation

image


LabVIEW Driver


A LabVIEW driver is a library that allows you to program an instrument in a intuitive way. It's one layer above the instrument's SCPI interface.

There is a convention that's used by many manufactures: you should provide an init and close block, and blocks to allow to control and query your device.


I am following those conventions for the LabVIEW driver lib that I'm building for the Arduino SCPI switch.

In the next few posts I'll introduce all blocks and an example LabVIEW flow.

Let's start of with the Initialize module.


Initialize


image

This block sets up the communication with your Arduino UNO.

You'll see that there are a number of settings that define the behaviour of the data exchange, like serial communication settings, ports, timeouts.

There are also some behavioural settings. You can ask the device to reset at initialisation*, or if you want check the ID of the device you're talking to.

image

All the values that aren't dependent on the firmware are available as parameters.

The communication settings are internal. They have to match the settings that the Arduino sketch uses to initialise serial communications.

image


From left to right, the flow is opening the communication channel, then optionally verifying if we're talking to the right device, optionally resetting the device,

and if an error occurs, handling that.


The first block opens the communication.

image

The serial settings are predefined. They are firmware dependent and you don't have to edit them.

The "VISA resource name" is the communication port. This is a parameter that you set before invoking this block.

The "deal with Arduino Communication Reset" parameter is there to do what the label says image. An Arduino UNO resets when you initialise serial communication with it.

There are hardware ways to modify the board so that this reset doesn't happen (but that has impact on the functionality of the Arduino IDE Serial Monitor !).

I'm assuming that the code will run on a board that isn't modded. I've added a wait time just after communication starts,  that can be configured.

On my Arduino, 1500 ms isn't long enough. 2000 ms works every time.

I haven't bothered optimising this value, because it only happens once when the instrument is initialised.

Because in a normal flow you have to initialise a number of instruments in parallel at the start of the flow, the 2 seconds are OK, comparable with many other instrument's setup time.

If you know a way to optimise this, please comment on this blog post with your approach.


The next part is a case structure.

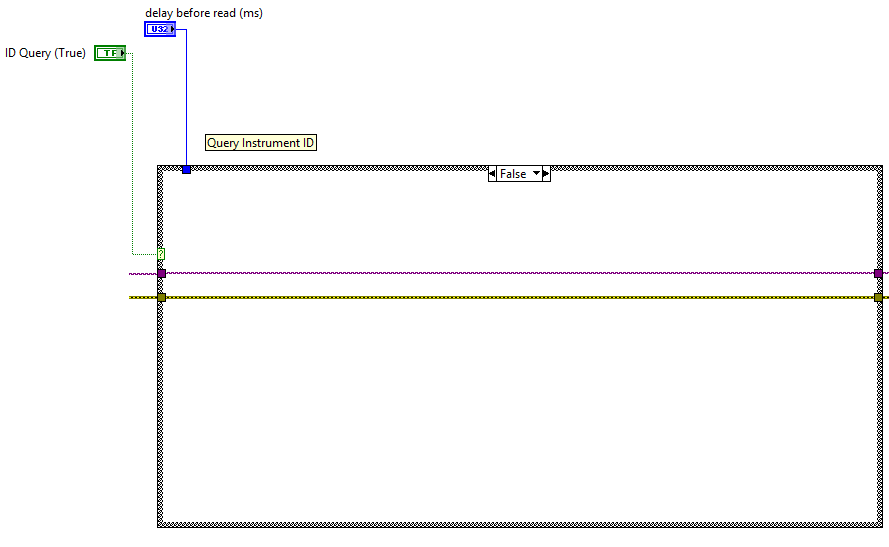
Depending of the value of ID Quey you pass, it will either ask the device to show its ID and validate that, or it will not perform that step:

This is the flow that's executed when you select to query the device ID:


image

You can see in this flow that the SCPI interface is used to retrieve the device ID. In the upper left corner we're sending the *IDN? command.


This much easier flow is run if you say that the flow doesn't have to validate the device:

image


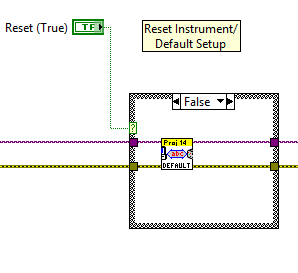
The next block defines what happens after establishing contact. We'll eather reset or not reset the device.

You'll see that both of these options invoke another driver block for the device.

The Reset option will call our driver's "Reset" module. The other option will call the "Default Instrument Setup" block.

I don't know yet if I will blog about those blocks. That depends on the interest.

In any case, I'll provide the LabVIEW driver lib. That 'll allow you to investigate them yourself.


This is the flow when you ask for a reset. Hint: It 'll call the *RST SCPI command.

image

This flow is called if you prefer to not ask a reset.

image

Again, this discussion is moot because a standard Arduino UNO will reset anyways.


The last block deals with error handling. Once more, there are two paths, depending on success or error.


This flow is executed on success:

image

Indeed, it does nothing. A sucessful flow doesn't require error handling.

When an error occured in the block, this process is executed:

image

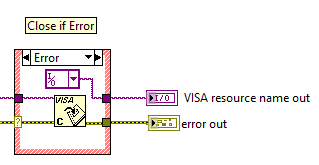
We're closing the device and sending a non-initialised VISA resource to the next block.

This will prevent that the next block sends commands to our device.


*big caviat: an Arduino UNO will always hardware reset the micro controller at start of serial communication, unless you modify the PCB.


Related Blog
Arduino in Test Instrumentation - Intro: SCPI Programmable Switch
Arduino in Test Instrumentation - Part 1: SCPI Lib
Arduino in Test Instrumentation - Part 2: Firmware
Arduino in Test Instrumentation - Part 3a: LabVIEW Driver Intitialisation Block
Arduino in Test Instrumentation - Part 3b: LabVIEW Driver Switch Control Block
Arduino in Test Instrumentation - Part 3c: LabVIEW Driver Read Status Block
Arduino in Test Instrumentation - Outro: LabVIEW Example
Attachments:
4370.project14.zip
  • Sign in to reply

Top Comments

  • genebren
    genebren over 7 years ago +1
    Very nice addition to your blog series. Very informative and makes me want to to rush off a learn something new (LabVIEW, at least new to me). Gene
  • michaeldchristopher
    michaeldchristopher over 6 years ago +1
    I very much appreciated your work on this. This is very useful to me. I control SCPI instruments all the time, in many ways (including C++, LabVIEW, and python) so this is awesome for me. I needed this…
Parents
  • Jan Cumps
    Jan Cumps over 7 years ago

    For the early adopters, I've added a premature version of the LabVIEW driver library.

    The Initialize, Close, Reset and Default Configuration blocks work. So does the Example workflow.

    It will call the Init and Close blocks. Attach your Arduino, program it with this project's firmware, and select the port in the Example flow. Then execute and enjoy.


    Once I have a fully functional driver lib, I'll attach it to the main post of this series

    • Cancel
    • Vote Up 0 Vote Down
    • Sign in to reply
    • More
    • Cancel
Comment
  • Jan Cumps
    Jan Cumps over 7 years ago

    For the early adopters, I've added a premature version of the LabVIEW driver library.

    The Initialize, Close, Reset and Default Configuration blocks work. So does the Example workflow.

    It will call the Init and Close blocks. Attach your Arduino, program it with this project's firmware, and select the port in the Example flow. Then execute and enjoy.


    Once I have a fully functional driver lib, I'll attach it to the main post of this series

    • Cancel
    • Vote Up 0 Vote Down
    • Sign in to reply
    • More
    • Cancel
Children
No Data
element14 Community

element14 is the first online community specifically for engineers. Connect with your peers and get expert answers to your questions.

  • Members
  • Learn
  • Technologies
  • Challenges & Projects
  • Products
  • Store
  • About Us
  • Feedback & Support
  • FAQs
  • Terms of Use
  • Privacy Policy
  • Legal and Copyright Notices
  • Sitemap
  • Cookies

An Avnet Company © 2025 Premier Farnell Limited. All Rights Reserved.

Premier Farnell Ltd, registered in England and Wales (no 00876412), registered office: Farnell House, Forge Lane, Leeds LS12 2NE.

ICP 备案号 10220084.

Follow element14

  • X
  • Facebook
  • linkedin
  • YouTube