


![]()
Hi all ! Hope all are well.
This is my sixth blog post of my adventure with the AMD Xilinx Kria KV260 Vision Starter Kit Road Test.
On this post and after having the necessary software, I'll try to quantize, inspect and compile the models - my custom models - to be able to run them in the KV260.
I'll start by using a PyTorch model and next a TensorFlow2 .
Quantizing the models
Because the quantizing process requires some images for validation, I'm going to use another set available on the Internet. This is a dataset made available by AUTO.RIA .
I'm using the following file - https://nomeroff.net.ua/datasets/autoriaNumberplateDataset-2019-09-17.zip It has about 1.5GB and almost 3000 images. Some don't have license numbers, so I've deleted those and ended up with about 1500 images. It's enough.
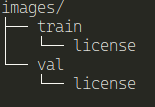
You'll realize that it's already split between train and val. Remove all the other directories and files.
But, because the quantization process requires, we need to create a label directory and inside we put the images.
This will be like:
images/train/<label>/*image_files*
Here's the structure:
Quantizing using PyTorch
Let's create a directory in the Vitis-AI folder to hold all the necessary files to quantize the PyTorch model
mkdir PyTorch_data
cd PyTorch_data
To here, we're going to copy all the images from the dataset above and create a new file - quantize.py - that will do the quantization of the model.
copy all the images decompressed above to our directory.
cp -r <images_location>/* .
Now, let's create the python file for the quantization.
Quantization
vai_q_pytorch was the file to run the quantization process for PyTorch files. But, for Vitis-AI 3.0, this was changed and now it runs as a Python plugin - you import the libraries and run the functions for the quantization process.
In our case, we have a docker container created for PyTorch that has all the tools and libraries necessary.
Now, let's get all the files needed ready.
Copy the Torch model to the created directory. We've created a model in AMD Xilinx Kria KV260 Vision AI Starter Kit : License plate detection : YOLOv7
In the directory yolov7CustomDetect/yolov7/runs/train/yolo7License_plate/weights we have several .pt files . Those are the weights needed for this.
Let's copy the file best.pt to here. We can change the name to make it more understandable.
mv best.pt yoloLicensePlateDetect.py
First, let's create the Python script for the quantization
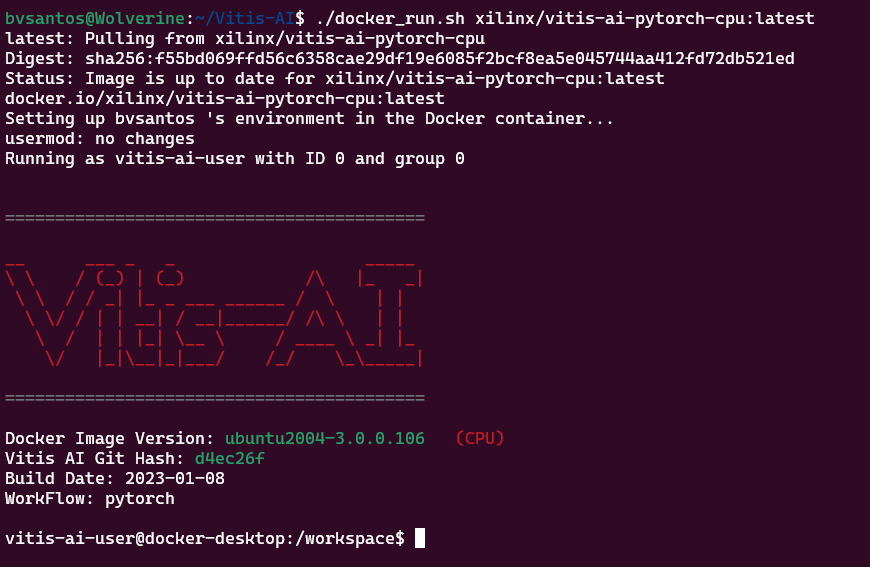
Now, start the docker image
./docker_run.sh xilinx/vitis-ai-pytorch-cpu:latest
My quantize.py is based - only changed some names - from the example that Vitis-AI makes available on the GitHub page.
import os
import re
import sys
import argparse
import time
import pdb
import random
from pytorch_nndct.apis import torch_quantizer
import torch
import torchvision
import torchvision.transforms as transforms
from pathlib import Path
#from torchvision.models.resnet import resnet18

from tqdm import tqdm

#device = torch.device("cuda")
device = torch.device("cpu")
#device = torch.device("cuda" if torch.cuda.is_available() else "cpu")
print (device)

yolo_folder_dir = str(Path(__file__).parent.absolute()) +"/yolov5" #  models folder path
sys.path.insert(0, yolo_folder_dir)

parser = argparse.ArgumentParser()

parser.add_argument(
    '--data_dir',
    default="/path/to/imagenet/",
    help='Data set directory, when quant_mode=calib, it is for calibration, while quant_mode=test it is for evaluation')
parser.add_argument(
    '--model_dir',
    default="/path/to/trained_model/",
    help='Trained model file path. Download pretrained model from the following url and put it in model_dir specified path: https://download.pytorch.org/models/resnet18-5c106cde.pth'
)
parser.add_argument(
    '--config_file',
    default=None,
    help='quantization configuration file')
parser.add_argument(
    '--subset_len',
    default=None,
    type=int,
    help='subset_len to evaluate model, using the whole validation dataset if it is not set')
parser.add_argument(
    '--batch_size',
    default=32,
    type=int,
    help='input data batch size to evaluate model')
parser.add_argument('--quant_mode',
    default='calib',
    choices=['float', 'calib', 'test'],
    help='quantization mode. 0: no quantization, evaluate float model, calib: quantize, test: evaluate quantized model')
parser.add_argument('--fast_finetune',
    dest='fast_finetune',
    action='store_true',
    help='fast finetune model before calibration')
parser.add_argument('--deploy',
    dest='deploy',
    action='store_true',
    help='export xmodel for deployment')
parser.add_argument('--inspect',
    dest='inspect',
    action='store_true',
    help='inspect model')

parser.add_argument('--target',
    dest='target',
    nargs="?",
    const="",
    help='specify target device')

args, _ = parser.parse_known_args()

def load_data(train=True,
              data_dir='dataset/imagenet',
              batch_size=128,
              subset_len=None,
              sample_method='random',
              distributed=False,
              model_name='resnet18',
              **kwargs):

  #prepare data
  # random.seed(12345)
  traindir = data_dir + '/train'
  valdir = data_dir + '/val'
  train_sampler = None
  normalize = transforms.Normalize(
      mean=[0.485, 0.456, 0.406], std=[0.229, 0.224, 0.225])
  if model_name == 'inception_v3':
    size = 299
    resize = 299
  else:
    size = 224
    resize = 256
  if train:
    dataset = torchvision.datasets.ImageFolder(
        traindir,
        transforms.Compose([
            transforms.RandomResizedCrop(size),
            transforms.RandomHorizontalFlip(),
            transforms.ToTensor(),
            normalize,
        ]))
    if subset_len:
      assert subset_len <= len(dataset)
      if sample_method == 'random':
        dataset = torch.utils.data.Subset(
            dataset, random.sample(range(0, len(dataset)), subset_len))
      else:
        dataset = torch.utils.data.Subset(dataset, list(range(subset_len)))
    if distributed:
      train_sampler = torch.utils.data.distributed.DistributedSampler(dataset)
    data_loader = torch.utils.data.DataLoader(
        dataset,
        batch_size=batch_size,
        shuffle=(train_sampler is None),
        sampler=train_sampler,
        **kwargs)
  else:
    dataset = torchvision.datasets.ImageFolder(
        valdir,
        transforms.Compose([
            transforms.Resize(resize),
            transforms.CenterCrop(size),
            transforms.ToTensor(),
            normalize,
        ]))
    if subset_len:
      assert subset_len <= len(dataset)
      if sample_method == 'random':
        dataset = torch.utils.data.Subset(
            dataset, random.sample(range(0, len(dataset)), subset_len))
      else:
        dataset = torch.utils.data.Subset(dataset, list(range(subset_len)))
    data_loader = torch.utils.data.DataLoader(
        dataset, batch_size=batch_size, shuffle=False, **kwargs)
  return data_loader, train_sampler

class AverageMeter(object):
  """Computes and stores the average and current value"""

  def __init__(self, name, fmt=':f'):
    self.name = name
    self.fmt = fmt
    self.reset()

  def reset(self):
    self.val = 0
    self.avg = 0
    self.sum = 0
    self.count = 0

  def update(self, val, n=1):
    self.val = val
    self.sum += val * n
    self.count += n
    self.avg = self.sum / self.count

  def __str__(self):
    fmtstr = '{name} {val' + self.fmt + '} ({avg' + self.fmt + '})'
    return fmtstr.format(**self.__dict__)

def accuracy(output, target, topk=(1,)):
  """Computes the accuracy over the k top predictions
    for the specified values of k"""
  with torch.no_grad():
    maxk = max(topk)
    batch_size = target.size(0)

    _, pred = output.topk(maxk, 1, True, True)
    pred = pred.t()
    correct = pred.eq(target.view(1, -1).expand_as(pred))

    res = []
    for k in topk:
      correct_k = correct[:k].flatten().float().sum(0, keepdim=True)
      res.append(correct_k.mul_(100.0 / batch_size))
    return res

def evaluate(model, val_loader, loss_fn):

  model.eval()
  model = model.to(device)
  top1 = AverageMeter('Acc@1', ':6.2f')
  top5 = AverageMeter('Acc@5', ':6.2f')
  total = 0
  Loss = 0
  for iteraction, (images, labels) in tqdm(
      enumerate(val_loader), total=len(val_loader)):
    images = images.to(device)
    labels = labels.to(device)
    #pdb.set_trace()
    outputs = model(images)
    loss = loss_fn(outputs, labels)
    Loss += loss.item()
    total += images.size(0)
    acc1, acc5 = accuracy(outputs, labels, topk=(1, 5))
    top1.update(acc1[0], images.size(0))
    top5.update(acc5[0], images.size(0))
  return top1.avg, top5.avg, Loss / total

def quantization(title='optimize',
                 model_name='',
                 file_path=''):

  data_dir = args.data_dir
  quant_mode = args.quant_mode
  finetune = args.fast_finetune
  deploy = args.deploy
  batch_size = args.batch_size
  subset_len = args.subset_len
  inspect = args.inspect
  config_file = args.config_file
  target = args.target
  if quant_mode != 'test' and deploy:
    deploy = False
    print(r'Warning: Exporting xmodel needs to be done in quantization test mode, turn off it in this running!')
  if deploy and (batch_size != 1 or subset_len != 1):
    print(r'Warning: Exporting xmodel needs batch size to be 1 and only 1 iteration of inference, change them automatically!')
    batch_size = 1
    subset_len = 1

  #model = resnet18().cpu()
  #model.load_state_dict(torch.load(file_path))
  model = torch.load('./yolov5/runs/train/exp7/weights/last.pt', map_location=device)['model']

  input = torch.randn([batch_size, 3, 224, 224])
  if quant_mode == 'float':
    quant_model = model
    if inspect:
      if not target:
          raise RuntimeError("A target should be specified for inspector.")
      import sys
      from pytorch_nndct.apis import Inspector
      # create inspector
      inspector = Inspector(target)  # by name
      # start to inspect
      inspector.inspect(quant_model, (input,), device=device)
      sys.exit()

  else:
    ## new api
    ####################################################################################
    quantizer = torch_quantizer(
        quant_mode, model, (input), device=device, quant_config_file=config_file, target=target)

    quant_model = quantizer.quant_model
    #####################################################################################

  # to get loss value after evaluation
  loss_fn = torch.nn.CrossEntropyLoss().to(device)

  val_loader, _ = load_data(
      subset_len=subset_len,
      train=False,
      batch_size=batch_size,
      sample_method='random',
      data_dir=data_dir,
      model_name=model_name)

  # fast finetune model or load finetuned parameter before test
  if finetune == True:
      ft_loader, _ = load_data(
          subset_len=5120,
          train=False,
          batch_size=batch_size,
          sample_method='random',
          data_dir=data_dir,
          model_name=model_name)
      if quant_mode == 'calib':
        quantizer.fast_finetune(evaluate, (quant_model, ft_loader, loss_fn))
      elif quant_mode == 'test':
        quantizer.load_ft_param()

  # record  modules float model accuracy
  # add modules float model accuracy here
  acc_org1 = 0.0
  acc_org5 = 0.0
  loss_org = 0.0

  #register_modification_hooks(model_gen, train=False)
  acc1_gen, acc5_gen, loss_gen = evaluate(quant_model, val_loader, loss_fn)

  # logging accuracy
  print('loss: %g' % (loss_gen))
  print('top-1 / top-5 accuracy: %g / %g' % (acc1_gen, acc5_gen))

  # handle quantization result
  if quant_mode == 'calib':
    quantizer.export_quant_config()
  if deploy:
    quantizer.export_torch_script()
    quantizer.export_onnx_model()
    quantizer.export_xmodel(deploy_check=False)


if __name__ == '__main__':

  #model_name = 'resnet18'
  #file_path = os.path.join(args.model_dir, model_name + '.pth')
  model_name = 'best'
  file_path = 'best.pt'

  feature_test = ' float model evaluation'
  if args.quant_mode != 'float':
    feature_test = ' quantization'
    # force to merge BN with CONV for better quantization accuracy
    args.optimize = 1
    feature_test += ' with optimization'
  else:
    feature_test = ' float model evaluation'
  title = model_name + feature_test

  print("-------- Start {} test ".format(model_name))

  # calibration or evaluation
  quantization(
      title=title,
      model_name=model_name,
      file_path=file_path)

  print("-------- End of {} test ".format(model_name)
Because further along I was getting some errors and after searching a bit online, It's necessary to copy the YOLOv7 (here is yolov5, but it's the same thing - this was the last attempt ) folder to here and add it in the Python script.

Let's try to quantize the model.
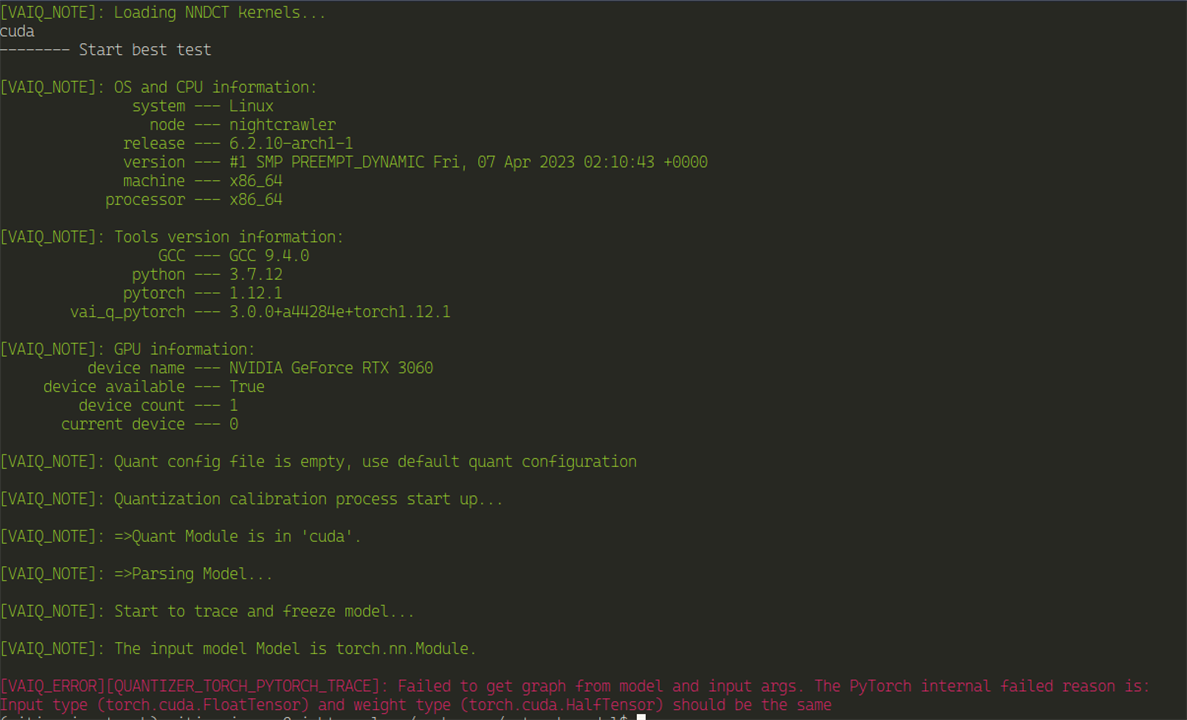
python quantize.py --data-dir . --model_dir ./yolov7/runs/train/yolo7License_plate/ --quant_model float
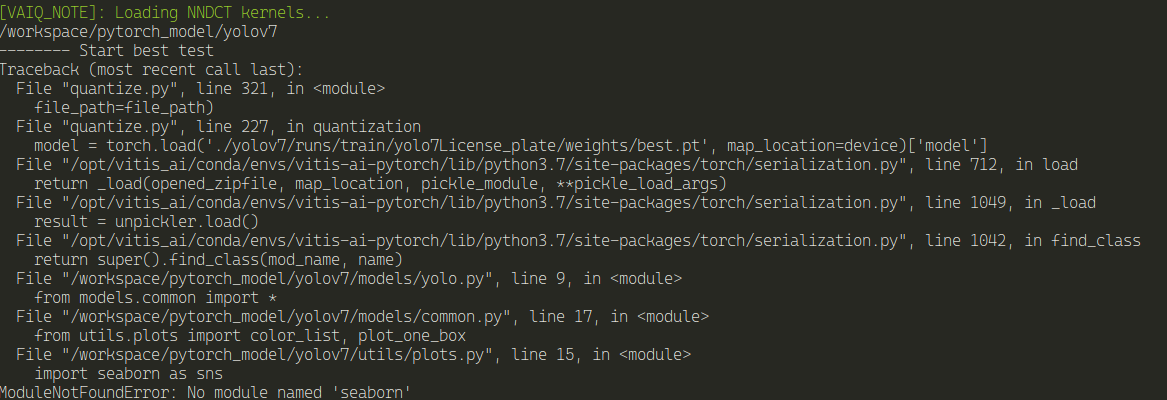
It requires seaborn. The downside is, because the docker image wasn't build with seaborn, every time you use the docker image, you'll need to install seaborn. I wonder why wasn't seaborn included in the image...
pip install seaborn
Let's try again.
python quantize.py --data-dir . --model_dir ./yolov7/runs/train/yolo7License_plate/ --quant_model float
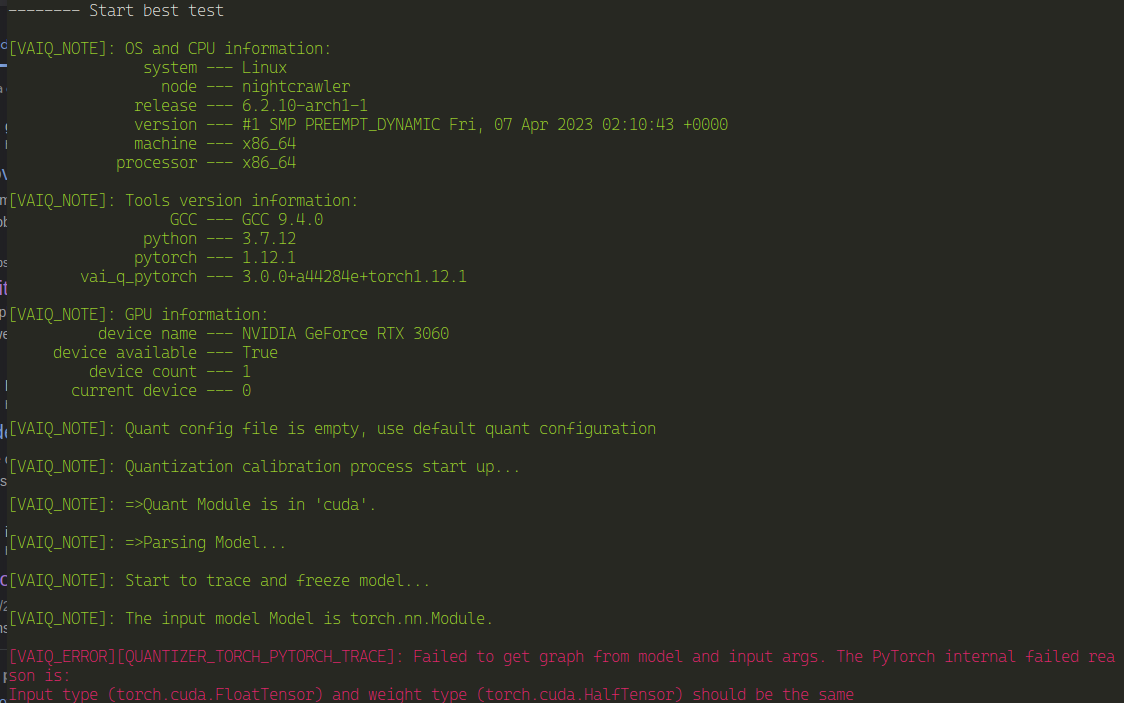
After a bit of searching on the Internet about that error and reached nothing, I decided to go with a older version of YOLO, being YOLOv5 .
According to the documentation, yolov5 is supported . Maybe it could be because of that.
But, it's the same error message.
After more reading, I've decided to post this error on the github issues for YOLO and on the AMD Xilinx forums.
In a wonderful move, Quenton Hall from AMD replied to my post and he sent me some YOLO models package that includes the source of the YOLO models they've used for VITIS AI 3.0 for me to try.
I'm using now a yolo5-m that they sent me. Because it has certain versions requirements, Python pip is of no use here, I'll resource to Anaconda, specifically miniconda3 - don't need the full conda enviroment.
Yolo5-m
For this, I need Python3.7, so, let's create a conda enviroment with Python 3.7
conda create --name yolo5xilinx python=3.7
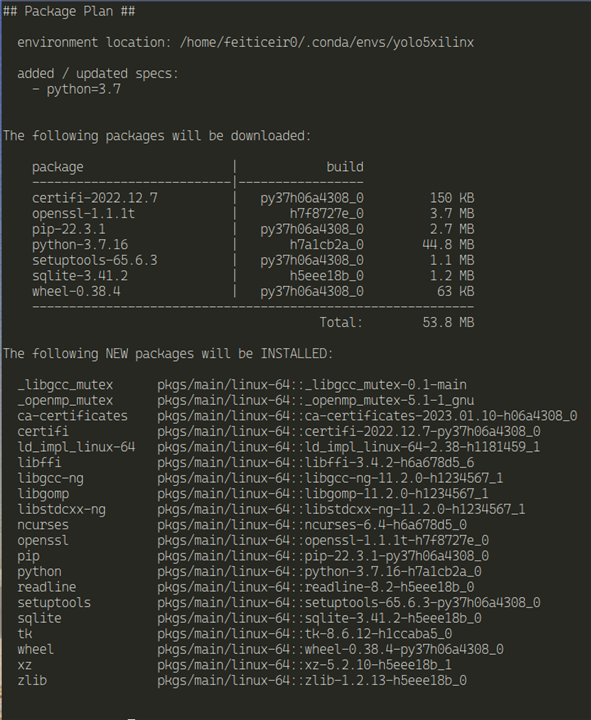
conda activate yolo5xilinx
Let's install the requirements
(conda comes with pip)
pip install -r requirements.txt
And it installed everything, older versions of the packages that are needed for this Yolo5-m version.
I already have a dataset and all the configurations needed to train the yolo5-m model, so, let's start.
Just issuing the help command for the train.py file
python train.py --help
I get this:

I tried to install it using conda, but no luck. After a bit of digging, I found out that I need to use the Xilinx Conda channel - didn't knew they had a channel.
They of doing it is not the usual way - we need to get the channel files:
wget -O conda-channel.tar.gz https://www.xilinx.com/bin/public/openDownload?filename=conda-channel_1.2.tar.gz
Uncompress it
tar zxvf conda-channel.tar.gz
and now install what we need using this local channel
conda install pytorch_nndct -c ./conda-channel
And, surprisingly... It didn't work...
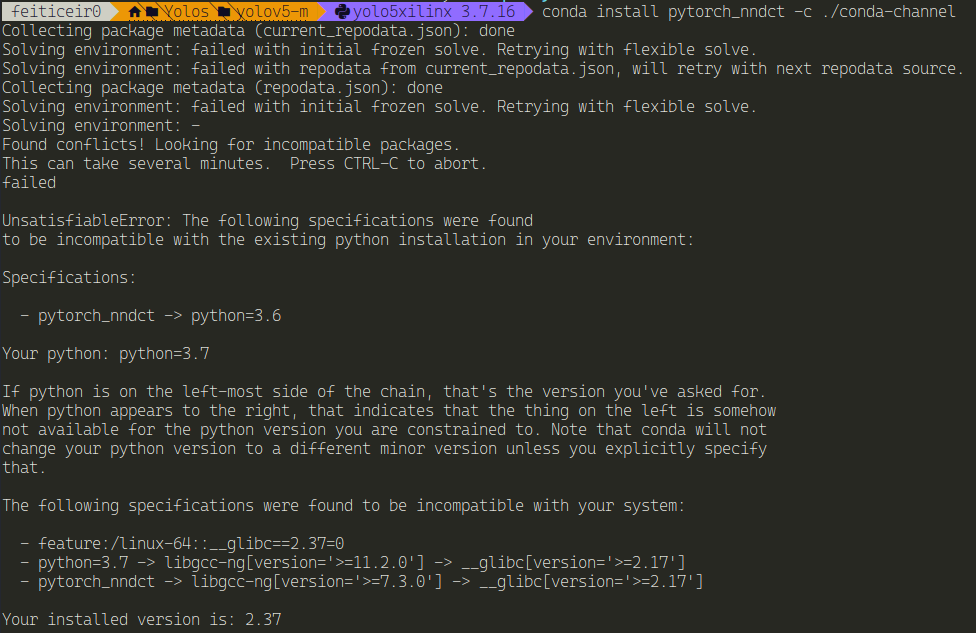
I'm assuming this is because this packages are old and my system is up to date with the latest versions.
The instructions mention Python 3.7...
Let's try with the docker image used for quantification
In the VITIS-AI Directory
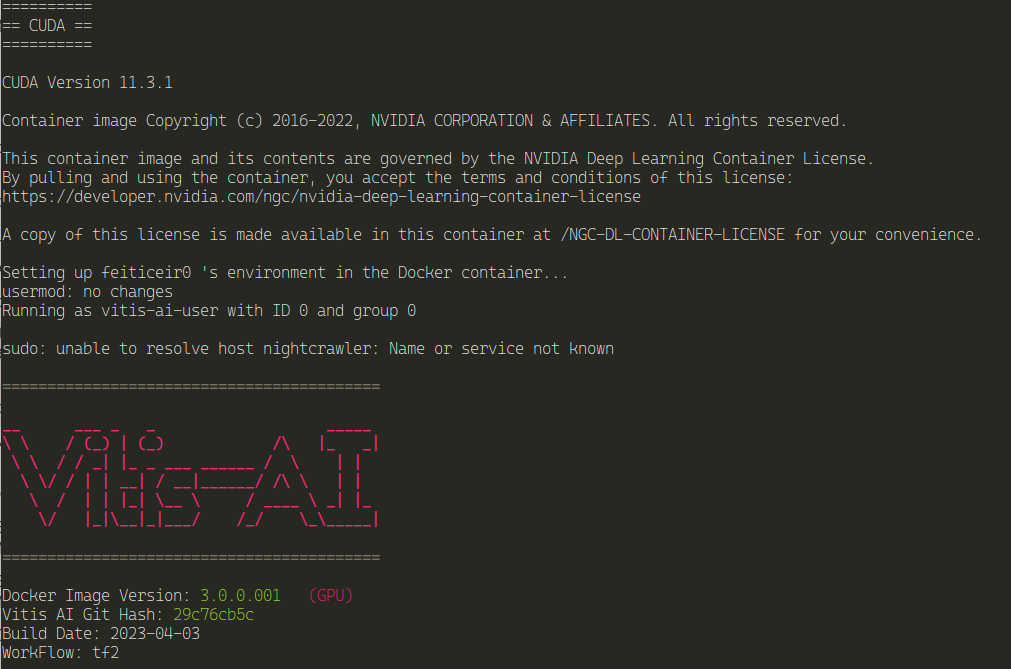
./docker_run.sh xilinx/vitis-ai-pytorch-gpu:latest
conda activate vitis-ai-pytorch
Let's try this. First, install the requirements they have for the docker image

So, let's uninstall this packages versions and install the ones they want.
pip uninstall numpy scipy
Install with the required versions
pip install numpy==1.17.2 scipy==1.3.1
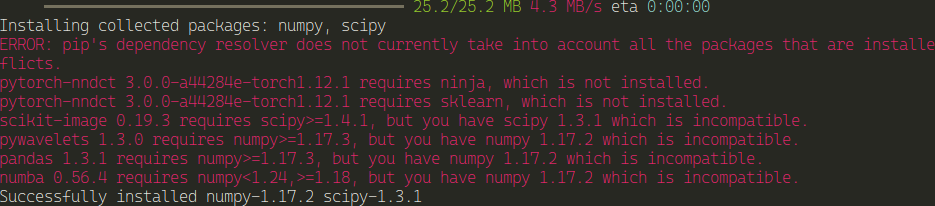
and this leads to more versions being incompatible... Well, I'm not going down this rabbit hole, because it will lead to more pain...
yolov6-m
Let's try with Yolov6-m
Again, Python 3.7 is in the instructions.
conda create -n yolo6m python=3.7
After a while, let's activate it
conda activate yolo6m
Install the necessary packages
pip install -r requirements.txt
After it install everything, it wants to install pytorch_nndct and xir, but the same errors above appear here..
I will post this to the Xilinx forums, replying to Quenton Hall and see if he has some solution..
Or I'm doing something wrong, or AMD should update the documentation and the package versions. This is some older versions problems. This docker image was created using the documentation and scripts AMD provided for Vitis-AI 3.0.
Yolo5-nano with Python 3.6
I've tried yolo5nano, but this time created a conda environment with python-3.6 .
conda create -n yolo5nano python=3.6
Install all the requirements
conda activate yolo5nano
pip install -r requirements.txt
conda install pytorch_nndct -c ./conda-channel
This time, I was able to install everything - even pytorch_nndct.
Let's roll.
Let's train this
python train.py --help
and, of course, why not, I get an error:

And from here on end it was a cascading effect of errors and versions and errors and versions...
I give up now. Will post this on Xilinx forums.
Quantizing using TensorFlow v2
This is my attempt of doind the same above, but using a TensorFlow model.
The TensorFlow quantizing process for Vitis-AI requires a model whether in Keras format (h5) or SavedModel .
The TensorFlow Object Detection API saves the model in the SavedModel format.
VITIS-AI provides a docker image - created in my previous post.
Let's start the TensorFlow2-gpu docker container
./docker_run.sh xilinx/vitis-ai-tensorflow2-gpu:latest
Here's the script (minimal, just to see if it works) to quantize a TensorFlow model
import tensorflow as tf
from tensorflow_model_optimization.quantization.keras import vitis_quantize

#load model in savedmodel format - exported from TensorFlow Object Detection API
#model = tf.saved_model.load('./export/saved_model/')
keras_model = tf.keras.models.load_model('./export/saved_model')
#keras_model = tf.saved_model.load('./export/saved_model')

# quantize model
quantizer = vitis_quantize.VitisQuantizer(keras_model)
quantized_model = quantizer.quantize_model(calib_dataset=calib_dataset,
                                            calib_steps=100,
                                            calib_batch_size=10,
                                            **kwargs)

# save the model
quantized_model.save('quantized_model.h5')
when trying to run the code
python quantize_model.py
But, I get the following error:
vitis-ai-user@nightcrawler:/workspace/tf2_license_plate$ python quantize_model.py 2023-04-13 16:23:08.264365: I tensorflow/core/platform/cpu_feature_guard.cc:193] This TensorFlow binary is optimized with oneAPI Deep Neural Network Library (oneDNN) to use the following CPU instructions in performance-critical operations: AVX2 FMATo enable them in other operations, rebuild TensorFlow with the appropriate compiler flags.2023-04-13 16:23:08.488441: E tensorflow/stream_executor/cuda/cuda_blas.cc:2981] Unable to register cuBLAS factory: Attempting to register factory for plugin cuBLAS when one has already been registered2023-04-13 16:23:09.200582: W tensorflow/stream_executor/platform/default/dso_loader.cc:64] Could not load dynamic library 'libnvinfer.so.7'; dlerror: libnvinfer.so.7: cannot open shared object file: No such file or directory; LD_LIBRARY_PATH: /opt/xilinx/xrt/lib:/usr/lib:/usr/lib/x86_64-linux-gnu:/opt/vitis_ai/conda/envs/vitis-ai-tensorflow2/lib2023-04-13 16:23:09.200685: W tensorflow/stream_executor/platform/default/dso_loader.cc:64] Could not load dynamic library 'libnvinfer_plugin.so.7'; dlerror: libnvinfer_plugin.so.7: cannot open shared object file: No such file or directory; LD_LIBRARY_PATH: /opt/xilinx/xrt/lib:/usr/lib:/usr/lib/x86_64-linux-gnu:/opt/vitis_ai/conda/envs/vitis-ai-tensorflow2/lib2023-04-13 16:23:09.200692: W tensorflow/compiler/tf2tensorrt/utils/py_utils.cc:38] TF-TRT Warning: Cannot dlopen some TensorRT libraries. If you would like to use Nvidia GPU with TensorRT, please make sure the missing libraries mentioned above are installed properly.WARNING:tensorflow:SavedModel saved prior to TF 2.5 detected when loading Keras model. Please ensure that you are saving the model with model.save() or tf.keras.models.save_model(), *NOT* tf.saved_model.save(). To confirm, there should be a file named "keras_metadata.pb" in the SavedModel directory.Traceback (most recent call last): File "quantize_model.py", line 6, in <module> keras_model = tf.keras.models.load_model('./export/saved_model') File "/opt/vitis_ai/conda/envs/vitis-ai-tensorflow2/lib/python3.7/site-packages/keras/utils/traceback_utils.py", line 70, in error_handler raise e.with_traceback(filtered_tb) from None File "/opt/vitis_ai/conda/envs/vitis-ai-tensorflow2/lib/python3.7/site-packages/keras/saving/saved_model/load.py", line 221, in _read_legacy_metadata "Unable to create a Keras model from SavedModel at "ValueError: Unable to create a Keras model from SavedModel at ./export/saved_model. This SavedModel was exported with `tf.saved_model.save`, and lacks the Keras metadata file. Please save your Keras model by calling `model.save` or `tf.keras.models.save_model`. Note that you can still load this SavedModel with `tf.saved_model.load`.
I did try to convert the model to Keras h5 with the following code:
import os
import tensorflow as tf
from tensorflow.keras.preprocessing import image

pb_model_dir = "./auto_model/best_model"
h5_model = "./mymodel.h5"

# Loading the Tensorflow Saved Model (PB)
model = tf.keras.models.load_model(pb_model_dir)
print(model.summary())

# Saving the Model in H5 Format
tf.keras.models.save_model(model, h5_model)

# Loading the H5 Saved Model
loaded_model_from_h5 = tf.keras.models.load_model(h5_model)
print(loaded_model_from_h5.summary())
python export_to_h5.py
But I get the following error:2023-04-13 23:34:43.358274: I tensorflow/core/platform/cpu_feature_guard.cc:193] This TensorFlow binary is optimized with oneAPI Deep Neural Network Library (oneDNN) to use the following CPU instructions in performance-critical operations: AVX2 FMATo enable them in other operations, rebuild TensorFlow with the appropriate compiler flags.2023-04-13 23:34:44.339234: W tensorflow/compiler/xla/stream_executor/platform/default/dso_loader.cc:64] Could not load dynamic library 'libnvinfer.so.7'; dlerror: libnvinfer.so.7: cannot open shared object file: No such file or directory; LD_LIBRARY_PATH: /opt/cuda/lib642023-04-13 23:34:44.340702: W tensorflow/compiler/xla/stream_executor/platform/default/dso_loader.cc:64] Could not load dynamic library 'libnvinfer_plugin.so.7'; dlerror: libcublasLt.so.12: cannot open shared object file: No such file or directory; LD_LIBRARY_PATH: /opt/cuda/lib642023-04-13 23:34:44.340715: W tensorflow/compiler/tf2tensorrt/utils/py_utils.cc:38] TF-TRT Warning: Cannot dlopen some TensorRT libraries. If you would like to use Nvidia GPU with TensorRT, please make sure the missing libraries mentioned above are installed properly.WARNING:tensorflow:SavedModel saved prior to TF 2.5 detected when loading Keras model. Please ensure that you are saving the model with model.save() or tf.keras.models.save_model(), *NOT* tf.saved_model.save(). To confirm, there should be a file named "keras_metadata.pb" in the SavedModel directory.Traceback (most recent call last): File "/home/feiticeir0/Programming/TFCustomDetector/workspace/export_to_h5.py", line 9, in <module> model = tf.keras.models.load_model(pb_model_dir) File "/home/feiticeir0/Programming/TFCustomDetector/tf2_obdetect/lib/python3.10/site-packages/keras/utils/traceback_utils.py", line 70, in error_handler raise e.with_traceback(filtered_tb) from None File "/home/feiticeir0/Programming/TFCustomDetector/tf2_obdetect/lib/python3.10/site-packages/keras/saving/legacy/saved_model/load.py", line 223, in _read_legacy_metadata raise ValueError(ValueError: Unable to create a Keras model from SavedModel at ./models/my_ssd_mobilenet_v2/export/saved_model. This SavedModel was exported with `tf.saved_model.save`, and lacks the Keras metadata file. Please save your Keras model by calling `model.save` or `tf.keras.models.save_model`. Note that you can still load this SavedModel with `tf.saved_model.load`.
After posting on the AMD Xilinx forums and get nothing and searching the Internet, the TensorFlow 2 Object Detection API works only with TensorFlow 2 Detection API.
There's a feature request for it on Github. Lot's of people are requesting this, but still, no luck.
But, because I'm stubborn, I've decided to go for the long haul and created a new model of object detection using Keras and designing the neural network (well, I've used one of the excellent Nicholas Renotte Youtube videos on Machine Learning) instead of going for the Object Detection API. This time, I was sure that the h5 saved model had the Keras metadata file (I was hopping at this point).
TensorFlow can use the GPU for the training of the network, but I wasn't being able to do so. The first time I run the training session, it took almost 4h to train the model and I didn't had the code to save the model. Bummer.
Let's get the docker image
docker pull tensorflow/tensorflow:latest-gpu
Let's run it, passing all the GPUS (really just the one) mapping my user and the folder where the scripts are.
docker run --gpus all -u $(id -u):$(id -g) -it -v /home/feiticeir0/Programming/TFcustom:/TFcustom tensorflow/tensorflow:latest-gpu
Because there are some constraints using the docker image - can't install nothing - or I really don't understand much of docker - I changed my script to just train the model, nothing more. Everything else, was done using my Python environment already setup for this.
From 4 hours, it took only a mere 12 minutes. Impressive. And I have 16 AMD cores !

Now that I have the h5 model, let's try to quantize it.
Start the docker container for the Vitis-AI Tensorflow GPU
Again, from the VITIS-AI directory:
./docker_run.sh xilinx/vitis-ai-tensorflow2-gpu:latest
Here's the script I'm using to quantify the model
import tensorflow as tf
from tensorflow_model_optimization.quantization.keras import vitis_quantize, vitis_inspect

#load labels
def load_labels(label_path):
    with open(label_path.numpy(), 'r', encoding = "utf-8") as f:
        label = json.load(f)

    return [label['class']], label['bbox']


# Images
def load_image(x):
    byte_img = tf.io.read_file(x)
    img = tf.io.decode_jpeg(byte_img)
    return img

#Load images
train_images = tf.data.Dataset.list_files('images/train/images/*.jpg', shuffle=False)
train_images = train_images.map (load_image)
train_images = train_images.map (lambda x: tf.image.resize(x, (120,120)))
train_images = train_images.map (lambda x: x/255) # normalize

# load labels
train_labels = tf.data.Dataset.list_files ('images/train/labels/*.json', shuffle=False)
train_labels = train_labels.map(lambda x: tf.py_function(load_labels, [x], [tf.uint8, tf.float16]))


# create dataset
calib_dataset = tf.data.Dataset.zip((train_images,train_labels))

model = tf.keras.models.load_model('licenseplate.h5')

quantizer = vitis_quantize.VitisQuantizer(model)
quantized_model = quantizer.quantize_model(calib_dataset=calib_dataset,
                                           calib_steps=100,
                                           calib_batch_size=10,
                                           input_shape=[None, 120,120,3])
And, when I try that, I get this:
[VAI INFO] Quantizing without specific `target`.Traceback (most recent call last): File "quantize_model2.py", line 49, in <module> input_shape=[None, 120,120,3]) File "/opt/vitis_ai/conda/envs/vitis-ai-tensorflow2/lib/python3.7/site-packages/tensorflow_model_optimization/python/core/quantization/keras/vitis/vitis_quantize.py", line 966, in quantize_model self.optimize_model() File "/opt/vitis_ai/conda/envs/vitis-ai-tensorflow2/lib/python3.7/site-packages/tensorflow_model_optimization/python/core/quantization/keras/vitis/vitis_quantize.py", line 701, in optimize_model self._create_optimized_model() File "/opt/vitis_ai/conda/envs/vitis-ai-tensorflow2/lib/python3.7/site-packages/tensorflow_model_optimization/python/core/quantization/keras/vitis/vitis_quantize.py", line 414, in _create_optimized_model quantize_strategy=self._quantize_strategy) File "/opt/vitis_ai/conda/envs/vitis-ai-tensorflow2/lib/python3.7/site-packages/tensorflow_model_optimization/python/core/quantization/keras/vitis/vitis_quantize.py", line 1137, in create_optimize_model model, candidate_layers, layer_metadata) File "/opt/vitis_ai/conda/envs/vitis-ai-tensorflow2/lib/python3.7/site-packages/tensorflow_model_optimization/python/core/quantization/keras/vitis/quantize_strategy/pof2s/vitis_pof2s_transforms_pipeline.py", line 85, in apply model, configs, available_transforms, candidate_layers, layer_metadata) File "/opt/vitis_ai/conda/envs/vitis-ai-tensorflow2/lib/python3.7/site-packages/tensorflow_model_optimization/python/core/quantization/keras/vitis/quantize_strategy/pof2s/vitis_pof2s_transforms_pipeline.py", line 55, in _apply_availables layer_metadata).recursive_transform() File "/opt/vitis_ai/conda/envs/vitis-ai-tensorflow2/lib/python3.7/site-packages/tensorflow_model_optimization/python/core/quantization/keras/vitis/graph_transformations/model_transformer.py", line 775, in recursive_transform self.layer_metadata).transform() File "/opt/vitis_ai/conda/envs/vitis-ai-tensorflow2/lib/python3.7/site-packages/tensorflow_model_optimization/python/core/quantization/keras/vitis/graph_transformations/model_transformer.py", line 741, in transform self._set_layer_weights(layer, weights_map) File "/opt/vitis_ai/conda/envs/vitis-ai-tensorflow2/lib/python3.7/site-packages/tensorflow_model_optimization/python/core/quantization/keras/vitis/graph_transformations/model_transformer.py", line 629, in _set_layer_weights K.batch_set_value(weight_value_tuples) File "/opt/vitis_ai/conda/envs/vitis-ai-tensorflow2/lib/python3.7/site-packages/tensorflow/python/util/traceback_utils.py", line 153, in error_handler raise e.with_traceback(filtered_tb) from None File "/opt/vitis_ai/conda/envs/vitis-ai-tensorflow2/lib/python3.7/site-packages/keras/backend.py", line 4302, in batch_set_value x.assign(np.asarray(value, dtype=dtype_numpy(x)))ValueError: Cannot assign value to variable ' block1_conv1/kernel:0': Shape mismatch.The variable shape (3, 3, 3, 64), and the assigned value shape (3, 3, 512, 512) are incompatible.(vitis-ai-tensorflow2) vitis-ai-user@nightcrawler:/workspace/tf2_license_plate$
I'm missing something here, because I get errors about the shape, but the input shape is right and the model summary confirms it:
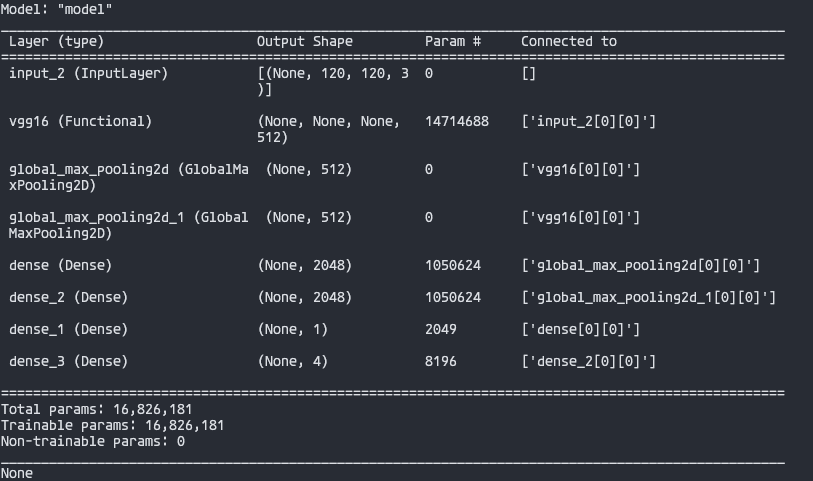
At this point, the only models I've been able to quantize and / or compile are the ones they provide.
I'll post this to the forums and wait back for some news.
If I get something or I'm able to solve this, will update this post.
EDIT at 18/04/2023
Grace from AMD replied to my post saying I should inspect the model first.
I already had done that, but I tried again, with no results.
This is the code I replaced - instead of having the quantizer code, I have the inspector code:
inspector = vitis_inspect.VitisInspector(target="DPUCZDX8G_ISA1_B4096")
inspector.inspect_model(model,
                        input_shape=(None, 120, 120, 3),
                        plot=True,
                        plot_file="model.svg",
                        dump_results=True,
                        dump_results_file="inspect_results.txt",
                        verbose=0)
but the result is:
File "quantize_model2.py", line 42, in <module> verbose=0) File "/opt/vitis_ai/conda/envs/vitis-ai-tensorflow2/lib/python3.7/site-packages/tensorflow_model_optimization/python/core/quantization/keras/vitis/vitis_inspect.py", line 629, in inspect_model quantize_strategy=self._quantize_strategy) File "/opt/vitis_ai/conda/envs/vitis-ai-tensorflow2/lib/python3.7/site-packages/tensorflow_model_optimization/python/core/quantization/keras/vitis/vitis_quantize.py", line 1137, in create_optimize_model model, candidate_layers, layer_metadata) File "/opt/vitis_ai/conda/envs/vitis-ai-tensorflow2/lib/python3.7/site-packages/tensorflow_model_optimization/python/core/quantization/keras/vitis/quantize_strategy/pof2s/vitis_pof2s_transforms_pipeline.py", line 85, in apply model, configs, available_transforms, candidate_layers, layer_metadata) File "/opt/vitis_ai/conda/envs/vitis-ai-tensorflow2/lib/python3.7/site-packages/tensorflow_model_optimization/python/core/quantization/keras/vitis/quantize_strategy/pof2s/vitis_pof2s_transforms_pipeline.py", line 55, in _apply_availables layer_metadata).recursive_transform() File "/opt/vitis_ai/conda/envs/vitis-ai-tensorflow2/lib/python3.7/site-packages/tensorflow_model_optimization/python/core/quantization/keras/vitis/graph_transformations/model_transformer.py", line 775, in recursive_transform self.layer_metadata).transform() File "/opt/vitis_ai/conda/envs/vitis-ai-tensorflow2/lib/python3.7/site-packages/tensorflow_model_optimization/python/core/quantization/keras/vitis/graph_transformations/model_transformer.py", line 741, in transform self._set_layer_weights(layer, weights_map) File "/opt/vitis_ai/conda/envs/vitis-ai-tensorflow2/lib/python3.7/site-packages/tensorflow_model_optimization/python/core/quantization/keras/vitis/graph_transformations/model_transformer.py", line 629, in _set_layer_weights K.batch_set_value(weight_value_tuples) File "/opt/vitis_ai/conda/envs/vitis-ai-tensorflow2/lib/python3.7/site-packages/tensorflow/python/util/traceback_utils.py", line 153, in error_handler raise e.with_traceback(filtered_tb) from None File "/opt/vitis_ai/conda/envs/vitis-ai-tensorflow2/lib/python3.7/site-packages/keras/backend.py", line 4302, in batch_set_value x.assign(np.asarray(value, dtype=dtype_numpy(x)))ValueError: Cannot assign value to variable ' block1_conv1/kernel:0': Shape mismatch.The variable shape (3, 3, 3, 64), and the assigned value shape (3, 3, 512, 512) are incompatible.
And, after a search, there's a similar issue on Gihub opened on the VITIS-AI Github page. Still not resolved.
Some remarks
For TensorFlow I thought that going with the TensorFlow Object Detection API would be easier and faster to create a model for License Detection instead of going with the full works of defining the model and having to train it.
This may be my mistake. I just wanted to speed up this part. But, since I've tried another model build from scratch and still I couldn't quantize a model, don't know what's going on.
Probably I just don't understand this enough.
For the YOLO version, after posting on the forums and checking in on the replies, I still found issues. I have posted them and will wait for any answer. I will try another YOLO model (from scratch) and see.
I've seen examples working with YOLO, but are for the 1.4 version of the VITIS-AI . They've since changed the scripts and they don't work anymore. I've tried.  .
.
I am to assume that AMD would like that people could alleviate the model training task by using this new versions of object detection APIs from TensorFlow and YOLOv7 or above instead of having to create the model and do all the tasks that this methods do for us.
Next, let's try Pyton PYNQ environment.
VITIS-AI supports a lot of model types - two of License Plate detection and recognition. If I have the time, will try those. They only support the caffe framework.. And VITIS-AI 3.0 does not support it.
References
https://backstreetcoder.com/convert-tensorflow-pb-model-to-keras-h5-model/

