


Intro
For quite a while now I have wanted to explore the idea of using MQTT as a text messaging system, where users publish and subscribe to a topic of mutual interest - forming an interest group.
The Arduino GIGA with its display is an excellent platform to implement this functionality, so that's what I did.
This is what it looks like:
GIGA MQTT Client
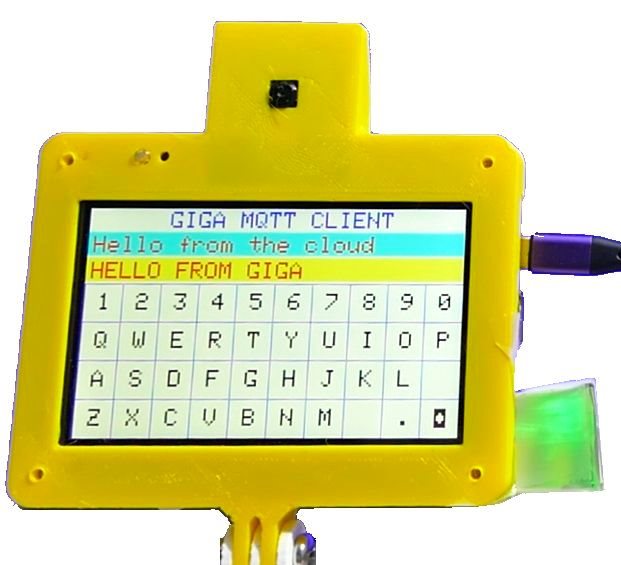
This image shows the texting MQTT client has a keyboard, a line of text to publish messages and a line of text to subscribe to message topics.
The green block on the right side is just a foil reflector, temporarily taped to the chassis, that allows the rear facing LED to be seen from the front.
Here is a little video that shows how it works.
GIGA MQTT Video
This MQTT client is using the Adafruit MQTT broker to demonstrate this text messaging concept. To use this broker you need to set up an account with Adafruit, but they have a free sandbox and a well described process to use it.
The Adafruit MQTT broker even has the tools to set up and run your own dashboards.
The messaging system I set up here just uses one topic for both publishing and subscribing, which means that when I publish a message to the topic, My subscriber will get an echo. I handle this by displaying the echo on my publishing line - essentially using it as confirmation that the message got received. The ">" on the right side of the publishing line is like a send button which disappears when the echo is displayed. Actually touching anywhere on the publishing line or above it will publish the message.
Editing the publishing line is very rudimentary. There is only a backspace button on the keyboard and the publishing button, but that is all I want. Simple and it allows any message to be edited before sending.
Messages are limited to 19 characters - not a magic limit, just an arbitrary number I chose that allows large fonts that are easy to see in a video demo. Actually, received messages can be longer, but if they are published by clone of this client, they will also only be 19 characters. Not exactly Twitter length, but a good demo for now.
Here is the sketch:
//Arduino GIGA MQTT client example
//Touch keyboard publishes text messages to an MQTT broker
//It also subscribes to the a text chat topic
//It also subscribes to the LED topic, which controls the GIGA LED
//by Doug Wong 2025

#include "PluggableUSBHID.h"
#include "USBKeyboard.h"
#include "Arduino_GigaDisplayTouch.h"
#include "Arduino_GigaDisplay_GFX.h"
#include <WiFi.h>
#include <PubSubClient.h>
#include "creds.h"  // the following commented out code is included in creds.h

/* replace the capitallized text (only) with your own info & uncomment
const char* ssid = "WIFIACCESSPOINTNAME";
const char* pass = "ACCESSPOINTPASSWORD";
const char* username = "MQTTUSERNAME";
const char* password = "MQTTPASSWORD";
const char* mqtt_server = "MQTTBROKERURL";

const char* topic0 = "MQTTUSERNAME/feeds/TOPICNAME";
const char* topic1 = "MQTTUSERNAME/feeds/TOPICNAME";
*/

#define BLACK 0x0000
#define WHITE 0xFFFF
#define RED 0xF800
#define YELLOW 0xFFE0
#define PURPLE 0xFB00
#define BLUE 0x001F

USBKeyboard Keyboard;
GigaDisplay_GFX display;
Arduino_GigaDisplayTouch touchDetector;

WiFiClient espClient;
PubSubClient client(espClient);

int ROW;                //row number of the key being touched
int COL;                //column number of the key being touched
int KEY;                // KEY character index for the qwerty array
int curp = 0;           //cursor position on the display
char qwerty [41] = "1234567890QWERTYUIOPASDFGHJKL\nZXCVBNM .\b";   //keyboard characters
char mtxt [20];         //message txt to publish
bool sendt = false;     //publish flag to send text message
bool sendf = false;     //send flag to deal with broker echo
bool txt = false;       //flag to determine if the received message is text or LED

void setup() {
  pinMode(LED_BUILTIN, OUTPUT);     // Initialize the LED_BUILTIN pin as an output
  Serial.begin(115200);
  setup_wifi();
  client.setServer(mqtt_server, 1883);
  client.setCallback(callback);

  display.begin();
  display.fillScreen(WHITE);
  display.setRotation(1);             //set landscape orientation
  display.setTextSize(5);
  display.setTextColor(BLUE);
  display.setCursor(170, 6);
  display.print("GIGA MQTT CLIENT");
  display.setTextColor(BLACK);
  for (int i = 160; i <= 480; i+= 80) {   //draw hoizontal lines for the keyboard
  display.fillRect(0, i, 800, 2, BLUE);
  }
  for (int j = 0; j < 800; j+= 80) {      //draw vertical lines and display the keyboard characters
  display.fillRect(j, 160, 2, 320, BLUE);
  KEY = j / 80;
  display.setCursor(j+30, 180);
  display.print(qwerty[KEY]);
  KEY = j / 80 + 10;
  display.setCursor(j+30, 260);
  display.print(qwerty[KEY]);
  KEY = j / 80 + 20;
  display.setCursor(j+30, 340);
  display.print(qwerty[KEY]);
  KEY = j / 80 + 30;
  display.setCursor(j+30, 420);
  display.print(qwerty[KEY]);
  }

  display.setTextColor(RED); // red text
  touchDetector.begin();

  mtxt[19] = '\0';          //null character in case we want to use this array as a string
}

void setup_wifi() {

  delay(1500);
  //start by connecting to a WiFi network
  Serial.println();
  Serial.print("Connecting to ");
  Serial.println(ssid);

  WiFi.begin(ssid, pass);

  while (WiFi.status() != WL_CONNECTED) {
    delay(800);
    Serial.print(".");
  }

  Serial.println("");
  Serial.println("WiFi connected");
  Serial.println("IP address: ");
  Serial.println(WiFi.localIP());
}

void callback(char* topic, byte* payload, unsigned int length) { //when a message is received from a broker
  Serial.print("Message arrived [");
  Serial.print(topic);
  Serial.print("] ");
  for (int i = 0; i < length; i++) {
    Serial.print((char)payload[i]);
  }
  Serial.println();

   char lc = topic[strlen(topic) -1];
  if (lc == 't') txt = true;                  //look at the last character of the topic to determine what to do with the payload
  else txt = false;
  if (!txt && (char)payload[0] == '1') {      //if it is not a text message, use the payload to control the LED
    digitalWrite(LED_BUILTIN, LOW);   // Turn the LED on
  } else if (!txt && (char)payload[0] == '0') {
    digitalWrite(LED_BUILTIN, HIGH);  // Turn the LED off
  }
  if (txt) {
    if (sendf) {                              //if it is a txt message echo from a published message, display it in the transmit line
      sendf = false;
      display.fillRect(0, 105, 799, 50, 0xFFD0);
      display.setCursor(10, 114);
      for (int i = 0; i < length; i++) {
        display.print((char)payload[i]);
      }
    }
    else {                                    //if it is a fresh txt message, display it in the receive line
      display.fillRect(0, 50, 799, 50, 0x0FFF);
      display.setCursor(10, 59);
      for (int i = 0; i < length; i++) {
        display.print((char)payload[i]);
      }

    }
  }

}

void reconnect() {              // connect or reconnect to the MQTT broker

  while (!client.connected()) {
    Serial.print("Attempting MQTT connection...");
    // Create a random client ID
    String clientId = "ArduinoClient-";
    clientId += String(random(0xffff), HEX);
    // Attempt to connect
    if (client.connect(clientId.c_str(), username, password)) {
      Serial.println("connected");
      // Once connected, publish an announcement...
      //client.publish(topic0, "hello world");
      // ... and resubscribe
      client.subscribe(topic0);
      client.subscribe(topic1);
    } else {
      Serial.print("failed, rc=");
      Serial.print(client.state());
      Serial.println(" try again in 8 seconds");
      // Wait 10 seconds before retrying
      delay(2000);
    }
    delay(1000);
  }
}

void loop() {                 //loop to read keyboard touches and display text
  uint8_t contacts;
  GDTpoint_t points[5];

  if (!client.connected()) {
    reconnect();
  }

  client.loop();

  if (sendt) {
    sendt = false;
    sendf = true;
    Serial.print("Publish message: ");
    Serial.println(mtxt);
    client.publish(topic0, mtxt);
  }

 contacts = touchDetector.getTouchPoints(points);      //read the touch screen
  if (contacts > 0) {           // figure out the keaboard row that was touched
  if (points[0].x > 320) {
    points[0].x = 400;
    sendt = true;
    display.fillRect(0, 105, 799, 50, 0xFFEE);
    display.setCursor(10, 114);
    display.print(mtxt);
    }

  else if (points[0].x < 320) {
      if (points[0].x < 80) {
        ROW = 3;
    } else if (points[0].x < 160) {
        ROW = 2;
      } else if (points[0].x < 240) {
        ROW = 1;
    } else {
      ROW = 0;
    }
    if (points[0].y < 80) COL = 0;    // figure out the keaboard column that was touched
    else if (points[0].y < 160) COL = 1;
    else if (points[0].y < 240) COL = 2;
    else if (points[0].y < 320) COL = 3;
    else if (points[0].y < 400) COL = 4;
    else if (points[0].y < 480) COL = 5;
    else if (points[0].y < 560) COL = 6;
    else if (points[0].y < 640) COL = 7;
    else if (points[0].y < 720) COL = 8;
    else COL = 9;
    KEY = (ROW * 10 + COL);       // calculate which key was touched
    if (KEY == 39) {
      curp--;
      mtxt[curp] = 32;
      if (curp < 0) curp = 0;
    }
    else {
      mtxt[curp] = qwerty[KEY];
      curp++;
      if (curp > 18) curp = 18;
    }
      display.fillRect(0, 105, 799, 50, 0xFFE0);
      display.setCursor(10, 114);
      display.print(mtxt);
      display.setCursor(760, 114);
      display.print(">");

  }

  for (int x = 0; x < 10; x++) {       //debounce touch
     contacts = touchDetector.getTouchPoints(points);
     if (contacts > 0) {
      x = 0;}   //you may want to time out to avoid a potential endless loop
     delay(10);
  }
  delay(100);
  contacts = 0;
 }
}
The code uses a credentials file called creds.h for passwords etc. but the code above shows what is in the creds.h file in its comments.
I am not that keen on demos of software that need secret information, because you can't just copy the redacted code and expect it to work, but part of this road test needs to explore WiFi, which makes it unavoidable.
Discussion
I took me a while to get the code working, but it turned out to meet my objectives, which is always gratifying.
The objectives were to develop a system that would use MQTT to implement a text messaging system. Unfortunately I don't have two Arduino GIGAs to have them message each other, but pretty much any computer could be programmed to act as a similar client. Another objective was to explore a WiFi application using this GIGA..
This Arduino GIGA kit is extremely versatile, which makes it easy to develop complex applications and it is a lot of fun doing things that would be daunting with most other platforms.
This application uses the touch screen, the WiFi, and an LED.
Links
Touch Screen and USB memory demo
GIGA display of an Arducam video camera

