element14 Community
element14 Community
    Register Log In
  • Site
  • Search
  • Log In Register
  • About Us
  • Community Hub
    Community Hub
    • What's New on element14
    • Feedback and Support
    • Benefits of Membership
    • Personal Blogs
    • Members Area
    • Achievement Levels
  • Learn
    Learn
    • Ask an Expert
    • eBooks
    • element14 presents
    • Learning Center
    • Tech Spotlight
    • STEM Academy
    • Webinars, Training and Events
    • Learning Groups
  • Technologies
    Technologies
    • 3D Printing
    • FPGA
    • Industrial Automation
    • Internet of Things
    • Power & Energy
    • Sensors
    • Technology Groups
  • Challenges & Projects
    Challenges & Projects
    • Design Challenges
    • element14 presents Projects
    • Project14
    • Arduino Projects
    • Raspberry Pi Projects
    • Project Groups
  • Products
    Products
    • Arduino
    • Avnet Boards Community
    • Dev Tools
    • Manufacturers
    • Multicomp Pro
    • Product Groups
    • Raspberry Pi
    • RoadTests & Reviews
  • Store
    Store
    • Visit Your Store
    • Choose another store...
      • Europe
      •  Austria (German)
      •  Belgium (Dutch, French)
      •  Bulgaria (Bulgarian)
      •  Czech Republic (Czech)
      •  Denmark (Danish)
      •  Estonia (Estonian)
      •  Finland (Finnish)
      •  France (French)
      •  Germany (German)
      •  Hungary (Hungarian)
      •  Ireland
      •  Israel
      •  Italy (Italian)
      •  Latvia (Latvian)
      •  
      •  Lithuania (Lithuanian)
      •  Netherlands (Dutch)
      •  Norway (Norwegian)
      •  Poland (Polish)
      •  Portugal (Portuguese)
      •  Romania (Romanian)
      •  Russia (Russian)
      •  Slovakia (Slovak)
      •  Slovenia (Slovenian)
      •  Spain (Spanish)
      •  Sweden (Swedish)
      •  Switzerland(German, French)
      •  Turkey (Turkish)
      •  United Kingdom
      • Asia Pacific
      •  Australia
      •  China
      •  Hong Kong
      •  India
      •  Korea (Korean)
      •  Malaysia
      •  New Zealand
      •  Philippines
      •  Singapore
      •  Taiwan
      •  Thailand (Thai)
      • Americas
      •  Brazil (Portuguese)
      •  Canada
      •  Mexico (Spanish)
      •  United States
      Can't find the country/region you're looking for? Visit our export site or find a local distributor.
  • Translate
  • Profile
  • Settings
Embedded and Microcontrollers
  • Technologies
  • More
Embedded and Microcontrollers
Blog PID temperature controller for the EasyL1105 MSPM0 board - Pt. 1: framework
  • Blog
  • Forum
  • Documents
  • Quiz
  • Polls
  • Files
  • Members
  • Mentions
  • Sub-Groups
  • Tags
  • More
  • Cancel
  • New
Join Embedded and Microcontrollers to participate - click to join for free!
  • Share
  • More
  • Cancel
Group Actions
  • Group RSS
  • More
  • Cancel
Engagement
  • Author Author: Jan Cumps
  • Date Created: 25 Sep 2025 6:01 PM Date Created
  • Views 231 views
  • Likes 7 likes
  • Comments 5 comments
  • MSPM0L1105
  • MSPM0
  • easyL1105
  • texas instruments
Related
Recommended

PID temperature controller for the EasyL1105 MSPM0 board - Pt. 1: framework

Jan Cumps
Jan Cumps
25 Sep 2025

 shabaz designed a development kit for the recent Texas Instruments MSPM0 microcontroller series. 
This 4 part blog series documents the steps to design a PID temperature controller. Part 1: the framework.

image
(post that introduces the kit)

Goal of this 1st post

  • select a PID algorithm that's fit for an MSPM0, without floating point
  • set up a timer that makes the code execute on precise intervals
  • have a heartbeat pulse to monitor time health (via green LED, counter or scope)
  • make it build and execute

Not a goal in post 1:  ADC, PWM. Conversion to PID savvy UOM of both. Tuning the PID algorithm.

Most of this stage of the design is borrowed from examples and previous posts.

resources used

  •  MSP432 and TI-RTOS: PID Library Part 1 - Intro 
  •  MSP432 and TI-RTOS: PID Library Part 2 - Real World Example 
  •  PID algo for ARM M0: Nuvoton PID Control Operation in Fixed-point Format
  • Timer: TI timx_timer_mode_periodic_sleep
  • PID guidelines:  PID Control in Flowcode 

Framework: PID algorithm

The ARM M0 doesn't have floating point hardware. I found a PID example that is written by Nuvoton for that family (see resources used). I'm using both the PID algorithm and the timer approach.

  • wait for a timer tick, 5 times per second
  • call the PID algorithm to keep the circuit controlled

int32_t PID(PIDC_T* C, int32_t i32_Cmd, int32_t i32_Feedback)
{
    int32_t output;
    
    /* Calculate error */
    C->i32_Err = i32_Cmd - i32_Feedback;
    
    /* Integral calculation */
    C->i32_I += C->i32_Ki * C->i32_Err;	
    
    /* PID calculation */
    output = C->i32_Kp * C->i32_Err + C->i32_I + C->i32_Kd * (C->i32_Err - C->i32_Last_Err);	
    
    /* Set output in Q15.0 format */
    output = output >> 15;	
    
    if(output > C->i32_Out_Limit)
        output = C->i32_Out_Limit;
    else if(output < -C->i32_Out_Limit)
        output = -C->i32_Out_Limit;	
        
    /* Update last error */
    C->i32_Last_Err = C->i32_Err;
        
    /* Return the output of PID Controller */
    return output;													
}

What I changed: I don't do the PID (or any other logic) in the timer handler. The handler just sets a flag, and the loop() executes the logic if that flag is set. This is an architectural choice. We 'll have to do ADC, PID and PWM. I prefer not to have all of that executed in an interrupt handler. For low power designs, I'd leave it in the interrupt.

void perform_pid() {

            
    /* Execute PID control in every TM0 interrupt. */
    i32_Output_PID = PID(&PID_Var, i32_Target_Command, i32_Plant_Signal);
		
    /* Following is for test only */
    /* Simulate it is unit gain feedback */
    i32_Plant_Signal = i32_Output_PID;	// TODO: this is test code. need to define correct feedback based on sensor hw

    // TODO: add PWM
    cnt++; // TODO: remove test

}

int main(void) {
    // ...

	/* Initialize the parameters of PID */
	Initialize_PID_Parameter();

    // ...   

    while (1) {
        if (perform) {
            perform = false;
            // ...
            
            perform_pid();

            // ...
        }
    }
}


The PID algorithm uses Q15 format, to represent - and calculate with - floating points as integers.

What does AI say about  Q15 format?

The Q15 format, also known as the 1.15 format, is a fixed-point number representation that uses 16 bits to store a two's complement signed fractional number, with one bit for the sign, zero bits for the integer part, and 15 bits for the fractional part. It is commonly used in Digital Signal Processing (DSP) for representing numbers in the range of -1.0 to +0.999969482, where the value is the stored integer divided by 2^15. 
How it Works
  • Signed Representation: The most significant bit (MSB) is the sign bit. 
  • Radix Point: The binary point (radix point) is implied to be just after the sign bit. 
  • Value Calculation: A number stored in Q15 format is calculated by dividing the integer value by 2^15 (32768). For example, the integer 24576 represents the value 0.75 in Q15 format (24576 / 32768). 
  • Range: The representable range for a Q15 number is from -1.0 to (1 - 2^-15), which is approximately -1.0 to 0.999969482. 
  • Storage: A Q15 value is stored as a 16-bit signed integer. 
Example 
  • 0x7FFF (0111 1111 1111 1111 in binary): This represents the maximum positive value, which is close to 1.0 (specifically 0.999969482).
  • 0x8000 (1000 0000 0000 0000 in binary): This represents the most negative value, which is -1.0.
Why Use Q15?
  • Efficiency: 
    Using fixed-point formats like Q15 allows for faster arithmetic operations (multiplication and division) compared to floating-point numbers because it uses integer hardware. 
  • DSP Applications: 
    It is frequently used in DSP applications where integer math is preferred for its speed and efficiency, especially on embedded systems. 

Framework: Timer

The timer logic is based on a TI example for this controller (see resources used). It fires an interrupt 5 times per second.
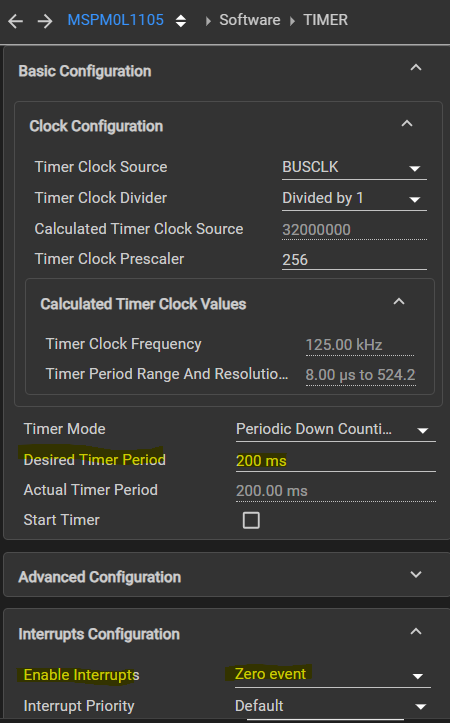
image

There's a little bit of setup in main():

int main(void) {
    SYSCFG_DL_init();

    // /* timer 5 interrupt ticks per second */ 
    // /* Enable Timer0 NVIC */
    NVIC_EnableIRQ(TIMER_0_INST_INT_IRQN);

	// ...

    // /* Start Timer counting */
    DL_TimerG_startCounter(TIMER_0_INST);    

    while (1) {
        if (perform) {
            perform = false;
            
            // ...
            
            perform_pid();

            // ...
        }
    }
}

Our handler checks if it's the right interrupt. Then sets a flag and moves on.

volatile bool perform = false;

void TIMER_0_INST_IRQHandler(void) {
    switch (DL_TimerG_getPendingInterrupt(TIMER_0_INST)) {
        case DL_TIMER_IIDX_ZERO:
            perform = true;
            break;
        default:
            break;
    }
}

Framework: heartbeat and placeholders for ADC and PWM

With the timer in place, and the PID executed after each tick, we're ready to put in some hooks for the next parts:

an empty implementation for the ADC and PWM logic. These will be implemented in the next posts.

void perform_adc() {
    // TODO: implement
}

void perform_pwm() {
    // TODO: implement    
}

Add a heartbeat, and ADC + PWM calls to the loop()
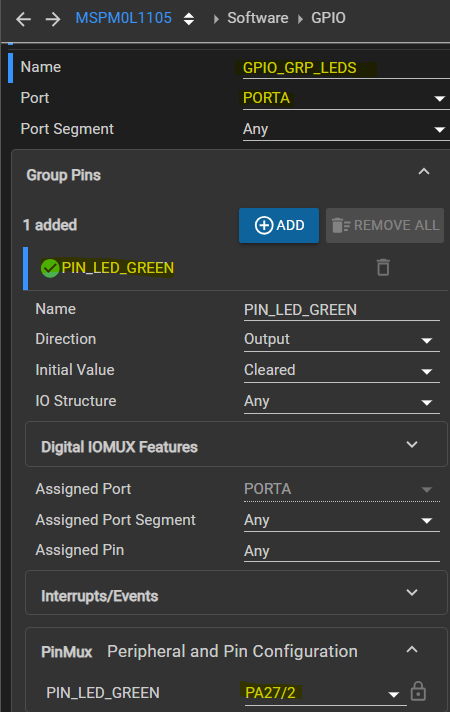
image

The heartbeat gives an option to externally monitor if we're staying within timer limits. A pin is pulled high when an end-to-end cycle starts, and switched off when finished. I've used the EasyL1105 pin that has the green LED attached. Although it 'll be barely visible, you can use it to check that the code runs every 200 ms. For better control, add an oscilloscope or counter.

    DL_TimerG_startCounter(TIMER_0_INST);    

    while (1) {
        if (perform) {
            perform = false;
            DL_GPIO_setPins(GPIO_GRP_LEDS_PORT,
                GPIO_GRP_LEDS_PIN_LED_GREEN_PIN);

            perform_adc();
            
            perform_pid();

            perform_pwm();

            DL_GPIO_clearPins(GPIO_GRP_LEDS_PORT,
                GPIO_GRP_LEDS_PIN_LED_GREEN_PIN);
        }
    }
}

Thanks for reading. Next, get ADC working.

ccs project for EasyL1105: pid_EasyL1105_20250925.zip

This post contains AI generated info. This info is put in a table with pink coloured background.

Related posts

  • Sign in to reply
Parents
  • shabaz
    shabaz 3 days ago

    Awesome work! Confirmed building with command line makefile, and also with Keil. Only minor issue is that gcc and keil need the 

    ti_msp_dl_config.c/h files copied from Debug/syscfg into the same location as the other source files, but I'll figure out a better solution for that later. I think it's minor, that anyone who wishes to use gcc or Keil, can simply manually copy those two files across (or generate using the SysConfig tool).

    gcc_and_keil_folders.zip

    I've been investigating the thermistor, and have tried this code, to simulate a potential divider with the thermistor at the bottom and a fixed resistance at the top, and currently assuming 3.3V as a reference:

    # thermistor_simulate.py
    # rev 1 - shabaz 2025
    # Simulate voltage output of a voltage divider using the following
    # potential divider circuit:
    #  Vref
    #   |
    #   R1
    #   |
    #   +---- Vout
    #   |
    #   Rt (thermistor)
    #   |
    #  GND
    
    import math
    import matplotlib.pyplot as plt
    
    vref = 3.3
    temp_min = 0.0
    temp_max = 300.0
    candidate_R1 = [470, 1000, 2200, 3300, 4700, 10000, 22000, 33000, 47000, 100000]
    
    def calc_thermistor_resistance(Tc: float) -> float:
        """
        Calculate resistance of Amazon NTC100K B3950 thermistor
        at a given temperature. Amazon item was:
        Printer Heater Cartridge Heating Tube Heating Rods 
        24V 40W Ceramic Cartridge Heater Element for Ender 3 S1 Pro
        """
        R0 = 100000.0
        T0 = 25.0 + 273.15
        B  = 3950.0        # Beta value
        T = Tc + 273.15
        R = R0 * math.exp(B * (1.0/T - 1.0/T0))
        return R
    
    def calc_voltage(Rt: float, R1: float) -> float:
        """
        Calculate output voltage of a voltage divider
        with thermistor resistance Rt and fixed resistor R1
        (R1 is connected to Vref, Rt to ground).
        """
        Vout = vref * Rt / (R1 + Rt)
        return Vout
    
    def calc_voltages(R1: float) -> list[float]:
        """
        Calculate output voltages for a range of temperatures
        using a given fixed resistor R1.
        """
        voltages = []
        for Tc in range(int(temp_min), int(temp_max)+1):
            Rt = calc_thermistor_resistance(Tc)
            Vout = calc_voltage(Rt, R1)
            voltages.append(Vout)
        return voltages
    
    def plot_charts(rlist):
        """
        Plot voltage vs temperature for a list of candidate fixed resistors in rlist.
        """
        plt.figure(figsize=(12, 8))
        for R1 in rlist:
            voltages = calc_voltages(R1)
            plt.plot(range(int(temp_min), int(temp_max)+1), voltages, label=f"R1={R1}Ω")
        plt.title("Thermistor Voltage vs Temperature")
        plt.xlabel("Temperature (°C)")
        plt.ylabel("Voltage (V)")
        plt.ylim(0, vref)
        plt.xlim(temp_min, temp_max)
        plt.grid(True)
        plt.legend()
        plt.show()
    
    if __name__ == "__main__":
        plot_charts(candidate_R1)


    According to that, it looks like for the best performance in the 100-170 °C ballpark (where I think I need to be for the hot stamping to be effective), it is for a resistor of about 3.3k. Self-heating isn't too bad, should be less than a degree error which seems pretty reasonable. 

    image

    • Cancel
    • Vote Up 0 Vote Down
    • Sign in to reply
    • More
    • Cancel
Comment
  • shabaz
    shabaz 3 days ago

    Awesome work! Confirmed building with command line makefile, and also with Keil. Only minor issue is that gcc and keil need the 

    ti_msp_dl_config.c/h files copied from Debug/syscfg into the same location as the other source files, but I'll figure out a better solution for that later. I think it's minor, that anyone who wishes to use gcc or Keil, can simply manually copy those two files across (or generate using the SysConfig tool).

    gcc_and_keil_folders.zip

    I've been investigating the thermistor, and have tried this code, to simulate a potential divider with the thermistor at the bottom and a fixed resistance at the top, and currently assuming 3.3V as a reference:

    # thermistor_simulate.py
    # rev 1 - shabaz 2025
    # Simulate voltage output of a voltage divider using the following
    # potential divider circuit:
    #  Vref
    #   |
    #   R1
    #   |
    #   +---- Vout
    #   |
    #   Rt (thermistor)
    #   |
    #  GND
    
    import math
    import matplotlib.pyplot as plt
    
    vref = 3.3
    temp_min = 0.0
    temp_max = 300.0
    candidate_R1 = [470, 1000, 2200, 3300, 4700, 10000, 22000, 33000, 47000, 100000]
    
    def calc_thermistor_resistance(Tc: float) -> float:
        """
        Calculate resistance of Amazon NTC100K B3950 thermistor
        at a given temperature. Amazon item was:
        Printer Heater Cartridge Heating Tube Heating Rods 
        24V 40W Ceramic Cartridge Heater Element for Ender 3 S1 Pro
        """
        R0 = 100000.0
        T0 = 25.0 + 273.15
        B  = 3950.0        # Beta value
        T = Tc + 273.15
        R = R0 * math.exp(B * (1.0/T - 1.0/T0))
        return R
    
    def calc_voltage(Rt: float, R1: float) -> float:
        """
        Calculate output voltage of a voltage divider
        with thermistor resistance Rt and fixed resistor R1
        (R1 is connected to Vref, Rt to ground).
        """
        Vout = vref * Rt / (R1 + Rt)
        return Vout
    
    def calc_voltages(R1: float) -> list[float]:
        """
        Calculate output voltages for a range of temperatures
        using a given fixed resistor R1.
        """
        voltages = []
        for Tc in range(int(temp_min), int(temp_max)+1):
            Rt = calc_thermistor_resistance(Tc)
            Vout = calc_voltage(Rt, R1)
            voltages.append(Vout)
        return voltages
    
    def plot_charts(rlist):
        """
        Plot voltage vs temperature for a list of candidate fixed resistors in rlist.
        """
        plt.figure(figsize=(12, 8))
        for R1 in rlist:
            voltages = calc_voltages(R1)
            plt.plot(range(int(temp_min), int(temp_max)+1), voltages, label=f"R1={R1}Ω")
        plt.title("Thermistor Voltage vs Temperature")
        plt.xlabel("Temperature (°C)")
        plt.ylabel("Voltage (V)")
        plt.ylim(0, vref)
        plt.xlim(temp_min, temp_max)
        plt.grid(True)
        plt.legend()
        plt.show()
    
    if __name__ == "__main__":
        plot_charts(candidate_R1)


    According to that, it looks like for the best performance in the 100-170 °C ballpark (where I think I need to be for the hot stamping to be effective), it is for a resistor of about 3.3k. Self-heating isn't too bad, should be less than a degree error which seems pretty reasonable. 

    image

    • Cancel
    • Vote Up 0 Vote Down
    • Sign in to reply
    • More
    • Cancel
Children
  • shabaz
    shabaz 3 days ago in reply to shabaz

    With ChatGPT help (I've spot-checked it, looks good), using that thermistor beta value and a 3.3k resistor and 3.3V ref, it's come up with this table for linearly-interpolating in-between; error resulting from the calculation should be a well under a degree in the most interesting range, with the MSPM0 ADC. I'll get this coded into a C function for applying to the ADC output.

    T (°C)    Vout (V)
      0.00    3.267924
     10.15    3.246503
     19.35    3.217789
     27.85    3.180998
     35.85    3.135253
     50.90    3.013301
     65.30    2.845280
     89.10    2.455257
    131.05    1.596619
    149.15    1.258646
    168.80    0.954237
    188.90    0.713287
    211.30    0.516870
    223.45    0.435736
    236.40    0.364801
    250.30    0.303167
    265.40    0.249729
    281.85    0.203951
    300.00    0.164853

    • Cancel
    • Vote Up 0 Vote Down
    • Sign in to reply
    • More
    • Cancel
  • Jan Cumps
    Jan Cumps 2 days ago in reply to shabaz

    Those .c and .h are build artifacts, not source artifacts. Let's check how the Keil and Make systems can generate them from the .sysconfig file at build time.

    • Cancel
    • Vote Up 0 Vote Down
    • Sign in to reply
    • More
    • Cancel
element14 Community

element14 is the first online community specifically for engineers. Connect with your peers and get expert answers to your questions.

  • Members
  • Learn
  • Technologies
  • Challenges & Projects
  • Products
  • Store
  • About Us
  • Feedback & Support
  • FAQs
  • Terms of Use
  • Privacy Policy
  • Legal and Copyright Notices
  • Sitemap
  • Cookies

An Avnet Company © 2025 Premier Farnell Limited. All Rights Reserved.

Premier Farnell Ltd, registered in England and Wales (no 00876412), registered office: Farnell House, Forge Lane, Leeds LS12 2NE.

ICP 备案号 10220084.

Follow element14

  • X
  • Facebook
  • linkedin
  • YouTube