


This blog is part of a series of blogs which describe the development steps for an in-depth project tutorial.
This part of the tutorial describes how to adapt and build the smart_model_select example for our custom Kria App.

Understanding the smart_model_select example
The smart_model_select example is defined with the following source files:
- v_multi_scaler_user_config.h
- dpu_conf.vh
- prj_config/prj_config
By analyzing the v_multi_scaler_user_config.h file, we can see that the multi-scaler pre-processing accelerator is configured to support the following color formats:
- YUV 4:2:0 (or NV12)
- BGR
Other color formats can be added by modifying this file.
The dpu_conf.vhd defines the DPU architecture:
- B4096
- URAM enabled
- Low RAM usage
- etc…
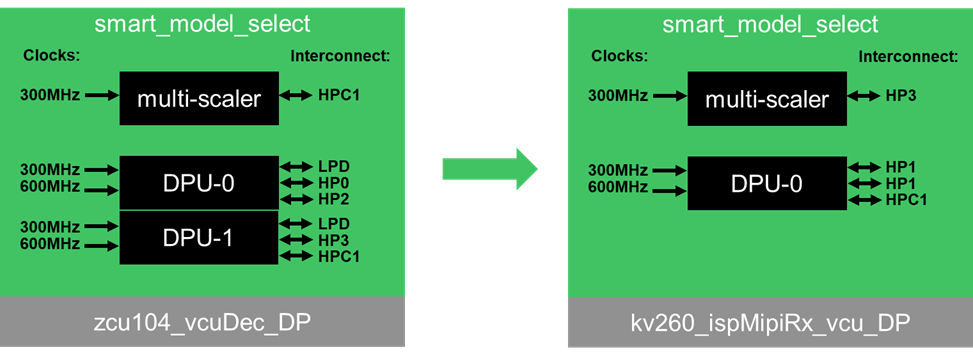
Finally, the prj_config file defines how many DPU cores to instantiate, as well as which interconnect and clocks to use when instantiation the accelerators in the Vitis Platform.
- DPU accelerator
- 2 cores
- Clocks : 300MHz / 600MHz
- Interconnect – core 1 : LPD, HP0, HP2
- Interconnect – core 2 : LPD, HP3, HPC1
- multi-scaler pre-processing accelerator
- Clocks : 300MHz
- Interconnect : HPC1
Adapting the smart_model_select example for Kria
We already know that one B4096 DPU accelerator will fit in the kv260 platform, but only if no other accelerators are instantiated. Since we also want to instantiate the multi-scaler accelerator, we need to change the configuration to one B3136 DPU.
We also need to modify the interconnect to match the ones available in the platform.
In order to make our changes, we can use the following smartcam configuration files as reference :
- kv260-vitis/overlays/examples/smartcam
- Makefile
- vh
- prj_config/prj_config_1dpu
- prj_config/strip_interconnects.tcl
The first file we want to modify is the Makefile, for which we will change the “package” recipe. Instead of creating a final sd_card.img file with v++, we will simply copy over the files that will be used to define the custom Kria app (.bit, .xclbin):
package:
#v++ -t ${TARGET} --platform ${PLATFORM} -p binary_container_1/dpu.xclbin -o dpu.xclbin --package.out_dir binary_container_1 --package.rootfs ${ROOTFS_FILE} --package.sd_file ${LINUX_IMAGE_FILE}
-@mkdir -p binary_container_1/sd_card
cp ./binary_*/link/vivado/vpl/prj/prj.runs/impl_1/*.bit ./binary_*/sd_card
cp ./binary_*/*.xclbin ./binary_*/sd_card
cp ./binary_*/link/vivado/vpl/prj/prj*/sources_1/bd/*/hw_handoff/*.hwh ./binary_*/sd_card
cp ./binary_*/link/vivado/vpl/prj/prj.gen/sources_1/bd/*/ip/*_DPUCZDX8G_1_0/arch.json ./binary_*/sd_card
The next file to modify is the dpu_conf.vhd, for which we only need to change the DPU architecture to B3136:
//`define B4096
`define B3136
Finally, we need to modify the prj_conf/prj_config file, to specify one DPU core, and valid interconnects for the kv260_ispMipiRx_vcu_DP platform.
[clock]
freqHz=300000000:DPUCZDX8G_1.aclk
freqHz=600000000:DPUCZDX8G_1.ap_clk_2
#freqHz=300000000:DPUCZDX8G_2.aclk
#freqHz=600000000:DPUCZDX8G_2.ap_clk_2
freqHz=300000000:v_multi_scaler_1.ap_clk
[connectivity]
#sp=DPUCZDX8G_1.M_AXI_GP0:LPD
#sp=DPUCZDX8G_1.M_AXI_HP0:HP0
#sp=DPUCZDX8G_1.M_AXI_HP2:HP2
#sp=DPUCZDX8G_2.M_AXI_GP0:LPD
#sp=DPUCZDX8G_2.M_AXI_HP0:HP3
#sp=DPUCZDX8G_2.M_AXI_HP2:HPC1
sp=DPUCZDX8G_1.M_AXI_GP0:HP1
sp=DPUCZDX8G_1.M_AXI_HP0:HP1
sp=DPUCZDX8G_1.M_AXI_HP2:HPC1
#sp=v_multi_scaler_1.m_axi_mm_video:HPC1
sp=v_multi_scaler_1.m_axi_mm_video:HP3
#nk=DPUCZDX8G:2
nk=DPUCZDX8G:1
We also need to modify the prj_conf/strip_interconnects.tcl file, based on the smartcam example, as follows:
# delete the fifo in the axi interconnect
set_property -dict [list CONFIG.STRATEGY {0} CONFIG.M00_HAS_REGSLICE {0} CONFIG.M00_HAS_DATA_FIFO {0} CONFIG.S00_HAS_REGSLICE {0} CONFIG.S01_HAS_REGSLICE {0} CONFIG.S02_HAS_REGSLICE {0} CONFIG.S03_HAS_REGSLICE {0} CONFIG.S00_HAS_DATA_FIFO {0} CONFIG.S01_HAS_DATA_FIFO {0} CONFIG.S02_HAS_DATA_FIFO {0} CONFIG.S03_HAS_DATA_FIFO {0}] [get_bd_cells axi_ic_PS_0_S_AXI_HP3_FPD]
set_property -dict [list CONFIG.STRATEGY {0} CONFIG.M00_HAS_REGSLICE {0} CONFIG.M00_HAS_DATA_FIFO {0} CONFIG.S00_HAS_REGSLICE {0} CONFIG.S01_HAS_REGSLICE {0} CONFIG.S02_HAS_REGSLICE {0} CONFIG.S00_HAS_DATA_FIFO {0} CONFIG.S01_HAS_DATA_FIFO {0} CONFIG.S02_HAS_DATA_FIFO {0}] [get_bd_cells axi_ic_PS_0_S_AXI_HP1_FPD]
set_property -dict [list CONFIG.STRATEGY {0} CONFIG.M00_HAS_REGSLICE {0} CONFIG.M00_HAS_DATA_FIFO {0} CONFIG.S00_HAS_REGSLICE {0} CONFIG.S01_HAS_REGSLICE {0} CONFIG.S00_HAS_DATA_FIFO {0} CONFIG.S01_HAS_DATA_FIFO {0}] [get_bd_cells axi_ic_PS_0_S_AXI_HPC1_FPD]
set ps_cell [get_bd_cells * -hierarchical -quiet -filter {VLNV =~ "xilinx.com:ip:zynq_ultra_ps_e:*"}]
if {$ps_cell ne ""} {
. . .
#startgroup
#set_property -dict [list CONFIG.S00_HAS_DATA_FIFO {0} CONFIG.S01_HAS_DATA_FIFO {0}] [get_bd_cells axi_interconnect_1]
#set_property -dict [list CONFIG.S00_HAS_DATA_FIFO {0} CONFIG.S01_HAS_DATA_FIFO {0}] [get_bd_cells axi_ic_ps_e_S_AXI_HPC1_FPD]
#endgroup
These changes are sufficient to build the hardware accelerators for the smart_model_select example.
The HLS Y2K22 bug
As of January 1, 2022, the HLS builds fail due to a timestamp generation bug. When building the multi-scaler accelerator, which is implemented in HLS, the following error will be generated in 2022.
ERROR: [v++ 213-28] Failed to generate IP.
ERROR: [v++ 60-300] Failed to build kernel(ip) v_multi_scaler, see log for details: /media/abbeef/TheLinuxElements/kria_custom_app/take01/VVAS/ivas-examples/Embedded/smart_model_select/_x/v_multi_scaler/v_multi_scaler/vitis_hls.log
ERROR: [v++ 60-773] In '/media/abbeef/TheLinuxElements/kria_custom_app/take01/VVAS/ivas-examples/Embedded/smart_model_select/_x/v_multi_scaler/v_multi_scaler/vitis_hls.log', caught Tcl error: ERROR: '2201041355' is an invalid argument. Please specify an integer value.
ERROR: [v++ 60-773] In '/media/abbeef/TheLinuxElements/kria_custom_app/take01/VVAS/ivas-examples/Embedded/smart_model_select/_x/v_multi_scaler/v_multi_scaler/vitis_hls.log', caught Tcl error: ERROR: [IMPL 213-28] Failed to generate IP.
ERROR: [v++ 60-599] Kernel compilation failed to complete
ERROR: [v++ 60-592] Failed to finish compilation
The bug is caused by the way that the timestamp is constructed : YYMMDDHHMM
This is packed into a 32 bit signed integer, which has a maximum value of : 2147483647
Thus, the last supported year using this scheme was 2021 … 
Happy New Year !
The bug is being tracked here, where a solution has been found:
I decided to use the “faketime” solution.
Install the faketime utility on your linux machine:
$ sudo apt install faketime
Building the smart_model_select example
With our modifications made, we can build the smart_model_select example design with “make”.
Start by creating a build.sh file with the following content in the smart_model_select directory:
faketime -f "-1y" make all \
PLATFORM=../../../../kv260-vitis/platforms/xilinx_kv260_ispMipiRx_vcu_DP_202110_1/kv260_ispMipiRx_vcu_DP.xpfm \
DPU_TRD_PATH=../../../../Vitis-AI/dsa/DPU-TRD \
HW_ACCEL_PATH=../../../../VVAS/ivas-accel-hw
Then launch the build.sh script from the smart_model_select directory:
$ cd $PROJ_DIR/VVAS/ivas-examples/Embedded/smart_model_select
$ source ./build.sh
The build artifacts are located in the following directory:
VVAS/ivas-examples/Embedded/smart_model_select/binary_container_1/sd_card/
- json
- xclbin
- hwh
- bit
The arch.json describes the DPU architecture in our design, and is used to compile models for our design.
The dpu.xclbin describes the details for the accelerators present in our design, and will be used at run-time for our application.
The kv260_ispMipiRx_vcu_DP_wrapper.bit is the bitstream, and will be used together with dpu.xclbin, to define our custom Kria App.
Understanding the smart_model_select application
The smart_model_select application is a front-end interface to setup a GStreamer pipeline using the VVAS infrastructure’s GStreamer plug-ins.
It starts by displaying the following visual chart of choices on the monitor:
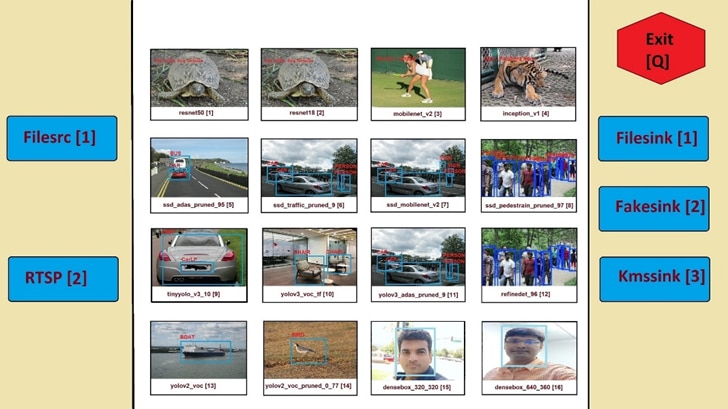
Then it captures input from the command line, to determine four (4) options:
- Input
- 0 : Filesrc
- 1 : RTSP
- Model
- 1-4 : classification models
- 5-8 : SSD detection models
- 9-11 : YoloV3 detection models
- 12 : refinedet detection model
- 13-14 : YoloV2 detection models
- 15-16 : face detection models
- Output
- 0 : Filesink
- 1 : Fakesink
- 2 : Kmssink
- Performance
- 0 : do not measure performance
- 1 : measure performance (only available for filesrc input)
With the specified input, it then converts generic template files to model-specific versions, as shown in the following diagram:
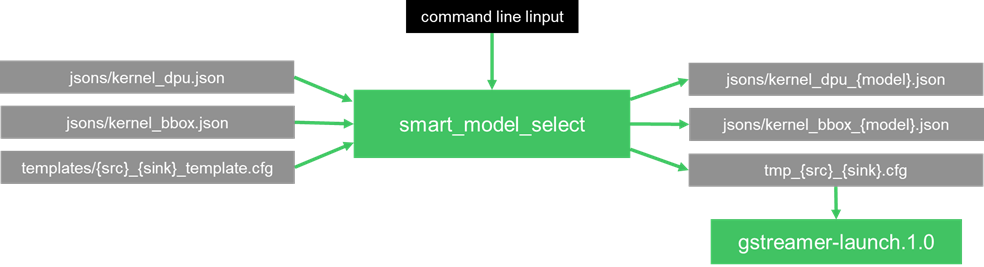
The following templates are copied and modified by the “smart_model_select” application for the specified model.
- jsons/kernel_dpu.json => jsons/kernel_dpu_{model}.json
- jsons/kernel_bbox.json => jsons/kernel_bbox_{model}.json
- templates/{src}_{sink}_template.cfg => tmp_{src}_{sink}.cfg
The following VVAS GStreamer plugins, and acceleration libraries, are used in this example:
- ivas_xfilter GStreamer plugin
- ivas_xdpuinfer software accelerator library
- ivas_xboundingbox software accelerator library
- ivas_xabrscaler multiscaler accelerator plugin
- ivas_xmetaaffixer GStreamer plugin
The “jsons/kernel_dpu_{model}.json” and “jsons/kernel_bbox_{model}.json” are config files that are used to specify which accelerator library (ivas_xdpuinfer or ivas_xboundingbox) to use by the ivas_xfilter GStreamer plug-in.
The tmp_{src}_{sink}.cfg is used as a linux script to launch the following GStreamer pipeline:

If “Filesrc [0]” is selected as the {src}, then one of the following video files is used, depending on the model type:
- videos/CLASSIFICATION.mp4
- videos/SSD.mp4
- videos/YOLOV3.mp4
- videos/REFINEDET.mp4
- videos/YOLOV2.mp4
- videos/FACEDETECT.mp4
For more information on the GStreamer plug-ins used in this example, as well as a more in-depth description of the json format, refer to the VVAS on-line documentation:
- Smart Model Select https://xilinx.github.io/VVAS/main/build/html/docs/Embedded/smart_model_select.html
- MultiChannel ML
https://xilinx.github.io/VVAS/main/build/html/docs/Embedded/Tutorials/MultiChannelML.html
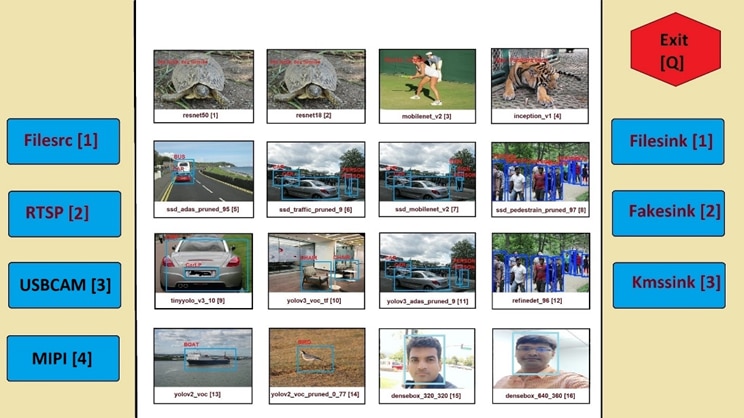
Modifying the smart_model_select application
For the purpose of our custom Kria App, we will make the following modifications to the smart_model_select application:
- Add following additional input sources
- USBCAM [3] = for use with USB cameras
- MIPI [4] => for use with the optional AR1335 sensor module
The first modification to make is to modify the visual chart, as follows:
The second modification to make is to modify the following source code:
VVAS/ivas-examples/Embedded/smart_model_select/src/smart_model_select.src
The following two (2) simple modifications are all that is needed to add support for our additional input sources:
static char *get_src(int n)
...
case 3: return "usbcam";
case 4: return "mipi";
...
static int validate_input(options *op, int n)
...
if (op[i].src < 1 || op[i].src > 4) {
...
The main modification to make for the additional input sources, is to provide the template linux scripts:
Adding the USBCAM input source
For the “USBCAM [3]” input source, we need to add the following templates:
- templates/usbcam_*_template.cfg
- usbcam_fake_template.cfg
- usbcam_file_tempalte.cfg
- usbcam_kms_template.cfg
The following content corresponds to the usbcam_kms_template.cfg template:
# Find usb cameras
declare -a usbcam_dev_list
declare -a usbcam_src_list
usbcam_idx=0
for dev_video in `ls /dev/video*`
do
dev_video_v4l2_ctl=$(v4l2-ctl -D -d $dev_video)
if [[ "$dev_video_v4l2_ctl" == *"uvcvideo"* ]]; then
if [[ "$dev_video_v4l2_ctl" == *"Device Caps"*"Video Capture"* ]]; then
echo "$dev_video is a uvcvideo driver of type Video Capture"
usbcam_dev_list[$usbcam_idx]=$dev_video
usbcam_list_formats=$(v4l2-ctl --list-formats -d $dev_video)
if [[ "$usbcam_list_formats" == *"NV12"* ]]; then
echo "$dev_video supports NV12 format"
usbcam_src_list[$usbcam_idx]="v4l2src device=$dev_video ! video/x-raw, width=1920, height=1080, format=NV12 "
else
usbcam_src_list[$usbcam_idx]="v4l2src device=$dev_video ! video/x-raw, width=1920, height=1080 ! videoconvert ! video/x-raw, format=NV12 "
fi
usbcam_idx=$usbcam_idx+1
fi
fi
done
echo "usbcam devices = ${usbcam_dev_list[@]}"
usbsrc0=${usbcam_src_list[0]}
echo "usbsrc0 = $usbsrc0"
# Launch gstreamer pipeline
gst-launch-1.0 -v \
$usbsrc0 ! \
tee name=t0 t0.src_0 ! \
queue ! \
ivas_xabrscaler xclbin-location="XCLBIN_PATH" kernel-name="v_multi_scaler:v_multi_scaler_1" alpha-r=MEANR alpha-g=MEANG alpha-b=MEANB beta-r=SCALER beta-g=SCALEG beta-b=SCALEB ! \
queue ! \
ivas_xfilter kernels-config="./jsons/kernel_dpu_MODEL.json" ! \
scalem0.sink_master ivas_xmetaaffixer name=scalem0 scalem0.src_master ! \
fakesink \
t0.src_1 ! \
queue ! \
scalem0.sink_slave_0 scalem0.src_slave_0 ! \
queue ! \
ivas_xfilter kernels-config="./jsons/kernel_bbox_MODEL.json" ! \
queue ! fpsdisplaysink video-sink="kmssink driver-name=xlnx sync=false" text-overlay=false sync=false
The first part of the template script is used to detect the USB camera.
The v4l2-ctl utility, with the “-D” option, is used to scan all of the /dev/video* devices, present on the embedded platform.
The following content is searched, to determine that a USB camera has been found:
- first search for the “uvcvideo” driver type
- next, search for the “Video Capture” capability, under the “Device Caps” section
Finally, using the v4l2-ctl utility, with the “--list-formats” option, determine if the USB camera supports the NV12 color format.
If NV12 if not supported, then an additional software color space conversion must first be applied. Since this will slow down the performance of the GStreamer pipeline, it is recommended to use the following USB camera for real-time performance:
- Logitech BRIO
For a web camera with NV12 support, this is the GStreamer pipeline that is launched:

For a web camera without NV12 support, this is the GStreamer pipeline that is launched:

Create the other two templates in a similar fashion.
Adding the MIPI input source
For the “MIPI [4]” input source, we need to add the following templates:
- templates/mipi_*_template.cfg
- mipi_fake_template.cfg
- mipi_file_tempalte.cfg
- mipi_kms_template.cfg
The following content corresponds to the mipi_kms_template.cfg template:
# Find mipi source
declare -a mipi_video_list
declare -a mipi_media_list
mipi_video_idx=0
mipi_media_idx=0
for dev_video in `ls /dev/video*`
do
dev_v4l2_ctl=$(v4l2-ctl -D -d $dev_video)
if [[ "$dev_v4l2_ctl" == *"isp_vcap_csi"* ]]; then
echo "$dev_video is a mipi video device"
mipi_video_list[$mipi_video_idx]=$dev_video
mipi_video_idx=$mipi_video_idx+1
fi
done
echo "mipi video devices = ${mipi_video_list[@]}"
mipi_video_dev=${mipi_video_list[0]}
for dev_media in `ls /dev/media*`
do
dev_media_ctl=$(media-ctl -p -d $dev_media)
if [[ "$dev_media_ctl" == *"isp_vcap_csi"* ]]; then
echo "$dev_media is a mipi media device"
mipi_media_list[$mipi_media_idx]=$dev_media
mipi_media_idx=$mipi_media_idx+1
fi
done
echo "mipi media devices = ${mipi_media_list[@]}"
mipi_media_dev=${mipi_media_list[0]}
echo "mipi : $mipi_video_dev, $mipi_media_dev"
# Configure mipi pipeline
media-ctl -d $mipi_media_dev --set-v4l "'ap1302.4-003c':2 [fmt:VYYUYY8_1X24/1920x1080 field:none]"
v4l2-ctl -d $mipi_video_dev --set-fmt-video=width=1920,height=1080,pixelformat='NV12'
# Launch gstreamer pipeline
gst-launch-1.0 -v \
v4l2src device=$mipi_video_dev io-mode="dmabuf" stride-align=256 ! \
video/x-raw,format=NV12,width=1920,height=1080, framerate=30/1 ! \
tee name=t0 t0.src_0 ! \
queue ! \
ivas_xabrscaler xclbin-location="XCLBIN_PATH" kernel-name="v_multi_scaler:v_multi_scaler_1" alpha-r=MEANR alpha-g=MEANG alpha-b=MEANB beta-r=SCALER beta-g=SCALEG beta-b=SCALEB ! \
queue ! \
ivas_xfilter kernels-config="./jsons/kernel_dpu_MODEL.json" ! \
scalem0.sink_master ivas_xmetaaffixer name=scalem0 scalem0.src_master ! \
fakesink \
t0.src_1 ! \
queue ! \
scalem0.sink_slave_0 scalem0.src_slave_0 ! \
queue ! \
ivas_xfilter kernels-config="./jsons/kernel_bbox_MODEL.json" ! \
queue ! fpsdisplaysink video-sink="kmssink driver-name=xlnx sync=false" text-overlay=false sync=false
The first part of the template script is used to detect the MIPI capture pipeline.
The v4l2-ctl and media-ctl utilities are used to scan all of the /dev/video* devices and /dev/media* media nodes, present on the embedded platform.
The following content is searched, to determine that a USB camera has been found:
- search for the “isp_vcap_csi” capture pipeline name
If found, the mipi capture pipeline is configured for 1080P resolution, as follows, before launching the GStreamer pipeline:
# Configure mipi pipeline
media-ctl -d $mipi_media_dev --set-v4l "'ap1302.4-003c':2 [fmt:VYYUYY8_1X24/1920x1080 field:none]"
v4l2-ctl -d $mipi_video_dev --set-fmt-video=width=1920,height=1080,pixelformat='NV12'
This is the GStreamer pipeline that will be launched.

Create the other two templates in a similar fashion.
Building the smart_model_select application
We will not be building the smart_model_select application at this time.
Instead, we will be building the application as a yocto recipe in Part 5, when we create the petalinux project.
Next Steps
The following blogs cover the previous development steps for this in-depth project tutorial.
The following blogs will cover the remaining development steps for this in-depth project tutorial.
Top Comments