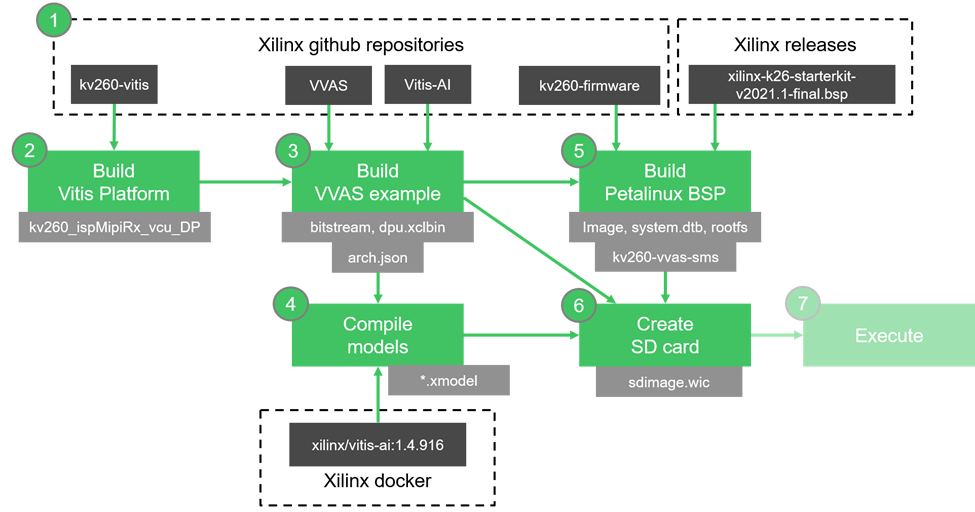
This blog is part of a series of blogs which describe the development steps for an in-depth project tutorial.
This part of the tutorial describes how to combine all the parts that we built in the previous sections, to create an SD card image.

Creating the final package
In this section, we will re-create the pre-built binaries
Although not required to complete the tutorial, the modified files and pre-built binaries are provided for reference:
- Pre-built binaries
- http://avnet.me/kv260-vvas-sms-2021-1-prebuilt
(2022-01-10 - md5sum : c0ba002bd340828b282b9f7549fe46dd)
- http://avnet.me/kv260-vvas-sms-2021-1-prebuilt
This archive contains the following files:
kv260-vvas-sms-2021-1-prebuilt
├── rpm
│ ├── kv260-vvas-sms-1.0-r0.0.zynqmp_generic.rpm
│ ├── kv260-vvas-sms-dbg-1.0-r0.0.zynqmp_generic.rpm
│ ├── kv260-vvas-sms-dev-1.0-r0.0.zynqmp_generic.rpm
│ ├── kv260-vvas-sms-lic-1.0-r0.0.zynqmp_generic.rpm
│ ├── kv260-vvas-sms-models-1.0-r0.0.zynqmp_generic.rpm
│ ├── kv260-vvas-sms-models -dbg-1.0-r0.0.zynqmp_generic.rpm
│ ├── kv260-vvas-sms-models -dev-1.0-r0.0.zynqmp_generic.rpm
│ ├── kv260-vvas-sms-models -lic-1.0-r0.0.zynqmp_generic.rpm
│ ├── kv260-vvas-sms-app-1.0-r0.0.zynqmp_generic.rpm
│ ├── kv260-vvas-sms-app -dbg-1.0-r0.0.zynqmp_generic.rpm
│ ├── kv260-vvas-sms-app -dev-1.0-r0.0.zynqmp_generic.rpm
│ ├── kv260-vvas-sms-app -lic-1.0-r0.0.zynqmp_generic.rpm
│ ├── packagegroup-kv260-vvas-sms-1.0-r0.0.noarch.rpm
│ ├── packagegroup-kv260-vvas-sms-dbg-1.0-r0.0.noarch.rpm
│ ├── packagegroup-kv260-vvas-sms-dev-1.0-r0.0.noarch.rpm
│ ├── packagegroup-kv260-vvas-sms-lic-1.0-r0.0.noarch.rpm
│ └── packagegroup-kv260-vvas-sms-ptest-1.0-r0.0.noarch.rpm
└── sdimage
├── kv260-2021.1-sdimage.wic.gz
└── kv260-vvas-sms-2021.1-sdimage.wic.gz
Create the main directory structure:
$ cd $PROJ_DIR
$ mkdir kv260-vvas-sms-2021-1-prebuilt
Create the “sdimage” sub-directory
$ mkdir kv260-vvas-sms-2021-1-prebuilt/sdimage
$ cp kv260-2021.1-sdimage.wic.gz kv260-vvas-sms-2021-1-prebuilt/sdimage/.
$ cp kv260-vvas-sms-2021.1-sdimage.wic.gz kv260-vvas-sms-2021-1-prebuilt/sdimage/.
Create the “rpm” sub-directory
$ mkdir kv260-vvas-sms-2021-1-prebuilt/rpm
$ cp xilinx-k26-starterkit-2021.1/build/tmp/work/zynqmp_generic-xilinx-linux/kv260-vvas-sms/1.0-r0/deploy-rpms/zynqmp_generic/*.rpm kv260-vvas-sms-2021-1-prebuilt/rpm/.
$ cp xilinx-k26-starterkit-2021.1/build/tmp/work/cortexa72-cortexa53-xilinx-linux/kv260-vvas-sms-models/1.0-r0/deploy-rpms/cortexa72-cortexa53/*.rpm kv260-vvas-sms-2021-1-prebuilt/rpm/.
$ cp xilinx-k26-starterkit-2021.1/build/tmp/work/cortexa72-cortexa53-xilinx-linux/kv260-vvas-sms-app/1.0-r0/deploy-rpms/cortexa72-cortexa53/*.rpm kv260-vvas-sms-2021-1-prebuilt/rpm/.
$ cp xilinx-k26-starterkit-2021.1/build/tmp/work/all-xilinx-linux/packagegroup-kv260-vvas-sms/1.0-r0/deploy-rpms/noarch/*.rpm kv260-vvas-sms-2021-1-prebuilt/rpm/.
Creating the SD card
Using the “kv260-vvas-sms-2021-1-prebuilt” directory we created in the previous section, we can now create our SD card image.
First, program the following image to a 16GB or greater micro SD card.
kv260-vvas-sms-2021-1-prebuilt/sdimage/kv260-2021.1-sdimage.wic.gz
Next, copy the “rpm” directory to the micro SD card’s second partition, under /home/root
$ cd $PROJ_DIR
$ sudo mkdir /media/{user}/root/home/root/kv260-vvas-sms-2021-1
$ sudo cp -r kv260-vvas-sms-2021-1-prebuilt/rpm /media/{user}/root/home/root/kv260-vvas-sms-2021-1/.
$ sync
Your SD card image is now ready to be used on the Kria KV260 Vision AI Starter Kit.
Next Steps
The following blogs cover the previous development steps for this in-depth project tutorial.
- http://avnet.me/kv260-vvas-sms-2021-1-part1
- http://avnet.me/kv260-vvas-sms-2021-1-part2
- http://avnet.me/kv260-vvas-sms-2021-1-part3
- http://avnet.me/kv260-vvas-sms-2021-1-part4
- http://avnet.me/kv260-vvas-sms-2021-1-part5
The following blogs will cover the remaining development steps for this in-depth project tutorial.


-

schneisw
-
Cancel
-
Vote Up
0
Vote Down
-
-
Sign in to reply
-
More
-
Cancel
Comment-

schneisw
-
Cancel
-
Vote Up
0
Vote Down
-
-
Sign in to reply
-
More
-
Cancel
Children