element14 Community
element14 Community
    Register Log In
  • Site
  • Search
  • Log In Register
  • Community Hub
    Community Hub
    • What's New on element14
    • Feedback and Support
    • Benefits of Membership
    • Personal Blogs
    • Members Area
    • Achievement Levels
  • Learn
    Learn
    • Ask an Expert
    • eBooks
    • element14 presents
    • Learning Center
    • Tech Spotlight
    • STEM Academy
    • Webinars, Training and Events
    • Learning Groups
  • Technologies
    Technologies
    • 3D Printing
    • FPGA
    • Industrial Automation
    • Internet of Things
    • Power & Energy
    • Sensors
    • Technology Groups
  • Challenges & Projects
    Challenges & Projects
    • Design Challenges
    • element14 presents Projects
    • Project14
    • Arduino Projects
    • Raspberry Pi Projects
    • Project Groups
  • Products
    Products
    • Arduino
    • Avnet Boards Community
    • Dev Tools
    • Manufacturers
    • Multicomp Pro
    • Product Groups
    • Raspberry Pi
    • RoadTests & Reviews
  • Store
    Store
    • Visit Your Store
    • Choose another store...
      • Europe
      •  Austria (German)
      •  Belgium (Dutch, French)
      •  Bulgaria (Bulgarian)
      •  Czech Republic (Czech)
      •  Denmark (Danish)
      •  Estonia (Estonian)
      •  Finland (Finnish)
      •  France (French)
      •  Germany (German)
      •  Hungary (Hungarian)
      •  Ireland
      •  Israel
      •  Italy (Italian)
      •  Latvia (Latvian)
      •  
      •  Lithuania (Lithuanian)
      •  Netherlands (Dutch)
      •  Norway (Norwegian)
      •  Poland (Polish)
      •  Portugal (Portuguese)
      •  Romania (Romanian)
      •  Russia (Russian)
      •  Slovakia (Slovak)
      •  Slovenia (Slovenian)
      •  Spain (Spanish)
      •  Sweden (Swedish)
      •  Switzerland(German, French)
      •  Turkey (Turkish)
      •  United Kingdom
      • Asia Pacific
      •  Australia
      •  China
      •  Hong Kong
      •  India
      •  Korea (Korean)
      •  Malaysia
      •  New Zealand
      •  Philippines
      •  Singapore
      •  Taiwan
      •  Thailand (Thai)
      • Americas
      •  Brazil (Portuguese)
      •  Canada
      •  Mexico (Spanish)
      •  United States
      Can't find the country/region you're looking for? Visit our export site or find a local distributor.
  • Translate
  • Profile
  • Settings
FPGA
  • Technologies
  • More
FPGA
Blog Porting PYQN to ZC702
  • Blog
  • Forum
  • Documents
  • Quiz
  • Events
  • Polls
  • Files
  • Members
  • Mentions
  • Sub-Groups
  • Tags
  • More
  • Cancel
  • New
Join FPGA to participate - click to join for free!
  • Share
  • More
  • Cancel
Group Actions
  • Group RSS
  • More
  • Cancel
Engagement
  • Author Author: dimiterk
  • Date Created: 11 Feb 2020 6:05 PM Date Created
  • Views 2026 views
  • Likes 7 likes
  • Comments 4 comments
  • zc702
  • fpga_projects
  • xilinx
  • fpga
  • pynq
  • pynqrunner
Related
Recommended

Porting PYQN to ZC702

dimiterk
dimiterk
11 Feb 2020
In this project we will port the PYNQ framework to the ZC702 development board.


Introduction


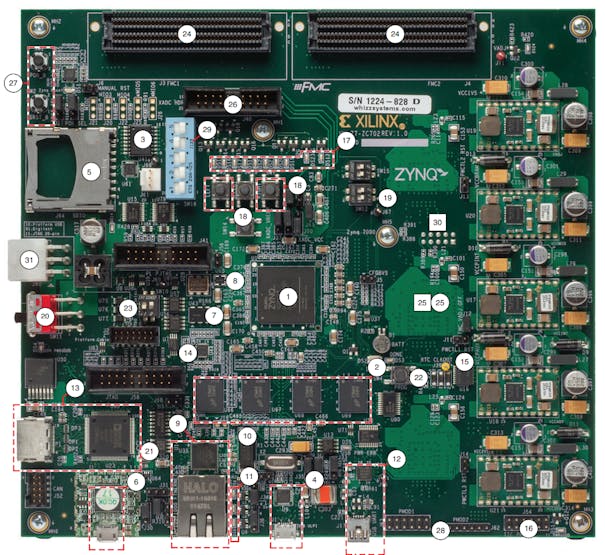
The ZC702 is an official development board from Xilinx. This board sports a ZC7020 ZYNQ FPGA SoC. It comes with a number of peripherals including HDMI, CAN Bus, UART, embedded Digilent JTAG Programmer, Ethernet , SD card, USB host , I2C bus expander and a number of SMBUS enabled PMIC for monitoring the SoC rails.


zc702callout.PNG


PYNQ is a project by Xilinx that brings Python level productivity to FPGA's. It allows a designer to import hardare designs called overlays in PYNQ parlance and write Python code to address and configure the cores.
This makes designs much easier compared to writing low level C code on the SDK everytime the device needs to be configured.


This speeds up development by an order of magnitude compared to bare metal designs. As of 2020 PYNQ V2.5 uses a Petalinux Kernels with a UBUNTU 28.04 Rootfs.
The ZC702 development board is not supported by the official PYNQ framework so I decided to try and port part of it to this board in order to use it for different projects.
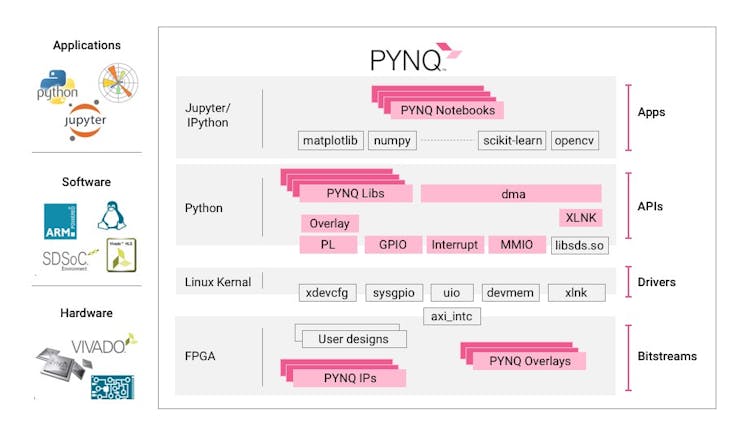
 

1555436991350.jpg


The official way to port PYNQ to a new board is to download the framework from Git create a custom board file that uses the custo board BSP and the board parameters.
Here we are going to take a shortcut that involves reusing the official image and generate a kernel from scratch using Petalinux.
PYNQ uses a Petalinux kernel coupled with a Ubuntu rootfs.
Porting PYQN the easy way.


Download the PYNQ image 2.5 and burn it to an SD CARD. This will partition the SD card with a FATFS partition that holds the kernel and device tree and an ext4 partition that holds the rootfs which in PYNQ's case is a UBUNTU 18.0 root file system.

To boot the board on the ZC702 we have to customize the default kernel of the PYNQ V2.5 image which targets the 400 pin version of ZC7020 to the 484 pin SOC on the ZC702.


Step #1


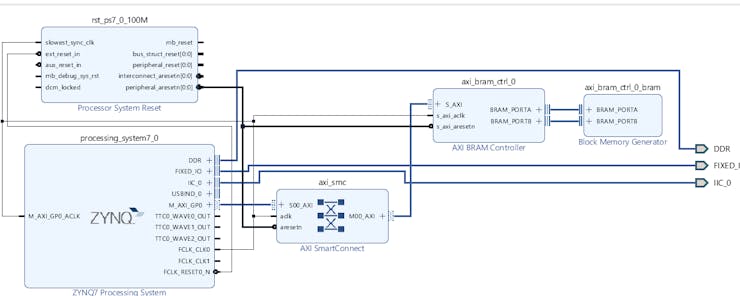
Create a basic Vivado design. I created a custom Vivado design targeting the ZC702 with a BRAM, 1 GPIO targeting the built in LEDS's and switches and an AXI IIC core deployed on the PL that shares the same I2C pins located on the FMC.


In this project we will read and write to the BRAM IP from the PS side..

Step #2


Compile the design and export it. Also create an FSBL and a hello world test app on the SDK folder. In addition create a folder called PYQN_ZC702 and export there the bistream and the .tcl file. We shall use this in the future to prove that the PYNQ framework works OK.


Step #3


Install Virtual Box, install Ubuntu 18.0 and then install Vivado 2019.1 as well as Petalinux 2019.1. Then copy the complete Vivado project folder on the Ubuntu VM.


Step #4


Make sure that both Vivado and Petalinux are in the user path. Then , from the project directory create a Petalinux project and read the exported hdf project file from the SDK folder.


Step #5


Build a custom kernel for the ZC702. Change the rootfs boot setting so that the kernel boots from the SD card. Then disable the net boot. Additionally enable common utilities such as i2cdetect.

Once all the settings are correct issue:


petalinux-build

Step#6


After the kernel is build create the custom kernel boot.img file by issuing the following


petalinux-package --boot --fsbl --fpga --u-boot


Finally use the SD card with the PYNQ image before and overwrite the boot image file as well as device tree with the new files generated from the Petalinix kernel compilation stage.


The steps above complete the process of porting PYNQ to the ZC702. Place the SD card on the ZC702 and change the position of the boot switches to all HIGH so that the SoC boots from the SD card.
Connecting the USB serial port shows that PYNQ boots correctly. You will get a login console.
Connect an Ethernet cable from a host computer to the ZC702.
You may needs to modify the uboot settings so that the uboot can read the rootfs from the second partition of the SD card.
Once PYNQ boots up we can connect from the host side. Then open a web browser and navigate to pynq:9090. This will bring the default page shown below. The default password for PYNQ is xilinx.


Now that we have booted PYNQ the next step is to test how it operates on the ZC702. Using WinSCP transfer the two files we created earlier on the PYNQ folder.


Testing PYNQ


To test the PYNQ framework a custom Vivado HW will be designed. The block diagram below shows the BRAM connected to the AXI interconnect.


Untitled.png


From the Vivado design export the block diagram, the bitstream and place them both in one folder.


Copy the folder with the notebook ( iPython Notebook) attached at the end as well as the tcl file and bitstream on the ZYNQ via winscp and open it by navigating to pynq:9090\ folder location.
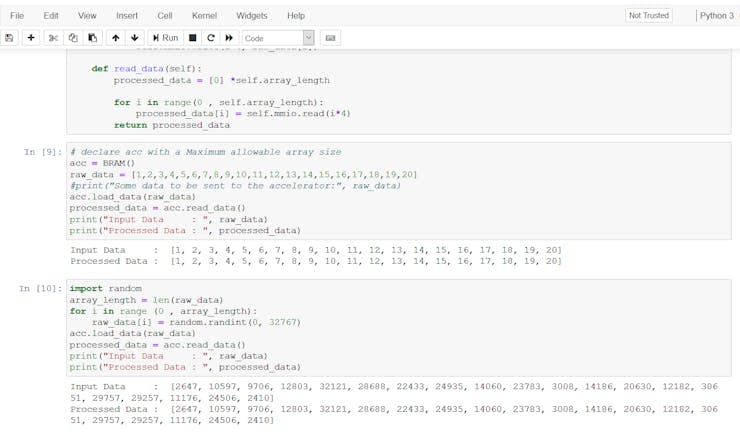
To test the PYQN framework we will build test setup with a BRAM IP an test it. First the bitstream is loaded.
The data is then printed on the Notebook.


Untitled.png


Conclusion


This completes the demonstration. In this project we showed how to create a custom PYNQ distribution the easy way by avoiding the complete recompilation of the rootfs.


The framework was tested by reading and writing data to a BRAM IP block.
Attachments:
bram_test.txt.zip
  • Sign in to reply
  • dimiterk
    dimiterk over 5 years ago in reply to Fred27

    I'll edit the entry with the complete commands later this week.  Basically it's 3-4 commands if not editing the filesystem.


    petalinux-config --get-hw-description <path to .hdf file in SDK>


    petalinux-config -c kernel


    petalinux-build


    Make sure the fpgamanager is enabled on the kernel.


    For the MIPI-CSI you can add the license to Vivado. 


    I don't have a PYNQ board so this was only tested on the ZC702 board I worked on.

    • Cancel
    • Vote Up 0 Vote Down
    • Sign in to reply
    • More
    • Cancel
  • Fred27
    Fred27 over 5 years ago

    I read this with interest as I've been struggling to build a PYNQ image for the Zybo-Z7 sp that I can use the Pcam5C over MIPI. The problem is that there's no 2019.1 bsp available for the Zybo Z7. I tried building one myself and can successfully build a Petalinux image. However when I tried to build a Pynq image from scratch it complains about the MIPI IP being protected.


    Your shortcut process sounds useful, but I must admit my petalinux experience is lacking and I've no idea how to do step 5 (building a custom kernel). I can't see anything that looks likely in the petalinux_config popup. Is it something that's easy to explain?

    • Cancel
    • Vote Up 0 Vote Down
    • Sign in to reply
    • More
    • Cancel
  • dimiterk
    dimiterk over 5 years ago in reply to mayermakes

    Yep, PYNQ lowers the barrier to FPGA programming, Will do a follow-up on image processing time permitting in the near future.

    • Cancel
    • Vote Up 0 Vote Down
    • Sign in to reply
    • More
    • Cancel
  • mayermakes
    mayermakes over 5 years ago

    Awesome writeup! i need to dabble itno fpga stuff, it is getting more accessible to noobies like me thanks to awesome people like you that share their findings and projects!

    • Cancel
    • Vote Up 0 Vote Down
    • Sign in to reply
    • More
    • Cancel
element14 Community

element14 is the first online community specifically for engineers. Connect with your peers and get expert answers to your questions.

  • Members
  • Learn
  • Technologies
  • Challenges & Projects
  • Products
  • Store
  • About Us
  • Feedback & Support
  • FAQs
  • Terms of Use
  • Privacy Policy
  • Legal and Copyright Notices
  • Sitemap
  • Cookies

An Avnet Company © 2025 Premier Farnell Limited. All Rights Reserved.

Premier Farnell Ltd, registered in England and Wales (no 00876412), registered office: Farnell House, Forge Lane, Leeds LS12 2NE.

ICP 备案号 10220084.

Follow element14

  • X
  • Facebook
  • linkedin
  • YouTube