


I'm Road Testing the Rohm SensorShield-EVK-003 (Arduino Compatible) and the sensors that come with it. In this post, the Ambient Light and Proximity Sensor RPR-0521RSRPR-0521RS.
|

The Sensor Shield ecosystemSensor Shield ecosystem is ROHM's test bed for their sensors. It's an Arduino form shield with a number of slots.
The small evaluation boards for their sensors plug into that board.
For each of the sensors, there's an example sketch available.
For this blog post, I'm testing the Ambient Light and Proximity Sensor that comes with the kit.
From now on, my blogs on the SensorShield and the ROHM sensors is different.
The first reviews were focusing on the Road Test. I've submitted my review, so now I have my hands free to focus on different aspects.
This time, i capture the i2c traffic and analyse it, because I want to use the sensor with another micocontroller.
For the performance of the sensor, please check the reviews of my fellow road testers.
I can confirm that my sensor performed according to the specs.
Arduino Example
The ROHM example first fires a few questions to the sensor, to verify its identity.
Then it loops and collects data continuously. The output is logged to the monitor.

You can see the start of the communication in the image below - this is the initial setup part of the sensor.
At the end of the post I've added a sequence that also shows measurements.
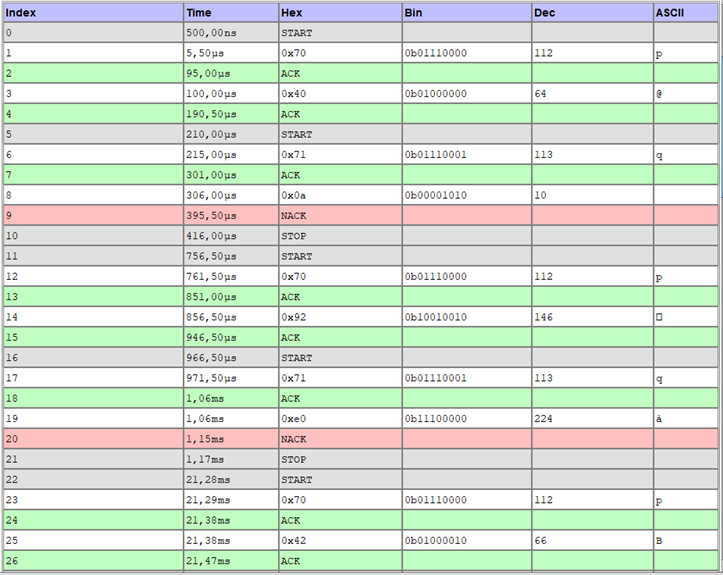
image: the very first i2c exchanges between Arduino and sensor
i2c Initialisation
ROHM has provided a good example on how to validate the hardware before talking.
The initialisation code checks the manufacturer and device id. It also checks if the device behaves as expected.
rc = read(RPR0521RS_SYSTEM_CONTROL, ®, sizeof(reg));
if (rc != 0) {
Serial.println(F("Can't access RPR0521RS"));
return (rc);
}
reg &= 0x3F;
Serial.print(F("RPR0521RS Part ID Register Value = 0x"));
Serial.println(reg, HEX);
if (reg != RPR0521RS_PART_ID_VAL) {
Serial.println(F("Can't find RPR0521RS"));
return (rc);
}
rc = read(RPR0521RS_MANUFACT_ID, ®, sizeof(reg));
if (rc != 0) {
Serial.println(F("Can't access RPR0521RS"));
return (rc);
}
Serial.print(F("RPR0521RS MANUFACT_ID Register Value = 0x"));
Serial.println(reg, HEX);
if (reg != RPR0521RS_MANUFACT_ID_VAL) {
Serial.println(F("Can't find RPR0521RS"));
return (rc);
}
reg = RPR0521RS_ALS_PS_CONTROL_VAL;
rc = write(RPR0521RS_ALS_PS_CONTROL, ®, sizeof(reg));
if (rc != 0) {
Serial.println(F("Can't write RPR0521RS ALS_PS_CONTROL register"));
return (rc);
}
rc = read(RPR0521RS_PS_CONTROL, ®, sizeof(reg));
if (rc != 0) {
Serial.println(F("Can't read RPR0521RS PS_CONTROL register"));
return (rc);
}
reg |= RPR0521RS_PS_CONTROL_VAL;
rc = write(RPR0521RS_PS_CONTROL, ®, sizeof(reg));
if (rc != 0) {
Serial.println(F("Can't write RPR0521RS PS_CONTROL register"));
}
reg = RPR0521RS_MODE_CONTROL_VAL;
rc = write(RPR0521RS_MODE_CONTROL, ®, sizeof(reg));
if (rc != 0) {
Serial.println(F("Can't write RPR0521RS MODE CONTROL register"));
return (rc);
}
Then it sets the configuration.
  unsigned char index;
  unsigned char als_gain_table[] = {1, 2, 64, 128};
  unsigned short als_meas_time_table[] = {0,0,0,0,0,100,100,100,100,100,400,400,50,0,0,0};

// ...

  reg = RPR0521RS_ALS_PS_CONTROL_VAL;
  index = (reg >> 4) & 0x03;
  _als_data0_gain = als_gain_table[index];
  index = (reg >> 2) & 0x03;
  _als_data1_gain = als_gain_table[index];


  index = RPR0521RS_MODE_CONTROL_VAL & 0x0F;
  _als_measure_time = als_meas_time_table[index];
From then on, the firmware queries the sensor.
i2c Traffic
It's easier to write firmware for a new controller if you have runtime captures of a working design.
That's one of the values of the ROHM SensorShield and code examples.
You have a working example up in no time and you can analyse its behaviour.
That's what you see below. The full init and setup sequence, and then a few data sample cycles.
From Index 57 on, the firmware queries data. Everything before that is setup.
I2C Analysis results
| Bus configuration | |
|---|---|
| SDA | Channel 0 |
| SCL | Channel 1 |
| Statistics | |
| Decoded bytes | 39 |
| Detected bus errors | 0 |
| Index | Time | Hex | Bin | Dec | ASCII |
|---|---|---|---|---|---|
| 0 | 500,00 ns | START | |||
| 1 | 5,50 μs | 0x70 | 0b01110000 | 112 | p |
| 2 | 95,00 μs | ACK | |||
| 3 | 100,00 μs | 0x40 | 0b01000000 | 64 | @ |
| 4 | 190,50 μs | ACK | |||
| 5 | 210,00 μs | START | |||
| 6 | 215,00 μs | 0x71 | 0b01110001 | 113 | q |
| 7 | 301,00 μs | ACK | |||
| 8 | 306,00 μs | 0x0a | 0b00001010 | 10 | |
| 9 | 395,50 μs | NACK | |||
| 10 | 416,00 μs | STOP | |||
| 11 | 756,50 μs | START | |||
| 12 | 761,50 μs | 0x70 | 0b01110000 | 112 | p |
| 13 | 851,00 μs | ACK | |||
| 14 | 856,50 μs | 0x92 | 0b10010010 | 146 | ’ |
| 15 | 946,50 μs | ACK | |||
| 16 | 966,50 μs | START | |||
| 17 | 971,50 μs | 0x71 | 0b01110001 | 113 | q |
| 18 | 1,06 ms | ACK | |||
| 19 | 1,06 ms | 0xe0 | 0b11100000 | 224 | à |
| 20 | 1,15 ms | NACK | |||
| 21 | 1,17 ms | STOP | |||
| 22 | 21,28 ms | START | |||
| 23 | 21,29 ms | 0x70 | 0b01110000 | 112 | p |
| 24 | 21,38 ms | ACK | |||
| 25 | 21,38 ms | 0x42 | 0b01000010 | 66 | B |
| 26 | 21,47 ms | ACK | |||
| 27 | 21,48 ms | 0x02 | 0b00000010 | 2 | |
| 28 | 21,57 ms | ACK | |||
| 29 | 21,59 ms | STOP | |||
| 30 | 21,60 ms | START | |||
| 31 | 21,61 ms | 0x70 | 0b01110000 | 112 | p |
| 32 | 21,70 ms | ACK | |||
| 33 | 21,70 ms | 0x43 | 0b01000011 | 67 | C |
| 34 | 21,79 ms | ACK | |||
| 35 | 21,81 ms | START | |||
| 36 | 21,82 ms | 0x71 | 0b01110001 | 113 | q |
| 37 | 21,90 ms | ACK | |||
| 38 | 21,91 ms | 0x01 | 0b00000001 | 1 | |
| 39 | 22,00 ms | NACK | |||
| 40 | 22,02 ms | STOP | |||
| 41 | 22,05 ms | START | |||
| 42 | 22,05 ms | 0x70 | 0b01110000 | 112 | p |
| 43 | 22,14 ms | ACK | |||
| 44 | 22,15 ms | 0x43 | 0b01000011 | 67 | C |
| 45 | 22,24 ms | ACK | |||
| 46 | 22,24 ms | 0x01 | 0b00000001 | 1 | |
| 47 | 22,33 ms | ACK | |||
| 48 | 22,35 ms | STOP | |||
| 49 | 22,38 ms | START | |||
| 50 | 22,38 ms | 0x70 | 0b01110000 | 112 | p |
| 51 | 22,47 ms | ACK | |||
| 52 | 22,48 ms | 0x41 | 0b01000001 | 65 | A |
| 53 | 22,57 ms | ACK | |||
| 54 | 22,57 ms | 0xc6 | 0b11000110 | 198 | Æ |
| 55 | 22,66 ms | ACK | |||
| 56 | 22,68 ms | STOP | |||
| 57 | 22,70 ms | START | |||
| 58 | 22,71 ms | 0x70 | 0b01110000 | 112 | p |
| 59 | 22,80 ms | ACK | |||
| 60 | 22,80 ms | 0x44 | 0b01000100 | 68 | D |
| 61 | 22,89 ms | ACK | |||
| 62 | 22,91 ms | START | |||
| 63 | 22,92 ms | 0x71 | 0b01110001 | 113 | q |
| 64 | 23,00 ms | ACK | |||
| 65 | 23,01 ms | 0x00 | 0b00000000 | 0 | |
| 66 | 23,10 ms | ACK | |||
| 67 | 23,10 ms | 0x00 | 0b00000000 | 0 | |
| 68 | 23,19 ms | ACK | |||
| 69 | 23,20 ms | 0x00 | 0b00000000 | 0 | |
| 70 | 23,29 ms | ACK | |||
| 71 | 23,29 ms | 0x00 | 0b00000000 | 0 | |
| 72 | 23,38 ms | ACK | |||
| 73 | 23,39 ms | 0x00 | 0b00000000 | 0 | |
| 74 | 23,48 ms | ACK | |||
| 75 | 23,48 ms | 0x00 | 0b00000000 | 0 | |
| 76 | 23,57 ms | NACK | |||
| 77 | 23,59 ms | STOP | |||
| 78 | 611,13 ms | START | |||
| 79 | 611,14 ms | 0x70 | 0b01110000 | 112 | p |
| 80 | 611,23 ms | ACK | |||
| 81 | 611,23 ms | 0x44 | 0b01000100 | 68 | D |
| 82 | 611,32 ms | ACK | |||
| 83 | 611,34 ms | START | |||
| 84 | 611,35 ms | 0x71 | 0b01110001 | 113 | q |
| 85 | 611,43 ms | ACK | |||
| 86 | 611,44 ms | 0x00 | 0b00000000 | 0 | |
| 87 | 611,53 ms | ACK | |||
| 88 | 611,53 ms | 0x00 | 0b00000000 | 0 | |
| 89 | 611,62 ms | ACK | |||
| 90 | 611,63 ms | 0x5a | 0b01011010 | 90 | Z |
| 91 | 611,72 ms | ACK | |||
| 92 | 611,72 ms | 0x00 | 0b00000000 | 0 | |
| 93 | 611,81 ms | ACK | |||
| 94 | 611,82 ms | 0x0e | 0b00001110 | 14 | |
| 95 | 611,91 ms | ACK | |||
| 96 | 611,91 ms | 0x00 | 0b00000000 | 0 | |
| 97 | 612,01 ms | NACK | |||
| 98 | 612,03 ms | STOP |
This data, with the source code that's available from ROHM, is a big help to get the sensor working in a different setup.
Top Comments