


A small script for the DMM6500 to take a number of measurements, triggered by an external signal. This can be useful when you're automating a test setup. On a production line, on a binning desk, in a setup with a foot pedal, ... I've deliberately kept the script as simple as possible, to make it easy to grasp. You get a lot of functionality with just 8 lines of code.
|
Let's get straight to business. The TSP code:
buffer_size = 10

app_buffer = buffer.make(buffer_size, buffer.STYLE_STANDARD)
app_buffer.fillmode = buffer.FILL_ONCE
display.activebuffer = app_buffer

trigger.model.load("LogicTrigger", 7, 7, buffer_size, 0, app_buffer)
trigger.model.initiate()
waitcomplete()

display.activebuffer = defbuffer1
I've indicated that the script is short. But it could have been shorter.
These two lines work too, but then I'd have nothing to blog about:
trigger.model.load("LogicTrigger", 7, 7, 10, 0, defbuffer1)
trigger.model.initiate()
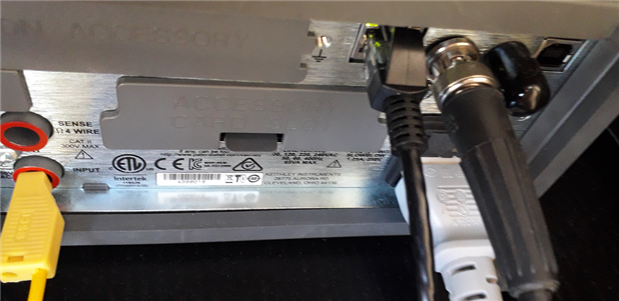
External Triggering
The DSS6500 has a Trigger In BNC connection at the backside. It accepts TTL level signals.
You can (as the label indicates) use this input to trigger activities in the DMM6500.
In this case, I want to take a measurement when 5 V appears on that input.
The way to react to the external trigger is to use the LogicTrigger model.
trigger.model.load("LogicTrigger", 7, 7,
This trigger strategy allows to trigger on digital I/O signals. If you have the I/O extension card for the meter, you have loads of options.
I don't ave such a card, so only the Trigger In is available as digital I/O. It's known as I/O #7 in the command interpreter.
The load() command also requires an output channel that it'll pulse when the trigger activity is done.
I don't need this here, but the parameter is mandatory. So I selected Trigger Out (also #7). An easy choice because it's the only I/O output available in my basic configuration.
The call has 3 more parameters:
trigger.model.load("LogicTrigger", 7, 7, buffer_size, 0, app_buffer)
- the number of times the instrument has to react on a signal on Trigger in
- wait time after the Trigger In fired
- the buffer to store the data in (more later)
Then you need to activate the trigger model.
trigger.model.initiate()
This arms the trigger. It will now perform a measurement each time the Trigger In detects a rising edge.
The result is stored in the buffer I passed as parameter.
The last line to complete the trigger behaviour is a wait:
waitcomplete()
The instrument allows to run code while it's in trigger mode. That's useful because you may want to expect results, update screens, do calculations...
But some things you want to happen only after the complete exercise is done. You guard that section with the waitcomplete() command.
The downstream of the script will only be executed when the whole process is done.
Application Specific Buffer
Although not essential, I prefer to define a dedicated buffer in my script.
There are 2 default buffers that always exist on the DMM6500, and you can use those.
But it's easy to have this little dataset available with exactly the data and format you need.
buffer_size = 10

app_buffer = buffer.make(buffer_size, buffer.STYLE_STANDARD)
app_buffer.fillmode = buffer.FILL_ONCE
display.activebuffer = app_buffer

--

display.activebuffer = defbuffer1
At the start of the script, the buffer is defined and we ask the instrument to display the buffer values while measuring.
When all is done, we reset the instrument to show the default buffer again.
A better way could have been to store the buffer that was active before we started the script.
origBuffer = display.activebuffer
display.activebuffer = origBuffer
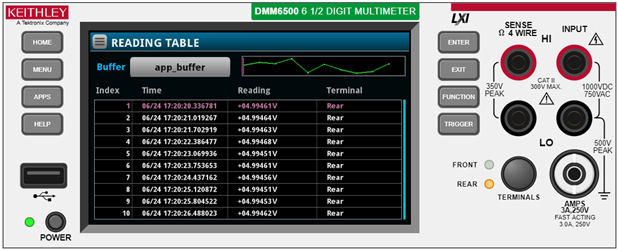
Once the data is in the buffer (10 pulses on the Trigger In connector), the instrument has some nice functions that you can do with the data.

You can display it in table form. The little graph top right shows that same data. When you set the cursor in the graph to a specific data point, that line in the table is highlighted.
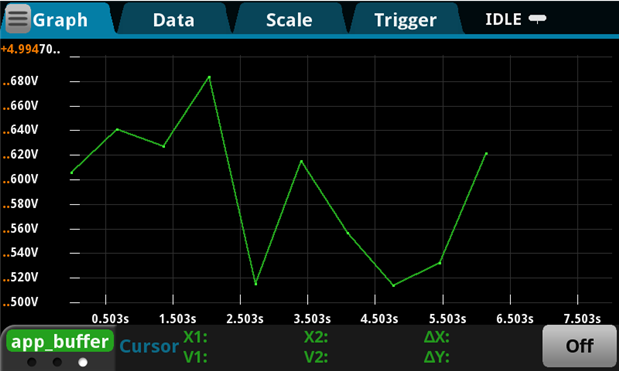
You can also load that data in the graph display:
Run it through the histogram view (this is useful when you're matching components, ...):
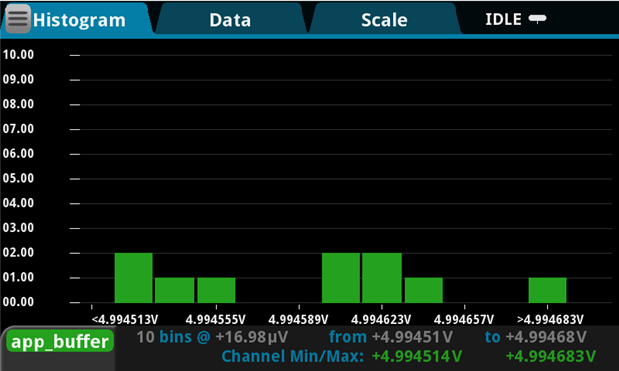
.... and get statistics:

Additional to that, you can also download the buffer, write it to USB. Or do custom calculations, aggregations within your script.
How Did I Test?
I've used the Test Script Builder to write and debug the application.
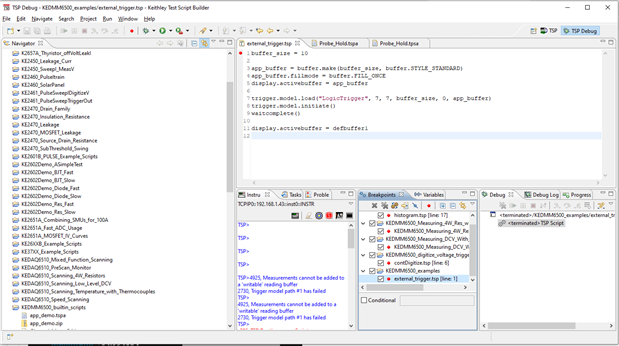
You can step through the code, view variables.
To simulate activity on the Trigger In, I used a function generator in TTL mode, set to approx. 1 Hz.
As soon as the trigger model is initiated, it takes a measurement at each rising edge of the TTL signal, then stop after the 10th sample.
The input for the measurement was a fixed 5 V DC power supply.
With this little post I try to show that it's easy to start automating things on the DMM6500. Little steps to learn the basics.
Top Comments