element14 Community
element14 Community
    Register Log In
  • Site
  • Search
  • Log In Register
  • Community Hub
    Community Hub
    • What's New on element14
    • Feedback and Support
    • Benefits of Membership
    • Personal Blogs
    • Members Area
    • Achievement Levels
  • Learn
    Learn
    • Ask an Expert
    • eBooks
    • element14 presents
    • Learning Center
    • Tech Spotlight
    • STEM Academy
    • Webinars, Training and Events
    • Learning Groups
  • Technologies
    Technologies
    • 3D Printing
    • FPGA
    • Industrial Automation
    • Internet of Things
    • Power & Energy
    • Sensors
    • Technology Groups
  • Challenges & Projects
    Challenges & Projects
    • Design Challenges
    • element14 presents Projects
    • Project14
    • Arduino Projects
    • Raspberry Pi Projects
    • Project Groups
  • Products
    Products
    • Arduino
    • Avnet Boards Community
    • Dev Tools
    • Manufacturers
    • Multicomp Pro
    • Product Groups
    • Raspberry Pi
    • RoadTests & Reviews
  • Store
    Store
    • Visit Your Store
    • Choose another store...
      • Europe
      •  Austria (German)
      •  Belgium (Dutch, French)
      •  Bulgaria (Bulgarian)
      •  Czech Republic (Czech)
      •  Denmark (Danish)
      •  Estonia (Estonian)
      •  Finland (Finnish)
      •  France (French)
      •  Germany (German)
      •  Hungary (Hungarian)
      •  Ireland
      •  Israel
      •  Italy (Italian)
      •  Latvia (Latvian)
      •  
      •  Lithuania (Lithuanian)
      •  Netherlands (Dutch)
      •  Norway (Norwegian)
      •  Poland (Polish)
      •  Portugal (Portuguese)
      •  Romania (Romanian)
      •  Russia (Russian)
      •  Slovakia (Slovak)
      •  Slovenia (Slovenian)
      •  Spain (Spanish)
      •  Sweden (Swedish)
      •  Switzerland(German, French)
      •  Turkey (Turkish)
      •  United Kingdom
      • Asia Pacific
      •  Australia
      •  China
      •  Hong Kong
      •  India
      •  Korea (Korean)
      •  Malaysia
      •  New Zealand
      •  Philippines
      •  Singapore
      •  Taiwan
      •  Thailand (Thai)
      • Americas
      •  Brazil (Portuguese)
      •  Canada
      •  Mexico (Spanish)
      •  United States
      Can't find the country/region you're looking for? Visit our export site or find a local distributor.
  • Translate
  • Profile
  • Settings
Test & Tools
  • Technologies
  • More
Test & Tools
Blog Keithley DMM6500: Store Multiple Measurements Manually
  • Blog
  • Forum
  • Documents
  • Files
  • Members
  • Mentions
  • Sub-Groups
  • Tags
  • More
  • Cancel
  • New
Join Test & Tools to participate - click to join for free!
  • Share
  • More
  • Cancel
Group Actions
  • Group RSS
  • More
  • Cancel
Engagement
  • Author Author: Jan Cumps
  • Date Created: 12 Feb 2019 2:50 PM Date Created
  • Views 2548 views
  • Likes 4 likes
  • Comments 3 comments
  • RoadTest
  • dmm6500
  • rt
  • keithley
Related
Recommended

Keithley DMM6500: Store Multiple Measurements Manually

Jan Cumps
Jan Cumps
12 Feb 2019

I'm road testing the  Keithley Bench Digital Multimeter DMM6500.

In this post, a simple method to save measurements and list them in a table with a keypress.

image


Saving Measurements to a Table


This is the default behaviour of the DMM. Measurements are stored in defbuffer1 when you switch on the meter.

I'm using this functionality to register a number of measurements, using the TRIGGER button to take a measurement.


I'm measuring a feedback circuit on my bench. I have a potentiometer that I set to a particular position, and I want to register the circuit's output voltage for that position.

I could use pen and paper to write down the measurements, but it's easier if I can store the data points on the meter, by pressing a button each time I want to store the value.

Even better if I can see the stored values on screen.


Manual Trigger Mode


Taking a measurement on command is done by setting the trigger to Manual Trigger Mode.

You do this by pressing the TRIGGER button for  3 seconds, and selecting the manual mode.

The display will stop updating. The next measurement is taken when you briefly push the TRIGGER button (try it!).

The meter will also store that measurement in defbuffer1.


Table View


You may want to clear the buffer before you display the table with measurements.

Do that via MENU -> Reading Buffers -> Clear -> Yes


image


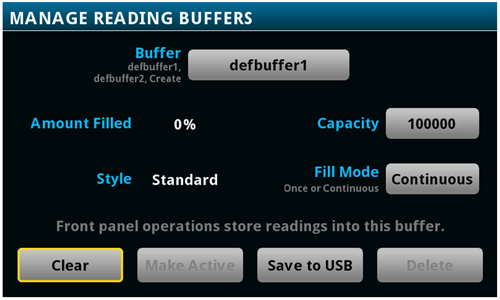
Then switch to the table display.

MENU -> Reading Table


image

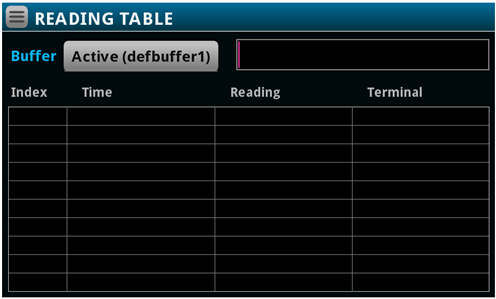
Place the probes on the circuit where you want to make your measurement. Each time you press TRIGGER, a fresh measurement is added to the table.


In the example below, I programmed a DAC from value 100 to 1000, in steps of 100.

Each time I changed the setting, I pushed the TRIGGER button to record the output of the DAC.

image

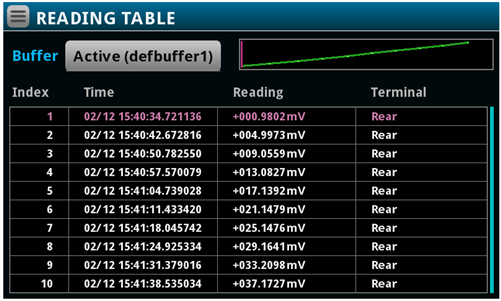
The purple line shows where you are on the graph. You can scroll through graph and table.

Tapping an entry shows reading details.


image


You can use this for any non-digitising meter function, like temp, capacity, current, ...

It theoretically works for digitising, but it will take many measures (1000 by default) at each TRIGGER press. Useful, but not what I want here.


Improvements


When you use this method, you don't see the current measurement until you press the TRIGGER button.

This could be a good candidate for an APP, where it always measures (Continuous Trigger Mode),

but stores the measurement in a custom buffer at the push of a button (could be the same TRIGGER button).

The custom display could be split in two. Active measurement on top, then the rest of the screen for the table display.


Related Blog
Keithley Bench Digital Multimeter - Review
Software Control Options Pt 1 - TSP Script Builder, LabVIEW, Web Interface
TSP Script Example - Measure Power
How to Create a Bitmap for a Custom App
Verify a µCurrent Manually
Verify a µCurrent in an Automated Setup
Measure Amp-Hours of a microcontroller with a µCurrent
Trigger from External Trigger Input
Trigger from External Trigger Input in LabVIEW
Software Control Options Pt 2 - Test Commands with Communicator
App to Hold Measurements

Store Multiple Measurements Manually

Script Example - Externally Triggered Measurements
  • Sign in to reply

Top Comments

  • DAB
    DAB over 6 years ago +1
    Nice update Jan. Are you looking into the capability to set up the trigger limits and then record? DAB
  • Jan Cumps
    Jan Cumps over 6 years ago in reply to Jan Cumps +1
    I just started this example: Set the trigger to 0.08 A, the used my load to go from 41 mA to above 90 mA. The trigger fired. It's very oscilloscope-like with the analog trigger.
  • Jan Cumps
    Jan Cumps over 6 years ago in reply to Jan Cumps

    I just started this example:

    Set the trigger to 0.08 A, the used my load to go from 41 mA to above 90 mA.

    The trigger fired.

    image

    It's very oscilloscope-like with the analog trigger.

    • Cancel
    • Vote Up +1 Vote Down
    • Sign in to reply
    • More
    • Cancel
  • Jan Cumps
    Jan Cumps over 6 years ago in reply to DAB

    DAB  wrote:


    ... Are you looking into the capability to set up the trigger limits and then record?


    DAB

    I have used that for other, more traditional, trigger requirements. Here I was deliberately looking for a push button triggered measurement.

    There are analog trigger options where you can react on the signal exceeding a set point on a rising edge, falling edge or both.

    It's elaborate. You can define a set of rules to trigger on.


    image

    • Cancel
    • Vote Up 0 Vote Down
    • Sign in to reply
    • More
    • Cancel
  • DAB
    DAB over 6 years ago

    Nice update Jan.


    Are you looking into the capability to set up the trigger limits and then record?


    DAB

    • Cancel
    • Vote Up +1 Vote Down
    • Sign in to reply
    • More
    • Cancel
element14 Community

element14 is the first online community specifically for engineers. Connect with your peers and get expert answers to your questions.

  • Members
  • Learn
  • Technologies
  • Challenges & Projects
  • Products
  • Store
  • About Us
  • Feedback & Support
  • FAQs
  • Terms of Use
  • Privacy Policy
  • Legal and Copyright Notices
  • Sitemap
  • Cookies

An Avnet Company © 2025 Premier Farnell Limited. All Rights Reserved.

Premier Farnell Ltd, registered in England and Wales (no 00876412), registered office: Farnell House, Forge Lane, Leeds LS12 2NE.

ICP 备案号 10220084.

Follow element14

  • X
  • Facebook
  • linkedin
  • YouTube