


Previous Blog Posts
Blog 1 - Challenge Overview + Plant Growth Factors
Blog 2 - Plant Growth Chamber Design
Blog 3 - The Project Plan + Prototype Materials
Blog 4 - Automation Using The Challenger Kit
Blog 5 - Enclosure Prototype + Light/Air/Temperature
Blog 6 - Plant Pot System + Assembly
Blog 7 - Enviro HAT Data Collection and Plotting
Blog 8 - Automation HAT Irrigation System
Wearing Two HATs At Once
This time I decided to have a playful pun as the blog title, as it aptly describes the content of this blog and the journey thus far. I believe the 1 Meter of Pi design challenge is not only a challenge to design a system to grow plants in space, but also a challenge of wearing two hats, one of botany and one of engineering. Coming into this challenge with zero Raspberry Pi experience, I'm so surprised by how much I've done and learned in the past month. Blog 7 and 8 hold a very special place in my heart as it documents the growth I've had as an engineer. I'm getting more comfortable with the engineering hat, but I've got so much more to learn. So this blog, I challenge myself with getting the Raspberry Pi to wear two HATs at once and adding a harvest notification feature to the Enviro HAT.
Fellow challenger dules solved the challenge of getting two HATs on a single Raspberry Pi. I follow along with his explanation, but also check for my own understanding:
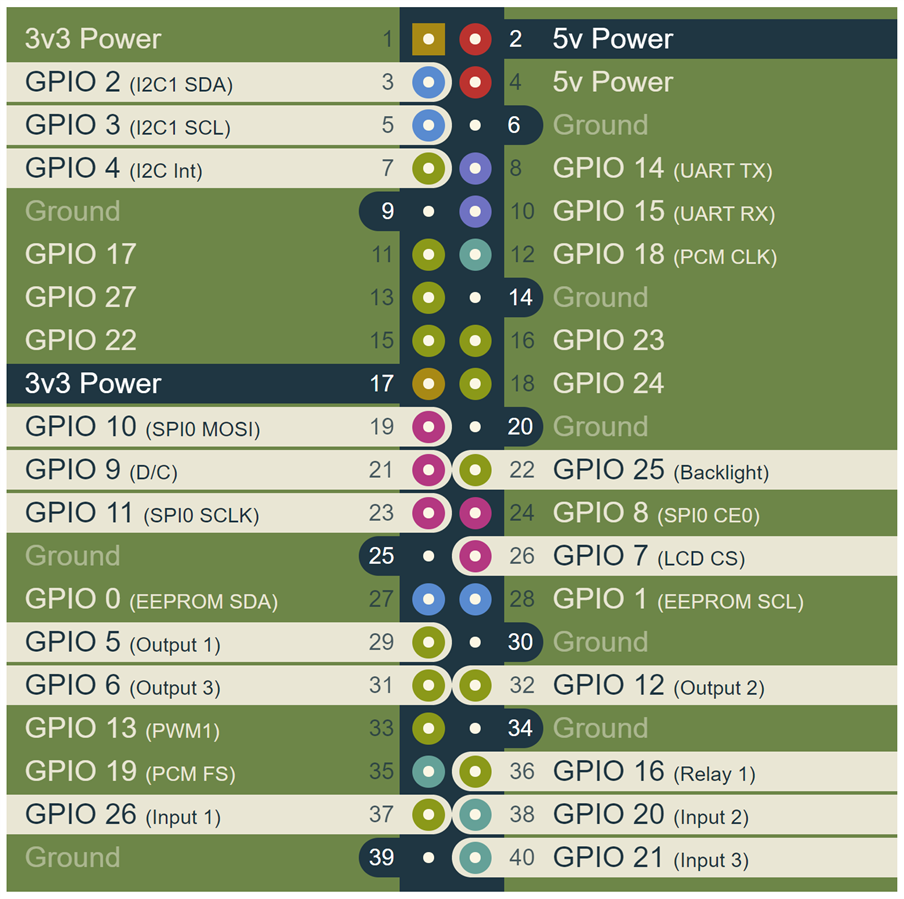
Pinout of the Automation HAT
Pinout of the Enviro HAT
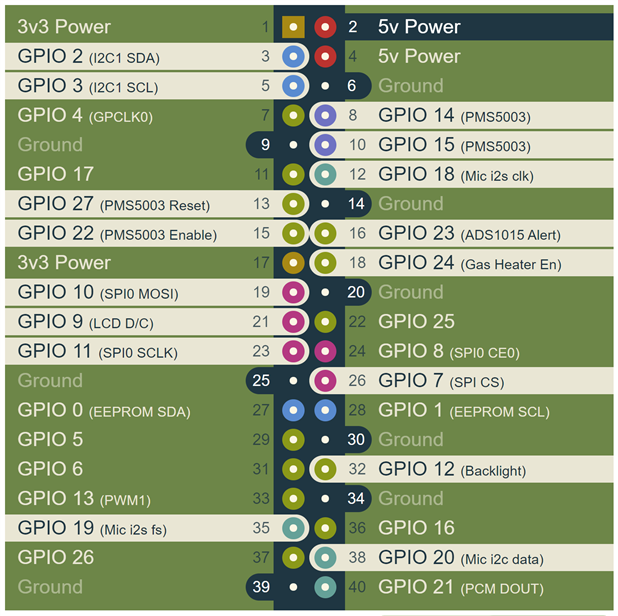
Clashing Pins
As dules observed, the following pins clash:
GPIO | Enviro HAT | Automation HAT Mini |
|---|---|---|
| 7 | SPI CS | SPI CS |
| 12 | Display Backlight | Output 2 |
| 20 | I2S Serial Data In (microphone) | Input 2 |
Following his recommendations, I switch SPI CS to GPIO 8, the only other available SPI CS pin, and switch Display Backlight to GPIO 25, which can be shared with Automation HAT Mini because it is a display backlight. I unplug 12S Serial Data In, because my project does not use a microphone. By changing only the Enviro HAT pins, I can keep Automation HAT pins unchanged and I am able to keep using the official library without changing the code.
GPIO | Enviro HAT |
|---|---|
| 8 | SPI CS |
| 25 | Display Backlight |
| None | I2S Serial Data In (microphone) |
Enviro HAT Pinout Initialization
I must modify ST7735 Initialization in the Enviro HAT weather-and-light.py example code so that it reflects the new pinout:
#Initialize the LCD
dispEnviro = ST7735.ST7735(
     port = 0,
     cs = 0, #GPIO 8
     dc = 9,
     backlight = 25,
     rotation = 270,
     spi_speed_hz = 10000000
)
Hooking up both HATs to the Raspberry Pi
This setup requires so many jumper wires that the number of failure points increases tremendously. Having experienced a faulty jumper wire situation with the Automation HAT, I decide to use a methodical approach of testing first before hooking things up. I test each jumper wire individually with an LED and breadboard then I proceed to hooking up the HATs. I choose to use bright colored jumper wires for the Enviro HAT and dark colored ones for the Automation HAT. None of the jumper wires were faulty, but it was a good practice nonetheless.
Enviro HAT Harvest Notifications
I only need 3 of the 4 environmental readings on the Enviro HAT display: temperature, humidity, and light. So that leaves extra space on the display to tinker with. I decided that the most useful feature would be harvest notifications. For this iteration of the project, I decided that the most useful harvest notification would be for lettuce, which takes four weeks to mature from seed to harvest. (Future iterations could have a harvest notification for each plant, but for this iteration, I only have space for one notification.)
In the 'weather-and-light.py' file, I first commented out all parts related to pressure since I am replacing pressure with harvest. I then created a 'describe_harvest' function that returns either "YES" or "NO". 'time_elapsed' is a variable defined in the latter part of the file. It represents the number of seconds since the file first ran (i.e. how long the Enviro HAT has been collecting environmental readings).
There's 2419200 seconds in a week. We convert time_elapsed to weeks_elapsed. The if-statement checks if 4 weeks have passed since planting. If so, we are ready to harvest!
def describe_harvest(time_elapsed):
    """Tells user whether harvest is ready or not"""
    harvest_is_ready = "NO"
    weeks_elapsed = time_elapsed // 2419200
    if weeks_elapsed > 0 and weeks_elapsed % 4 == 0:
        harvest_is_ready = "YES"
    return harvest_is_ready
I then insert some code for harvest display within the 'while True:' loop, just right before '# Display image'.
    # Harvest
    harvest_string = "Harvest?"
    img = overlay_text(img, (WIDTH - margin, 48), harvest_string, font_lg, align_right=True)
    harvest_desc = describe_harvest(time_elapsed)
    spacing = font_lg.getsize(harvest_string.replace(",", ""))[1] + 1
    img = overlay_text(img, (WIDTH - margin - 1, 48 + spacing), harvest_desc, font_sm, align_right=True, rectangle=True)

    # Display image
    disp.display(img)
Video Demo
Success! Although this setup looks quite busy with all the jumper wires, it does provided an added benefit. With the Enviro HAT positioned far away from the Raspberry Pi, the heat radiated from the Raspberry Pi CPU no longer affects Enviro HAT environmental readings. The measurements are now different, but are not yet accurate it seems. (I also learned that BAD humidity stands for any humidity that is not between 40-60%)
| Environmental Reading | Enviro HAT on Pi | Enviro HAT away from Pi |
|---|---|---|
| Temperature | 25°C | 15°C |
| Humidity | 64% BAD | 93% BAD |
| Light | 328 Lux | 621 Lux |
In the next blog, I'll summarize my project, show a full video demo, and express many thanks to those who helped me during this awesome journey! Until then, keep learning and have fun! Click the arrow to navigate to the next blog.
