


Door Opener Node Architecture and API
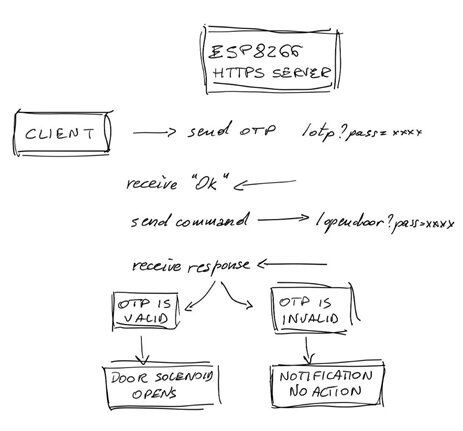
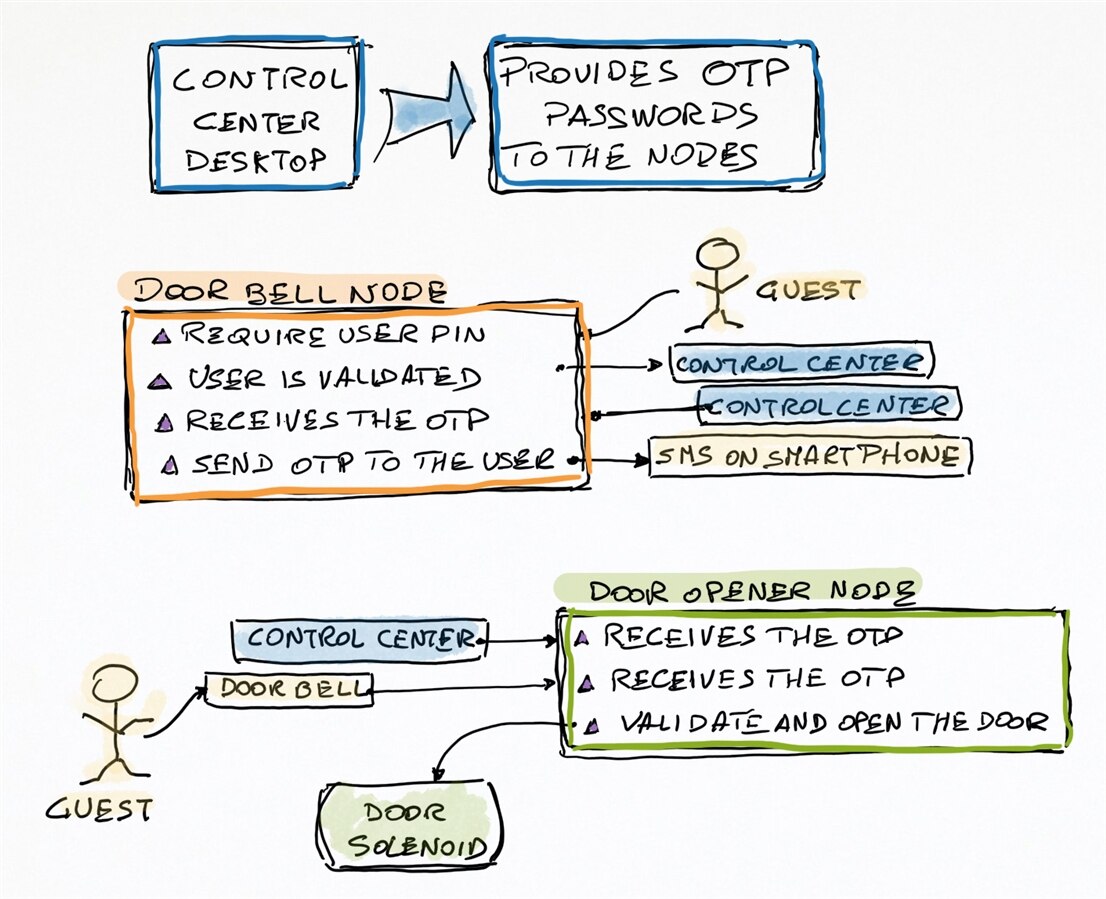
After that the Door Opener hardware has been assembled and tested I have developed the final software. The activation of the Door Opener functionality is also the step to create the Control Center's first software parts, covering most of the features that are common to all the nodes. The image below shows the data that should be exchanged between the Door Opener node and the controller. It should also be considered that the Door Opener is operated through the Door Bell node, as well as directly from a button on the Control Center interface.
Below: the two-ways door opener APIs implemented in the ESP8266
The APIs
/otp
Description: Expect the OTP password pin that will
Parameter: pass
Value: 4 numeric digits
Return: "Ok"
/opendoor
Description: Activates the door solenoid if the OTP password is the same received by a previous call to the /otp API
Parameter: pass
Value: 4 numeric digits
Return: "ESP8266 Door Opened"
The Two-way Password Implementation
As shown in the scheme above the door opener never receives the OTP password twice from the same device. When the guest pulses his code on the doorbell numeric keyboard, it is sent to the Control Center that validates the user. If the user is recognized, he receives the OTP password on his smartphone. The same password is sent to the door opener via the /otp API. If the guest presses the received OTP password on the smartphone, it is sent to the Door Opener via the /opendoor API. If the password match with the one previously received by the Door Opener from the Control Center, the door opens else the password is deleted and the door remains closed.
A Web Server with ESP8266
The Door Opener, as described in Super Smart Home #2 The Door Opener, is controlled by an ESP8266-01. After the device has been set up correctly for programming and testing now it is time to implement the real software. According to the node architecture described in the paragraph above, I implemented an https server. There are two possibilities to send API commands to a web server: using HTTP_POST or HTTP_GET. The POST method is more secure than the GET because of all the parameters are passed in the HTTP header and are not explicitly visible by the user. In this case, the ESP8266 server is only accessed by other devices so I decided to adopt the HTTP_GET method to send the API calls to the server.
A Consideration on the IP Address of the Devices
In the majority of the examples connecting IoT devices and other physical computing boards (including the Raspberry Pi) to the LAN are always shown strange and complex tricks to detect the dynamics IP address assigned by the Internet router. This approach may work for experimenting and testing but in a local distributed network it is not a good idea. Taking into account that all the Internet routes do not reserve all the available local IP addresses to the DHCP but only a part, in my project I always prefer to adopt static IP addresses, easily to manage a well-structured network map.
Below: as an example, the DHCP settings I have assigned to my router to keep some IP address pools free to be assigned to specific devices.

Based on the DHCP and router parameters shown in the above image the current network map I am using is shown in the scheme below.
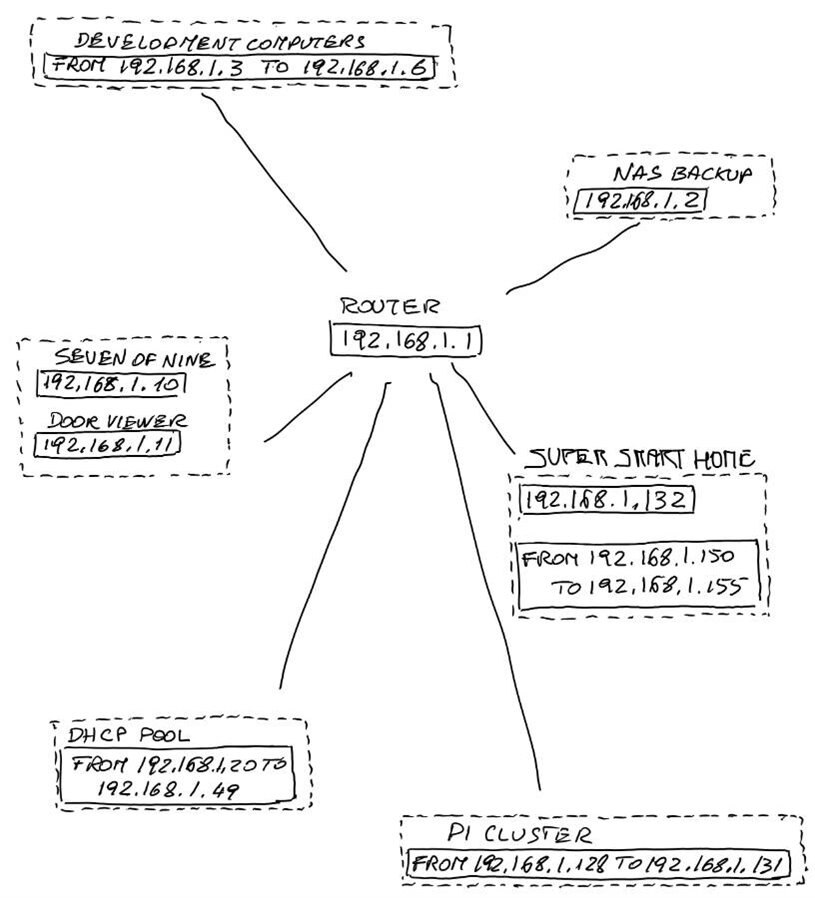
Despite the number of devices connected to the network, there are not many different users; for this reason, it is sufficient a simple topology but in the case that some group of IP addresses should not communicate with others (i.e. in a company network with different departments) I had to create isolated subnets.
The ESP8266 HTTPS Web Server Software
The idea of making a web server without including the security of the TLS/SSL Open Certificates is not very good; it is not an incredible security improvement but at least the connection is encrypted point-to-point. The challenging problem is how to create the x509 certificate and the pubis key converted to bytes and uploaded in some way to the ESP8266. I have found several examples and tutorials on how to set-up this part but all of them are done in two steps: first, the ESP8266 should be programmed to generate the certificate and key and store it in the source then it should be programmed with the server source. This method is not very reliable if we consider that the effort of programming the ESP is not an operation to do once, it depends on how the development proceeds.
The final solution comes from the ESP8266WiFi examples of the Arduino Library. Not very different from the other elementary examples I found on the Internet but with a very useful plus: a simple shell script (runs on all Linux including the Mac OSX) to generate the x509 certificate and key and converting it to a couple of include files, ready to be added to the ESP8266 sketch.
#!/bin/bash

# This script generates a self-signed certificate for use by the ESP8266
# Replace your-name-here with somethine appropriate before running and use
# the generated .H files in your code as follows:
#
#      static const uint8_t rsakey[] PROGMEM = {
#        #include "key.h"
#      };
#
#      static const uint8_t x509[] PROGMEM = {
#        #include "x509.h"
#      };
#
#      ....
#      WiFiServerSecure server(443);
#      server.setServerKeyAndCert_P(rsakey, sizeof(rsakey), x509, sizeof(x509));
#      ....

# 1024 or 512.  512 saves memory...
BITS=512
C=$PWD
pushd /tmp

openssl genrsa -out tls.ca_key.pem $BITS
openssl genrsa -out tls.key_$BITS.pem $BITS
openssl rsa -in tls.key_$BITS.pem -out tls.key_$BITS -outform DER
cat > certs.conf <<EOF
[ req ]
distinguished_name = req_distinguished_name
prompt = no
[ req_distinguished_name ]
O = Enrico_Miglino
CN = SuperSmartHome
EOF
openssl req -out tls.ca_x509.req -key tls.ca_key.pem -new -config certs.conf
openssl req -out tls.x509_$BITS.req -key tls.key_$BITS.pem -new -config certs.conf
openssl x509 -req -in tls.ca_x509.req  -out tls.ca_x509.pem -sha256 -days 5000 -signkey tls.ca_key.pem
openssl x509 -req -in tls.x509_$BITS.req  -out tls.x509_$BITS.pem -sha256 -CAcreateserial -days 5000 -CA tls.ca_x509.pem -CAkey tls.ca_key.pem
openssl x509 -in tls.ca_x509.pem -outform DER -out tls.ca_x509.cer
openssl x509 -in tls.x509_$BITS.pem -outform DER -out tls.x509_$BITS.cer

xxd -i tls.key_$BITS       | sed 's/.*{//' | sed 's/\};//' | sed 's/unsigned.*//' > "$C/key.h"
xxd -i tls.x509_$BITS.cer  | sed 's/.*{//' | sed 's/\};//' | sed 's/unsigned.*//' > "$C/x509.h"

rm -f tls.ca_key.pem tls.key_$BITS.pem tls.key_$BITS certs.conf tls.ca_x509.req tls.x509_$BITS.req tls.ca_x509.pem tls.x509_$BITS.pem tls.srl tls.x509_$BITS.cer tls.ca_x509.cer

popd
To avoid too heavy calculations to the ESP8266 I have used the generator to create a 512-bit certificate (the variable BITS-512 at line 21 can be changed to 1024 or 2048). According to the most recent security requirement by the Open SSL, this value is too weak so the browser will show an alert but for the kind of usage I need it is more than sufficient. Anyway, the value can be changed to regenerate the two header files x509.h and key.h. Replacing the files and recompiling the sketch no further change to the original source should be done.
To make the sketch more readable I have also added another header file, defining all the network parameters needed to set-up the server, as well as the APIs definition and response strings.
/**
 * @file netowkrparams.h
 *
 * Hardcoded network parameters to connect the server to the lan
 * and other server messages
 */

#ifndef _NETWORK_PARAMS
#define _NETWORK_PARAMS

// Private WiFi access
#define STASSID "********"
#define STAPSK "********"

#define OPENER_PIN 0      ///< Pin to open the door
#define OPENED_DELAY 500  ///< ms needed to activate the solenoid to open the door

// Server messages
#define DOOR_VERSION "ESP8266 Door Opener V. 0.1.2"
#define ERROR404 "Error 404 - Door Opener\ninvalid request\n\n"
#define DOOR_OPEN "esp8266 Door is Open"
#define OPERATION_COMPLETE "Ok"

// OTP Password reset string
#define RESET_OTP "0000"

// Server error codes
#define ERR_ARGS "Error code 001\n\n"     ///< Wrong number of arguments
#define ERR_PARM "Error code 002\n\n"     ///< Wrong parameter name
#define ERR_METHOD "Error code 003\n\n"   ///< Wrong client method (should be GET)
#define ERR_OTP "Error code 004\n\n"      ///< Wrong OTP password

// Server get APIs
#define API_OPENDOOR "/opendoor"
#define API_ROOT "/"
#define API_OTP "/otp"

// Server parameter names
#define APIPARM_PASS "pass"

#endif
The first lines of the sketch should include the header files and the ESP8266 Arduino libraries (included in the ESP8266 package installed with the Arduino IDE feature Board Manager):
#include <ESP8266WiFi.h>
#include <WiFiClient.h>
#include <ESP8266WebServerSecure.h>
#include <ESP8266mDNS.h>
#include "networkparams.h"

const char* ssid = STASSID;     ///< The WiFi SSID
const char* password = STAPSK;  ///< The SSID password
The certificate header file, as well as the key header file generated by the shell script described above just defines a sequence of bytes in hexadecimal format:
/**
 * @file x509.h
 *
 * X509 certificate for ssl communication.
 *
 * The certificate has been geerate accordingly to the key. This file
 * should be hardcoded in the program
 */

  0x30, 0x82, 0x01, 0x56, 0x30, 0x82, 0x01, 0x00, 0x02, 0x09, 0x00, 0xf3,
  0xfc, 0xcf, 0x50, 0x5f, 0x3e, 0x77, 0xe1, 0x30, 0x0d, 0x06, 0x09, 0x2a,
  0x86, 0x48, 0x86, 0xf7, 0x0d, 0x01, 0x01, 0x0b, 0x05, 0x00, 0x30, 0x32,
  0x31, 0x17, 0x30, 0x15, 0x06, 0x03, 0x55, 0x04, 0x0a, 0x0c, 0x0e, 0x45,
  0x6e, 0x72, 0x69, 0x63, 0x6f, 0x5f, 0x4d, 0x69, 0x67, 0x6c, 0x69, 0x6e,
  0x6f, 0x31, 0x17, 0x30, 0x15, 0x06, 0x03, 0x55, 0x04, 0x03, 0x0c, 0x0e,
  0x53, 0x75, 0x70, 0x65, 0x72, 0x53, 0x6d, 0x61, 0x72, 0x74, 0x48, 0x6f,
  0x6d, 0x65, 0x30, 0x1e, 0x17, 0x0d, 0x32, 0x30, 0x30, 0x34, 0x31, 0x34,
  0x31, 0x32, 0x33, 0x37, 0x34, 0x36, 0x5a, 0x17, 0x0d, 0x33, 0x33, 0x31,
  0x32, 0x32, 0x32, 0x31, 0x32, 0x33, 0x37, 0x34, 0x36, 0x5a, 0x30, 0x32,
  0x31, 0x17, 0x30, 0x15, 0x06, 0x03, 0x55, 0x04, 0x0a, 0x0c, 0x0e, 0x45,
  0x6e, 0x72, 0x69, 0x63, 0x6f, 0x5f, 0x4d, 0x69, 0x67, 0x6c, 0x69, 0x6e,
  0x6f, 0x31, 0x17, 0x30, 0x15, 0x06, 0x03, 0x55, 0x04, 0x03, 0x0c, 0x0e,
  0x53, 0x75, 0x70, 0x65, 0x72, 0x53, 0x6d, 0x61, 0x72, 0x74, 0x48, 0x6f,
  0x6d, 0x65, 0x30, 0x5c, 0x30, 0x0d, 0x06, 0x09, 0x2a, 0x86, 0x48, 0x86,
  0xf7, 0x0d, 0x01, 0x01, 0x01, 0x05, 0x00, 0x03, 0x4b, 0x00, 0x30, 0x48,
  0x02, 0x41, 0x00, 0xd9, 0xc9, 0x84, 0x70, 0xc1, 0x8e, 0xb2, 0x90, 0xde,
  0x78, 0x6e, 0xf1, 0xa0, 0xc1, 0x2d, 0xd2, 0x7d, 0x08, 0x1b, 0x86, 0x05,
  0xcf, 0x4f, 0x97, 0xe7, 0x82, 0xec, 0x74, 0x14, 0x02, 0xde, 0x84, 0x58,
  0x18, 0x53, 0xaa, 0xce, 0x86, 0x0c, 0x40, 0x57, 0x98, 0x4f, 0x81, 0x20,
  0x63, 0xc2, 0x7b, 0xb3, 0x09, 0x94, 0x9e, 0x9f, 0x71, 0x84, 0x73, 0x97,
  0xca, 0x8b, 0xd0, 0x19, 0x35, 0xe6, 0x6d, 0x02, 0x03, 0x01, 0x00, 0x01,
  0x30, 0x0d, 0x06, 0x09, 0x2a, 0x86, 0x48, 0x86, 0xf7, 0x0d, 0x01, 0x01,
  0x0b, 0x05, 0x00, 0x03, 0x41, 0x00, 0xd2, 0x0f, 0x0f, 0x9e, 0xba, 0xf1,
  0x42, 0xed, 0xe4, 0xa1, 0x1f, 0x97, 0x6b, 0x70, 0xe0, 0x2a, 0xeb, 0xa9,
  0x85, 0xde, 0xc3, 0x21, 0x2e, 0xe2, 0xfe, 0x89, 0x88, 0x5e, 0x42, 0x7b,
  0x50, 0x9c, 0x7a, 0x44, 0xc3, 0x6a, 0x01, 0xc0, 0x52, 0x2c, 0xb9, 0xa6,
  0x32, 0x07, 0x7d, 0x72, 0xa6, 0xfb, 0x88, 0x4b, 0xec, 0x64, 0xba, 0x99,
  0xbd, 0x5f, 0x0c, 0x29, 0xa7, 0x97, 0xa5, 0x45, 0x08, 0x13
These files should be included a bit different than what we are used to doing. As the precompiled #include statement act as a bare replacement of the content of a symbolic name or a group of data where it is inserted, while we keep the generated files separated and untouched in the sketch these are included defining two arrays as shown below:
/**
 * The certificate is stored in PMEM created with the shell command generator
 *
 */
static const uint8_t x509[] PROGMEM = {
#include "x509.h"
};

/**
 * The key is stored in PMEM created with the shell command generator
 *
 */
static const uint8_t rsakey[] PROGMEM = {
#include "key.h"
};
The full source of the ESP8266 server is available on the GitHub repository SuperSmartHome.
The image below shows the test of the ESP8266 Web server using the Firefox browser.

Full Content
Already Posted (until now)
Super Smart Home #1 The project
Super Smart Home #2 The Door Opener
Super Smart Home #3 Designing the Control Center
Super Smart Home #4 Activating the Door Opener
Super Smart Home #5 Connecting the First Node to the Control Center
Super Smart Home #6 PSoC6 On the Cloud
Super Smart Home #7 From AWS IoT Core to AWS SiteWise
Super Smart Home #8 The Kitchen Node: Parts, Design and Components
Super Smart Home #9 The Kitchen Node: Circuit and Software
Super Smart Home #10 Building IoT nodes with PSoC6-WiFi-Bt and Mbed OS
Super Smart Home #11 Project Summary, Highlights, and More...
Super Smart Home #12 PSoC6 Local Node: Application Skeleton
Super Smart Home #13 PSoC6 Protection Case
Sources, Circuits, and Documentation
All the software sources, scripts, circuits schematics, and more are available as Open Source material on the SuperSmartHome GitHub repository.
The video episodes of this challenge are repurposed on the blog posts of the site we-are-borg.com
Thanks to
Element14, AWS, and Cypress, main sponsors
Elegoo for 3D printers ad printing material
Digitspace for sensors, actuators, and boards
The friends and community members Jan Cumps and shabaz always available with advice and suggestions.
Top Comments