


Previous posts for this project:
- [CaTS] ForgetMeNot - Index
- [CaTS] ForgetMeNot - Week 0: Project Description
- [CaTS] ForgetMeNot - Week 1: EnOceanPi and Sensors
- [CaTS] ForgetMeNot - Week 2: Elro CoCo and Pi Cam with OpenHAB
- [CaTS] ForgetMeNot - Week 3: Data persistence and charts with OpenHAB
- [CaTS] ForgetMeNot - Week 4: Arduino-OpenHAB communication
- [CaTS] ForgetMeNot - Week 5: Getting familiar with EAGLE
- [CaTS] ForgetMeNot - Week 6: Getting to know the TBS1052B-EDU oscilloscope
- [CaTS] ForgetMeNot - Week 7: First tests with RPiSoC
- [CaTS] ForgetMeNot - Week 7 (2): More testing with RPiSoC
- [CaTS] ForgetMeNot - 3D Printing: EnOcean sensor bracket
- [CaTS] ForgetMeNot - 3D Printing: EnOcean rocker switch and magnet holder
- [CaTS] ForgetMeNot - 3D Printing: Food dispenser prototype
- [CaTS] ForgetMeNot - 3D Printing: Weighing scale
- [CaTS] ForgetMeNot - Security: Some basic tips
- [CaTS] ForgetMeNot - Minion: Dave, the gassy minion
Introduction
The time remaining in this challenge is running low and I haven't been able to work on my project in the weekend. It's time to kick everything in a higher gear.
This week, I've been working on a prototype water dispenser and on getting data from a waterproof temperature sensor.
This post is about a combining a solenoid valve, DC-DC step up converter, 1-Wire, temperature sensor and 3D printing.
Let's go.
Water dispenser
Having built an earlier (working) prototype of the food dispenser, it was time to work on the water dispenser.
Test setup
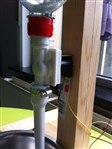
I built a water container from a bottle, connected it to a solenoid valve and connected the other end of the solenoid valve to a flexible tap.
Everything is mounted on a wooden frame, using 3D printed brackets holding everything in place.
These are the brackets:


The first bracket is meant to hold the "neck" of the bottle. The second bracket holds the cut bottom part of the bottle in place. It also serves as a protection against the cut edges.
This is what the assembled setup looks like:



Circuit
The circuit was documented in an earlier post. But to summarise, the solenoid valve is controlled by turning a DC-DC step up converter on and off using a digital output of a Pi/RPiSoC/Arduino/....
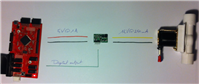
In this test setup, I used a pushbutton to simulate the digital output, as I didn't want to play with water in my office ...
Demo
Here it is, the water dispenser in action:
In the coming weeks (not so many left !) I'll be combining the dispenser with the weighing scale, in order to have openHAB trigger the dispenser based on the quantity of water left in the bowl.
Water temperature
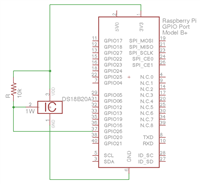
To measure the temperature of the water inside the bowl, I'll be using a DS18B20 1-Wire waterproof temperature sensor.

1-Wire on RPi
Raspbian has built-in support for 1-Wire and I found a tutorial on how to set up the temperature sensor: DS18B20 temperature sensing
By default, GPIO4 (pin 7) is used for 1-Wire on the Raspberry Pi. Because I have the RPiSoC connected to the first 26 pins, GPIO4 cannot (easily) be used/accessed.
That's where the B+'s additional GPIO pins come in! Pins 27-40 are available to use, so if I could reconfigure the Pi to use let's say GPIO26 (pin 37) instead, my problem would be solved.
I found a comment while Googling, explaining an easy way to change the 1-Wire pin.
In the /boot/cmdline.txt, add following bit:
bcm2708.w1_gpio_pin=<gpio>
Where <gpio> is the GPIO number, not the pin number on the GPIO header.
In my case, the "new" cmdline.txt contained the following data:
pi@webserver ~ $ cat /boot/cmdline.txt

dwc_otg.lpm_enable=0 console=tty1 root=/dev/mmcblk0p2 rootfstype=ext4 elevator=deadline rootwait bcm2708.w1_gpio_pin=26
Be sure to reboot the Pi after making the modification to ensure it is applied.
Circuit


Software
In order to be able to use 1-Wire, the necessary kernel modules need to be loaded:
pi@webserver ~ $ sudo modprobe w1-gpio
pi@webserver ~ $ sudo modprobe w1-therm
Note the kernel modules were now manually added. To make this change persistent across reboots, both commands should be added to the /etc/rc.local file.
pi@webserver ~ $ sudo nano /etc/rc.local
#!/bin/sh -e
#
# rc.local
#
# This script is executed at the end of each multiuser runlevel.
# Make sure that the script will "exit 0" on success or any other
# value on error.
#
# In order to enable or disable this script just change the execution
# bits.
#
# By default this script does nothing.

#start openHAB
sudo /opt/openhab/start.sh &

#load modules for temp sensor
sudo modprobe w1-gpio &
sudo modprobe w1-therm &

exit 0
With the kernel modules loaded and the 1-Wire sensor connected, it should be possible to list it:
pi@webserver ~ $ cd /sys/bus/w1/devices
pi@webserver /sys/bus/w1/devices $ ls -l
total 0
lrwxrwxrwx 1 root root 0 Sep 22 19:06 28-0004314f8aff -> ../../../devices/w1_bus_master1/28-0004314f8aff
lrwxrwxrwx 1 root root 0 Sep 22 19:06 w1_bus_master1 -> ../../../devices/w1_bus_master1
The sensor is detected and its ID is 28-0004314f8aff. The detected sensor can now be queried for data.
By reading the "w1_slave" file within the sensor's folder, we can get the data:
pi@webserver /sys/bus/w1/devices $ cd 28-0004314f8aff
pi@webserver /sys/bus/w1/devices/28-0004314f8aff $ cat w1_slave
80 01 55 00 7f ff 0c 10 5a : crc=5a YES
80 01 55 00 7f ff 0c 10 5a t=24000
The data contains a CRC check. If this is ok, the reading below is correct . In this case t=24000, meaning 24°C.
I performed a negative check by disconnecting the sensor and querying the data again:
pi@webserver /sys/bus/w1/devices/28-0004314f8aff $ cat w1_slave
00 00 00 00 00 00 00 00 00 : crc=00 NO
80 01 55 00 7f ff 0c 10 5a t=0
The CRC check failed and t=0. The CRC check can be used to verify the validity of the data. You could query the data until the CRC check is valid and only return the value then.
A script to get the sensor's data is provided in Adafruit's tutorial. I have slightly modified it to meet my needs. This is the modified script:
#!/usr/bin/env python

import time
import sys

base_dir = '/sys/bus/w1/devices/'
device_folder = base_dir + sys.argv[1]
device_file = device_folder + '/w1_slave'

def read_temp_raw():
    f = open(device_file, 'r')
    lines = f.readlines()
    f.close()
    return lines

def read_temp():
    lines = read_temp_raw()
    while lines[0].strip()[-3:] != 'YES':
        time.sleep(0.2)
        lines = read_temp_raw()
    equals_pos = lines[1].find('t=')
    if equals_pos != -1:
        temp_string = lines[1][equals_pos+2:]
        temp_c = float(temp_string) / 1000.0
        return temp_c

print(read_temp())
The changes I take care of the following:
- Ability to execute script without having to call "python" first by adding shebang (calling "./temp.py" vs "python temp.py")
- Temperature sensor ID is passed as a variable when calling the script, so same script can be used with multiple sensors
- When called, the script waits for a valid temperature reading, returns the value and then quits (will be useful when calling it from openHAB)
- Only degrees celsius are required, removed the fahrenheit calculation
- Removed obsolete imports due to cleanup
When executed, the temperature is returned as soon as a valid reading has been received. I grabbed the sensor to verify the temperature would increase:
pi@webserver ~ $ ./temp.py 28-0004314f8aff
22.812
pi@webserver ~ $ ./temp.py 28-0004314f8aff
30.062
openHAB
The next step was to integrate the 1-Wire sensor data in openHAB? The temperature sensor is defined as follows:
Number DS18B20_temperature_280004314f8aff "Water temperature [%.1f °C]" <temperature> (Dispenser_Chart) {exec="<[/home/pi/temp.py 28-0004314f8aff:5000:REGEX((.*?))]"}
Using the exec binding, openHAB will execute the script which will return a temperature value. The script is called (/home/pi/temp.py 28-0004314f8aff) every 5 seconds (:5000), and the full output of the script is taken (:REGEX((.*?))). This gives following result after adding the item to the sitemap:
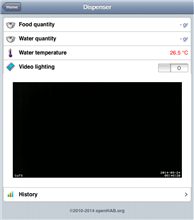
With the data now available in openHAB, it can be processed to trigger rules and other actions. But that will be for another time 


