element14 Community
element14 Community
    Register Log In
  • Site
  • Search
  • Log In Register
  • About Us
  • Community Hub
    Community Hub
    • What's New on element14
    • Feedback and Support
    • Benefits of Membership
    • Personal Blogs
    • Members Area
    • Achievement Levels
  • Learn
    Learn
    • Ask an Expert
    • eBooks
    • element14 presents
    • Learning Center
    • Tech Spotlight
    • STEM Academy
    • Webinars, Training and Events
    • Learning Groups
  • Technologies
    Technologies
    • 3D Printing
    • FPGA
    • Industrial Automation
    • Internet of Things
    • Power & Energy
    • Sensors
    • Technology Groups
  • Challenges & Projects
    Challenges & Projects
    • Design Challenges
    • element14 presents Projects
    • Project14
    • Arduino Projects
    • Raspberry Pi Projects
    • Project Groups
  • Products
    Products
    • Arduino
    • Avnet Boards Community
    • Dev Tools
    • Manufacturers
    • Multicomp Pro
    • Product Groups
    • Raspberry Pi
    • RoadTests & Reviews
  • Store
    Store
    • Visit Your Store
    • Choose another store...
      • Europe
      •  Austria (German)
      •  Belgium (Dutch, French)
      •  Bulgaria (Bulgarian)
      •  Czech Republic (Czech)
      •  Denmark (Danish)
      •  Estonia (Estonian)
      •  Finland (Finnish)
      •  France (French)
      •  Germany (German)
      •  Hungary (Hungarian)
      •  Ireland
      •  Israel
      •  Italy (Italian)
      •  Latvia (Latvian)
      •  
      •  Lithuania (Lithuanian)
      •  Netherlands (Dutch)
      •  Norway (Norwegian)
      •  Poland (Polish)
      •  Portugal (Portuguese)
      •  Romania (Romanian)
      •  Russia (Russian)
      •  Slovakia (Slovak)
      •  Slovenia (Slovenian)
      •  Spain (Spanish)
      •  Sweden (Swedish)
      •  Switzerland(German, French)
      •  Turkey (Turkish)
      •  United Kingdom
      • Asia Pacific
      •  Australia
      •  China
      •  Hong Kong
      •  India
      •  Korea (Korean)
      •  Malaysia
      •  New Zealand
      •  Philippines
      •  Singapore
      •  Taiwan
      •  Thailand (Thai)
      • Americas
      •  Brazil (Portuguese)
      •  Canada
      •  Mexico (Spanish)
      •  United States
      Can't find the country/region you're looking for? Visit our export site or find a local distributor.
  • Translate
  • Profile
  • Settings
In the Air Design Challenge
  • Challenges & Projects
  • Design Challenges
  • In the Air Design Challenge
  • More
  • Cancel
In the Air Design Challenge
Blog [AirCare] InTheAir - Week 16: CNC Milling
  • Blog
  • Forum
  • Documents
  • Polls
  • Files
  • Events
  • Mentions
  • Sub-Groups
  • Tags
  • More
  • Cancel
  • New
  • Share
  • More
  • Cancel
Group Actions
  • Group RSS
  • More
  • Cancel
Engagement
  • Author Author: fvan
  • Date Created: 11 Feb 2015 2:38 PM Date Created
  • Views 1865 views
  • Likes 5 likes
  • Comments 18 comments
  • eclipse_iot
  • mqtt
  • openhab
  • beaglebone_black
  • internet_of_things
  • in_the_air
  • texas_instruments
  • iot_sensor_nodes
  • cc3200
  • launchpad
Related
Recommended

[AirCare] InTheAir - Week 16: CNC Milling

fvan
fvan
11 Feb 2015

Previous posts for this project:

  • [AirCare] InTheAir - Project Description
  • [AirCare] InTheAir - Week 1: Getting a Launchpad to Blink
  • [AirCare] InTheAir - Week 2: Preparing the Beaglebone Black
  • [AirCare] InTheAir - Week 3: Fuel Tank Testing
  • [AirCare] InTheAir - Week 4: Using the CC3200
  • [AirCare] InTheAir - Week 5: openHAB and MQTT
  • [AirCare] InTheAir - Week 6: Accessing Fuel Tank's Data
  • [AirCare] InTheAir - Week 7: Dust sensor
  • [AirCare] InTheAir - Week 8: MSP430FR5969 with Energia14
  • [AirCare] InTheAir - Week 11: CC3200, Energia and analogRead()
  • [AirCare] InTheAir - Week 12: Automatically starting some things
  • [AirCare] InTheAir - Week 13: GP2Y10 BoosterPack
  • [AirCare] InTheAir - Week 14: Ordering Parts and PCBs


  • Introduction
  • Waste board
  • Inkscape & Makercam
  • Milling
  • Result
  • Vote


Introduction


I missed last week's post, and I'm sorry. I was trying to get the wireless control of the fan using dimmable sockets to work, but just didn't manage crack the coder. You can expect a post about it this week.


For this post, I have something completely different in mind! It's been a while since I used my ShapeOko2 CNC milling machine and since my wife's not home, I can make all the noise and dust I want (I'll have to clean up before she gets home though ...)! The goal was to make a simple panel/enclosure to which I could mount the BB View touchscreen to give it a more finished look.
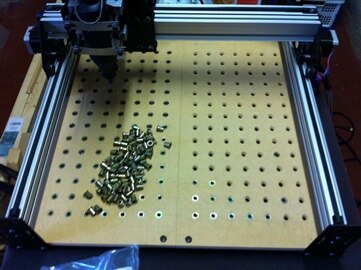
 

Waste board


Before getting to the actual milling, I completed a modification to the stock waste board of the ShapeOko2.


I drilled a whole bunch of holes (totally overdid it!) in the waste board and screwed in threaded insert. This will help me clamp down the work piece when milling, instead of using tape like I did until now ... There were about 200 inserts to screw in, so I ended up with a few blisters on my fingers. I'll survive, and I'll spare you the pictures image


imageimage


Inkscape & Makercam


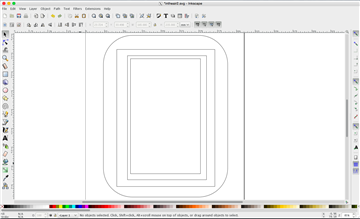
The first thing to do was making the measurements of the screen. The BB View is not symmetrical, a bit annoying but not a problem. Once I had the measurements done and verified, I ported them to inkscape.


The flow is as such:

  • a line drawing is made in Inkscape and exported as *.svg
  • the *.svg is imported in Makercam
  • a milling operation is associated to a line or area
  • gcode of the milling operations is exported from Makercam
  • the gcode file is interpreted by the GcodeSender application
  • GcodeSender passes the commands to an Arduino UNO which controls the stepper motors


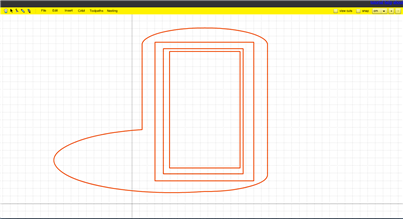
Everything went well in Inkscape, but once I imported it in Makercam, the rounded edges caused a glitch:

imageimage


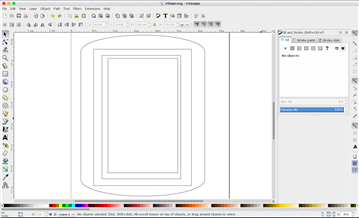
Errr, right. I tried various things to get that fixed but nothing helped. So instead, I used rounded corners. I wanted to try something different, but as it didn't work, I had to move on and not waste too much time.

That's when I realized I forgot to mirror my design, as the milling will happen on the back side of the panel. And of course, there had to be another glitch ...

imageimage


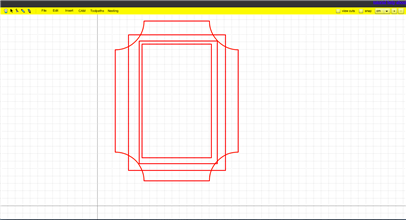
What is it today with things going wrong ?? I removed the outer shape and redrew it unmirrored. That did the trick.


Milling


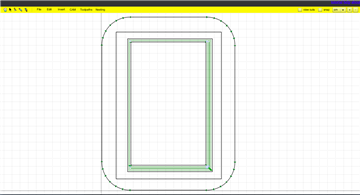
With the drawing finally properly imported in Makercam, I started associating milling operations to the lines.


The inner rectangle needs to be cut out completely. To do this, I used the "follow path" operation which will mill the rectangle for the entire thickness of the piece of MDF.

The second rectangle needs to clear an area for the screen to slide in. This calls for the "pocket" operation.

Finally, the outer edge uses the "follow path" operation to cut out the piece completely.


Makercam visualizes the operations by means of arrows, taking into account the width of the drill bit to determine how many passes are required. With the operations calculated, the gcode was exported and imported in GcodeSender. A simulation can be run to confirm everything is as intended.


imageimage


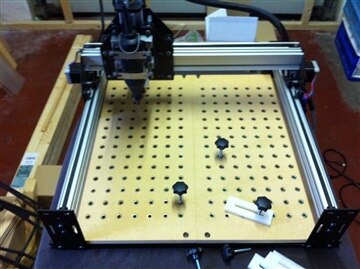
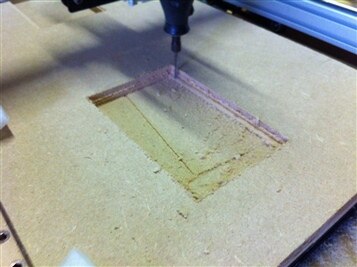
All ready to go, I clamped down a piece of MDF to cut out the shape from, set the Dremel in position and hit the "send" button.


image By the way: when working with a CNC or any other power tool for that matter, wear protection and be careful! Safety first!


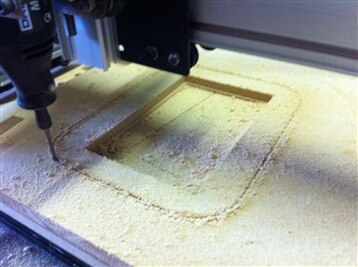
Now, back to milling. Here are some "action" shots of the milling in progress. I regularly took the vacuum cleaner to get rid of the material being milled off.
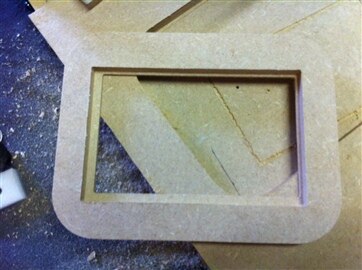
 

imageimage


Result


The result is not bad at all (if I may say so myself). The piece came out clean and only required a tiny bit of sanding.


imageimage

image


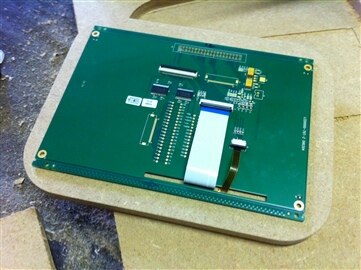
I'll be milling more pieces to make it a "PiBow" style enclosure in which I can fit all the electronics.


Vote


Your vote counts! If you like my project or anyone else's, don't forget to vote for it! Community Choice Poll - In the Air Challenge

  • Sign in to reply

Top Comments

  • DAB
    DAB over 10 years ago +2
    I like what you did with the CNC board. I have thinking of doing the same with mine. DAB
  • shabaz
    shabaz over 10 years ago +1
    Nice! And I see what you mean about the clamping holes, it looks like some over-enthusiastic moles went crazy in a field ; ) I think one can never over-worry about clamping stuff to stop it flying off…
  • mcb1
    mcb1 over 10 years ago +1
    Nice job. I've been wanting a CNC but I fear it will just lead to less projects getting completed ...so I have resisted. Mark
  • ipv1
    ipv1 over 10 years ago in reply to DAB

    Looking forward to it and hope you get it up and running without any further accidents. Fingers crosses and tongue at the right angle image

    • Cancel
    • Vote Up 0 Vote Down
    • Sign in to reply
    • More
    • Cancel
  • DAB
    DAB over 10 years ago in reply to ipv1

    Ok,


    I will add it to my to do list.

    The kit was reasonably well made, I just ran into problems with some of the screw holes being too small.

    I tried to force twist them in and popped the elbow instead.


    I will try to put some pictures together of where I am at and what I need to complete the build.

    Then I need to set up a MCU to control the motors using G-code.


    DAB

    • Cancel
    • Vote Up 0 Vote Down
    • Sign in to reply
    • More
    • Cancel
  • ipv1
    ipv1 over 10 years ago in reply to mcb1

    My next Xmas list has the Shapeoko2 right up there. Lets see what happens in the future.. image

    • Cancel
    • Vote Up 0 Vote Down
    • Sign in to reply
    • More
    • Cancel
  • mcb1
    mcb1 over 10 years ago in reply to ipv1

    It does look like quite an expensive piece of kit ...I didn't get to the freight part...


    the fact that I almost lost a thumb prevented us from going beyond the basic bed.

    Done that (well the end anyway) so I should be able to make one now ...image


    Mark

    • Cancel
    • Vote Up +1 Vote Down
    • Sign in to reply
    • More
    • Cancel
  • ipv1
    ipv1 over 10 years ago in reply to mcb1

    I looked it up and it just costs more to get it here than the machine itself. I will ask our Head Of Deptt. at the university to set aside some funds to buy one in the future. I tried building one with some students a while back but lack of moolah and the fact that I almost lost a thumb prevented us from going beyond the basic bed. image

    • Cancel
    • Vote Up 0 Vote Down
    • Sign in to reply
    • More
    • Cancel
>
element14 Community

element14 is the first online community specifically for engineers. Connect with your peers and get expert answers to your questions.

  • Members
  • Learn
  • Technologies
  • Challenges & Projects
  • Products
  • Store
  • About Us
  • Feedback & Support
  • FAQs
  • Terms of Use
  • Privacy Policy
  • Legal and Copyright Notices
  • Sitemap
  • Cookies

An Avnet Company © 2025 Premier Farnell Limited. All Rights Reserved.

Premier Farnell Ltd, registered in England and Wales (no 00876412), registered office: Farnell House, Forge Lane, Leeds LS12 2NE.

ICP 备案号 10220084.

Follow element14

  • X
  • Facebook
  • linkedin
  • YouTube