


BLOG# 4 - BPM Display - System Implementation and Testing
A Heart Rate Monitor Display project utilizing the PSoC 6S2 + AIROC Wi-Fi/Bluetooth Pioneer Kit
manufactured by CYPRESS - INFINEON TECHNOLOGIES (Part# CY8CKIT-062S2-43012)
This is my 4th blog post for this Design Challenge: Low Power IoT Design Challenge
version 1.3
<<< PREVIOUS BLOG | NEXT BLOG >>> |
|---|---|
| Blog#5 - BPM Display - Conclusion and Future Enhancements |
- This blog will describe the Testing and implementation phases of my design idea.
- I will be following the path of my design from my previous Blog# 3
- I'll be using the research from Blog# 2, to implement my idea.
- To review, my idea is basically
- To take a heart rate reading from a sensor
- Calculate a Beats Per Minute value
- Send the BPM data to the PSoC6 EVK. Using the UART on the Kit
- Use the FreeRTOS Operating System on the kit:
- to send the data trough the kit using:
- Triggers
- Scheduler
- Message Queue
- MQTT client to connect to and send the data to AWS.
- to send the data trough the kit using:
- The Design includes:
- Two separate MCU kits that use different Embedded Development Paradigms
- 1. The Arduino Nano 33 IoT Board
- Uses the Arduino IDE which uses the Python Scripting Language.
- The application is a Bare-Metal Python script using the Libraries supplied by the Heart Rate Vendor
- 2. The Cypress PSoC 6 EVK
- Uses the ModusToolBox IDE using the C/C++ language
- The application uses an OS (FreeRTOS), and a compiled C/C++ project using the BSP (Board Support Package) for the OS, UART and Anycloud (AWS) support.
- Two separate MCU kits that use different Embedded Development Paradigms

- Electronics build
- Software Programming
- Testing
- Conclusions and Summary
- Appendices
-
REFERENCES
- Jan Crumps PSoC 6 Series.
-
Mosquitto Documentation
- mosquitto - running the Mosquitto broker
- mosquitto.conf - the Mosquitto broker configuration file
- mosquitto_passwd - command line utility for generating Mosquitto password files
- mosquitto_pub - command line utility for publishing messages to a broker
- mosquitto_rr - command line utility for simple request/response with a broker
- mosquitto_sub - command line utility for subscribing to topics on a broker
- mosquitto-tls - brief cheat sheet for creating x509 certificates
- mqtt - description of MQTT features
- MQTT Client Example
- GitHub repo
- README.md
Electronics build
- This Section describes how I attached the 2 boards together
.

- Connect the 2 kits together referring to the wiring diagram from blog#3
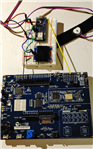
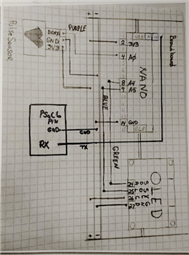
- connect a jumper wire between the 3.3 V Arduino GND to a PSoC 6 GND pin
- connect a jumper wire between the Arduino TX pin to PSoC 6 UART RX pin
Software Programming
- My approach will be to implement Jan Crumps blog series on the PSoC 6 kit:
- FROM Front -- UART receiver
- TO Back -- AWS server.
10/15/2021 - Checkpoint
- I'm running out of time to implement my idea fully. The deadline for the end of the Design Challenge is approaching.
- If I can successfully get test data through Jan's application then I can loop back around and make the changes to the Arduino board as suggested in my design.
- The complete application from the PSoC6 Series is in the GitHub repo referred to in Appendix D - Solution Project From a PSoC6 blog Series.
- the 3 areas of the example I will focus on are:
- Implement a UART Receiver for incoming serial data from the Arduino design.
 TODO Need to define and test the Pin connections on the PSoC6
- Use of FreeRTOS Scheduling, Messaging, Semaphores and Triggers.
- Implement a UART Receiver for incoming serial data from the Arduino design.

- Changes to the AnyCloud MQTT Client example to Publish data from an RTOS message queue using the AWS MQTT service.
- Before getting this application running, I experimented and tested the AnyCloud MQTT Client example
- I loaded AnyCloud MQTT Client example in ModusToolbox.
- I spent considerable time to get this example to run.
- Refer to Appendix B - AnyCloud MQTT Client example in ModusToolbox
- Download/Install mosquitto MQTT Broker, to be used as a test local broker.
- Learn/experiment with it
- Installed it on my local windows machine
- Refer to Appendix A - MosQuiTTo An open source MQTT broker
- Use AWS IoT MQTT Broker instead of MosquiTTo for the Anycloud MQTT Client Eample
- I loaded AnyCloud MQTT Client example in ModusToolbox.
Testing
Electrical
- Test the wiring
- Are the Pins correct?
- Use the code attached at the end of PsoC6 series blog PSoC 6 and ModusToolbox: FreeRTOS message queue To test the Jumper Wire Connections between the Arduino and the PSoC6 kit.
The Project archive is ENRICO_UART_FREERTOS_20210318.zip
Load the project into ModusToolbox and run it.
It's configured for: UART 5.0 and 5.1 (the Debug USB COM port), 9600 / 8 / 1 / N
If you want to use other pins, check uart_task.h. Theres's an example for pins 10.0 and 10.1 that you can use as inspiration...
Software
Test scripts to do the following test
- UART Receiver for incoming serial data
- FreeRTOS
- Scheduling,
- Messaging,
- Semaphores and Triggers.
- Use the AnyCloud MQTT Client example
- Publish data from an RTOS message queue to the AWS MQTT service.
Run the Application Front to Back
Run the application and compare the BPM to another BPM app if possible.
- Change the code on the Arduino to send the BPM Value over the serial connection.
- Observe the values on the AWS MQTT Broker
- Open the TEST link on the AWS IoT Console to see the values.
Conclusions
- I had a few Roadblocks and the design was more difficult to implement than I had expected.
- I was able to get the Heart rate Sensor BPM values through the PSoC6 onto the AWS MQTT Broker.
Any Problems?
- I had problems that were resolved.
- I had problems:
- With the MosQuiTTo broker working with the Anycloud mQTT Client example, I could not get the example to connect to the broker.
- With the AWS IoT thing configuration, that I finally figured out.
- With the PSoc^ series example, Building and executing it
- With The BSP importing the PSoC6 series Example.
- The Connection with the UART.
Conclusions and Summary
Summary
- Started by seeing what I needed to do to implement my idea.
- Came up with the outline for this blog.
- For the software section i decided to get Jan Crumps - PSoC6 series example to run.
- I ran into problems right away.
- I started on the AWS implementation and Had error connecting to my WIFI router
- I decided to use a local MQTT broker"Mosquitto" for testing.
- I was able to configure it but did not get it connected
- I then tried to run the PSoC8 Example to build in ModusToolbox and started getting BUILD errors that Files are Missing?
- I decided to use the AnyCloud MQTT Client and a thing on AWS IoT cload. I did get this to run.
Conclusions
- I have changed my path to my original idea for a project for this Design Challenge from the project idea mentioned in my application for this challenge.
- I decided to use the Arduino project from another challenge because it was displaying a BPM value on an LED display.
- I originally thought to move the entire design (Heart Rate Sensor, OLED display, and Software ) to the PSoC6.
- I then discovered Jan Crumps series of Blogs describing connecting an Arduino serially to the PSoC6 and sending data thru the board to the CLOUD.
- So in researching his series in blog#2 I realized that, If I used his example I could use my Arduino project to gather the BPM data and pass it thru his Design.
- Not so easy, I ran into all kinds of snags. Not with his code but with getting the components of his design to work.
- This was due to my lack of experience with the:
- PSoC8 kit
- ModusToolbox
- FreeRTOS
- UART
- MQTT
- AWS IoT
- a local MQTT Broker MosQuiTTo
- I have learned a great deal from implementing his Blog Series Example.
Appendices
Appendix A - MosQuiTTo An open source MQTT broker
This appendix contains my experiences with using A local installation of the moscuitto MQTT broker
- install
- read documentation
- run
- mosquitto_pub
- mosquitto_sub
- configure
- configs/MQTT_client_config.h see man page mosquitto.conf
Appendix B - AnyCloud MQTT Client example in ModusToolbox.
This appendix describes my experiences with the example
- It serves two purposes:
- you have an example,
- and it takes care that the dependencies are all available in your workspace.
- Load the example "" AnyCloud MQTT Client:" from the template Application list
- If your not sure how to do this, I describe it in my blog#2 section Create a "New Application"
- Follow its instructions to connect you to AWS MQTT. You'll need to do the exact same steps with other MQTT projects. If you know it works with the example, it makes the next steps easier.
- GitHub example READ.me
- Set up an AWS account.
- Setup a AWS IoT thing called "ledstatus"
- Make changes described in Appendix C- Setting up the MQTT Broker -- AWS IoT MQTT
- Run the example.
- Observe the results described in the READ.me file.
- It serves two purposes:

Appendix C- Setting up the MQTT Broker -- AWS IoT MQTT
This appendix describes my experiences with setting up the AWS IoT MQTT connection to be used with the example.
Set Up the MQTT Device
- Set up the MQTT device (also known as a Thing) in the AWS IoT Core as described in the https://docs.aws.amazon.com/iot/latest/developerguide/iot-gs.html.
Note: While setting up your device, ensure that the policy associated with this device permits all MQTT operations (iot:Connect, iot:Publish, iot:Receive, and iot:Subscribe) for the resource used by this device. For testing purposes, it is recommended to have the following policy document which allows all MQTT Policy Actions on all Amazon Resource Names (ARNs).
{
"Version": "2012-10-17",
"Statement": [
{
"Effect": "Allow",
"Action": "iot:*",
"Resource": "*"
}
]
}
- In the configs/mqtt_client_config.h file, set
MQTT_BROKER_ADDRESSto your custom endpoint on the Settings page of the AWS IoT Console. This has the formatABCDEFG1234567.iot.<region>.amazonaws.com.
- Set the macros
MQTT_PORTto8883andMQTT_SECURE_CONNECTIONto1in the configs/mqtt_client_config.h file. - Download the following certificates and keys that are created and activated in the previous step:
- A certificate for the AWS IoT Thing - xxxxxxxxxx.cert.pem
- A public key - xxxxxxxxxx.public.key
- A private key - xxxxxxxxxx.private.key
- Root CA "RSA 2048 bit key: Amazon Root CA 1" for AWS IoT from CA Certificates for Server Authentication.
- Using these certificates and keys, enter the following parameters in mqtt_client_config.h in Privacy-Enhanced Mail (PEM) format:You can either convert the values to strings manually following the format shown in mqtt_client_config.h or you can use the HTML utility available here to convert the certificates and keys from PEM format to C string format. You need to clone the repository from GitHub to use the utility.
CLIENT_CERTIFICATE- xxxxxxxxxx.cert.pemCLIENT_PRIVATE_KEY- xxxxxxxxxx.private.keyROOT_CA_CERTIFICATE- Root CA certificate
----------------------------------------------------------------------------------------------------------------------------------------------
Appendix D - Solution Project From a PSoC6 blog Series.
CONTINUE
This appendix describes my experiences with the entire FreeRTOS implementation project by Jan Crumps.
The firmware is available on github: https://github.com/alicemirror/Nanodrone-II_PSoC6
.
After cloning and importing the project into your workspace, perform these activities in the Quick Panel:
- open the Library Manager and click Update. Close when finished.
- click Refresh Quick Panel.
- update mqtt_client.h with your Amazon certificates, and wifi_config.h with your WiFI settings, as you'd do for the AnyCloud MQTT Client example.
- click Build Nanodrone-II_PSoC Application.
10/20/2021 - I Ran into a SNAG
The Project Won't build?
- DETAILS:
- when trying to follow step 1 above "open the Library Manager and click Update. " I get the following error.


Solution
- I worked through this problem with the author of the code with Jan Crumps
- In short there was a problem with one of the HTTPS libraries used in ModusToolbox 2.3 and the BSP.
- This caused the author, Jan Crumps to change the Project to work with ModusToolBox 2.4 and the BSP 3.X
- The project is available on the GitHub repo:
- I reinstalled ModusToolbox 2.4 and imported the project ino my workspace
- I was able to build the project
- I Ran the application.
REFERENCES |
|---|
Jan Crumps PSoC 6 Series.
|
Mosquitto Documentationman pages
|
MQTT Client Example
|
<<< PREVIOUS BLOG | NEXT BLOG >>> |
|---|---|
Blog#3 - BPM Display - System Design | Blog#5 - BPM Display - Conclusion and Future Enhancements |