


Posts in this project
Pallet Tracker - 01 - Project description
Pallet Tracker - 02 - Development environment
Pallet Tracker - 03 - Application skeleton
Pallet Tracker - 04 - PSoC6 power modes and LPComp
Pallet Tracker - 05 - Evaluating power consumption
Pallet Tracker - 06 - Indoor localization
In this post, I will create the skeleton application for the PalletTracker
This is a very basic flowchart of the application

The skeleton will include the following components
- retarget IO
- WiFi
- RTOS
Creating the application
First, I created an application based on the "Hello_World" template. I choose this approach because I think it's easier to incorporate specific features on a barebone application rather than try to modify an existing application. The Hello_World application includes all the basic plumbing I need to get started. I will later add the libraries and features I require
Adding libraries
Modus Toolbox provides a very convenient tool to manage the libraries in your project. The tool can be launched from the Quick panel

When launched, the Library manager let you (eventually) change the BSP. I will leave it unchanged and click the "Libraries" tab


Here I flagged the following libraries
| Name | Description |
|---|---|
| wifi-connection-manager | Wi-Fi Connection manager (WCM) provides a set of APIs that are useful to establish and monitor Wi-Fi connection on Cypress platforms that support Wi-Fi connectivity. WCM library APIs are easy to use, and the library also provides additional features such Wi-Fi Protected Setup (WPS) and connection monitoring. |
| wifi-mw-core |
Core components needed for Wi-Fi connectivity support - bundles FreeRTOS, lwIP TCP/IP stack, mbedTLS for security, Cypress Wi-Fi host driver (WHD), configuration files and associated code to bind these components together. These components are bundled as ".lib" entries; each ".lib" points to the respective repositories, where they are hosted. All but lwIP and mbedTLS libraries are hosted on Cypress' Github repository. lwIP and mbedTLS libraries are hosted on their respective external repositories. Includes predefined configuration files for FreeRTOS, lwIP and mbedTLS for typical embedded IoT usecases; and associated glue layer between lwIP and WHD, and mbedTLS and lwIP. |
These libraries are part of the Anycloud solution, which provides a ready-to-use framework to implement cloud connectivity
These libraries however has some dependencies, so the following libraries are also automatically selected
| Name | Description |
|---|---|
| abstraction-rtos | The RTOS Abstraction Library provides a generic API that allows Cypress middleware to be written in an RTOS agnostic manner. It also contains implementations of the Abstraction Layer for FreeRTOS, CMSIS RTOS, and ThreadX. |
| core-lib | The Core Library provides device agnostic utilities that all middleware can rely on. This includes a generic result type and some common utility functions. |
| core-make | Core Make build system provides generic build files and scripts for building and programming ModusToolbox applications. |
| retarget-io | The Retarget IO library provides APIs for transmitting messages to or from the board via standard printf/scanf functions using a UART connection which is generally connected to a host machine. |
| capsense | Capacitive sensing solution (CapSense) enabling a variety of applications such as touch, gesture and proximity detection. |
| clib-support | The CLib Support Library provides the necessary hooks to make C library functions such as malloc and free thread safe. This implementation is specific to FreeRTOS. |
| freertos | FreeRTOS kernel, distributed as standard C source files with configuration header file. |
| mtb-hal-cat1 | PSoC 6 Hardware Abstraction Layer package, provides a set of APIs to initialize, configure, and use the PSoC 6 MCU resources using the Cypress defined Hardware Abstraction Layer. |
| mtb-pdl-cat1 | The Peripheral Driver Library (PDL) integrates device header files, startup code, and low-level peripheral drivers into a single package. |
| psoc6cm0p | PSoC 6 Cortex M0+ prebuilt images enabling flash write services and BLE event handling. |
| recipe-make-cat1a | PSoC 6 Make build recipe provides the make files and scripts for building and programming PSoC 6 applications. |
| connectivity-utilities | The connectivity utilities library is a collection of general purpose middleware utilities. Several connectivity middleware libraries shall depend on this utilities library. Currently, the following utilities are included: JSON parser, linked list, string utilities, network helpers and logging functions, and connectivity middleware error codes. |
| secure-sockets | Secure sockets library provides network abstraction APIs for underlying network and security library. Secure sockets library eases application development by exposing a socket like interface for both non-secure (LwIP) and secure (mbedTLS) TCP connections. The APIs are thread safe and enable both client and server mode operations. Secure sockets provide both synchronous and asynchronous APIs for data transfer. Additionally, socket options are supported to configure send/receive timeout, callback for asynchronous mode, TCP keep-alive parameters, certificates/key and TLS extensions. |
| lwip | lwIP is a small independent open source implementation of the TCP/IP protocol suite. Using this library in a project will cause lwIP to be downloaded on your computer. It is your responsibility to understand and accept the lwIP license. |
| wifi-host-driver | Wi-Fi Host Driver(WHD) is an independent, embedded Wi-Fi Host Driver that provides a set of APIs to interact with Cypress WLAN chips. |
In particular, connectivity libraries relies on FreeRTOS functionalities. This means you need some additional steps to build the application
Configuring FreeRTOS
To build a FreeRTOS-enabled application, you need two additional steps
- add the FREERTOS component. Edit the Makefile in the project and add the line shown in picture (COMPONENTS += FREERTOS)

- Copy file FreeRTOSCOnfig.h from <workspace path>\mtb_shared\freertos\release-v10.3.1\Source\portable\COMPONENT_CM4 to your project's folder and remove the #warning message

Configuring mbedTLS
mbedTLS is another library automatically included by the Library manager. You need to make some additional changes to include this library (all steps are well documented in the readme files included in the library source code)
- copy file <workspace path>\mtb_shared\mbedtls\mbedtls-2.22.0\configs\config-no-entry.h to the project's folder and rename the file mbedtls_config.h
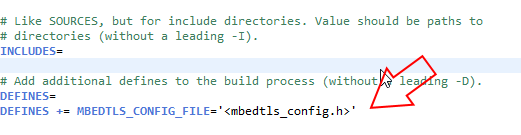
- Add the following line to the project Makefile (DEFINES += MBEDTLS_CONFIG_FILE='<mbedtls_config.h>')
With this changes I was able to successfully build the application
Configuring mw-core
To configure the mw-core library, you can follow the readme file included in the library, which suggests to make the following changes to the Makefile
- add LWIP and MBEDTLS components

- add the following DEFINES to the Makefile

Changing application name
Because I created the application from a template, a default name was given to the application. So I changed the Makefile to use a more significant name for my application
So I changed this line
APPNAME=mtb-example-psoc6-hello-world
to
APPNAME=pallet-tracker
Because I changed the output filename, I also had to change Run and Debug configurations. I chose Debug -> Debug configurations and changed the application name


Then I did the same for Run -> Run configurations

Implementing WiFi network scan
The first function I am going to implement is the WiFi networks scan. This function will give me a WiFi fingerprint that will be analyzed by the indoor location service to provide an approximate position of the tracker. Cypress WiFi Connection Manager provides a convenient way to do network scan.
First, you need to initialized the Connection manager
    cy_wcm_scan_filter_t scan_filter;
    cy_rslt_t result = CY_RSLT_SUCCESS;
    cy_wcm_config_t wcm_config = { .interface = CY_WCM_INTERFACE_TYPE_STA };

    memset(&scan_filter, 0, sizeof(cy_wcm_scan_filter_t));
    result = cy_wcm_init(&wcm_config);
As usual, there is a specific namespace for the connection manager function: cy_wcm_xx
Then, we can invoke the cy_wcn_start_scan function
result = cy_wcm_start_scan(scan_callback, NULL, NULL);
This function class the provided scan_callback function for each WiFi network found
static void scan_callback(cy_wcm_scan_result_t *result_ptr, void *user_data, cy_wcm_scan_status_t status)
cy_wcm_scan_result_t stores all the information about the WiFi network, for example SSID and signal strength. status says whether there are other networks to be scanned or the scan process has been completed. If the latter is the case, then status is equal to CY_WCM_SCAN_COMPLETE

Communicating with the server
Next step is to test the ability to send and receive messages to a server using a TCP socket.
I choose to use a "raw" TCP socket instead of other "high-level" protocols like HTTP or MQTT to make the packet being sent as small as possible, thus saving transmission time and battery. To test connectivity, I started from the secure_tcp_client example. From this example, one can easily find the main APIs to interact with socket library implement by Cypress BSP.
Connecting to the Access Point
Before creating the socket, we need to connect to an Access Point. This task can be accomplished by leveraging the functions in the Connection manager
     /* Set the Wi-Fi SSID, password and security type. */
    memset(&wifi_conn_param, 0, sizeof(cy_wcm_connect_params_t));
    memcpy(wifi_conn_param.ap_credentials.SSID, WIFI_SSID, sizeof(WIFI_SSID));
    memcpy(wifi_conn_param.ap_credentials.password, WIFI_PASSWORD, sizeof(WIFI_PASSWORD));
    wifi_conn_param.ap_credentials.security = WIFI_SECURITY_TYPE;

    /* Join the Wi-Fi AP. */
    result = cy_wcm_connect_ap(&wifi_conn_param, &ip_address);
The function returns CY_RSLT_SUCCESS if everything is fine. In ip_address the address assigned by the DHCP server is returned, and can be easily printed out
printf("IPv4 address assigned: %s\n", ip4addr_ntoa((const ip4_addr_t*)&ip_address.ip.v4));
Connecting to the TCP server
After successful connection to the TCP server, we can create a socket and connect to the TCP server
result = cy_socket_create(CY_SOCKET_DOMAIN_AF_INET, CY_SOCKET_TYPE_STREAM,
CY_SOCKET_IPPROTO_TLS, &client_handle);
Receiving data from the server
Incoming data can be read by registering a callback function that is invoked by the BSP libraries when data is available for the socket
    /* Register the callback function to handle messages received from TCP server. */
    tcp_recv_option.callback = tcp_client_recv_handler;
    tcp_recv_option.arg = NULL;
    result = cy_socket_setsockopt(client_handle, CY_SOCKET_SOL_SOCKET,
                                  CY_SOCKET_SO_RECEIVE_CALLBACK,
                                  &tcp_recv_option, sizeof(cy_socket_opt_callback_t));
    if (result != CY_RSLT_SUCCESS)
    {
        printf("Set socket option: CY_SOCKET_SO_RECEIVE_CALLBACK failed! "
                "Error Code: %"PRIu32"\n", result);
        return result;
    }
In the callback, cy_socket_recv is called to read data out from the socket
cy_rslt_t tcp_client_recv_handler(cy_socket_t socket_handle, void *arg)
{
    /* Variable to store number of bytes received. */
    uint32_t bytes_received = 0;

    char message_buffer[MAX_TCP_DATA_PACKET_LENGTH];
    cy_rslt_t result ;

    result = cy_socket_recv(socket_handle, message_buffer, TCP_LED_CMD_LEN,
                            CY_SOCKET_FLAGS_NONE, &bytes_received);

    printf("Received %d bytes [%s]\n", bytes_received, message_buffer);
     ...
}
A callback can also be registered in order to be notified when socket is disconnected
    /* Register the callback function to handle disconnection. */
    tcp_disconnection_option.callback = tcp_disconnection_handler;
    tcp_disconnection_option.arg = NULL;


    result = cy_socket_setsockopt(client_handle, CY_SOCKET_SOL_SOCKET,
                                  CY_SOCKET_SO_DISCONNECT_CALLBACK,
                                  &tcp_disconnection_option, sizeof(cy_socket_opt_callback_t));
    if(result != CY_RSLT_SUCCESS)
    {
        printf("Set socket option: CY_SOCKET_SO_DISCONNECT_CALLBACK failed! "
                "Error Code: %"PRIu32"\n", result);
        return result;
    }
Sending data to the server
To send data to the server, cy_socket_send function can be used
    result = cy_socket_send(socket_handle, message_buffer, strlen(message_buffer),
                            CY_SOCKET_FLAGS_NONE, &bytes_sent);
Adjusting mbedTLS settings
I omitted the explanation about how to use TLS because that a very huge topic. I just want to point out some changed I had to make to the mbedTLS configuration to build the code. I had to add the following defines to the configuration file mbedtls_config.h
#define MBEDTLS_PLATFORM_TIME_ALT
#define MBEDTLS_SSL_PROTO_TLS1
#define MBEDTLS_SSL_TLS_C
#define MBEDTLS_SSL_CLI_C
#define MBEDTLS_SSL_ALPN
#define MBEDTLS_SSL_MAX_FRAGMENT_LENGTH
#define MBEDTLS_MD5_C
#define MBEDTLS_SHA1_C
#define MBEDTLS_ECDH_C
#define MBEDTLS_KEY_EXCHANGE_RSA_ENABLED
#define MBEDTLS_ENTROPY_C
#define MBEDTLS_NO_PLATFORM_ENTROPY
#define MBEDTLS_CTR_DRBG_C
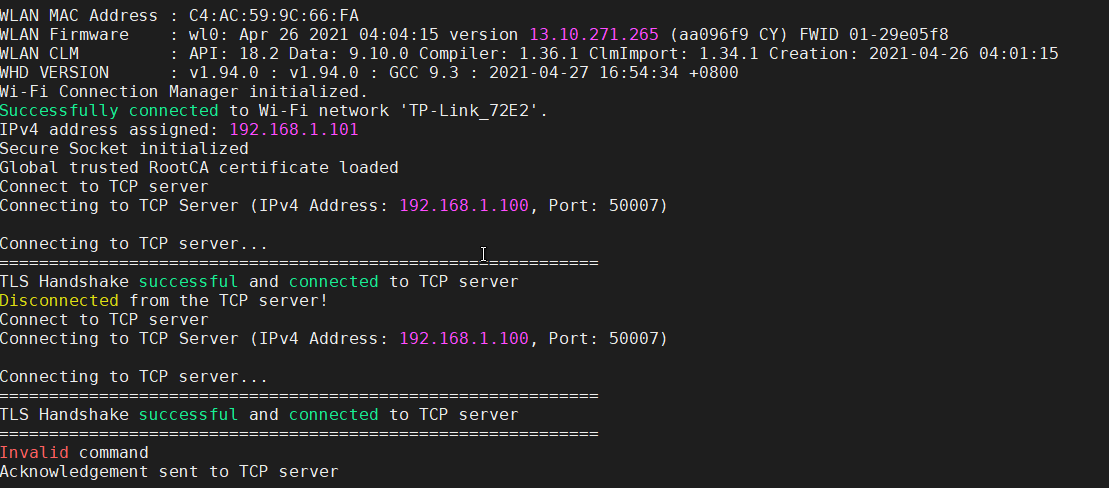
Running the server
The code on github include a python server that can be launched from a terminal by typing the command
python tcp-secure-server.sh
On the terminal connected to the PSoC6, I got the following output
Next steps
With all the pieces now in place, I can move to the most challenging part: investigating the power modes and optimize power consumption