


Over the past couple of weeks I have been dipping in and out of various parts of my project - developing the MIDI I/O interface (as seen in my last couple of blogposts), as well as starting to implement my audio synthesis engine design into a working entity (which I will probably talk about it my next blogpost). However both of these elements have required me to develop a general structure of software on the BeagleBone Black board that allow the keyboard, MIDI interface, and eventually the panel to communicate with a sound engine. Therefore in this blogspot I thought I'd cover the various different pieces of software that make up the vintage toy synthesiser, both on the BBB and off, and how they all connect together.
To begin with, here's a diagram of the software architecture of the synth:
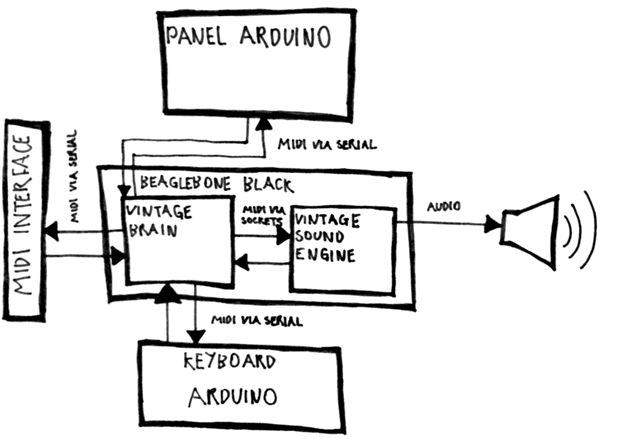
Arduino Software
Keyboard
As shown in my third blogpost, the keys/sensors on the digitised keyboard mechanism are scanned/read by a dedicated microcontroller - an Arduino Pro Mini. The Arduino software, or sketch, for this Pro Mini simply reads the state of each sensor over and over, and detects any changes in the press or pressure status of any of the keys. Note and aftertouch messages are then sent from the Arduino to the BBB using MIDI messages over serial.
As previous stated I decided to use a dedicated microcontroller for this task, instead if using the BBB, for two main reasons:
- Splitting tasks - The main job for the BBB in this project is to run a sound synthesis engine which is going to be time critical, so I don't want it to be doing any extra tasks that could slow it down. Also the scanning of the pianos 18 keys needs to be done as fast as possible so that the keys trigger sound as soon as they are pressed, so using a dedicated microcontroller for this task would be preferable.
- More Modular - Connecting a microcontroller to the BBB rather than connecting 18 sensors directly requires a lot less connections and wires to the BBB, which makes it easier to remove the key mech or BBB from the piano if desired.
You can see the latest version of the Keyboard code here.
Panel
The software for the panel is essentially going to be the same as that of the keyboard - a sketch running on a second Arduino Pro Mini that scans the state of a number of potentiometers and switches, sending any control changes to the BBB over serial using MIDI CC messages. Once again a dedicated microcontroller is being used for this task for the exact same reasons.
I've only just started writing the panel code, and as I haven't yet completed the circuit this may change, so I'll wait until a later blogpost to show the code for this.
BeagleBone Black Software
The BBB is both the brain and the soul of the vintage toy piano - by that I mean it runs the central process that communicates between all the different parts of the synth, as well as running the synthesis engine that creates the sound of the synthesiser. I decided to split these two main tasks into separate pieces of software which run side-by-side on the Linux OS - vintageBrain and vintageSoundEngine, which communicate with each other using standard MIDI messages but sent via datagram sockets.
I've given each of these tasks dedicated applications for almost the same reasons as using Arduino's as well as the BBB:
- Multithreading - Splitting the tasks into two separate applications means that each process can run in its own thread without the complexities of writing multi-threaded applications.
- Using multiple programming languages - vintageBrain is written in C where I've had the most experience with developing this kind of application, however vintageSoundEngine is written in C++ due to using the C++ audio synthesis library Maximilian. However these two languages aren't that different and can easily be combined if needed.
- Keeping code separate - developing two completely separate applications means that the code is separate, rather than potentially having lots of different code that does different things mixed together, potentially making it harder to maintain. This kind of thing can be solved using object-orientated programming languages such as C++ where code can be split into dedicated classes/objects, however the C language doesn't have this feature.
- More modular - Say in the future I want to swap my digital sound engine for an analogue one, having the brain application separate from the sound application means that all I'd need to do is reroute my messages from the brain to a different destination, rather than having the rewrite a large chunk of the program.
vintageBrain
As stated above, the vintage brain application handles the task of allowing all the separate parts of the synthesiser to communicate. It is a single-threaded application that listens for messages coming from the keyboard, MIDI, and panel serial ports, and sends the messages to the sound engine and possible back to the MIDI serial port. It also handles all the voice and keyboard settings of the synthesiser, particularly:
- Voice mode and voice allocation. In polyphonic mode this involves knowing which digital 'voice' within the vintageSoundEngine application each note and aftertouch message needs to be sent to, and in monophonic mode keeping track of all currently held down notes/keys so that the synth can be played with the expected mono behaviour.
- Keyboard notes. The raw MIDI note messages coming directly from the keyboard will always be the same, however it's the vintageBrain's job to modify these messages based on the octave, transpose, and scale settings, allowing the user to chose the exact range of notes that the keyboard can play.
This application is developed in C, and I use my cross-compiler mentioned in a previous blogpost to compile the application before using a script to copy the binary onto the BBB. You can see the up-to-date code for vintageBrain here.
vintageSoundEngine
vintageSoundEngine is the more interesting application of the two, as this is where the sound synthesis engine has been developed. It is a multithreaded application where the main thread is responsible for processing any MIDI messages coming from vintageBrain via the datagram socket which are used to trigger and control the sound, however the second thread is used to handle audio streaming and processing. As stated previously I am using the Maximilian audio synthesis library to develop my synthesis engine, and a lot of the structure of this application is based on the example Maximilian applications. However within this application I've created a 'vintageVoice' class which handles all the audio processing for a single 'voice' within my synth; making a dedicated class/object for this allows me to easy increase or decrease the amount of voices within my synth.
This application is developed in C++, and is compiled on the BBB itself due to not being able to get my cross-compiler to compile any Maximilian-based application, as outlined in a previous blogpost. I will talk about this application and the sound engine in a lot more detail in a future blogpost, as well give examples of the code.