element14 Community
element14 Community
    Register Log In
  • Site
  • Search
  • Log In Register
  • About Us
  • Community Hub
    Community Hub
    • What's New on element14
    • Feedback and Support
    • Benefits of Membership
    • Personal Blogs
    • Members Area
    • Achievement Levels
  • Learn
    Learn
    • Ask an Expert
    • eBooks
    • element14 presents
    • Learning Center
    • Tech Spotlight
    • STEM Academy
    • Webinars, Training and Events
    • Learning Groups
  • Technologies
    Technologies
    • 3D Printing
    • FPGA
    • Industrial Automation
    • Internet of Things
    • Power & Energy
    • Sensors
    • Technology Groups
  • Challenges & Projects
    Challenges & Projects
    • Design Challenges
    • element14 presents Projects
    • Project14
    • Arduino Projects
    • Raspberry Pi Projects
    • Project Groups
  • Products
    Products
    • Arduino
    • Avnet Boards Community
    • Dev Tools
    • Manufacturers
    • Multicomp Pro
    • Product Groups
    • Raspberry Pi
    • RoadTests & Reviews
  • Store
    Store
    • Visit Your Store
    • Choose another store...
      • Europe
      •  Austria (German)
      •  Belgium (Dutch, French)
      •  Bulgaria (Bulgarian)
      •  Czech Republic (Czech)
      •  Denmark (Danish)
      •  Estonia (Estonian)
      •  Finland (Finnish)
      •  France (French)
      •  Germany (German)
      •  Hungary (Hungarian)
      •  Ireland
      •  Israel
      •  Italy (Italian)
      •  Latvia (Latvian)
      •  
      •  Lithuania (Lithuanian)
      •  Netherlands (Dutch)
      •  Norway (Norwegian)
      •  Poland (Polish)
      •  Portugal (Portuguese)
      •  Romania (Romanian)
      •  Russia (Russian)
      •  Slovakia (Slovak)
      •  Slovenia (Slovenian)
      •  Spain (Spanish)
      •  Sweden (Swedish)
      •  Switzerland(German, French)
      •  Turkey (Turkish)
      •  United Kingdom
      • Asia Pacific
      •  Australia
      •  China
      •  Hong Kong
      •  India
      •  Korea (Korean)
      •  Malaysia
      •  New Zealand
      •  Philippines
      •  Singapore
      •  Taiwan
      •  Thailand (Thai)
      • Americas
      •  Brazil (Portuguese)
      •  Canada
      •  Mexico (Spanish)
      •  United States
      Can't find the country/region you're looking for? Visit our export site or find a local distributor.
  • Translate
  • Profile
  • Settings
PiCasso Design Challenge
  • Challenges & Projects
  • Design Challenges
  • PiCasso Design Challenge
  • More
  • Cancel
PiCasso Design Challenge
Blog Hologram Pi-ramid - Plexiglass Pyramid
  • Blog
  • Forum
  • Documents
  • Polls
  • Files
  • Events
  • Mentions
  • Sub-Groups
  • Tags
  • More
  • Cancel
  • New
  • Share
  • More
  • Cancel
Group Actions
  • Group RSS
  • More
  • Cancel
Engagement
  • Author Author: luislabmo
  • Date Created: 24 Apr 2019 12:22 AM Date Created
  • Views 4650 views
  • Likes 11 likes
  • Comments 15 comments
  • mechanical drawings
  • picasso
  • rpi 3b+
  • addressable led
  • raspberri pi
  • plexiglass
  • rgb
  • touchscreen
  • luislab
  • acrylic_welding
  • acrylic
Related
Recommended

Hologram Pi-ramid - Plexiglass Pyramid

luislabmo
luislabmo
24 Apr 2019

I'm very excited about the progress of the Hologram Pi-ramid. At this point I'm just one step away of testing the Pepper's Ghost principle.

You don't have permission to edit metadata of this video.
Edit media
x
image
Upload Preview
image


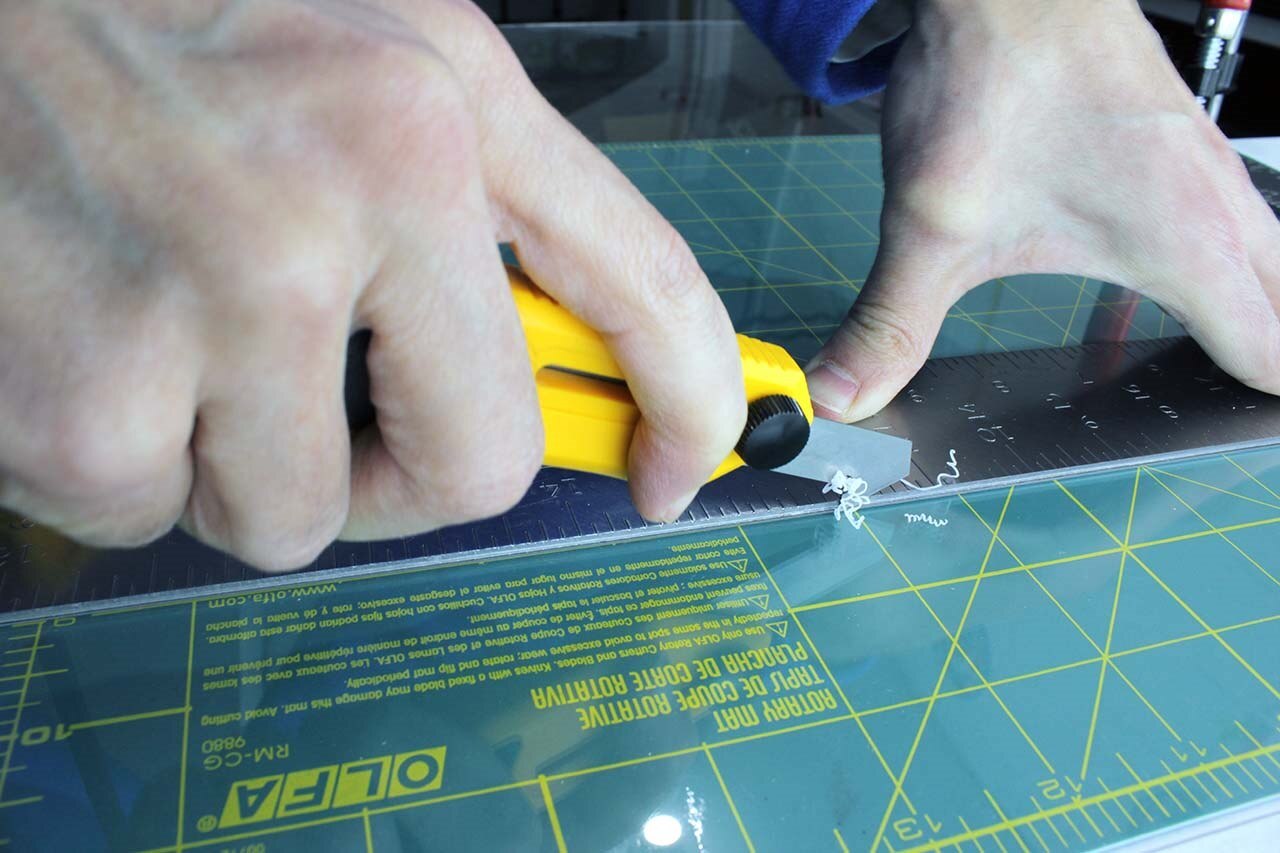
In the previous blog post, I've covered the 3d printed parts and some assembly. Such parts will help in the construction of the Plexiglass pyramid too as they will provide support when gluing the pyramid which is made of 3 pieces of 2mm thick (0.08 inches) clear Acrylic -also known as Plexiglass among many other names. To cut the Plexiglass I used a Plastic/Laminate Scorer and only needed three or four passes for each cut with clean results. To avoid scratching the Acrylic I added some blue masking tape as can be appreciated in some of the pictures.


{gallery:width=960,height=768,autoplay=false} Cutting Plexiglass Pyramid

image

Scoring Plexiglass: Scoring Plexiglass/Acrylic with a Plastic/Laminate Scorer

image

Plexiglass pyramid cutting: Plexiglass pyramid - before cutting preparation

image

Plexiglass pyramid front piece: Front piece (Plexiglass/Acrylic pyramid)

image

Plexiglass pyramid assembly: Technical drawings Acrylic/Plexiglass pyramid


To bond all the Plexiglass pieces together I used Methylene chloride, also known as dichloromethane or DCM; a fast drying solvent that welds some plastics by softening the polymer and fusing it together, which I applied with a small blunt tip syringe allowing it to flow along the surfaces to be joined via capillary action. To add support I used some of the 3d printed parts assembled together, a rubber band and a little help of gravity.

{gallery:width=960,height=768,autoplay=false} Gluing the Plexiglass Pyramid

image

Welding Plexiglass: Welding the Plexiglass/Acrylic with Methylene chloride

image

Zoomed-in weld: Zoomed-in Plexiglass/Acrylic weld

As can be appreciated results are very good, the Plexiglass pyramid seems sturdy enough and can be removed/placed in the project easily -as seen on the video- which is one of the features I had planned which I will be covering in more detail in a later entry.

image


Blogs in this series


  1. Hologram Pi-ramid - Intro and initial design
  2. Hologram Pi-ramid - 3D CAD/CAM design
  3. Hologram Pi-ramid - 3D printed parts and initial assembly
  4. Hologram Pi-ramid - Plexiglass Pyramid
  5. Hologram Pi-ramid - My name is Automan
  6. Hologram Pi-ramid - PCB Design
  7. Hologram Pi-ramid - Painting the 3D printed parts
  8. Hologram Pi-ramid - Electronic Parts
  9. Hologram Pi-ramid - Displaying Holograms
  10. Hologram Pi-ramid - Project complete!


  • My Picasso Design Challenge entries


image
3D printed parts and initial assembly

image
My name is Automan

  • Sign in to reply

Top Comments

  • balearicdynamics
    balearicdynamics over 6 years ago +6
    Very accurate and nice building. Two important things I have appreciated and never known. The first is the way you joined the transparent parts, I have always used Cyanoacrilate but with your solution…
  • luislabmo
    luislabmo over 6 years ago in reply to dubbie +6
    Hi Dubbie, I think it all boils down to patience and trying and trying. It took me about a month to calibrate my new printer to get smooth prints and the features I add to the 3d printed parts like the…
  • luislabmo
    luislabmo over 6 years ago in reply to balearicdynamics +6
    Hello Enrico, This is the first time I've heard of the Cyanocrilate. If you ever try the D ichloromethane method, the edges that will be welded should be "rough", ironically laser-cut parts are hard to…
Parents
  • balearicdynamics
    balearicdynamics over 6 years ago

    Very accurate and nice building. Two important things I have appreciated and never known. The first is the way you joined the transparent parts, I have always used Cyanoacrilate but with your solution it seems more efficient and precise. The second is the way of masking you have adopted to cut the transparent sheet. Incenious and efficient!


    Enrico

    • Cancel
    • Vote Up +6 Vote Down
    • Sign in to reply
    • More
    • Cancel
Comment
  • balearicdynamics
    balearicdynamics over 6 years ago

    Very accurate and nice building. Two important things I have appreciated and never known. The first is the way you joined the transparent parts, I have always used Cyanoacrilate but with your solution it seems more efficient and precise. The second is the way of masking you have adopted to cut the transparent sheet. Incenious and efficient!


    Enrico

    • Cancel
    • Vote Up +6 Vote Down
    • Sign in to reply
    • More
    • Cancel
Children
  • shabaz
    shabaz over 6 years ago in reply to balearicdynamics

    Also that blade looks safer than a normal knife..

    I used to try cutting plastic with a normal knife, and here the nearby stores sold steel rules that would slip on the plastic, resulting in the blade to bend and snap, and lose a bit of flesh : )

    image

    • Cancel
    • Vote Up +5 Vote Down
    • Sign in to reply
    • More
    • Cancel
  • luislabmo
    luislabmo over 6 years ago in reply to balearicdynamics

    Hello Enrico,


    This is the first time I've heard of the Cyanocrilate. If you ever try the Dichloromethane method, the edges that will be welded should be "rough", ironically laser-cut parts are hard to glue at-first with this product because the edges cut are smooth and not 90 degrees; this won't allow the product to penetrate and melt the material easily -learned this the hard way with one of my failed projects image. For laser-cut parts it's better to sand edges that will be welded...


    When I learned a little about making stuff with Plastics, parts were cut with a Router which will leave all the edges rough and perfect 90 degrees (unlike the laser cut) perfect for DCM welding, leaving nice and strong bonds.


    Luis

    • Cancel
    • Vote Up +6 Vote Down
    • Sign in to reply
    • More
    • Cancel
  • balearicdynamics
    balearicdynamics over 6 years ago in reply to luislabmo

    https://www.amazon.com/Starbond-Instant-PREMIUM-Cyanoacrylate-Adhesive/dp/B00C32MENO/ref=sr_1_2?crid=11V3S4500B4DK&keywo…


    There are tons of types, with different viscosity and specific characteristics. I learned to use this kind of glues when working with anthropologists and archaeologists. You can essentially glue any kind of organic or chemical organic material together with almost any other thing (glass with metal, metal with metal, etc. And plexiglass or acrylic is great. After gluing you break it. But the concept probably is the same in the case of meta polymerization of organic cyclic plastics.


    Enrico

    • Cancel
    • Vote Up +6 Vote Down
    • Sign in to reply
    • More
    • Cancel
  • luislabmo
    luislabmo over 6 years ago in reply to shabaz

    Hi Shabaz,


    It is not seen in the blog's pictures but I always secure the steel ruler with clamps -usually quick-grip- to avoid the slipping problem.

    image


    As far as I know, to cut laminates a regular cutting tool (knife, art-knife, etc) is not a good tool for the job, it will break, will not leave a clean cut, harder to use -it requires more passes- and will likely scratch at unwanted places. When I learned to cut laminates, I made my Scorer -poor man's version- with an old hacksaw blade and a bench grinder leaving a hook shape and later adding a handle (lots of tape, wood, etc) -like in the drawing below:
    image

    Now, I use the OLFA Laminate Scorer seen in the blog post


    Luis

    • Cancel
    • Vote Up +4 Vote Down
    • Sign in to reply
    • More
    • Cancel
  • luislabmo
    luislabmo over 6 years ago in reply to balearicdynamics

    Nice tip Enrico!. I'll keep it later use.


    Luis

    • Cancel
    • Vote Up +1 Vote Down
    • Sign in to reply
    • More
    • Cancel
element14 Community

element14 is the first online community specifically for engineers. Connect with your peers and get expert answers to your questions.

  • Members
  • Learn
  • Technologies
  • Challenges & Projects
  • Products
  • Store
  • About Us
  • Feedback & Support
  • FAQs
  • Terms of Use
  • Privacy Policy
  • Legal and Copyright Notices
  • Sitemap
  • Cookies

An Avnet Company © 2025 Premier Farnell Limited. All Rights Reserved.

Premier Farnell Ltd, registered in England and Wales (no 00876412), registered office: Farnell House, Forge Lane, Leeds LS12 2NE.

ICP 备案号 10220084.

Follow element14

  • X
  • Facebook
  • linkedin
  • YouTube