element14 Community
element14 Community
    Register Log In
  • Site
  • Search
  • Log In Register
  • Community Hub
    Community Hub
    • What's New on element14
    • Feedback and Support
    • Benefits of Membership
    • Personal Blogs
    • Members Area
    • Achievement Levels
  • Learn
    Learn
    • Ask an Expert
    • eBooks
    • element14 presents
    • Learning Center
    • Tech Spotlight
    • STEM Academy
    • Webinars, Training and Events
    • Learning Groups
  • Technologies
    Technologies
    • 3D Printing
    • FPGA
    • Industrial Automation
    • Internet of Things
    • Power & Energy
    • Sensors
    • Technology Groups
  • Challenges & Projects
    Challenges & Projects
    • Design Challenges
    • element14 presents Projects
    • Project14
    • Arduino Projects
    • Raspberry Pi Projects
    • Project Groups
  • Products
    Products
    • Arduino
    • Avnet Boards Community
    • Dev Tools
    • Manufacturers
    • Multicomp Pro
    • Product Groups
    • Raspberry Pi
    • RoadTests & Reviews
  • Store
    Store
    • Visit Your Store
    • Choose another store...
      • Europe
      •  Austria (German)
      •  Belgium (Dutch, French)
      •  Bulgaria (Bulgarian)
      •  Czech Republic (Czech)
      •  Denmark (Danish)
      •  Estonia (Estonian)
      •  Finland (Finnish)
      •  France (French)
      •  Germany (German)
      •  Hungary (Hungarian)
      •  Ireland
      •  Israel
      •  Italy (Italian)
      •  Latvia (Latvian)
      •  
      •  Lithuania (Lithuanian)
      •  Netherlands (Dutch)
      •  Norway (Norwegian)
      •  Poland (Polish)
      •  Portugal (Portuguese)
      •  Romania (Romanian)
      •  Russia (Russian)
      •  Slovakia (Slovak)
      •  Slovenia (Slovenian)
      •  Spain (Spanish)
      •  Sweden (Swedish)
      •  Switzerland(German, French)
      •  Turkey (Turkish)
      •  United Kingdom
      • Asia Pacific
      •  Australia
      •  China
      •  Hong Kong
      •  India
      •  Korea (Korean)
      •  Malaysia
      •  New Zealand
      •  Philippines
      •  Singapore
      •  Taiwan
      •  Thailand (Thai)
      • Americas
      •  Brazil (Portuguese)
      •  Canada
      •  Mexico (Spanish)
      •  United States
      Can't find the country/region you're looking for? Visit our export site or find a local distributor.
  • Translate
  • Profile
  • Settings
Rube Goldberg Device
  • Challenges & Projects
  • Project14
  • Rube Goldberg Device
  • More
  • Cancel
Rube Goldberg Device
Blog Patpat-o-matic (aka celebration of self-celebration)
  • Blog
  • Forum
  • Documents
  • Events
  • Polls
  • Files
  • Members
  • Mentions
  • Sub-Groups
  • Tags
  • More
  • Cancel
  • New
Join Rube Goldberg Device to participate - click to join for free!
  • Share
  • More
  • Cancel
Group Actions
  • Group RSS
  • More
  • Cancel
Engagement
  • Author Author: amgalbu
  • Date Created: 15 Aug 2022 6:37 AM Date Created
  • Views 40540 views
  • Likes 10 likes
  • Comments 8 comments
  • tmc2300-iot-ref
  • raspberry pi pico
  • autohacksch
  • pimoroni
  • emoticam
  • gr0g
  • automationhat
  • rubegoldbergch
  • project14
  • kemet
  • buildapresentch
  • energy_squezzer
  • magichat
Related
Recommended

Patpat-o-matic (aka celebration of self-celebration)

amgalbu
amgalbu
15 Aug 2022

Problem description

You spent many nights on your project for a Design Challenge and sometimes people on the community likes your efforts. So, isn’t it a good opportunity to self-celebrate yourself with this fantastic device?


What is patpat-o-matic?

Patpat-o-matic monitors the number of points on you Element14’s profile. Every time someone likes your contents, the number of points increases, and the device activates to compliment you by giving a pat on your shoulder. Obviously, it’s not easy to pat with the right amount of force, so I will leverage the knowledge I built while making the projects and design challenges to create the perfect pat


Stages

The patpat-o-matic is made has the following stages

image 

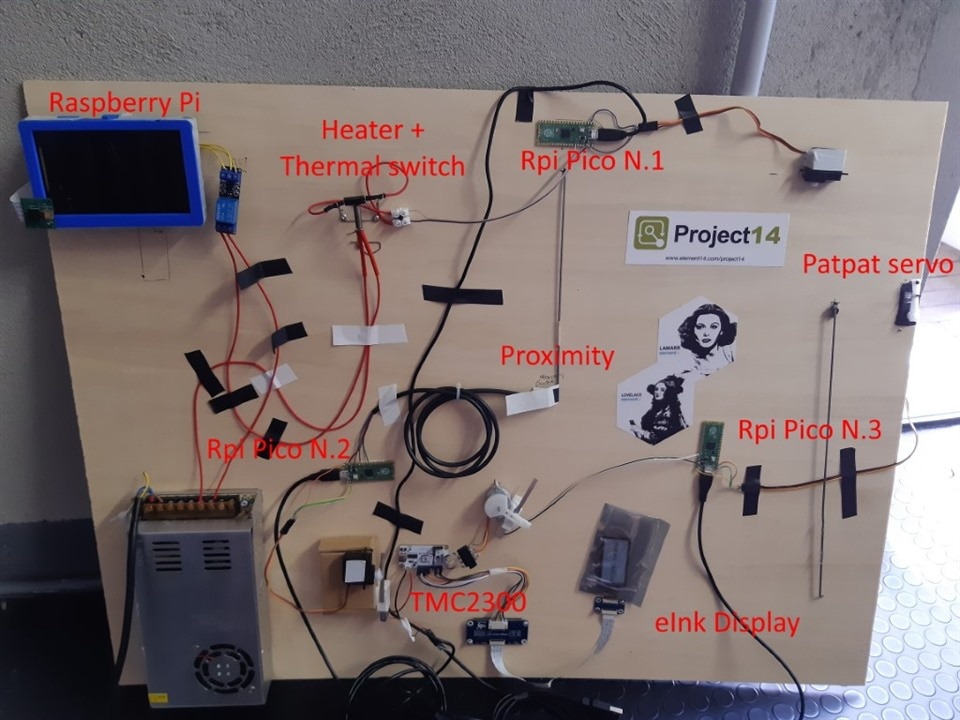
Stage 1: Raspberry Pi

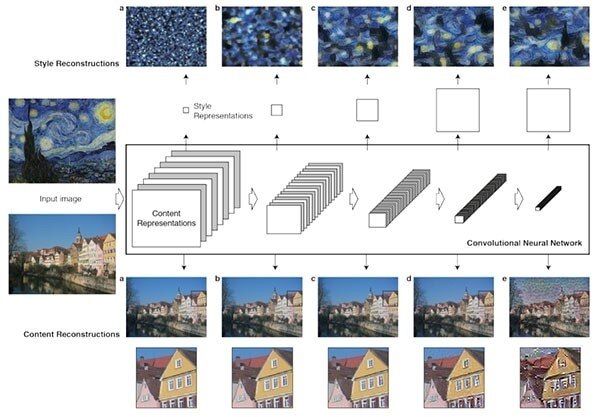
A Raspberry Pi with a camera “reads” a computer screen. I received a Raspberry PI HW camera has part of the Photography Project14, where I built the Emoticam, a camera that allows you the overimpress your feelings to the pictures you are taking. This was my first approach to the technique called neural style transfer

image

By means of Tesseract, the image undergoes the OCR to detect extract the number of points. Luckily, I explored OCR with OpenCV in my Automated car marshal, which was built during the Auto hack Project14.

image

When the value changes, an output on a Pimoroni Automation hat is activated. You can find more details about the Pimoroni Automation hat in my Gr0G project, which was part of my preparation for my next travel to Mars.

image

The output is connected to a relay which drives a heater

Here is the source code for the application running on the Raspberry Pi and OCRs the video stream from the camera to detect points

#!/usr/bin/env python3

import sys
import time
import os

import cv2
import pytesseract
from pytesseract import Output

import automationhat
time.sleep(0.1) # Short pause after ads1015 class creation recommended

try:
    from PIL import Image, ImageDraw
except ImportError:
    print("""This example requires PIL.
Install with: sudo apt install python{v}-pil
""".format(v="" if sys.version_info.major == 2 else sys.version_info.major))
    sys.exit(1)

cap = cv2.VideoCapture(0)
cap.set(cv2.CAP_PROP_BUFFERSIZE, 1)

state = 0
start = 0
n = 0

d = None
n_boxes = 0

while True:
    # Capture frame-by-frame
    ret, frame = cap.read()
    n = n+1

    if n == 10:
        n = 0
        d = pytesseract.image_to_data(frame, output_type=Output.DICT)
        n_boxes = len(d['text'])

    for i in range(n_boxes):
        if int(d['conf'][i]) > 60:
            (text, x, y, w, h) = (d['text'][i], d['left'][i], d['top'][i], d['width'][i], d['height'][i])
            # don't show empty text
            if text and text.strip() != "":
                frame = cv2.rectangle(frame, (x, y), (x + w, y + h), (0, 255, 0), 2)
                frame = cv2.putText(frame, text, (x, y - 10), cv2.FONT_HERSHEY_SIMPLEX, 1.0, (0, 0, 255), 3)
                automationhat.output[0].on()
                start = time.time()
                state = 1

    # Display the resulting frame
    cv2.imshow('frame', frame)
    if cv2.waitKey(1) & 0xFF == ord('q'):
        break

    if (state == 1):
        end = time.time();
        delta = end - start
        if (delta > 15):
            automationhat.output[0].off()
            state = 2

# When everything done, release the capture
cap.release()
cv2.destroyAllWindows()

Stage 2: Raspberry Pi Micro (1)

The heater heats a Thermorite thermal switch. I experimented with thermal switches during a design challenge. In this challenge, I created two devices to extract otherwise-wasted heat from my boiler and solar plant.

 image

When the target temperature is reached, the thermal switch closes and a Raspberry Pi Micro is powered up. The Raspberry Pi Micro drives a servo motor, that releases a bar made of harmonic steel

Most of the Raspberry Pi Pico runs a very simple code the basically reads a digital input and drives a servo when the input is 1 or 0 (depending on the input being monitored)

image

from time import sleep
from machine import Pin, PWM

input=Pin(28,Pin.IN,Pin.PULL_UP)
led=Pin(25,Pin.OUT)
led.value(0)

pwm = PWM(Pin(1))
pwm.freq(50)

pwm.duty_u16(5500)
done=False

led.value(1)
sleep(3)
led.value(0)

while True:
    led.value(input.value())
    if (input.value() == 1):
        for position in range(5500,2000,-50):
            pwm.duty_u16(position)
            sleep(0.01)
        done=True
    else:
        sleep(0.5)

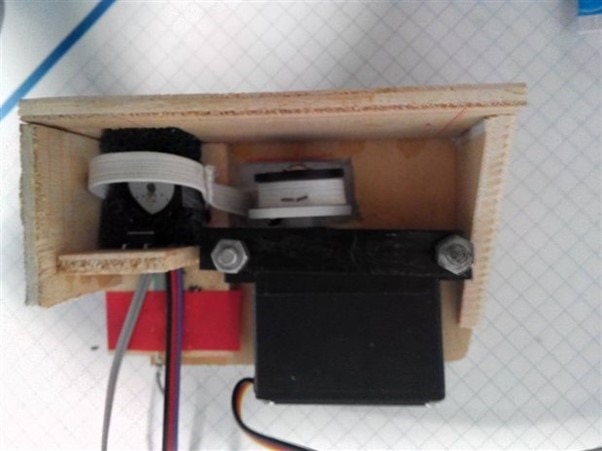
Stage 3: Raspberry Pi Micro (2)

The steel bar passes by a TT Electronic reflective optical proximity switch, which I reviewed some time ago.

image 

A Raspberry Pi Micro reads the output of the proximity sensor. When proximity sensor detects the bar, the Raspberry Pi Micro activates a servo. The lever on the servo shaft activates a switch


Stage 4: TMC2300

The lever on the servo shaft activates a switch which powers a TMC2300. The TMS2300 is a very interesting board.

 I initially reviewed this product, and later built an ornament for your Christmas Tree that shows wishes sent via Twitter.

 image

image

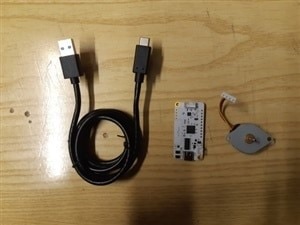
The TMC2300 drives a stepper motor that winds a thread and powers up the next stage


Stage 5: Raspberry Pi Micro (3)

The last step is a Raspberry Pi Micro that drives a servo that controls the pat-pat mechanism. The pat-pat mechanism is driven by a relic from many years ago: it was kindly provided by Element14 as part of the “Enchanted objects” challenge, where I took inspiration from Harry Potter’s Sorting hat to create a Magic hat .

 image

The original idea was to devise a blood pressure instrument based on a novel approach, but unfortunately this experiment failed miserably

 image


Patpat-o-matic in action

But now, no more talk. Let’s have our daily portion of pats!

You don't have permission to edit metadata of this video.
Edit media
x
image
Upload Preview
image

  • Sign in to reply
  • amgalbu
    amgalbu over 2 years ago in reply to ntewinkel

    Thanks ntewinkel!

    • Cancel
    • Vote Up 0 Vote Down
    • Sign in to reply
    • More
    • Cancel
  • ntewinkel
    ntewinkel over 2 years ago

    This is amazing!

    I also love how you used past projects and reviewed items to build it! Slight smile

    • Cancel
    • Vote Up 0 Vote Down
    • Sign in to reply
    • More
    • Cancel
  • amgalbu
    amgalbu over 2 years ago in reply to robogary

    Thanks robogary! When your work is not even appreciated by the machine that is supposed to give you appreciation, you should start to think of what an engineer life is all about :-)

    • Cancel
    • Vote Up 0 Vote Down
    • Sign in to reply
    • More
    • Cancel
  • amgalbu
    amgalbu over 2 years ago in reply to dougw

    Thanks dougw! To be honest, it was not that big effort, because I recycled most of the code from projects I made in the past

    • Cancel
    • Vote Up 0 Vote Down
    • Sign in to reply
    • More
    • Cancel
  • amgalbu
    amgalbu over 2 years ago in reply to javagoza

    Thanks javagoza!!

    • Cancel
    • Vote Up 0 Vote Down
    • Sign in to reply
    • More
    • Cancel
>
element14 Community

element14 is the first online community specifically for engineers. Connect with your peers and get expert answers to your questions.

  • Members
  • Learn
  • Technologies
  • Challenges & Projects
  • Products
  • Store
  • About Us
  • Feedback & Support
  • FAQs
  • Terms of Use
  • Privacy Policy
  • Legal and Copyright Notices
  • Sitemap
  • Cookies

An Avnet Company © 2025 Premier Farnell Limited. All Rights Reserved.

Premier Farnell Ltd, registered in England and Wales (no 00876412), registered office: Farnell House, Forge Lane, Leeds LS12 2NE.

ICP 备案号 10220084.

Follow element14

  • X
  • Facebook
  • linkedin
  • YouTube