


![]()
Hi all.
This is going to be my final blog post before I post my review.
If you just got here,here's a summary:
The ultimate goal of my Road Test was to run a custom model in the KV260, using Python. I knew that the KV260 was able to run Ubuntu, and at first, this was were I was going to run the models.
But, I've discovered the PYNQ project, by AMD.
PYNQ

PYNQ is an open-source project from AMD to make it easier to use Adaptive Computing Platforms.
Using the Python Language and libraries we can exploit the benefits of programmable logic and microprocessors to build more exciting programs.
PYNQ can be used with the AMD Xilinx KV260 Vision kit - along others.
It can be used to create high performance applications with:
- parallel hardware execution
- high frame-rate video processing
- hardware accelerated algorithms
- real-time signal processing
- high bandwidth IO
- low latency control
The PYNQ is used using Jupyter Notebooks.
For those that aren't familiar with them, Jupyter Notebooks are browser based interactive computing environments. Know Google Coolab ? It's the same. In fact, Google Coolab is based on the Jupyter project.
We only need a recent browser.
Although it's supposed to use the browser, we can program Python using the PYNQ environment in the command line. This is how I'm going to do this.
Installation
To install the PYNQ libraries in the KV260, we need to use Ubuntu.
I'm not going through the installation of Ubuntu here - check my post AMD Xilinx Kria KV260 Vision AI Starter Kit : Preparing the KV260
After Ubuntu is installed, let's save some resources.
Because I don't need the graphical environment, I'm going to disable it and make Ubuntu boot to the command line instead.
Find the default target (we don't need this, but for the completeness of the commands)
Find the current default boot target
sudo systemctl get-default

Let's set the boot default
sudo systemctl set-default multi-user
NOTE: We don't need to specify the extension. Systemd knows it

After a reboot, it boots to the command line and will allow us to save resources.
Let's install PYNQ
Following the instructions on the Github page is straightforward .
Let's clone the repository
git clone https://github.com/Xilinx/Kria-PYNQ.git
After it finishes, let's enter the directory
cd Kria-PYNQ/
And now let's install it for our board
sudo bash install.sh -b KV260
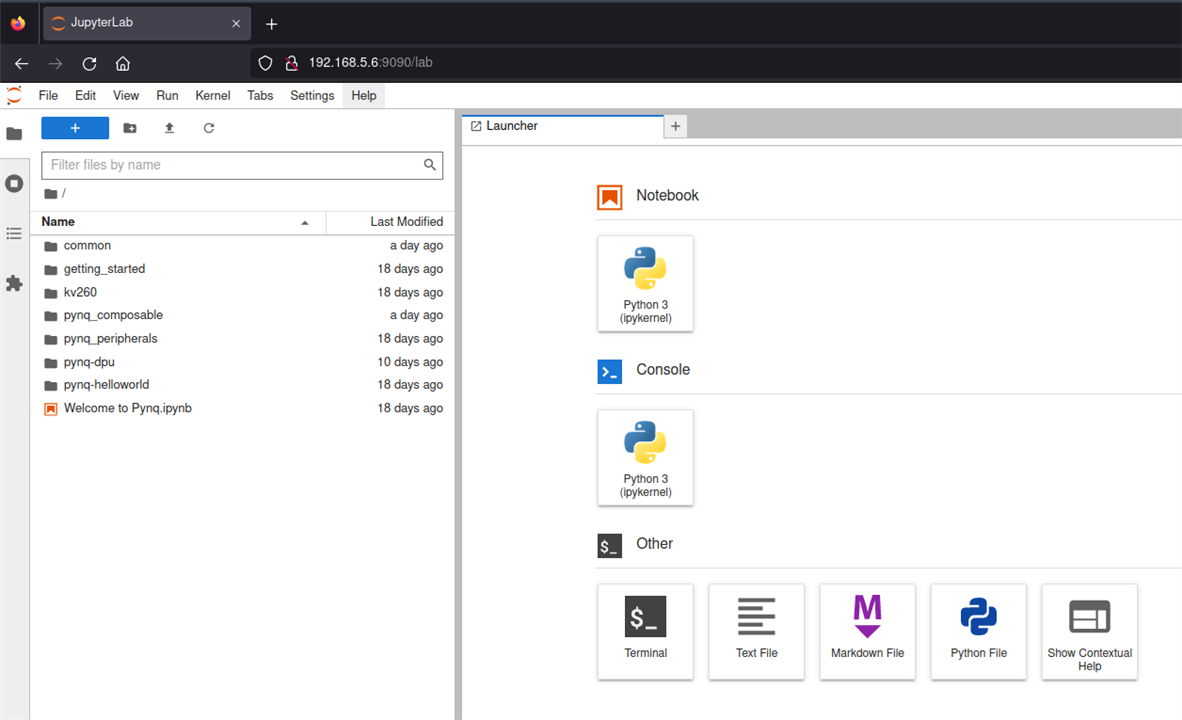
After it is installed - about 25 minutes, we can access the Jupyter Notebook using the browser
http://<kv260_IP>:9090/lab
The password is xilinx
How does this works ?
This is straight Python language syntax. I'm assuming that not all the libraries available for Python work here, but since the architecture is aarch64, what is available for it, in theory should be possible to install here.
What does not work out of the box is all the hardware. For example, the KV260 has support for the Raspberry PI CAM though a DSI cable, but PYNQ can't access it - only supports a Diligent Pcam 5C.
To be able to support that, we must used what is called Overlays.
Overlays
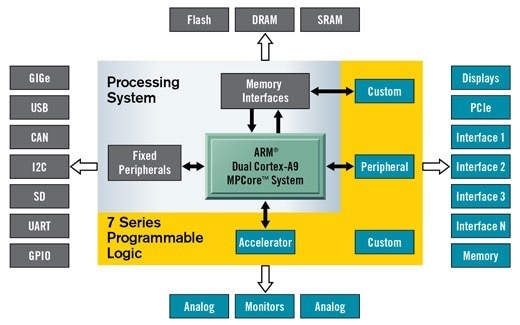
Overlays, or hardware libraries, are programmable/configurable FPGA designs that extend the user application from the Processing System to the Programmable Logic.
They can be used to accelerate a software application or customize the hardware.
They are used the same way one could use a library, by loading them dynamically, as required. If you know how to program FPGAs and work with the VITIS or VIVADO software, you can design an overlay and use it here.
Python
Although PYNQ is meant to be use with Jupyter Nootbooks, it can also be used on the command line.
We just need to access the board using ssh or the console and have a terminal.
After that, we need to activate the PYQN environment.
source /etc/profile.d/pynq_venv.sh

After this, we can use the environment and all the Python libraries associated with it.
Here's an example of opening the webcam
import cv2
import time

cap = cv2.VideoCapture(0)

if not cap.isOpened():
    print ("cannot open camera")

cap.set(cv2.CAP_PROP_FRAME_WIDTH, 640)
cap.set(cv2.CAP_PROP_FRAME_HEIGHT, 480)

cap.set(cv2.CAP_PROP_BUFFERSIZE, 1)
buf_size = cap.get(cv2.CAP_PROP_BUFFERSIZE)
print(f"Buffer size: {buf_size}")  # make sure there is no build up of frames from slow processing
prev_frame = 0
new_frame = 0
while True:
    ret, frame = cap.read()
    if not ret:
        print ("empty frame")
    font = cv2.FONT_HERSHEY_SIMPLEX
    new_frame = time.time()
    fps = 1 / (new_frame - prev_frame)
    prev_frame = new_frame
    fps = int(fps)
    #display fps
    cv2.putText(frame, str(fps), (7, 70), font, 1, (255, 0, 0), 2, cv2.LINE_AA)

    cv2.imshow("output", frame)
    if cv2.waitKey(1) & 0xFF == ord('q'):
        break
And here's the result, forwarded to my computer, using X11 forward, at 18/20 frames per second
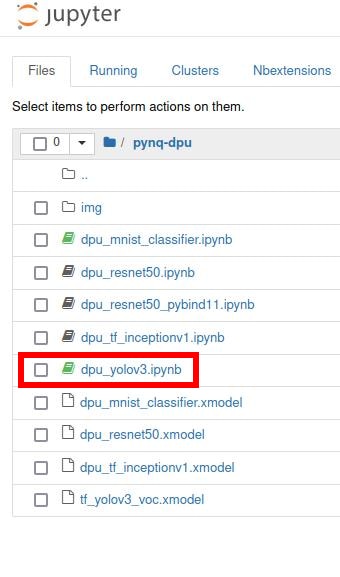
Inference
To be able to run my model I had to have it compiled and quantize in xmodel format. Unfortunately I haven't accomplished it yet.
Nonetheless, PYNQ comes with some examples for other models. For the acceleration and to use the DPU of the board, we need to use the DPU overlay.
from pynq_dpu import DpuOverlay
overlay = DpuOverlay("dpu.bit")
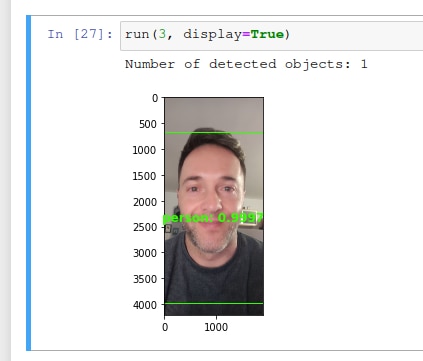
This is the dpu_yolo3 example.
This model will detect the following objects:
aeroplanebicyclebirdboatbottlebuscarcatchaircowdiningtabledoghorsemotorbikepersonpottedplantsheepsofatraintvmonitor
And here's the result wit a picture of myself.
I've created a new code (adapted from the dpu_yolov3) that will use the Webcam and run inference on the frames using the Yolov3 model above. This was the final code that I was going to do, but with my license plate model.
from pynq_dpu import DpuOverlay
import cv2
import time
import os
import time
import numpy as np
import cv2
import random
import colorsys
from matplotlib.patches import Rectangle
import matplotlib.pyplot as plt

overlay = DpuOverlay("dpu.bit")
overlay.load_model("tf_yolov3_voc.xmodel")

anchor_list = [10,13,16,30,33,23,30,61,62,45,59,119,116,90,156,198,373,326]
anchor_float = [float(x) for x in anchor_list]
anchors = np.array(anchor_float).reshape(-1, 2)

'''Get model classification information'''
def get_class(classes_path):
    with open(classes_path) as f:
        class_names = f.readlines()
    class_names = [c.strip() for c in class_names]
    return class_names

classes_path = "voc_classes.txt"
class_names = get_class(classes_path)
num_classes = len(class_names)
hsv_tuples = [(1.0 * x / num_classes, 1., 1.) for x in range(num_classes)]
colors = list(map(lambda x: colorsys.hsv_to_rgb(*x), hsv_tuples))
colors = list(map(lambda x:
                  (int(x[0] * 255), int(x[1] * 255), int(x[2] * 255)),
                  colors))
random.seed(0)
random.shuffle(colors)
random.seed(None)

'''resize image with unchanged aspect ratio using padding'''
def letterbox_image(image, size):
    ih, iw, _ = image.shape
    w, h = size
    scale = min(w/iw, h/ih)
    #print(scale)

    nw = int(iw*scale)
    nh = int(ih*scale)
    #print(nw)
    #print(nh)

    image = cv2.resize(image, (nw,nh), interpolation=cv2.INTER_LINEAR)
    new_image = np.ones((h,w,3), np.uint8) * 128
    h_start = (h-nh)//2
    w_start = (w-nw)//2
    new_image[h_start:h_start+nh, w_start:w_start+nw, :] = image
    return new_image


'''image preprocessing'''
def pre_process(image, model_image_size):
    image = image[...,::-1]
    image_h, image_w, _ = image.shape

    if model_image_size != (None, None):
        assert model_image_size[0]%32 == 0, 'Multiples of 32 required'
        assert model_image_size[1]%32 == 0, 'Multiples of 32 required'
        boxed_image = letterbox_image(image, tuple(reversed(model_image_size)))
    else:
        new_image_size = (image_w - (image_w % 32), image_h - (image_h % 32))
        boxed_image = letterbox_image(image, new_image_size)
    image_data = np.array(boxed_image, dtype='float32')
    image_data /= 255.
    image_data = np.expand_dims(image_data, 0)
    return image_data

def _get_feats(feats, anchors, num_classes, input_shape):
    num_anchors = len(anchors)
    anchors_tensor = np.reshape(np.array(anchors, dtype=np.float32), [1, 1, 1, num_anchors, 2])
    grid_size = np.shape(feats)[1:3]
    nu = num_classes + 5
    predictions = np.reshape(feats, [-1, grid_size[0], grid_size[1], num_anchors, nu])
    grid_y = np.tile(np.reshape(np.arange(grid_size[0]), [-1, 1, 1, 1]), [1, grid_size[1], 1, 1])
    grid_x = np.tile(np.reshape(np.arange(grid_size[1]), [1, -1, 1, 1]), [grid_size[0], 1, 1, 1])
    grid = np.concatenate([grid_x, grid_y], axis = -1)
    grid = np.array(grid, dtype=np.float32)

    box_xy = (1/(1+np.exp(-predictions[..., :2])) + grid) / np.array(grid_size[::-1], dtype=np.float32)
    box_wh = np.exp(predictions[..., 2:4]) * anchors_tensor / np.array(input_shape[::-1], dtype=np.float32)
    box_confidence = 1/(1+np.exp(-predictions[..., 4:5]))
    box_class_probs = 1/(1+np.exp(-predictions[..., 5:]))
    return box_xy, box_wh, box_confidence, box_class_probs


def correct_boxes(box_xy, box_wh, input_shape, image_shape):
    box_yx = box_xy[..., ::-1]
    box_hw = box_wh[..., ::-1]
    input_shape = np.array(input_shape, dtype = np.float32)
    image_shape = np.array(image_shape, dtype = np.float32)
    new_shape = np.around(image_shape * np.min(input_shape / image_shape))
    offset = (input_shape - new_shape) / 2. / input_shape
    scale = input_shape / new_shape
    box_yx = (box_yx - offset) * scale
    box_hw *= scale

    box_mins = box_yx - (box_hw / 2.)
    box_maxes = box_yx + (box_hw / 2.)
    boxes = np.concatenate([
        box_mins[..., 0:1],
        box_mins[..., 1:2],
        box_maxes[..., 0:1],
        box_maxes[..., 1:2]
    ], axis = -1)
    boxes *= np.concatenate([image_shape, image_shape], axis = -1)
    return boxes


def boxes_and_scores(feats, anchors, classes_num, input_shape, image_shape):
    box_xy, box_wh, box_confidence, box_class_probs = _get_feats(feats, anchors, classes_num, input_shape)
    boxes = correct_boxes(box_xy, box_wh, input_shape, image_shape)
    boxes = np.reshape(boxes, [-1, 4])
    box_scores = box_confidence * box_class_probs
    box_scores = np.reshape(box_scores, [-1, classes_num])
    return boxes, box_scores

'''Draw detection frame'''
def draw_bbox(image, bboxes, classes):
    """
    bboxes: [x_min, y_min, x_max, y_max, probability, cls_id] format coordinates.
    """
    num_classes = len(classes)
    image_h, image_w, _ = image.shape
    hsv_tuples = [(1.0 * x / num_classes, 1., 1.) for x in range(num_classes)]
    colors = list(map(lambda x: colorsys.hsv_to_rgb(*x), hsv_tuples))
    colors = list(map(lambda x: (int(x[0] * 255), int(x[1] * 255), int(x[2] * 255)), colors))

    random.seed(0)
    random.shuffle(colors)
    random.seed(None)

    for i, bbox in enumerate(bboxes):
        coor = np.array(bbox[:4], dtype=np.int32)
        fontScale = 0.5
        score = bbox[4]
        class_ind = int(bbox[5])
        bbox_color = colors[class_ind]
        bbox_thick = int(0.6 * (image_h + image_w) / 600)
        c1, c2 = (coor[0], coor[1]), (coor[2], coor[3])
        cv2.rectangle(image, c1, c2, bbox_color, bbox_thick)
    return image


def nms_boxes(boxes, scores):
    """Suppress non-maximal boxes.

    # Arguments
        boxes: ndarray, boxes of objects.
        scores: ndarray, scores of objects.

    # Returns
        keep: ndarray, index of effective boxes.
    """
    x1 = boxes[:, 0]
    y1 = boxes[:, 1]
    x2 = boxes[:, 2]
    y2 = boxes[:, 3]

    areas = (x2-x1+1)*(y2-y1+1)
    order = scores.argsort()[::-1]

    keep = []
    while order.size > 0:
        i = order[0]
        keep.append(i)

        xx1 = np.maximum(x1[i], x1[order[1:]])
        yy1 = np.maximum(y1[i], y1[order[1:]])
        xx2 = np.minimum(x2[i], x2[order[1:]])
        yy2 = np.minimum(y2[i], y2[order[1:]])

        w1 = np.maximum(0.0, xx2 - xx1 + 1)
        h1 = np.maximum(0.0, yy2 - yy1 + 1)
        inter = w1 * h1

        ovr = inter / (areas[i] + areas[order[1:]] - inter)
        inds = np.where(ovr <= 0.55)[0]  # threshold
        order = order[inds + 1]

    return keep

def draw_boxes(image, boxes, scores, classes):
    _, ax = plt.subplots(1)
    ax.imshow(cv2.cvtColor(image, cv2.COLOR_BGR2RGB))
    image_h, image_w, _ = image.shape

    for i, bbox in enumerate(boxes):
        [top, left, bottom, right] = bbox
        width, height = right - left, bottom - top
        center_x, center_y = left + width*0.5, top + height*0.5
        score, class_index = scores[i], classes[i]
        label = '{}: {:.4f}'.format(class_names[class_index], score)
        color = tuple([color/255 for color in colors[class_index]])
        ax.add_patch(Rectangle((left, top), width, height,
                               edgecolor=color, facecolor='none'))
        ax.annotate(label, (center_x, center_y), color=color, weight='bold',
                    fontsize=12, ha='center', va='center')
    return ax

def draw_boxes2(image, boxes, scores, classes):
    image_h, image_w, _ = image.shape

    for i, bbox in enumerate(boxes):
        [top, left, bottom, right] = bbox
        top = int(top)
        left = int (left)
        bottom = int (bottom)
        right = int (right)
        #width, height = right - left, bottom - top
        #center_x, center_y = left + width*0.5, top + height*0.5
        score, class_index = scores[i], classes[i]
        label = '{}: {:.4f}'.format(class_names[class_index], score)
        color = tuple([color/255 for color in colors[class_index]])
        # show frame
        cv2.rectangle(image, (left,top), (right,bottom), (0,255,0), 2)
        # show class
        cv2.putText(image, label, (left,top-10), font, 1, (0, 0, 255), 2, cv2.LINE_AA)

    return image

def evaluate(yolo_outputs, image_shape, class_names, anchors):
    score_thresh = 0.2
    anchor_mask = [[6, 7, 8], [3, 4, 5], [0, 1, 2]]
    boxes = []
    box_scores = []
    input_shape = np.shape(yolo_outputs[0])[1 : 3]
    input_shape = np.array(input_shape)*32

    for i in range(len(yolo_outputs)):
        _boxes, _box_scores = boxes_and_scores(
            yolo_outputs[i], anchors[anchor_mask[i]], len(class_names),
            input_shape, image_shape)
        boxes.append(_boxes)
        box_scores.append(_box_scores)
    boxes = np.concatenate(boxes, axis = 0)
    box_scores = np.concatenate(box_scores, axis = 0)

    mask = box_scores >= score_thresh
    boxes_ = []
    scores_ = []
    classes_ = []
    for c in range(len(class_names)):
        class_boxes_np = boxes[mask[:, c]]
        class_box_scores_np = box_scores[:, c]
        class_box_scores_np = class_box_scores_np[mask[:, c]]
        nms_index_np = nms_boxes(class_boxes_np, class_box_scores_np)
        class_boxes_np = class_boxes_np[nms_index_np]
        class_box_scores_np = class_box_scores_np[nms_index_np]
        classes_np = np.ones_like(class_box_scores_np, dtype = np.int32) * c
        boxes_.append(class_boxes_np)
        scores_.append(class_box_scores_np)
        classes_.append(classes_np)
    boxes_ = np.concatenate(boxes_, axis = 0)
    scores_ = np.concatenate(scores_, axis = 0)
    classes_ = np.concatenate(classes_, axis = 0)

    return boxes_, scores_, classes_

dpu = overlay.runner
inputTensors = dpu.get_input_tensors()
outputTensors = dpu.get_output_tensors()

shapeIn = tuple(inputTensors[0].dims)
shapeOut0 = (tuple(outputTensors[0].dims)) # (1, 13, 13, 75)
shapeOut1 = (tuple(outputTensors[1].dims)) # (1, 26, 26, 75)
shapeOut2 = (tuple(outputTensors[2].dims)) # (1, 52, 52, 75)
outputSize0 = int(outputTensors[0].get_data_size() / shapeIn[0]) # 12675
outputSize1 = int(outputTensors[1].get_data_size() / shapeIn[0]) # 50700
outputSize2 = int(outputTensors[2].get_data_size() / shapeIn[0]) # 202800

input_data = [np.empty(shapeIn, dtype=np.float32, order="C")]
output_data = [np.empty(shapeOut0, dtype=np.float32, order="C"),
               np.empty(shapeOut1, dtype=np.float32, order="C"),
               np.empty(shapeOut2, dtype=np.float32, order="C")]
image = input_data[0]

def run(frame):
    # Read input image

    # Pre-processing
    image_size = frame.shape[:2]
    image_data = np.array(pre_process(frame, (416, 416)), dtype=np.float32)
    #print (image_data)
    #print (shapeIn)
    #print (shapeIn[1:])

    # Fetch data to DPU and trigger it
    image[0,...] = image_data.reshape(shapeIn[1:])
    job_id = dpu.execute_async(input_data, output_data)
    dpu.wait(job_id)

    # Retrieve output data
    conv_out0 = np.reshape(output_data[0], shapeOut0)
    conv_out1 = np.reshape(output_data[1], shapeOut1)
    conv_out2 = np.reshape(output_data[2], shapeOut2)
    yolo_outputs = [conv_out0, conv_out1, conv_out2]

    # Decode output from YOLOv3
    boxes, scores, classes = evaluate(yolo_outputs, image_size, class_names, anchors)

    #new_image = draw_boxes2(frame, boxes, scores, classes)
    draw_boxes2(frame, boxes, scores, classes)
    #print (f"Number of detected objects: {len(boxes)}")
    #print (f"Class: {(classes)}")
    #print (f"boxes: {(boxes)}")


#cap = cv2.VideoCapture(0 + cv2.CAP_V4L2)
cap = cv2.VideoCapture(0)
#cv2.namedWindow("output", cv2.WINDOW_NORMAL)

if not cap.isOpened():
    print ("cannot open camera")

# setup proper backend and codec to allow for 1920x1080 frames
#fourcc = cv2.VideoWriter_fourcc(*'MJPG')
#cap.set(cv2.CAP_PROP_FOURCC, fourcc)

cap.set(cv2.CAP_PROP_FRAME_WIDTH, 640)
cap.set(cv2.CAP_PROP_FRAME_HEIGHT, 480)

cap.set(cv2.CAP_PROP_BUFFERSIZE, 1)
buf_size = cap.get(cv2.CAP_PROP_BUFFERSIZE)
prev_frame = 0
new_frame = 0
font = cv2.FONT_HERSHEY_SIMPLEX
while True:
    ret, frame = cap.read()
    if not ret:
        print ("empty frame")
    new_frame = time.time()
    fps = 1 / (new_frame - prev_frame)
    prev_frame = new_frame
    fps = int(fps)
    #display fps
    cv2.putText(frame, str(fps), (7, 70), font, 1, (255, 0, 0), 2, cv2.LINE_AA)
    run(frame)
    cv2.imshow("output", frame)
    if cv2.waitKey(1) & 0xFF == ord('q'):
        break


cv2.destroyAllWindows()
cap.release()
del overlay
del dpu
Here's two examples of the code, running inference from the webcam and detecting objects.
One using a SSH tunnel to my computer.
The other is running on the Ubuntu desktop.
The downside of this approach - running from the CLI - is that we need to be root to run the script. To use the dpu overlay, we need to be root - at least on the CLI.
Remote SSH tunnel (5 frames per second).
KRIA KV260 Ubuntu Desktop
To be able to run the script, I had to login as root - and to do that, I had to enable the root login though GDM
I'm surprised with the terrible performance. I was expecting this to run at a much higher frame rate.
I'm going to try it to run using the DisplayPort output and see if it runs much faster.
Here's the code to send the images to the DisplayPort:
from pynq_dpu import DpuOverlay
from pynq.lib.video import *
import cv2
import time
import os
import time
import numpy as np
import cv2
import random
import colorsys
from matplotlib.patches import Rectangle
import matplotlib.pyplot as plt

overlay = DpuOverlay("dpu.bit")
overlay.load_model("tf_yolov3_voc.xmodel")

#display port
displayport = DisplayPort()
displayport.configure(VideoMode(640,480,24), PIXEL_RGB)

anchor_list = [10,13,16,30,33,23,30,61,62,45,59,119,116,90,156,198,373,326]
anchor_float = [float(x) for x in anchor_list]
anchors = np.array(anchor_float).reshape(-1, 2)

'''Get model classification information'''
def get_class(classes_path):
    with open(classes_path) as f:
        class_names = f.readlines()
    class_names = [c.strip() for c in class_names]
    return class_names

classes_path = "voc_classes.txt"
class_names = get_class(classes_path)
num_classes = len(class_names)
hsv_tuples = [(1.0 * x / num_classes, 1., 1.) for x in range(num_classes)]
colors = list(map(lambda x: colorsys.hsv_to_rgb(*x), hsv_tuples))
colors = list(map(lambda x:
                  (int(x[0] * 255), int(x[1] * 255), int(x[2] * 255)),
                  colors))
random.seed(0)
random.shuffle(colors)
random.seed(None)

'''resize image with unchanged aspect ratio using padding'''
def letterbox_image(image, size):
    ih, iw, _ = image.shape
    w, h = size
    scale = min(w/iw, h/ih)
    #print(scale)

    nw = int(iw*scale)
    nh = int(ih*scale)
    #print(nw)
    #print(nh)

    image = cv2.resize(image, (nw,nh), interpolation=cv2.INTER_LINEAR)
    new_image = np.ones((h,w,3), np.uint8) * 128
    h_start = (h-nh)//2
    w_start = (w-nw)//2
    new_image[h_start:h_start+nh, w_start:w_start+nw, :] = image
    return new_image


'''image preprocessing'''
def pre_process(image, model_image_size):
    image = image[...,::-1]
    image_h, image_w, _ = image.shape

    if model_image_size != (None, None):
        assert model_image_size[0]%32 == 0, 'Multiples of 32 required'
        assert model_image_size[1]%32 == 0, 'Multiples of 32 required'
        boxed_image = letterbox_image(image, tuple(reversed(model_image_size)))
    else:
        new_image_size = (image_w - (image_w % 32), image_h - (image_h % 32))
        boxed_image = letterbox_image(image, new_image_size)
    image_data = np.array(boxed_image, dtype='float32')
    image_data /= 255.
    image_data = np.expand_dims(image_data, 0)
    return image_data

def _get_feats(feats, anchors, num_classes, input_shape):
    num_anchors = len(anchors)
    anchors_tensor = np.reshape(np.array(anchors, dtype=np.float32), [1, 1, 1, num_anchors, 2])
    grid_size = np.shape(feats)[1:3]
    nu = num_classes + 5
    predictions = np.reshape(feats, [-1, grid_size[0], grid_size[1], num_anchors, nu])
    grid_y = np.tile(np.reshape(np.arange(grid_size[0]), [-1, 1, 1, 1]), [1, grid_size[1], 1, 1])
    grid_x = np.tile(np.reshape(np.arange(grid_size[1]), [1, -1, 1, 1]), [grid_size[0], 1, 1, 1])
    grid = np.concatenate([grid_x, grid_y], axis = -1)
    grid = np.array(grid, dtype=np.float32)

    box_xy = (1/(1+np.exp(-predictions[..., :2])) + grid) / np.array(grid_size[::-1], dtype=np.float32)
    box_wh = np.exp(predictions[..., 2:4]) * anchors_tensor / np.array(input_shape[::-1], dtype=np.float32)
    box_confidence = 1/(1+np.exp(-predictions[..., 4:5]))
    box_class_probs = 1/(1+np.exp(-predictions[..., 5:]))
    return box_xy, box_wh, box_confidence, box_class_probs


def correct_boxes(box_xy, box_wh, input_shape, image_shape):
    box_yx = box_xy[..., ::-1]
    box_hw = box_wh[..., ::-1]
    input_shape = np.array(input_shape, dtype = np.float32)
    image_shape = np.array(image_shape, dtype = np.float32)
    new_shape = np.around(image_shape * np.min(input_shape / image_shape))
    offset = (input_shape - new_shape) / 2. / input_shape
    scale = input_shape / new_shape
    box_yx = (box_yx - offset) * scale
    box_hw *= scale

    box_mins = box_yx - (box_hw / 2.)
    box_maxes = box_yx + (box_hw / 2.)
    boxes = np.concatenate([
        box_mins[..., 0:1],
        box_mins[..., 1:2],
        box_maxes[..., 0:1],
        box_maxes[..., 1:2]
    ], axis = -1)
    boxes *= np.concatenate([image_shape, image_shape], axis = -1)
    return boxes


def boxes_and_scores(feats, anchors, classes_num, input_shape, image_shape):
    box_xy, box_wh, box_confidence, box_class_probs = _get_feats(feats, anchors, classes_num, input_shape)
    boxes = correct_boxes(box_xy, box_wh, input_shape, image_shape)
    boxes = np.reshape(boxes, [-1, 4])
    box_scores = box_confidence * box_class_probs
    box_scores = np.reshape(box_scores, [-1, classes_num])
    return boxes, box_scores

'''Draw detection frame'''
def draw_bbox(image, bboxes, classes):
    """
    bboxes: [x_min, y_min, x_max, y_max, probability, cls_id] format coordinates.
    """
    num_classes = len(classes)
    image_h, image_w, _ = image.shape
    hsv_tuples = [(1.0 * x / num_classes, 1., 1.) for x in range(num_classes)]
    colors = list(map(lambda x: colorsys.hsv_to_rgb(*x), hsv_tuples))
    colors = list(map(lambda x: (int(x[0] * 255), int(x[1] * 255), int(x[2] * 255)), colors))

    random.seed(0)
    random.shuffle(colors)
    random.seed(None)

    for i, bbox in enumerate(bboxes):
        coor = np.array(bbox[:4], dtype=np.int32)
        fontScale = 0.5
        score = bbox[4]
        class_ind = int(bbox[5])
        bbox_color = colors[class_ind]
        bbox_thick = int(0.6 * (image_h + image_w) / 600)
        c1, c2 = (coor[0], coor[1]), (coor[2], coor[3])
        cv2.rectangle(image, c1, c2, bbox_color, bbox_thick)
    return image


def nms_boxes(boxes, scores):
    """Suppress non-maximal boxes.

    # Arguments
        boxes: ndarray, boxes of objects.
        scores: ndarray, scores of objects.

    # Returns
        keep: ndarray, index of effective boxes.
    """
    x1 = boxes[:, 0]
    y1 = boxes[:, 1]
    x2 = boxes[:, 2]
    y2 = boxes[:, 3]

    areas = (x2-x1+1)*(y2-y1+1)
    order = scores.argsort()[::-1]

    keep = []
    while order.size > 0:
        i = order[0]
        keep.append(i)

        xx1 = np.maximum(x1[i], x1[order[1:]])
        yy1 = np.maximum(y1[i], y1[order[1:]])
        xx2 = np.minimum(x2[i], x2[order[1:]])
        yy2 = np.minimum(y2[i], y2[order[1:]])

        w1 = np.maximum(0.0, xx2 - xx1 + 1)
        h1 = np.maximum(0.0, yy2 - yy1 + 1)
        inter = w1 * h1

        ovr = inter / (areas[i] + areas[order[1:]] - inter)
        inds = np.where(ovr <= 0.55)[0]  # threshold
        order = order[inds + 1]

    return keep

def draw_boxes(image, boxes, scores, classes):
    _, ax = plt.subplots(1)
    ax.imshow(cv2.cvtColor(image, cv2.COLOR_BGR2RGB))
    image_h, image_w, _ = image.shape

    for i, bbox in enumerate(boxes):
        [top, left, bottom, right] = bbox
        width, height = right - left, bottom - top
        center_x, center_y = left + width*0.5, top + height*0.5
        score, class_index = scores[i], classes[i]
        label = '{}: {:.4f}'.format(class_names[class_index], score)
        color = tuple([color/255 for color in colors[class_index]])
        ax.add_patch(Rectangle((left, top), width, height,
                               edgecolor=color, facecolor='none'))
        ax.annotate(label, (center_x, center_y), color=color, weight='bold',
                    fontsize=12, ha='center', va='center')
    return ax

def draw_boxes2(image, boxes, scores, classes):
    image_h, image_w, _ = image.shape

    for i, bbox in enumerate(boxes):
        [top, left, bottom, right] = bbox
        top = int(top)
        left = int (left)
        bottom = int (bottom)
        right = int (right)
        #width, height = right - left, bottom - top
        #center_x, center_y = left + width*0.5, top + height*0.5
        score, class_index = scores[i], classes[i]
        label = '{}: {:.4f}'.format(class_names[class_index], score)
        color = tuple([color/255 for color in colors[class_index]])
        # show frame
        cv2.rectangle(image, (left,top), (right,bottom), (0,255,0), 2)
        # show class
        cv2.putText(image, label, (left,top-10), font, 1, (0, 0, 255), 2, cv2.LINE_AA)

    return image

def evaluate(yolo_outputs, image_shape, class_names, anchors):
    score_thresh = 0.2
    anchor_mask = [[6, 7, 8], [3, 4, 5], [0, 1, 2]]
    boxes = []
    box_scores = []
    input_shape = np.shape(yolo_outputs[0])[1 : 3]
    input_shape = np.array(input_shape)*32

    for i in range(len(yolo_outputs)):
        _boxes, _box_scores = boxes_and_scores(
            yolo_outputs[i], anchors[anchor_mask[i]], len(class_names),
            input_shape, image_shape)
        boxes.append(_boxes)
        box_scores.append(_box_scores)
    boxes = np.concatenate(boxes, axis = 0)
    box_scores = np.concatenate(box_scores, axis = 0)

    mask = box_scores >= score_thresh
    boxes_ = []
    scores_ = []
    classes_ = []
    for c in range(len(class_names)):
        class_boxes_np = boxes[mask[:, c]]
        class_box_scores_np = box_scores[:, c]
        class_box_scores_np = class_box_scores_np[mask[:, c]]
        nms_index_np = nms_boxes(class_boxes_np, class_box_scores_np)
        class_boxes_np = class_boxes_np[nms_index_np]
        class_box_scores_np = class_box_scores_np[nms_index_np]
        classes_np = np.ones_like(class_box_scores_np, dtype = np.int32) * c
        boxes_.append(class_boxes_np)
        scores_.append(class_box_scores_np)
        classes_.append(classes_np)
    boxes_ = np.concatenate(boxes_, axis = 0)
    scores_ = np.concatenate(scores_, axis = 0)
    classes_ = np.concatenate(classes_, axis = 0)

    return boxes_, scores_, classes_

dpu = overlay.runner
inputTensors = dpu.get_input_tensors()
outputTensors = dpu.get_output_tensors()

shapeIn = tuple(inputTensors[0].dims)
shapeOut0 = (tuple(outputTensors[0].dims)) # (1, 13, 13, 75)
shapeOut1 = (tuple(outputTensors[1].dims)) # (1, 26, 26, 75)
shapeOut2 = (tuple(outputTensors[2].dims)) # (1, 52, 52, 75)
outputSize0 = int(outputTensors[0].get_data_size() / shapeIn[0]) # 12675
outputSize1 = int(outputTensors[1].get_data_size() / shapeIn[0]) # 50700
outputSize2 = int(outputTensors[2].get_data_size() / shapeIn[0]) # 202800

input_data = [np.empty(shapeIn, dtype=np.float32, order="C")]
output_data = [np.empty(shapeOut0, dtype=np.float32, order="C"),
               np.empty(shapeOut1, dtype=np.float32, order="C"),
               np.empty(shapeOut2, dtype=np.float32, order="C")]
image = input_data[0]

def run(frame):
    # Read input image

    # Pre-processing
    image_size = frame.shape[:2]
    image_data = np.array(pre_process(frame, (416, 416)), dtype=np.float32)
    #print (image_data)
    #print (shapeIn)
    #print (shapeIn[1:])

    # Fetch data to DPU and trigger it
    image[0,...] = image_data.reshape(shapeIn[1:])
    job_id = dpu.execute_async(input_data, output_data)
    dpu.wait(job_id)

    # Retrieve output data
    conv_out0 = np.reshape(output_data[0], shapeOut0)
    conv_out1 = np.reshape(output_data[1], shapeOut1)
    conv_out2 = np.reshape(output_data[2], shapeOut2)
    yolo_outputs = [conv_out0, conv_out1, conv_out2]

    # Decode output from YOLOv3
    boxes, scores, classes = evaluate(yolo_outputs, image_size, class_names, anchors)

    #new_image = draw_boxes2(frame, boxes, scores, classes)
    draw_boxes2(frame, boxes, scores, classes)
    #print (f"Number of detected objects: {len(boxes)}")
    #print (f"Class: {(classes)}")
    #print (f"boxes: {(boxes)}")


#cap = cv2.VideoCapture(0 + cv2.CAP_V4L2)
cap = cv2.VideoCapture(0)
#cv2.namedWindow("output", cv2.WINDOW_NORMAL)

if not cap.isOpened():
    print ("cannot open camera")

# setup proper backend and codec to allow for 1920x1080 frames
#fourcc = cv2.VideoWriter_fourcc(*'MJPG')
#cap.set(cv2.CAP_PROP_FOURCC, fourcc)

cap.set(cv2.CAP_PROP_FRAME_WIDTH, 640)
cap.set(cv2.CAP_PROP_FRAME_HEIGHT, 480)

cap.set(cv2.CAP_PROP_BUFFERSIZE, 1)
buf_size = cap.get(cv2.CAP_PROP_BUFFERSIZE)
prev_frame = 0
new_frame = 0
font = cv2.FONT_HERSHEY_SIMPLEX
while True:
    try:
        #ret, frame = cap.read()
        #if not ret:
        #    print ("empty frame")
        frame = displayport.newframe()
        cap.read(frame)

        new_frame = time.time()
        fps = 1 / (new_frame - prev_frame)
        prev_frame = new_frame
        fps = int(fps)
        #display fps
        cv2.putText(frame, str(fps), (7, 70), font, 1, (255, 0, 0), 2, cv2.LINE_AA)
        run(frame)
        #cv2.imshow("output", frame)
        displayport.writeframe(frame)
    except KeyboardInterrupt:
        cv2.destroyAllWindows()
        cap.release()
        displayport.close()
        del overlay
        del dpu
        break
And here's the video:
I really don't understand what's happening. I was hoping for a better performance. It's natural that, decreasing the resolution, the frames are faster. Probably to detect license plates, I'm sure a lower resolution than 640x480 will be enough.
And here it is, how to use Python with the Xilinx Kria KV260 .
Fun fact: Every time the dpu overlay was loaded, the SOM module fan started running like crazy.
References
https://github.com/Xilinx/DPU-PYNQ