element14 Community
element14 Community
    Register Log In
  • Site
  • Search
  • Log In Register
  • Community Hub
    Community Hub
    • What's New on element14
    • Feedback and Support
    • Benefits of Membership
    • Personal Blogs
    • Members Area
    • Achievement Levels
  • Learn
    Learn
    • Ask an Expert
    • eBooks
    • element14 presents
    • Learning Center
    • Tech Spotlight
    • STEM Academy
    • Webinars, Training and Events
    • Learning Groups
  • Technologies
    Technologies
    • 3D Printing
    • FPGA
    • Industrial Automation
    • Internet of Things
    • Power & Energy
    • Sensors
    • Technology Groups
  • Challenges & Projects
    Challenges & Projects
    • Design Challenges
    • element14 presents Projects
    • Project14
    • Arduino Projects
    • Raspberry Pi Projects
    • Project Groups
  • Products
    Products
    • Arduino
    • Avnet Boards Community
    • Dev Tools
    • Manufacturers
    • Multicomp Pro
    • Product Groups
    • Raspberry Pi
    • RoadTests & Reviews
  • Store
    Store
    • Visit Your Store
    • Choose another store...
      • Europe
      •  Austria (German)
      •  Belgium (Dutch, French)
      •  Bulgaria (Bulgarian)
      •  Czech Republic (Czech)
      •  Denmark (Danish)
      •  Estonia (Estonian)
      •  Finland (Finnish)
      •  France (French)
      •  Germany (German)
      •  Hungary (Hungarian)
      •  Ireland
      •  Israel
      •  Italy (Italian)
      •  Latvia (Latvian)
      •  
      •  Lithuania (Lithuanian)
      •  Netherlands (Dutch)
      •  Norway (Norwegian)
      •  Poland (Polish)
      •  Portugal (Portuguese)
      •  Romania (Romanian)
      •  Russia (Russian)
      •  Slovakia (Slovak)
      •  Slovenia (Slovenian)
      •  Spain (Spanish)
      •  Sweden (Swedish)
      •  Switzerland(German, French)
      •  Turkey (Turkish)
      •  United Kingdom
      • Asia Pacific
      •  Australia
      •  China
      •  Hong Kong
      •  India
      •  Korea (Korean)
      •  Malaysia
      •  New Zealand
      •  Philippines
      •  Singapore
      •  Taiwan
      •  Thailand (Thai)
      • Americas
      •  Brazil (Portuguese)
      •  Canada
      •  Mexico (Spanish)
      •  United States
      Can't find the country/region you're looking for? Visit our export site or find a local distributor.
  • Translate
  • Profile
  • Settings
Embedded and Microcontrollers
  • Technologies
  • More
Embedded and Microcontrollers
Blog PSoC6: Low Power Management - prepare the board for current measurements
  • Blog
  • Forum
  • Documents
  • Quiz
  • Polls
  • Files
  • Members
  • Mentions
  • Sub-Groups
  • Tags
  • More
  • Cancel
  • New
Join Embedded and Microcontrollers to participate - click to join for free!
  • Share
  • More
  • Cancel
Group Actions
  • Group RSS
  • More
  • Cancel
Engagement
  • Author Author: Jan Cumps
  • Date Created: 19 Feb 2021 4:21 PM Date Created
  • Views 1841 views
  • Likes 8 likes
  • Comments 5 comments
  • low_power
  • psoc6
Related
Recommended

PSoC6: Low Power Management - prepare the board for current measurements

Jan Cumps
Jan Cumps
19 Feb 2021

When you're making a low power design, it's interesting to know the energy use of your gizmo.

I'm working on PSoC6 projects, and I'm going to calculate its energy profile.

I'll need to measure the current used by the SoC, and that requires a mod of the proto kit.

image


The PSoC6 has several sleep modes. Depending on the one that's active, parts of the controller are switched off:

  • Normal state
  • Low Power mode
  • Low Power state
  • Ultra Low Power mode
  • MCU Active
  • CPU Active
  • MCU Sleep
  • CPU Sleep


Keeping the power low is tricky. It's hard to assess how much time the device spends in different modes by looking at the code.

And you can't use a debugger to check it. Most power modes are not available when in debug mode.


A solution is to measure the SoC's current consumption. The voltage is known and constant. If you log the current use over time, you know the energy profile.

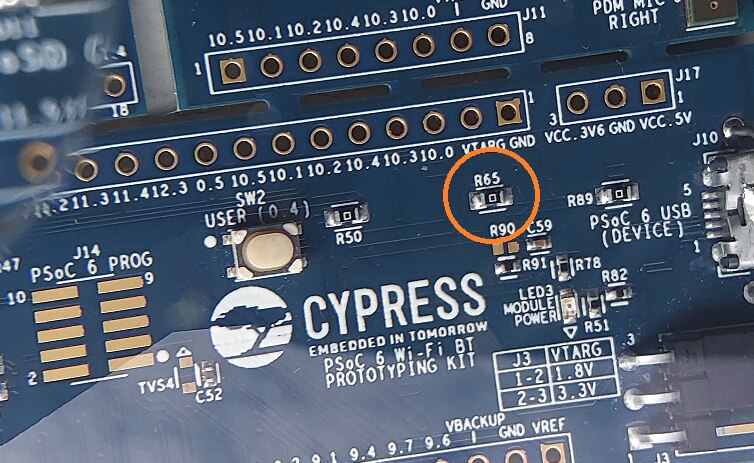
Cypress provides a solution for current measurement on the PSoC6 prototyping kit.

image

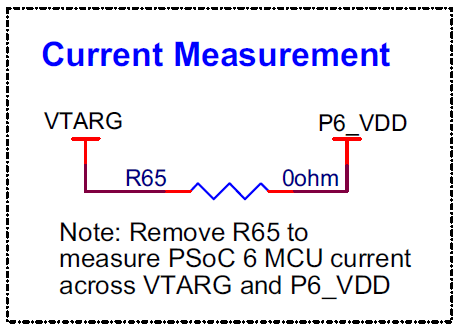
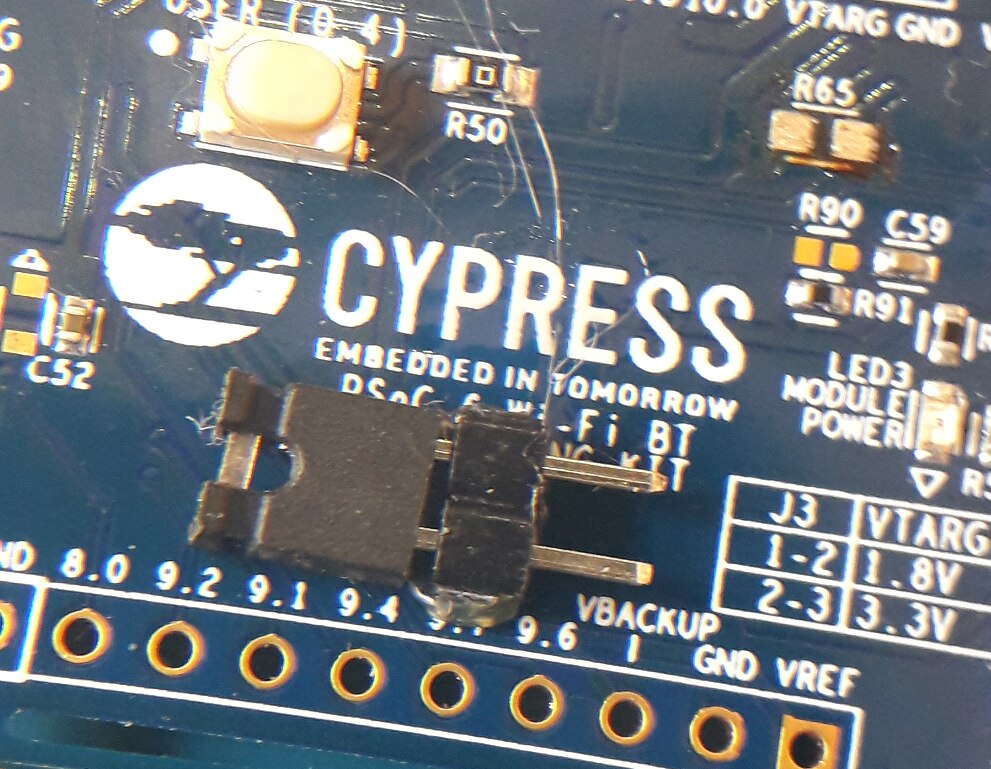
If you remove R65, a 0 Ohm resistor, you can put a DC current meter  in its place.

You can then log the measurements and analyse them.


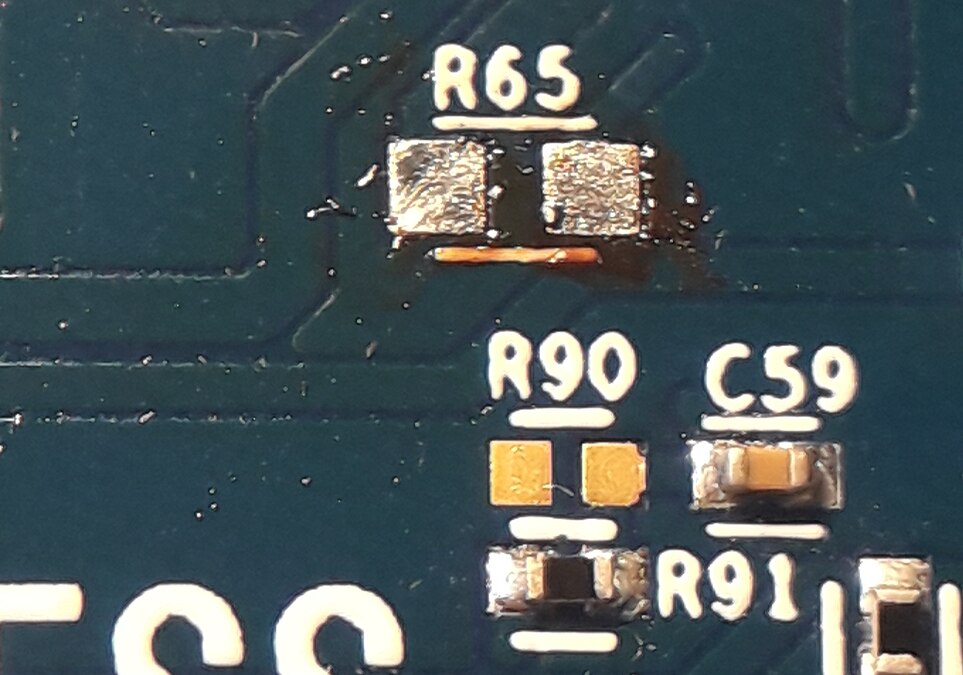
R65 is easy to remove. There are no sensitive components near it. I used a hot air pencil.

In case you want to put it back later, tape it for safekeeping in the inside of the kit's box.

image

Here is the result after wicking remaining solder from the pads.

image


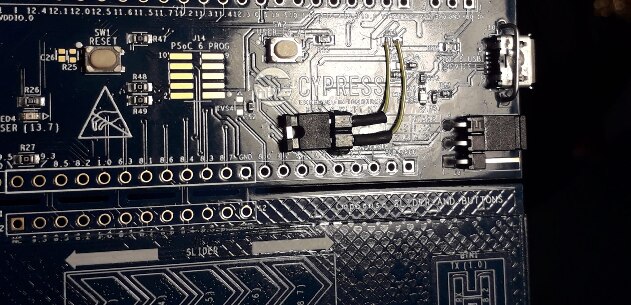
I want to have a replacement that makes it easy to put a meter in the circuit. Also to make it easy to bypass if I'm not measuring.

I'm using a male pcb header for that. When not measuring, I can put a jumper on it. When measuring, I can make a little cable with female pcb headers.

image

I used a tiny drop of hot glue to fix the header on the pcb. I glued it without the jumper in place to avoid that it gets stuck there.

Then I soldered two thin wires from header pins to the pads of R65. A little crimp sleeve isolates the 2 pins.

image

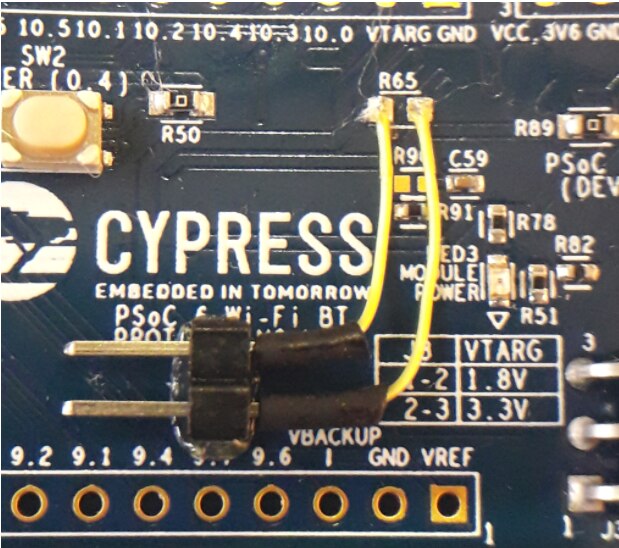
That's it. The board is now ready for energy profiling.


PSoC 6 series
Create a Project with its own Board- and Module configurations
Low Power Management - prepare the board for current measurements
Power consumption without WiFi or Bluetooth
Create a FreeRTOS 10.3 Project
UART receiver with FreeRTOS
FreeRTOS message queue
UART receiver with FreeRTOS - Deep Sleep support
  • Sign in to reply

Top Comments

  • Jan Cumps
    Jan Cumps over 4 years ago in reply to Jan Cumps +4
    Here is the result of running the power modes example. Ignore the red overflows. They are pull resistor current during button clicks. You see 10 green lines. They translate to these 10 steps: After programming…
  • Jan Cumps
    Jan Cumps over 4 years ago +3
    Preview of current measurements: The peaks in the measurements are button presses. I measure between 12 mA with the controller full on, and 20 µA in deep sleep. I haven't turned WiFi or BT on.
  • DAB
    DAB over 4 years ago +2
    Good start Jan. DAB
  • Jan Cumps
    Jan Cumps over 4 years ago

    Analysis of the measurements: PSoC 6: Low Power Management - Power consumption without WiFi or Bluetooth

    • Cancel
    • Vote Up +1 Vote Down
    • Sign in to reply
    • More
    • Cancel
  • Jan Cumps
    Jan Cumps over 4 years ago in reply to Jan Cumps

    When running the AWS example. This uses WiFi.


    image

    The first block establishes the WiFi connection. The 2nd and 3rd the AWS MQTT connection. Then a number of data exchanges.

    • Cancel
    • Vote Up +2 Vote Down
    • Sign in to reply
    • More
    • Cancel
  • Jan Cumps
    Jan Cumps over 4 years ago in reply to Jan Cumps

    Here is the result of running the power modes example. Ignore the red overflows. They are pull resistor current during button clicks.

    image

    You see 10 green lines. They translate to these 10 steps:

    1. After programming, the application starts automatically. Confirm that kit LED blinks at 5 Hz (approximately). Take note of the current consumption. The device is in Normal Power / MCU Active state at this moment.
    2. Press the kit button for approximately one second and release it. Observe that the LED is ON and fully bright. Confirm that the current consumption drops a few hundreds of microamperes. The device is in Normal Power/MCU Sleep state at this moment.
    3. Quickly press the kit button to return to Normal Power/MCU Active state. Observe that the LED blinks quickly again.
    4. Press the kit button for at least two seconds and release it. Observe that the LED is OFF and that the current consumption has dropped to a few microamperes. The device is in Deep Sleep state at this moment.
    5. Quickly press the kit button to return to Normal Power state. Observe that the LED blinks quickly and that the current consumption has increased to the same level measured before.
    6. Quickly press the kit button again to enter Low Power state. Observe that the LED blinks slowly and that the current consumption has dropped significantly when compared to Normal Power state. You can quickly press the kit button to switch between the two modes.
    7. Keep the device in Low Power state and press the kit button for approximately one second and release it. Observe that the LED dims and that the current consumption has dropped a few hundred microamperes. The device is in the Low Power / MCU Sleep state at this moment.
    8. Quickly press the kit button to return to the Low Power/MCU Active state. Observe that the is blinking slowly again.
    9. Press the kit button for at least two seconds and release it. Observe that the LED is OFF and that the current consumption has dropped to a few microamperes. The device is in deep sleep state at this moment.
    10. Quickly press the user button and return to the Low Power/MCU Active state. Observe that the LED blinks slowly again and that the current consumption has increased to the same level measured before.

    image

    • Cancel
    • Vote Up +4 Vote Down
    • Sign in to reply
    • More
    • Cancel
  • Jan Cumps
    Jan Cumps over 4 years ago

    Preview of current measurements:

    image

    The peaks in the measurements are button presses.

    I measure between 12 mA with the controller full on, and 20 µA in deep sleep.

    I haven't turned WiFi or BT on.

    • Cancel
    • Vote Up +3 Vote Down
    • Sign in to reply
    • More
    • Cancel
  • DAB
    DAB over 4 years ago

    Good start Jan.


    DAB

    • Cancel
    • Vote Up +2 Vote Down
    • Sign in to reply
    • More
    • Cancel
element14 Community

element14 is the first online community specifically for engineers. Connect with your peers and get expert answers to your questions.

  • Members
  • Learn
  • Technologies
  • Challenges & Projects
  • Products
  • Store
  • About Us
  • Feedback & Support
  • FAQs
  • Terms of Use
  • Privacy Policy
  • Legal and Copyright Notices
  • Sitemap
  • Cookies

An Avnet Company © 2025 Premier Farnell Limited. All Rights Reserved.

Premier Farnell Ltd, registered in England and Wales (no 00876412), registered office: Farnell House, Forge Lane, Leeds LS12 2NE.

ICP 备案号 10220084.

Follow element14

  • X
  • Facebook
  • linkedin
  • YouTube