element14 Community
element14 Community
    Register Log In
  • Site
  • Search
  • Log In Register
  • Community Hub
    Community Hub
    • What's New on element14
    • Feedback and Support
    • Benefits of Membership
    • Personal Blogs
    • Members Area
    • Achievement Levels
  • Learn
    Learn
    • Ask an Expert
    • eBooks
    • element14 presents
    • Learning Center
    • Tech Spotlight
    • STEM Academy
    • Webinars, Training and Events
    • Learning Groups
  • Technologies
    Technologies
    • 3D Printing
    • FPGA
    • Industrial Automation
    • Internet of Things
    • Power & Energy
    • Sensors
    • Technology Groups
  • Challenges & Projects
    Challenges & Projects
    • Design Challenges
    • element14 presents Projects
    • Project14
    • Arduino Projects
    • Raspberry Pi Projects
    • Project Groups
  • Products
    Products
    • Arduino
    • Avnet & Tria Boards Community
    • Dev Tools
    • Manufacturers
    • Multicomp Pro
    • Product Groups
    • Raspberry Pi
    • RoadTests & Reviews
  • About Us
    About the element14 Community
  • Store
    Store
    • Visit Your Store
    • Choose another store...
      • Europe
      •  Austria (German)
      •  Belgium (Dutch, French)
      •  Bulgaria (Bulgarian)
      •  Czech Republic (Czech)
      •  Denmark (Danish)
      •  Estonia (Estonian)
      •  Finland (Finnish)
      •  France (French)
      •  Germany (German)
      •  Hungary (Hungarian)
      •  Ireland
      •  Israel
      •  Italy (Italian)
      •  Latvia (Latvian)
      •  
      •  Lithuania (Lithuanian)
      •  Netherlands (Dutch)
      •  Norway (Norwegian)
      •  Poland (Polish)
      •  Portugal (Portuguese)
      •  Romania (Romanian)
      •  Russia (Russian)
      •  Slovakia (Slovak)
      •  Slovenia (Slovenian)
      •  Spain (Spanish)
      •  Sweden (Swedish)
      •  Switzerland(German, French)
      •  Turkey (Turkish)
      •  United Kingdom
      • Asia Pacific
      •  Australia
      •  China
      •  Hong Kong
      •  India
      •  Japan
      •  Korea (Korean)
      •  Malaysia
      •  New Zealand
      •  Philippines
      •  Singapore
      •  Taiwan
      •  Thailand (Thai)
      •  Vietnam
      • Americas
      •  Brazil (Portuguese)
      •  Canada
      •  Mexico (Spanish)
      •  United States
      Can't find the country/region you're looking for? Visit our export site or find a local distributor.
  • Translate
  • Profile
  • Settings
Experts, Learning and Guidance
  • Technologies
  • More
Experts, Learning and Guidance
Ask an Expert Forum Why is the Schottky diode being used in control circuit?
  • Blog
  • Forum
  • Documents
  • Leaderboard
  • Files
  • Members
  • Mentions
  • Sub-Groups
  • Tags
  • More
  • Cancel
  • New
Join Experts, Learning and Guidance to participate - click to join for free!
Actions
  • Share
  • More
  • Cancel
Forum Thread Details
  • Replies 26 replies
  • Subscribers 313 subscribers
  • Views 623 views
  • Users 0 members are here
Related
See a helpful answer?

Be sure to click 'more' and select 'suggest as answer'!

If you're the thread creator, be sure to click 'more' then 'Verify as Answer'!

Why is the Schottky diode being used in control circuit?

Humaninsane
Humaninsane 6 days ago

image
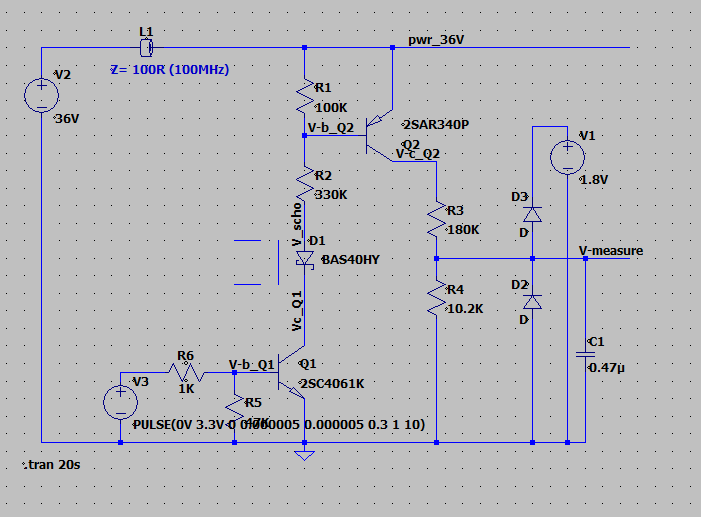
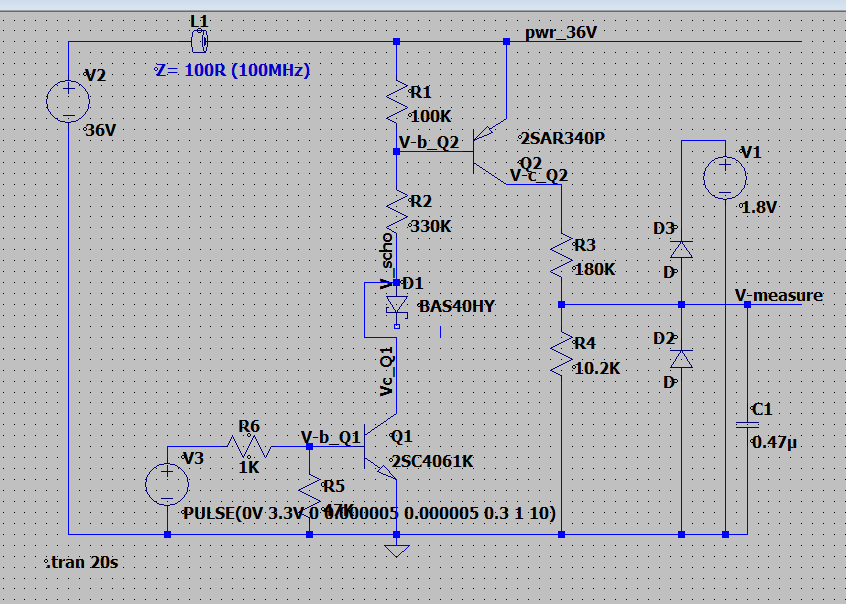
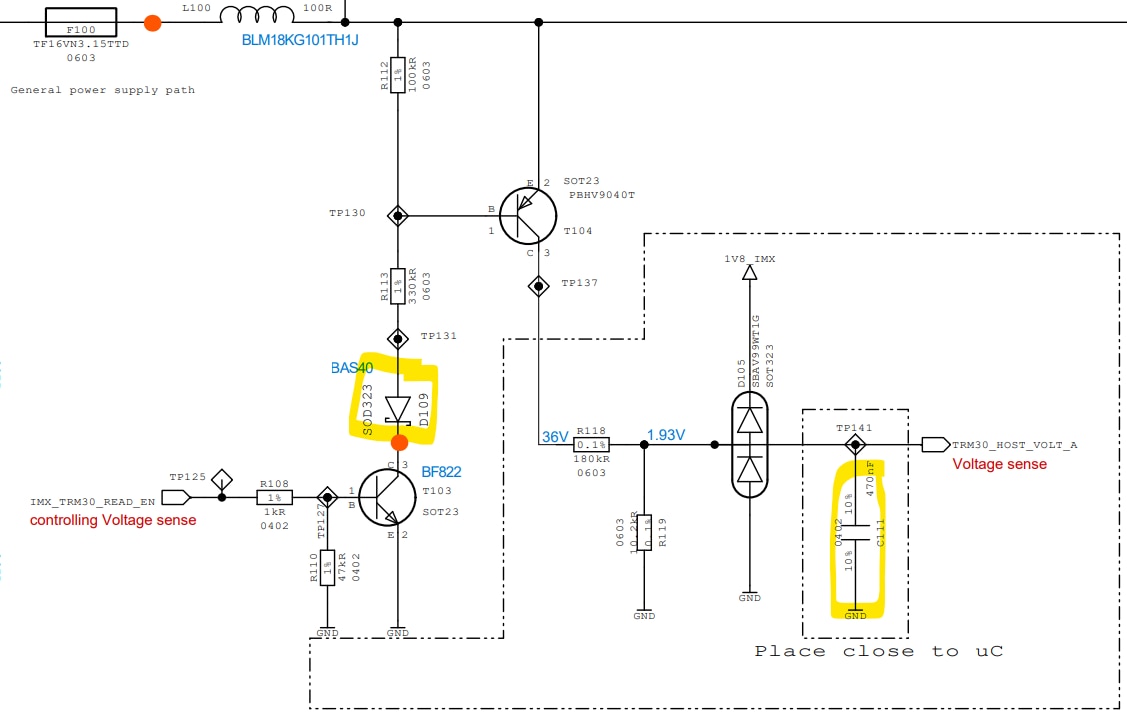
Why is the Schottky diode being used in control circuit? and why is the 470nF cap is added at that voltage divider output? how is the Cap value 470nF calculated?

  • Sign in to reply
  • Cancel

Top Replies

  • michaelkellett
    michaelkellett 5 days ago in reply to Humaninsane +2
    I think I can see what the ciruit is attempting: T103 switches T104 on and T104 connects R108 to the supply rail. R108 and R119 attenuate the signal by a factor of (180 + 10.2)/10.2. C111 makes a…
  • geralds
    geralds 4 days ago in reply to michaelkellett +2
    Hi simulation with Schottky diode: simulation without Schottky diode: The Schottky diode is important during switching off the transistors. Without Schottky it can produce very high…
  • geralds
    geralds 5 days ago in reply to Humaninsane +1
    Hi, I would say that the T103 is a simple switching transistor in a higher voltage-rated circuit. A BC846 would be too small at 60V. The microcontroller's output switches it on to measure the voltage…
Parents
  • michaelkellett
    michaelkellett 6 days ago

    I would need to know more about the function of the circuit to make an informed comment.

    The two transistors are high voltage parts (250V and 500V).

    What are the inductor connections and what is the working voltage on emitter of T104 ?

    D108 is only rated for 40V reverse voltage.

    I suspect that the diode is to protect T103 from negative voltages at TP131 - but without more information its only a guess. 

    MK

    • Cancel
    • Vote Up 0 Vote Down
    • Sign in to reply
    • Cancel
  • Humaninsane
    Humaninsane 5 days ago in reply to michaelkellett

    The two transistors are high voltage parts (250V and 500V)- fuse & inductor path is max60V from Lead-acid battery. This a random selection. 100V part cab used.

    What are the inductor connections and what is the working voltage on emitter of T104 ? -  ferrite bead used for High Impedance at high frequency (EMI/EMC) 

    D108 is only rated for 40V reverse voltage. - D109, after 100k and 300k, 60V will drop...so they have used 40V schottky

    I suspect that the diode is to protect T103 from negative voltages at TP131 - do we get -ve voltage in between?not sure, I thought it's only at product out (Connector/GND...).

    • Cancel
    • Vote Up 0 Vote Down
    • Sign in to reply
    • Cancel
  • dang74
    dang74 5 days ago in reply to michaelkellett

    Yeah, sounds like you got it.  If the frequency is only 60Hz  I think a larger cap than 470nF should be used to lower the corner frequency below 36Hz.

    • Cancel
    • Vote Up 0 Vote Down
    • Sign in to reply
    • Cancel
  • geralds
    geralds 5 days ago in reply to Humaninsane

    Hi,

    I would say that the T103 is a simple switching transistor in a higher voltage-rated circuit. A BC846 would be too small at 60V.

    The microcontroller's output switches it on to measure the voltage at the output of the "voltage sense" module.

    The T103 then switches on the T104, which applies a voltage source to the voltage divider. The two diodes D105 are freewheeling, protection diodes, diodes that eliminate both positive and negative over voltages and dissipate voltage spikes against the 1.8V supply voltage (the voltage of the controller board).

    The Schottky diode acts as a voltage barrier; it helps transistor T104 switch off very quickly (T103), much faster, because T103 is somewhat slower.

    The capacitor at the output of the voltage source is simply a storage capacitor that temporarily stores the switched-on voltage, approximately 2V according to the RC propagation delay.

    Furthermore, it helps to eliminate and smooth out some spikes present on this measuring line.

    The choke above is a low-pass filter that suppresses RF interference when power is switched. It also limits inrush current.

    The voltage divider R118/R119 has a ratio of approximately 17.6470; therefore, with a 36V power supply, the output voltage is approximately 2V (1.93V depends on the actual conditions).

    There is no AC voltage at a battery (normally; however, superimposed voltage can unfortunately occur).

    Best Regards

    Gerald

    ---

    • Cancel
    • Vote Up +1 Vote Down
    • Sign in to reply
    • Cancel
  • michaelkellett
    michaelkellett 5 days ago in reply to geralds

    The 

    geralds said:
    The choke above is a low-pass filter that suppresses RF interference when power is switched. It also limits inrush current.

    It's an 0603 ferrite bead with an impedance of 120R at 300MHz and a resistance of approx 0.03ohms, it won't do much to limit inrush current. And it wont need to since the only path for inrush current is through R113 or R118 (300k and 180k respectively).

    geralds said:
    The Schottky diode acts as a voltage barrier; it helps transistor T104 switch off very quickly (T103), much faster, because T103 is somewhat slower.

    Could you explain this - and maybe illustrate with simulation because I can't see how a diode of any kind in series with 300k will help T104 switch off quickly.

    geralds said:
    The two diodes D105 are freewheeling, protection diodes, diodes that eliminate both positive and negative over voltages and dissipate voltage spikes against the 1.8V supply voltage (the voltage of the controller board).

    The diodes in the ciruit are not freewheeling diodes according to the generally accepted use of the term.

    https://en.wikipedia.org/wiki/Flyback_diode

    And the action of the diodes is to clamp the signal at between -0.6V and +2.4V - one clamps to the ground rail and the other to the 1.8V source.

    MK

    • Cancel
    • Vote Up +1 Vote Down
    • Sign in to reply
    • Cancel
  • geralds
    geralds 4 days ago in reply to michaelkellett

    Hi

    simulation with Schottky diode:

    schematic with schottky

    diagram with schottky

    simulation without Schottky diode:

    schematic without schottky

    diagram without schottky

    The Schottky diode is important during switching off the transistors.

    Without Schottky it can produce very high voltage spikes during switching off. 

    Yes, the two diodes on the measure line are clamping diodes. sorry, it's my English is not very well. I translate it all from German to English. I forgot the word clamping.... "..to you know Mr. Alzheimer? - no, I forgot him."Wink In the 70's I learned about them, telecommunication - telephones.

    • Cancel
    • Vote Up +2 Vote Down
    • Sign in to reply
    • Cancel
  • Humaninsane
    Humaninsane 4 days ago in reply to geralds

    Thanks for the effortsHeart️.

    Without Schottky it can produce very high voltage spikes during switching off. - you are refereing T103(npn)?. 

    as we can see in the 2nd waveform (VC-Q1 - red)  there is high voltage spike...in-turn leading Vc-q2 (orange) -ve spike....image

    But any how this -ve spike will be suppressed by clamping diode right? so can we remove schottky?...

    And can you please share the Simulation settings. If you can share the .asc file that would be greatSweat smile. 

    • Cancel
    • Vote Up 0 Vote Down
    • Sign in to reply
    • Cancel
  • geralds
    geralds 4 days ago in reply to Humaninsane

    Hi,

    diagram with schottky current ferritbead

    diagram without schottky current ferritbead

    With Schottky - the current through the ferrite bead is minimal few micro ampere.
    Without Schottky - the current is much more - it produce a current spike, that produce a spike voltage on the Q1 transistor during switching off.
    This diode blocks the back current, which will stored in the induction during switching off, it separates Q1 from Q2.
    refer what michaelkellet told - flyback diode

    -->>> see also switched power supplies, such circuits looking similar.

    copy this .docx file to your folder and rename the extension docx to .asc.

    Best Regards

    Gerald

    --

    • Cancel
    • Vote Up +1 Vote Down
    • Sign in to reply
    • Cancel
  • Humaninsane
    Humaninsane 4 days ago in reply to geralds

    Ok now its clear. Once again thanks for the support

    • Cancel
    • Vote Up 0 Vote Down
    • Sign in to reply
    • Cancel
  • Humaninsane
    Humaninsane 4 days ago in reply to michaelkellett

    Thank for the efforts and discussionsHeart️.

    • Cancel
    • Vote Up 0 Vote Down
    • Sign in to reply
    • Cancel
  • michaelkellett
    michaelkellett 3 days ago in reply to geralds

    Hello Gerald,

    I have replicated your model quite closely in LTSpice and it shows no sign of the huge spikes.

    image

    I used a Wurth ferrite bead:

    image

    MK

    • Cancel
    • Vote Up 0 Vote Down
    • Sign in to reply
    • Cancel
  • geralds
    geralds 3 days ago in reply to michaelkellett

    original ferrite bead in the original circuit, Murata BLM18KG101TH1D:

    murata ferrite bead

    I've selected the Würth ferrite bead 74276051:

    simulated ferrite bead - 74276051

    Well, may be your simulation have other setting in the software.

    I just installed the software and worked with default settings, in the simulation settings.

    Just drag and drop, I selected components that have "real" parameters, I did not use ideal components.

    In the fused wire draws < 3A at 36V, not mA. This is the power rail.

    The measurement circuit is just a small part of a bigger circuit.

    You can ask the developers who inserted the Schottky. 

    • Cancel
    • Vote Up 0 Vote Down
    • Sign in to reply
    • Cancel
Reply
  • geralds
    geralds 3 days ago in reply to michaelkellett

    original ferrite bead in the original circuit, Murata BLM18KG101TH1D:

    murata ferrite bead

    I've selected the Würth ferrite bead 74276051:

    simulated ferrite bead - 74276051

    Well, may be your simulation have other setting in the software.

    I just installed the software and worked with default settings, in the simulation settings.

    Just drag and drop, I selected components that have "real" parameters, I did not use ideal components.

    In the fused wire draws < 3A at 36V, not mA. This is the power rail.

    The measurement circuit is just a small part of a bigger circuit.

    You can ask the developers who inserted the Schottky. 

    • Cancel
    • Vote Up 0 Vote Down
    • Sign in to reply
    • Cancel
Children
  • michaelkellett
    michaelkellett 3 days ago in reply to geralds

    Could you post your .asc file for the simulation an I can try running it here. (I can't copy it as text the way you've posted it above.)

    Here is mine:

    Version 4.1
    SHEET 1 880 692
    WIRE -256 -208 -352 -208
    WIRE 192 -208 -192 -208
    WIRE 320 -208 192 -208
    WIRE 192 -176 192 -208
    WIRE 320 -112 320 -208
    WIRE 192 -64 192 -96
    WIRE 256 -64 192 -64
    WIRE 192 -32 192 -64
    WIRE 560 32 464 32
    WIRE 320 64 320 -16
    WIRE 464 80 464 32
    WIRE 192 112 192 48
    WIRE 192 176 192 112
    WIRE -352 208 -352 -208
    WIRE 320 208 320 144
    WIRE 464 208 464 144
    WIRE 464 208 320 208
    WIRE 688 208 464 208
    WIRE -32 224 -128 224
    WIRE 80 224 48 224
    WIRE 128 224 80 224
    WIRE 80 256 80 224
    WIRE 320 272 320 208
    WIRE 688 272 688 208
    WIRE 464 288 464 208
    WIRE -128 304 -128 224
    WIRE 560 304 560 32
    WIRE -352 416 -352 288
    WIRE -128 416 -128 384
    WIRE -128 416 -352 416
    WIRE 80 416 80 336
    WIRE 80 416 -128 416
    WIRE 192 416 192 272
    WIRE 192 416 80 416
    WIRE 240 416 192 416
    WIRE 320 416 320 352
    WIRE 320 416 240 416
    WIRE 464 416 464 352
    WIRE 464 416 320 416
    WIRE 560 416 560 384
    WIRE 560 416 464 416
    WIRE 688 416 688 336
    WIRE 688 416 560 416
    WIRE 240 432 240 416
    FLAG 240 432 0
    FLAG 192 112 Q1_C
    FLAG 688 208 OUT
    SYMBOL npn 128 176 R0
    SYMATTR InstName Q1
    SYMATTR Value 2SC4061K
    SYMBOL res 64 240 R0
    SYMATTR InstName R1
    SYMATTR Value 47k
    SYMBOL res 64 208 R90
    WINDOW 0 0 56 VBottom 2
    WINDOW 3 32 56 VTop 2
    SYMATTR InstName R2
    SYMATTR Value 1k
    SYMBOL voltage -128 288 R0
    WINDOW 3 -165 160 Left 2
    WINDOW 123 0 0 Left 0
    WINDOW 39 0 0 Left 0
    SYMATTR Value PULSE(0 3.3 .1 5u 5u 0.1 0.5 3)
    SYMATTR InstName V1
    SYMBOL voltage -352 192 R0
    WINDOW 123 0 0 Left 0
    WINDOW 39 0 0 Left 0
    SYMATTR InstName V2
    SYMATTR Value 36
    SYMBOL pnp 256 -16 M180
    SYMATTR InstName Q2
    SYMATTR Value 2SAR340P
    SYMBOL res 176 -192 R0
    SYMATTR InstName R3
    SYMATTR Value 100k
    SYMBOL res 176 -48 R0
    SYMATTR InstName R4
    SYMATTR Value 330k
    SYMBOL res 304 48 R0
    SYMATTR InstName R5
    SYMATTR Value 180k
    SYMBOL res 304 256 R0
    SYMATTR InstName R6
    SYMATTR Value 10.2k
    SYMBOL diode 480 352 R180
    WINDOW 0 24 64 Left 2
    WINDOW 3 24 0 Left 2
    SYMATTR InstName D2
    SYMATTR Value 1N4148
    SYMBOL diode 480 144 R180
    WINDOW 0 24 64 Left 2
    WINDOW 3 24 0 Left 2
    SYMATTR InstName D3
    SYMATTR Value 1N4148
    SYMBOL voltage 560 288 R0
    WINDOW 123 0 0 Left 0
    WINDOW 39 0 0 Left 0
    SYMATTR InstName V3
    SYMATTR Value 1.8
    SYMBOL cap 672 272 R0
    SYMATTR InstName C1
    SYMATTR Value 0.47µ
    SYMBOL FerriteBead -224 -208 R90
    WINDOW 0 -16 0 VBottom 2
    SYMATTR InstName L1
    SYMATTR Value 600n
    SYMATTR SpiceLine Ipk=0.3 Rser=0.219 Rpar=121 Cpar=279f mfg="Würth Elektronik" pn="782422101 WE-CBA 0402"
    TEXT -96 -256 Left 2 !.tran 0 5 0

    MK

    • Cancel
    • Vote Up 0 Vote Down
    • Sign in to reply
    • Cancel
  • geralds
    geralds 3 days ago in reply to michaelkellett

    sorry, uploading the .asc file is not allowed.

    I uploaded above the .docx file to Humaninsane postings.

    Please download this docx file and rename the extension from .docx to asc.

    I use the newest version of LTSpice. Please update it or download it.

    • Cancel
    • Vote Up 0 Vote Down
    • Sign in to reply
    • Cancel
  • michaelkellett
    michaelkellett 3 days ago in reply to geralds
    geralds said:
    I uploaded above the .docx file to Humaninsane postings.

    I know that's what you tried to do but the rendering of that upload is incomplete and if it is downloaded MS Word can't decode it. The easy way to this is to just paste the text into a post.

    Thanks.

    MK

    • Cancel
    • Vote Up 0 Vote Down
    • Sign in to reply
    • Cancel
  • michaelkellett
    michaelkellett 3 days ago in reply to michaelkellett

    WARNING - LONG REPLY BUT WITH A HAPPY ENDING

    Found I could download as a .pdf and translate that.

    But - no overshoots:

    image

    image

    image

    Same overshoot result if I press reset to defaults and run again.

    Updated to latest version.

    And huge overshoot on Q1 collector is visible.

    No picture of it here - see Geralds plots above.

    But we know this is false because there is no big overshoot on the 36V power rail:

    image

    Let's remove the inductor:

    image

    Now we have a design with NO INDUCTANCE but we still get the 200V spike.

    Analog seem to have broken LTSpice.

    let's prove that:

    image

    There you are - no inductance and we get the nonsense spike.

    This is so disappointing - LTSpice has been great for ages and now they have broken it.

    The spike varies if you change the transistor model to npn2 or the type of device but it doesn't go away.

    So let's find out what's wrong,

    ........................ several abortive tests I won't bore you with.

    image

    Here is a clue - only one rising edge is spikey, and less than they were, but all I've done is change the quiet intervals between edges.

    Lets make a wild guess and set the minimum time step to 1us (its at the default setting of whatever it decides right now)

    image

    Suddenly it looks sensible.

    image

    And if the min time step is set then Gerald's original model works OK as well.

    So all they have changed/broken is how the auto time step works - I preferred the older version.

    So the take away from this - never trust a simulator - the hierarchy of truth is:

    Lies

    Damn lies

    Statistics

    SImulators

    AI

    But we have learnt that we don't need a diode in the collector circuit of Q1.

    MK

    MK

    • Cancel
    • Vote Up 0 Vote Down
    • Sign in to reply
    • Cancel
  • geralds
    geralds 3 days ago in reply to michaelkellett

    the docx file is complete uploaded, I checked it.

    https://community.element14.com/technologies/experts/f/forum/56751/why-is-the-schottky-diode-being-used-in-control-circuit/234345#

    do NOT open it with word.

    in the windows explorer just rename the extension - .docx to .asc 

    than open it with LTSpice. That's all.

    https://www.analog.com/en/resources/design-tools-and-calculators/ltspice-simulator.html

    the actual simulator is version 26.0.1

    ---- ok,ok,ok, Wink,,,,, here is it ------ (but the text below can have a format-problem because it is embedded into the webpage, please check it) 

    Version 4.1
    SHEET 1 880 680
    WIRE -160 -384 -320 -384
    WIRE 160 -384 -96 -384
    WIRE 320 -384 160 -384
    WIRE 400 -384 320 -384
    WIRE 752 -384 400 -384
    WIRE -320 -336 -320 -384
    WIRE 160 -336 160 -384
    WIRE 320 -272 320 -384
    WIRE 640 -240 576 -240
    WIRE 160 -224 160 -256
    WIRE 208 -224 160 -224
    WIRE 256 -224 208 -224
    WIRE 640 -224 640 -240
    WIRE 160 -176 160 -224
    WIRE 368 -176 320 -176
    WIRE 400 -176 368 -176
    WIRE 400 -112 400 -176
    WIRE 576 -112 576 -240
    WIRE 160 -64 160 -96
    WIRE 160 -32 160 -64
    WIRE 160 -32 112 -32
    WIRE 400 0 400 -32
    WIRE 576 0 576 -48
    WIRE 576 0 400 0
    WIRE 672 0 576 0
    WIRE 720 0 672 0
    WIRE 752 0 720 0
    WIRE 400 32 400 0
    WIRE 576 48 576 0
    WIRE 96 64 96 -32
    WIRE 160 64 160 32
    WIRE 160 64 112 64
    WIRE 160 128 160 64
    WIRE 672 144 672 0
    WIRE 160 160 160 128
    WIRE -96 208 -176 208
    WIRE 32 208 -16 208
    WIRE 64 208 32 208
    WIRE 96 208 64 208
    WIRE -176 224 -176 208
    WIRE 32 240 32 208
    WIRE -320 336 -320 -256
    WIRE -176 336 -176 304
    WIRE -176 336 -320 336
    WIRE 32 336 32 320
    WIRE 32 336 -176 336
    WIRE 160 336 160 256
    WIRE 160 336 32 336
    WIRE 400 336 400 112
    WIRE 400 336 160 336
    WIRE 576 336 576 112
    WIRE 576 336 400 336
    WIRE 640 336 640 -144
    WIRE 640 336 576 336
    WIRE 672 336 672 208
    WIRE 672 336 640 336
    WIRE 160 352 160 336
    FLAG 160 352 0
    FLAG 400 -384 pwr_36V
    FLAG 720 0 V-measure
    FLAG 368 -176 V-c_Q2
    FLAG 160 128 Vc_Q1
    FLAG 160 -64 V_scho
    FLAG 208 -224 V-b_Q2
    FLAG 64 208 V-b_Q1
    SYMBOL npn 96 160 R0
    SYMATTR InstName Q1
    SYMATTR Value 2SC4061K
    SYMBOL pnp 256 -176 M180
    SYMATTR InstName Q2
    SYMATTR Value 2SAR340P
    SYMBOL res 144 -352 R0
    SYMATTR InstName R1
    SYMATTR Value 100K
    SYMATTR SpiceLine tol=1 pwr=0.125
    SYMBOL res 144 -192 R0
    SYMATTR InstName R2
    SYMATTR Value 330K
    SYMATTR SpiceLine tol=1 pwr=0.125
    SYMBOL res 384 -128 R0
    SYMATTR InstName R3
    SYMATTR Value 180K
    SYMATTR SpiceLine tol=0.1 pwr=0.125
    SYMBOL res 384 16 R0
    SYMATTR InstName R4
    SYMATTR Value 10.2K
    SYMATTR SpiceLine tol=0.1 pwr=0.125
    SYMBOL res 16 224 R0
    SYMATTR InstName R5
    SYMATTR Value 47K
    SYMATTR SpiceLine tol=1 pwr=0.1
    SYMBOL res 0 192 R90
    WINDOW 0 0 56 VBottom 2
    WINDOW 3 32 56 VTop 2
    SYMATTR InstName R6
    SYMATTR Value 1K
    SYMATTR SpiceLine tol=1 pwr=0.1
    SYMBOL schottky 144 -32 R0
    WINDOW 3 49 34 Left 2
    SYMATTR Value BAS40HY
    SYMATTR InstName D1
    SYMBOL diode 592 112 R180
    WINDOW 0 24 64 Left 2
    WINDOW 3 24 0 Left 2
    SYMATTR InstName D2
    SYMBOL diode 592 -48 R180
    WINDOW 0 24 64 Left 2
    WINDOW 3 24 0 Left 2
    SYMATTR InstName D3
    SYMBOL cap 656 144 R0
    SYMATTR InstName C1
    SYMATTR Value 0.47
    SYMATTR SpiceLine V=16 Irms=0 Rser=0 Lser=0 mfg="Murata" pn="GCM188R71C474KA55" type="X7R"
    SYMBOL voltage 640 -240 R0
    WINDOW 123 0 0 Left 0
    WINDOW 39 0 0 Left 0
    SYMATTR InstName V1
    SYMATTR Value 1.8V
    SYMBOL voltage -320 -352 R0
    WINDOW 123 0 0 Left 0
    WINDOW 39 0 0 Left 0
    SYMATTR InstName V2
    SYMATTR Value 36V
    SYMBOL FerriteBead -128 -384 R90
    WINDOW 0 -16 0 VBottom 2
    SYMATTR InstName L1
    SYMATTR Value 580n
    SYMATTR SpiceLine Ipk=3 Rser=0.0032 Rpar=105 Cpar=10f mfg="W rth Elektronik" pn="74276051 WE-WAFB 7835"
    SYMBOL voltage -176 208 R0
    WINDOW 123 0 0 Left 0
    WINDOW 39 0 0 Left 0
    WINDOW 3 -29 178 Left 2
    SYMATTR InstName V3
    SYMATTR Value PULSE(0V 3.3V 0 0.000005 0.000005 0.1 0.5 10)
    TEXT -192 -344 Left 2 ;Z= 100R (100MHz)
    TEXT -208 416 Left 2 !.tran 10s
    TEXT -96 8 Left 1 ;move this wire using \nwith/without the diode

    ----

    Regards

    Gerald

    • Cancel
    • Vote Up 0 Vote Down
    • Sign in to reply
    • Cancel
  • michaelkellett
    michaelkellett 3 days ago in reply to geralds

    Looks like our messages crossed in the ether !

    MK

    • Cancel
    • Vote Up 0 Vote Down
    • Sign in to reply
    • Cancel
element14 Community

element14 is the first online community specifically for engineers. Connect with your peers and get expert answers to your questions.

  • Members
  • Learn
  • Technologies
  • Challenges & Projects
  • Products
  • Store
  • About Us
  • Feedback & Support
  • FAQs
  • Terms of Use
  • Privacy Policy
  • Legal and Copyright Notices
  • Sitemap
  • Cookies

An Avnet Company © 2026 Premier Farnell Limited. All Rights Reserved.

Premier Farnell Ltd, registered in England and Wales (no 00876412), registered office: Farnell House, Forge Lane, Leeds LS12 2NE.

ICP 备案号 10220084.

Follow element14

  • X
  • Facebook
  • linkedin
  • YouTube