element14 Community
element14 Community
    Register Log In
  • Site
  • Search
  • Log In Register
  • Community Hub
    Community Hub
    • What's New on element14
    • Feedback and Support
    • Benefits of Membership
    • Personal Blogs
    • Members Area
    • Achievement Levels
  • Learn
    Learn
    • Ask an Expert
    • eBooks
    • element14 presents
    • Learning Center
    • Tech Spotlight
    • STEM Academy
    • Webinars, Training and Events
    • Learning Groups
  • Technologies
    Technologies
    • 3D Printing
    • FPGA
    • Industrial Automation
    • Internet of Things
    • Power & Energy
    • Sensors
    • Technology Groups
  • Challenges & Projects
    Challenges & Projects
    • Design Challenges
    • element14 presents Projects
    • Project14
    • Arduino Projects
    • Raspberry Pi Projects
    • Project Groups
  • Products
    Products
    • Arduino
    • Avnet Boards Community
    • Dev Tools
    • Manufacturers
    • Multicomp Pro
    • Product Groups
    • Raspberry Pi
    • RoadTests & Reviews
  • Store
    Store
    • Visit Your Store
    • Choose another store...
      • Europe
      •  Austria (German)
      •  Belgium (Dutch, French)
      •  Bulgaria (Bulgarian)
      •  Czech Republic (Czech)
      •  Denmark (Danish)
      •  Estonia (Estonian)
      •  Finland (Finnish)
      •  France (French)
      •  Germany (German)
      •  Hungary (Hungarian)
      •  Ireland
      •  Israel
      •  Italy (Italian)
      •  Latvia (Latvian)
      •  
      •  Lithuania (Lithuanian)
      •  Netherlands (Dutch)
      •  Norway (Norwegian)
      •  Poland (Polish)
      •  Portugal (Portuguese)
      •  Romania (Romanian)
      •  Russia (Russian)
      •  Slovakia (Slovak)
      •  Slovenia (Slovenian)
      •  Spain (Spanish)
      •  Sweden (Swedish)
      •  Switzerland(German, French)
      •  Turkey (Turkish)
      •  United Kingdom
      • Asia Pacific
      •  Australia
      •  China
      •  Hong Kong
      •  India
      •  Korea (Korean)
      •  Malaysia
      •  New Zealand
      •  Philippines
      •  Singapore
      •  Taiwan
      •  Thailand (Thai)
      • Americas
      •  Brazil (Portuguese)
      •  Canada
      •  Mexico (Spanish)
      •  United States
      Can't find the country/region you're looking for? Visit our export site or find a local distributor.
  • Translate
  • Profile
  • Settings
FPGA
  • Technologies
  • More
FPGA
Blog Arty: talk to SPI EEPROM - part 1: hardware and modules
  • Blog
  • Forum
  • Documents
  • Quiz
  • Events
  • Polls
  • Files
  • Members
  • Mentions
  • Sub-Groups
  • Tags
  • More
  • Cancel
  • New
FPGA requires membership for participation - click to join
  • Share
  • More
  • Cancel
Group Actions
  • Group RSS
  • More
  • Cancel
Engagement
  • Author Author: Jan Cumps
  • Date Created: 25 Jun 2022 12:51 PM Date Created
  • Views 2153 views
  • Likes 6 likes
  • Comments 5 comments
  • summer of fpga
  • Spartan_Migration
Related
Recommended

Arty: talk to SPI EEPROM - part 1: hardware and modules

Jan Cumps
Jan Cumps
25 Jun 2022
Arty: talk to SPI EEPROM - part 1: hardware and modules

Goal: write a design that exchanges data with an external EEPROM IC. I have a set of 25LC256 SPI 256 Kbit EEPROMs, so I'll see if I can communicate with them, in VHDL.
At this point, I'm not going to use the Xilinx MicroBlaze or SPI IPs, although they are a good fit for this kind of exercise. It 'll be a HDL exercise.

Until now, the projects I did for the Spartan-7 were ports from things I did on a Spartan-6, or little try-outs. One of the asks of the 7 Ways to Leave Your Spartan-6 FPGA program is to build a design with a sensor. I was looking for SPI sensors in my parts bin. Didn't find any, but I found this EEPROM. I think it can become a nice project. Maybe my little LDR/XADC post counts for the sensor exercise...

image

Functionality:

  • Use the 4 slider buttons as memory address setters, for read and write operation.
  • When pushing one of the 4 push buttons, write the value 1 .. 4 to that memory address to EEPROM.
  • and then immediately load the value represented by the 4 slide buttons, and light up the corresponding LED.
  • When pressing reset, dim all LEDs, unitl released. Then load the value represented by the 4 slide buttons, and light up the corresponding LED.

Components:

  • 25LC256 SPI EEPROM
  • Arty S7 board (any FPGA would do) , with 4 slide switches, 4 push buttons, 4 LEDs and 4 GIO pins
  • little breadboard
  • some patch and jumper cables
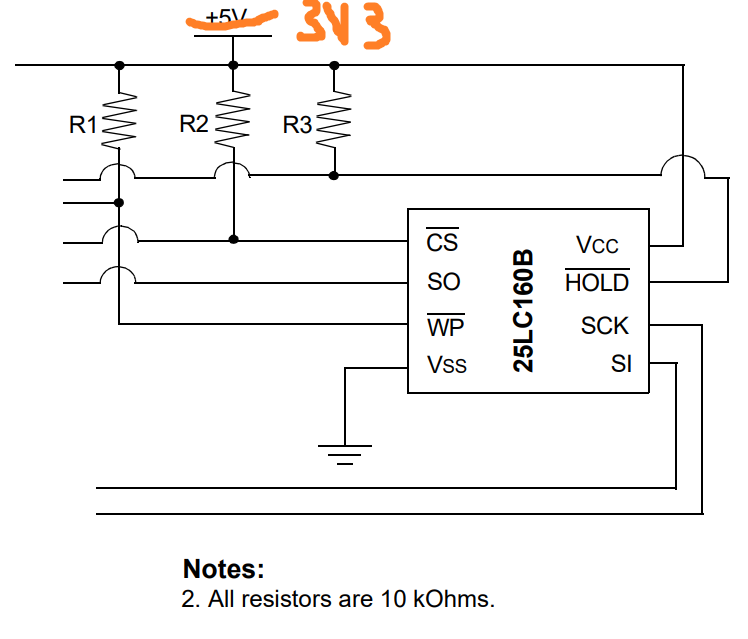
  • 3 10K pull-up resistors 
  • power for the EEPROM. I'm tapping it from the Arty board.

Side note: handling active low pins

Microchip app notes aren't consistent. Some pull unused and ~CS up with a resistor, some tie unused to VCC and don't pull up ~CS

image
EEPROM schematic (source: app note annotated)

Hardware and wiring

image
Power and ground for the EEPROM come from the Arty board's PMOD JA. The 4 SPI lines are pin 1 -> 4 of that same PMOD.

FPGA blocks

The SPI master is from Iman Nematollahi, available on github. Clock divider is the same one used in my previous blog. The eeprom_25lc256 is a VHDL design that I have yet to make (part 2 of this project). On the left side you find the push buttons for reset, data generation and the slide buttons to set EEPROM address. On the right side are the 4 SPI signals and the 4 LEDs, directly wired to what the SPI block reads from the EEPROM.
note: the NOT gate after the reset pin should not be there. The Arty has this implemented as pulled high, so it can directly go into the downstream blocks.

image

Good thing that I blogged this. On the image at the top, you can see that I put a wrong IC on the breadbord: an i2c EEPROM. I would not have spotted that if I didn't take that photo. I left the photo there because it looks good ;)

  • Sign in to reply
  • genebren
    genebren over 2 years ago

    Nice catch on the I2C versus SPI interfaces.  Good luck moving forward on this design.

    • Cancel
    • Vote Up 0 Vote Down
    • Sign in to reply
    • More
    • Cancel
  • Jan Cumps
    Jan Cumps over 2 years ago in reply to Jan Cumps

    Preparing for the "bitbang myself" option:

    image

    • Cancel
    • Vote Up 0 Vote Down
    • Sign in to reply
    • More
    • Cancel
  • Jan Cumps
    Jan Cumps over 2 years ago in reply to Jan Cumps

    ... another option is to ignore that block's CS, and bitbang the CS line low and then high in my own eeprom VHDL module. It knows the EEPROM requirements.

    • Cancel
    • Vote Up 0 Vote Down
    • Sign in to reply
    • More
    • Cancel
  • DAB
    DAB over 2 years ago

    It is always good to check interfaces several times before you connect and test them.

    • Cancel
    • Vote Up 0 Vote Down
    • Sign in to reply
    • More
    • Cancel
  • Jan Cumps
    Jan Cumps over 2 years ago

    The SPI module I selected won't do. It will hold CS low until the requested data size is sent. But that's a fixed size. The EEPROM has requirements to hold the CS until a activity is completed. In my case, that can be 1 byte (an instruction, or 4 bytes: instruction, 2 byte address, data).

    I can either adapt the current one I'm using - add an input parameter telling for how many bytes to hold the CS low, or look for an other one...

    • Cancel
    • Vote Up 0 Vote Down
    • Sign in to reply
    • More
    • Cancel
element14 Community

element14 is the first online community specifically for engineers. Connect with your peers and get expert answers to your questions.

  • Members
  • Learn
  • Technologies
  • Challenges & Projects
  • Products
  • Store
  • About Us
  • Feedback & Support
  • FAQs
  • Terms of Use
  • Privacy Policy
  • Legal and Copyright Notices
  • Sitemap
  • Cookies

An Avnet Company © 2025 Premier Farnell Limited. All Rights Reserved.

Premier Farnell Ltd, registered in England and Wales (no 00876412), registered office: Farnell House, Forge Lane, Leeds LS12 2NE.

ICP 备案号 10220084.

Follow element14

  • X
  • Facebook
  • linkedin
  • YouTube