element14 Community
element14 Community
    Register Log In
  • Site
  • Search
  • Log In Register
  • Community Hub
    Community Hub
    • What's New on element14
    • Feedback and Support
    • Benefits of Membership
    • Personal Blogs
    • Members Area
    • Achievement Levels
  • Learn
    Learn
    • Ask an Expert
    • eBooks
    • element14 presents
    • Learning Center
    • Tech Spotlight
    • STEM Academy
    • Webinars, Training and Events
    • Learning Groups
  • Technologies
    Technologies
    • 3D Printing
    • FPGA
    • Industrial Automation
    • Internet of Things
    • Power & Energy
    • Sensors
    • Technology Groups
  • Challenges & Projects
    Challenges & Projects
    • Design Challenges
    • element14 presents Projects
    • Project14
    • Arduino Projects
    • Raspberry Pi Projects
    • Project Groups
  • Products
    Products
    • Arduino
    • Avnet Boards Community
    • Dev Tools
    • Manufacturers
    • Multicomp Pro
    • Product Groups
    • Raspberry Pi
    • RoadTests & Reviews
  • Store
    Store
    • Visit Your Store
    • Choose another store...
      • Europe
      •  Austria (German)
      •  Belgium (Dutch, French)
      •  Bulgaria (Bulgarian)
      •  Czech Republic (Czech)
      •  Denmark (Danish)
      •  Estonia (Estonian)
      •  Finland (Finnish)
      •  France (French)
      •  Germany (German)
      •  Hungary (Hungarian)
      •  Ireland
      •  Israel
      •  Italy (Italian)
      •  Latvia (Latvian)
      •  
      •  Lithuania (Lithuanian)
      •  Netherlands (Dutch)
      •  Norway (Norwegian)
      •  Poland (Polish)
      •  Portugal (Portuguese)
      •  Romania (Romanian)
      •  Russia (Russian)
      •  Slovakia (Slovak)
      •  Slovenia (Slovenian)
      •  Spain (Spanish)
      •  Sweden (Swedish)
      •  Switzerland(German, French)
      •  Turkey (Turkish)
      •  United Kingdom
      • Asia Pacific
      •  Australia
      •  China
      •  Hong Kong
      •  India
      •  Korea (Korean)
      •  Malaysia
      •  New Zealand
      •  Philippines
      •  Singapore
      •  Taiwan
      •  Thailand (Thai)
      • Americas
      •  Brazil (Portuguese)
      •  Canada
      •  Mexico (Spanish)
      •  United States
      Can't find the country/region you're looking for? Visit our export site or find a local distributor.
  • Translate
  • Profile
  • Settings
FPGA
  • Technologies
  • More
FPGA
Blog Image processing on ZC702 using PYNQ
  • Blog
  • Forum
  • Documents
  • Quiz
  • Events
  • Polls
  • Files
  • Members
  • Mentions
  • Sub-Groups
  • Tags
  • More
  • Cancel
  • New
Join FPGA to participate - click to join for free!
  • Share
  • More
  • Cancel
Group Actions
  • Group RSS
  • More
  • Cancel
Engagement
  • Author Author: dimiterk
  • Date Created: 24 Mar 2020 3:24 PM Date Created
  • Views 3299 views
  • Likes 5 likes
  • Comments 2 comments
  • zc702
  • video
  • fpga_projects
  • fpga
  • pynq
  • pynqstarter
Related
Recommended

Image processing on ZC702 using PYNQ

dimiterk
dimiterk
24 Mar 2020

Introduction

This project is a follow up from the previous project on porting the PYNQ framework to the ZC702 development board.

In this article we will show how to leverage the xOpenCV framework in conjunction with the PYNQ framework  to implement a basic image processing pipeline on ZYNQ series FPGA SoC .

The project will be developed on a ZC702 development board using a generic USB camera.


Now , we will look at developing an end to end system for resizing live video using the FPGA side of the ZYNQ. Why resize video on the fly?

Well, most of the modern neural networks need images in a specific resolution so all the acquired frames have to be resized prior to passing them through the network.

Image resizing can be done quite easily on a sequential processor using OpenCV or handcrafted code at the expense of speed of course.

FPGA's on the other hand easily allow for a gain of at least 10x in most image processing applications.


Then we will develop the Vivado hardware called an overlay in PYNQ parlance. Then we will look at the Python notebook code used to control the video resizing operation in HW.


Hardware

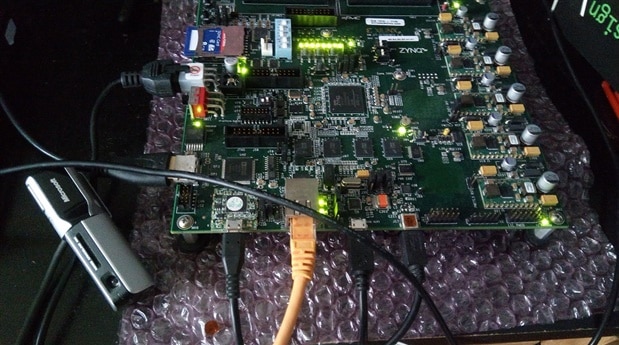
The ZC702 does not have a full sized USB port so a USB hub has to be used. Luckily the development platform comes with a Target 4 port USB hub that plugs into the USB

micro port of the development board. This is a USB host port so it allows using standard USB cameras. A generic USB camera can then be lugged into the USB hub.

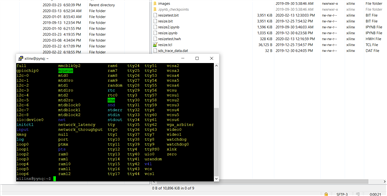
This will enumerate as a /video device under /dev folder on PYNQ distro as shown below.

There are other options for using an image source such as CMOS cameras, camera with HDMI output or even RTSP (Real Time Streaming Protocol) video streams from IP cameras.

imageimage

image


Developing Image processing IP's

Developing IP blocks for image processing is a task that can be accomplished in multiple ways.

The typical design of IP cores in the involves writing test benches for the DUT and simulating the designs using PGM or BMP data for the image files.

Implementing this in Verilog/System Verilog or VHDL requires some non-trivial infrastructure.

Higher level frameworks such as can all be used .

a) MATLAB

b) Chisel (Scala)

c)  MyHDL (Python)

d) Vivado HLS (C/C++)


The IP used is the resize IP from the XfOpenCV Revision library.

As of early 2020 6 versions of the the xfOpenCV revision library has been released by Xilinx.  Vivado HLS video library may soon be deprecated according to the Xilinx Github commentary.

The XfOpenCV Revision framework is a set of kernels and image processing primitives that replicate the functionality of OpenCV library kernels.

In simple terms this allows executing a function such as Gaussian(image_in_image_out, mju, sigma) completely in hardware by accelerating it by 40-100x fold. Even better you can control power consumption by controlling for area (number of PE (processing elements)) and latency.


In this tutorial we will have used Vivado HLS to generate the cores with standard interfaces and the XfOpenCV revision library

to provide the underlying image processing kernels.

The xfOpenCV resize IP will be refactored with an AXI stream interface.

The focus of this article however would be on the Vivado HW design and the PYNQ notebook design,

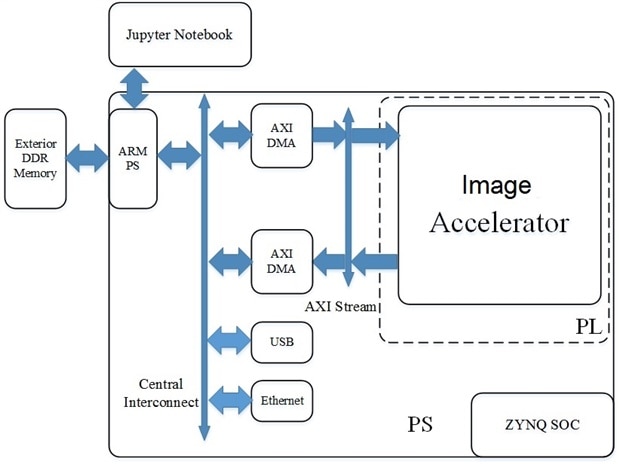
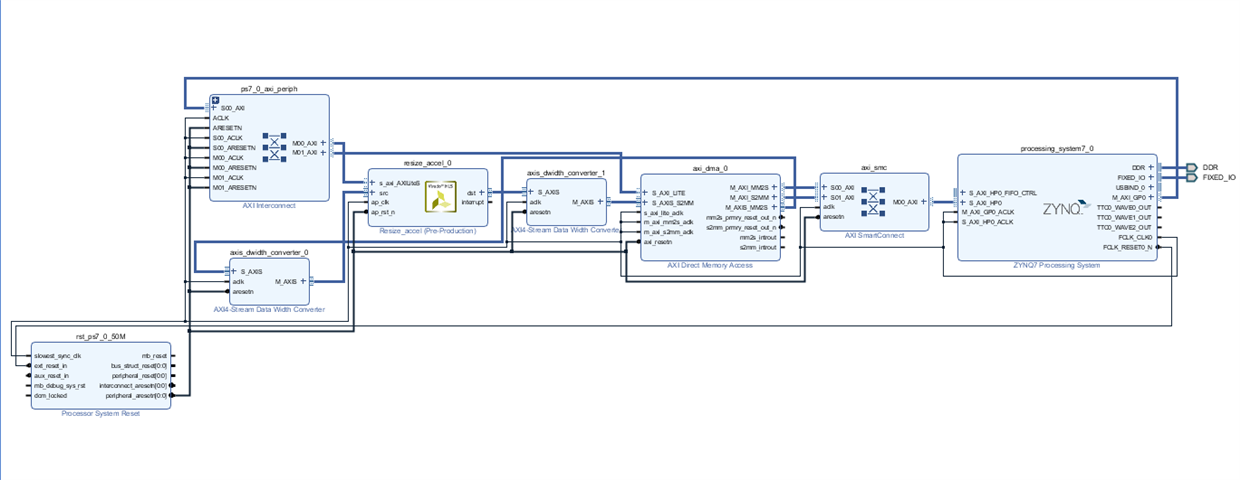
The block diagram below shows the gist of what the project will implement using PYNQ.


image


Designing the image processing pipeline


The Vivado hardware design will be designed using Vivado 2019.1 using the ZC702 development board.

From a top level perspective , the image processing pipeline involves sending data to the resize IP accelerator via the DMA and reading back data.

In essence we have a loop back setup between the DMA and PS DDR memroy with the accelerator in the middle.

The DMA has to be configured with a read and a write channel.

One important parts is that PYNQ as of early 2020 does not allow un-aligned transfers.

The resize IP needs to be added to the IP folder and the IP folder needs to be added to IP integrator path so that Vivado can find it.


The image below shows the hardware design. It basically consists of a DMA loop-back with the the resize IP tucked in between.


image

Now that the Vivado HW design is completed the next step is to compile the design and export:


a) The bitstream

b) the tcl file

c) the .hwh file.

The above two files are located under: PROJECT.src/sources_1/bd/design_name/hw_handoff.


Create a folder called PYNQ under the Vivado project folder and copy the two files above (.tcl and .hwh).

Then export the bitstream by going to File->Export-> Export Bitstream.

This completes the hardware design stage once all three files have been exported.


Python Notebook app

Moving on to the software part . We will use the resize IP software example and modify it to read the USB camera frames.

We will leverage the PYNQ framework to do the heavy lifting for the data movers.


image

The Resize IP has an AXI stream slave and master interface for input and output respectively. In addition it also has an AXI lite interface for configuring the core.image


The configuration involves starting or stopping the core , enabling the interrupts and setting the input and output dimensions.

image


To start the IP core, it needs to be programmed from the AXI Lite bus of the resize_accel IP core. Specifically , the MSB on register 0x00 has to be set as well as clearing the IDLE mode. This is done by writing 0x81 to the register.
The next step is to write the DMA data and then read it back.. The incoming frames will be resized to half the size of the VGA resolution.


Summary
So this project shows how to implement a simple end to end image processing pipeline on the ZC702 development board.
Leveraging the PYNQ framework and Ipython notebooks allows one to speed up image processing by deploying selected image processing accelerators on the PL fabric of a ZYNQ7020 FPGA SOC.
  • Sign in to reply
  • nashra
    nashra over 5 years ago

    Hey there! Can you please mention the proper link for .tcl and .hwh files. I can not find it. Also if you have designed IP for filter2D please do share

    • Cancel
    • Vote Up 0 Vote Down
    • Sign in to reply
    • More
    • Cancel
  • clem57
    clem57 over 5 years ago

    Interesting project.Thanks.

    • Cancel
    • Vote Up 0 Vote Down
    • Sign in to reply
    • More
    • Cancel
element14 Community

element14 is the first online community specifically for engineers. Connect with your peers and get expert answers to your questions.

  • Members
  • Learn
  • Technologies
  • Challenges & Projects
  • Products
  • Store
  • About Us
  • Feedback & Support
  • FAQs
  • Terms of Use
  • Privacy Policy
  • Legal and Copyright Notices
  • Sitemap
  • Cookies

An Avnet Company © 2025 Premier Farnell Limited. All Rights Reserved.

Premier Farnell Ltd, registered in England and Wales (no 00876412), registered office: Farnell House, Forge Lane, Leeds LS12 2NE.

ICP 备案号 10220084.

Follow element14

  • X
  • Facebook
  • linkedin
  • YouTube