element14 Community
element14 Community
    Register Log In
  • Site
  • Search
  • Log In Register
  • Members
    Members
    • Benefits of Membership
    • Achievement Levels
    • Members Area
    • Personal Blogs
    • Feedback and Support
    • What's New on element14
  • Learn
    Learn
    • Learning Center
    • eBooks
    • STEM Academy
    • Webinars, Training and Events
    • More
  • Technologies
    Technologies
    • 3D Printing
    • FPGA
    • Industrial Automation
    • Internet of Things
    • Power & Energy
    • Sensors
    • More
  • Challenges & Projects
    Challenges & Projects
    • Design Challenges
    • element14 presents
    • Project14
    • Arduino Projects
    • Raspberry Pi Projects
    • More
  • Products
    Products
    • Arduino
    • Dev Tools
    • Manufacturers
    • Raspberry Pi
    • RoadTests & Reviews
    • Avnet Boards Community
    • More
  • Store
    Store
    • Visit Your Store
    • Choose Another Store
      • Europe
      •  Austria (German)
      •  Belgium (Dutch, French)
      •  Bulgaria (Bulgarian)
      •  Czech Republic (Czech)
      •  Denmark (Danish)
      •  Estonia (Estonian)
      •  Finland (Finnish)
      •  France (French)
      •  Germany (German)
      •  Hungary (Hungarian)
      •  Ireland
      •  Israel
      •  Italy (Italian)
      •  Latvia (Latvian)
      •  
      •  Lithuania (Lithuanian)
      •  Netherlands (Dutch)
      •  Norway (Norwegian)
      •  Poland (Polish)
      •  Portugal (Portuguese)
      •  Romania (Romanian)
      •  Russia (Russian)
      •  Slovakia (Slovak)
      •  Slovenia (Slovenian)
      •  Spain (Spanish)
      •  Sweden (Swedish)
      •  Switzerland(German, French)
      •  Turkey (Turkish)
      •  United Kingdom
      • Asia Pacific
      •  Australia
      •  China
      •  Hong Kong
      •  India
      •  Korea (Korean)
      •  Malaysia
      •  New Zealand
      •  Philippines
      •  Singapore
      •  Taiwan
      •  Thailand (Thai)
      • Americas
      •  Brazil (Portuguese)
      •  Canada
      •  Mexico (Spanish)
      •  United States
      Can't find the country/region you're looking for? Visit our export site or find a local distributor.
  • Translate
  • Profile
Industrial Automation
  • Technologies
  • More
Industrial Automation
Blog AVNET SmartEdge IIOT Gateway: Control Industrial I/O directly from GPIO Pins
  • Blog
  • Forum
  • Documents
  • Events
  • Members
  • Mentions
  • Sub-Groups
  • Tags
  • More
  • Cancel
  • New
Industrial Automation requires membership for participation - click to join
Blog Post Actions
  • Subscribe by email
  • More
  • Cancel
  • Share
  • Subscribe by email
  • More
  • Cancel
Group Actions
  • Group RSS
  • More
  • Cancel
Engagement
Author: Jan Cumps
Date Created: 9 Jan 2021 5:42 PM
Views: 330
Likes: 4
Comments: 8
  • iiot
  • industrial
  • avnet
  • smartedge
  • gateway
Related
Recommended

AVNET SmartEdge IIOT Gateway: Control Industrial I/O directly from GPIO Pins

Jan Cumps
Jan Cumps
9 Jan 2021

The SmartEdge IIOT GatewaySmartEdge IIOT Gateway is a Raspberry Pi 3 Compute based industrial Linux box.

It runs Raspbian with some additions. There's a set of industrial hardware extensions. In this blog I revisit the industrial I/O. I try to control the industrial pins just liker traditional ARM GPIOs on, a Pi.

This is a follow up on a discussion started by ergouser: can you talk to the industrial I/O with WiringPi?


Goal

In the previous post, I checked how to use the industrial I/Os in the default way: by using the Linux character device interface that's provided by AVNET.

They aren't plain ARM GPIOs. The underlying mechanism is a i2c gpio expander IC that provides 8 I/Os.

You set or read the pins by talking to an 8 bit register on the expander IC.

All of that is abstracted on the Linux level. Each pin is a character device.

A common - and excellent - design.


Jim has a requirement to use them as if they are generic Raspberry PI GPIOs. That is possible, but you need to modify the board.

That's what I'm doing in this post.


You don't have permission to edit metadata of this video.
Edit media
x
Upload Preview


Switch from i2c based DIGIO to GPIO Controlled: Board Modifications


You switch by moving a set of resistors on the PCB. These are 0402 (1005 imperial). Tiny but doable.

I am modifying one block. I leave DIGIO A as is, connected to the port expander. The DIGIO B pins will switch to GPIO control.


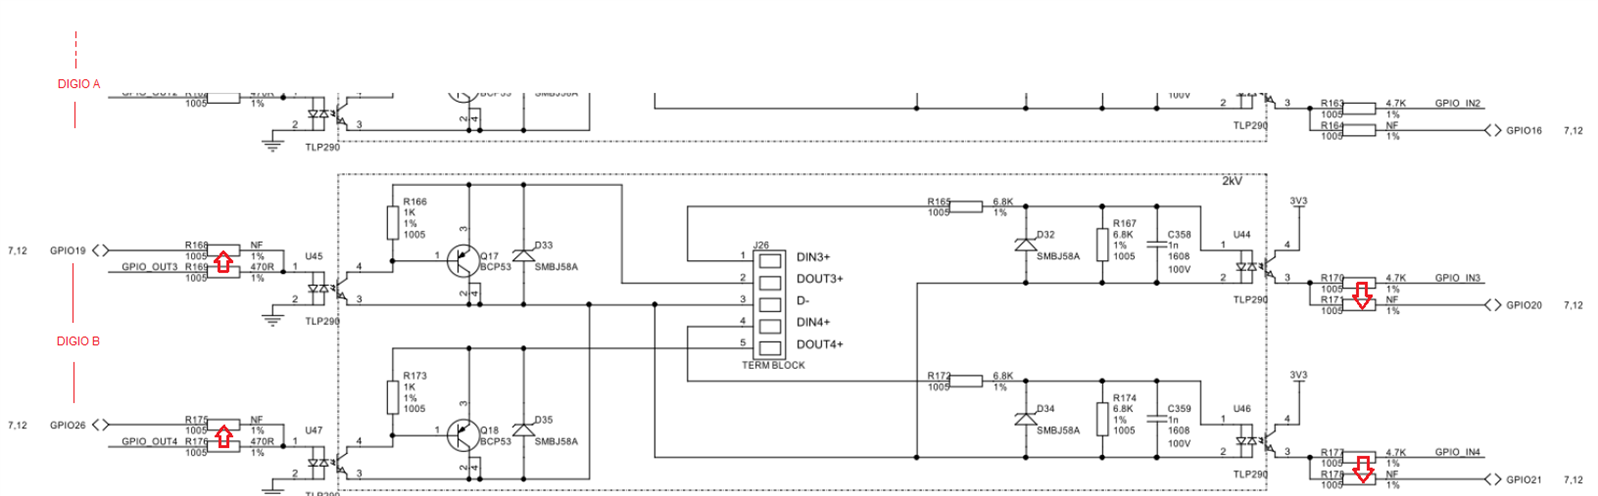
image source: SmartEdge-iiot-gateway_programmers_reference.pdf (annotated)


The output side resistors are 470R, the input side 4K7.

On the PCBs, these are located just right of the upper right corner of the opto-couplers.

Each time, you have to move the resistor from the upper to lower position.

I used 460° C (yeah) and very little air - 25%. And put a big blob of flux on top so that they stay on the PCB when reworking.

Still R170 flew away. I ordered a set of new ones.

This is the result. Spot the empty location.

This doesn't stop me from proceeding. I have 2 outputs and an input to test. Once the replacement resistors arrived, I'll complete the exercise.


Software Control via GPIO


Jim wants to control the pins from WiringPi. I'm using its GPIO command here as proof of concept.


I'm going to test DIN4 and DOUT4.

DIN4 is connected (now, by moving R176) to GPIO21.

DOUT4 to GPIO26.


I'm using the same test circuit as in the previous post -  except for using 5V instead of 24 V, but that does not matter:


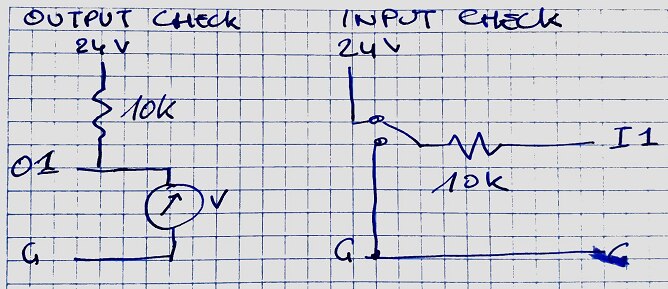
I first did an output test:

avnet@smartedge:~ $ gpio -g mode 26 out
avnet@smartedge:~ $ gpio -g write 26 0
avnet@smartedge:~ $ gpio -g write 26 1
avnet@smartedge:~ $ gpio -g write 26 0


That worked. When I drive pin 26 high, the output is active, pulls the pin down to 0 V.

When I drive it low, the output is pulled to 5 V by the 10K pull-up resistor.

Evidence:

You don't have permission to edit metadata of this video.
Edit media
x
Upload Preview


Then the input test:

avnet@smartedge:~ $ gpio -g mode 21 in
avnet@smartedge:~ $ gpio -g read 21
0
avnet@smartedge:~ $ gpio -g read 21
1
avnet@smartedge:~ $ gpio -g read 21
0
avnet@smartedge:~ $


Evidence:


Related Blog
Industrial I/O
Use the Industrial I/O
Control Industrial I/O directly from GPIO Pins
C Program for the Industrial I/O
Control Industrial I/O directly from Node-RED
Display Industrial I/O on Node-RED Dashboard
CAN Bus
Use the Isolated CAN
CAN programming in C on Linux: Filter and Mask
2020 Linux Image
The 2020 Linux Image and IoTConnect Scripts
Understand the Custom Scripts and Services (Pt. 1: intro and reset button service)
Understand the Custom Scripts and Services (Pt. 2: led service)
Understand the Custom Scripts and Services (Pt. 3: IoT Connect service)
Anonymous

Top Comments

  • Jan Cumps
    Jan Cumps over 1 year ago +2

    I think that's the lost resistor:

  • Jan Cumps
    Jan Cumps over 1 year ago in reply to Jan Cumps +2

    Yep


    That's better:

  • DAB
    DAB over 1 year ago +1

    Good post Jan.


    DAB

  • Jan Cumps
    Jan Cumps over 1 year ago in reply to ajcc

    I'm checking this out, wasn't aware. I'm always running behind the facts with embedded Linux.

    The good thing with having the I/Os hard wired to ARM GPIOs is that the new way should automagically work for this setup ...

    • Cancel
    • Up +1 Down
    • Reply
    • More
    • Cancel
  • ajcc
    ajcc over 1 year ago

    The sysfs interface /sys/class/gpio is going to go away soon, since Linux 4.8 it's not enabled by default and it will eventually be completely removed. They've switched to a character device based interface instead that can be used through the linux/gpio.h API, there's also the libgpiod library that makes using it a lot easier. With the new way of doing it GPIO pin 21 on the schematic is GPIO pin 21 in the kernel too, plus you can read and write many pins at once.

    • Cancel
    • Up +1 Down
    • Reply
    • More
    • Cancel
  • Jan Cumps
    Jan Cumps over 1 year ago in reply to Jan Cumps

    Step 1 completed:

    • Cancel
    • Up +1 Down
    • Reply
    • More
    • Cancel
  • Jan Cumps
    Jan Cumps over 1 year ago

    The natural next step is to try OpenPLC. I tried it on a Pi: Try out OpenPLC on a Raspberry Pi.

    The combination of a SmartEdge with its industry compiant IO and PLC software can be great asset...

    hang on.

    • Cancel
    • Up +1 Down
    • Reply
    • More
    • Cancel
  • Jan Cumps
    Jan Cumps over 1 year ago

    Obviously, there are pros and cons.


    Pro:

    • for Pi users and software, the industrial I/Os look like any Raspberry Pi  GPIO
    • Specific software like WiringPi and OpenPLC can run out of box.


    Con:

    • modification of the PCB
    • I bet the certifications will be void
    • 8 GPIO pins are now used, while the original design uses none.
    • Cancel
    • Up +1 Down
    • Reply
    • More
    • Cancel
>
Element14

element14 is the first online community specifically for engineers. Connect with your peers and get expert answers to your questions.

  • Members
  • Learn
  • Technologies
  • Challenges & Projects
  • Products
  • Store
  • About Us
  • Feedback & Support
  • FAQs
  • Terms of Use
  • Privacy Policy
  • Legal and Copyright Notices
  • Sitemap
  • Cookies

An Avnet Company © 2022 Premier Farnell Limited. All Rights Reserved.

Premier Farnell Ltd, registered in England and Wales (no 00876412), registered office: Farnell House, Forge Lane, Leeds LS12 2NE.

ICP 备案号 10220084.

Follow element14

  • Facebook
  • Twitter
  • linkedin
  • YouTube