


I'm trying to control an unknown stepper motor with the high-end timer (NHET) module of a Texas Instruments Hercules microcontroller
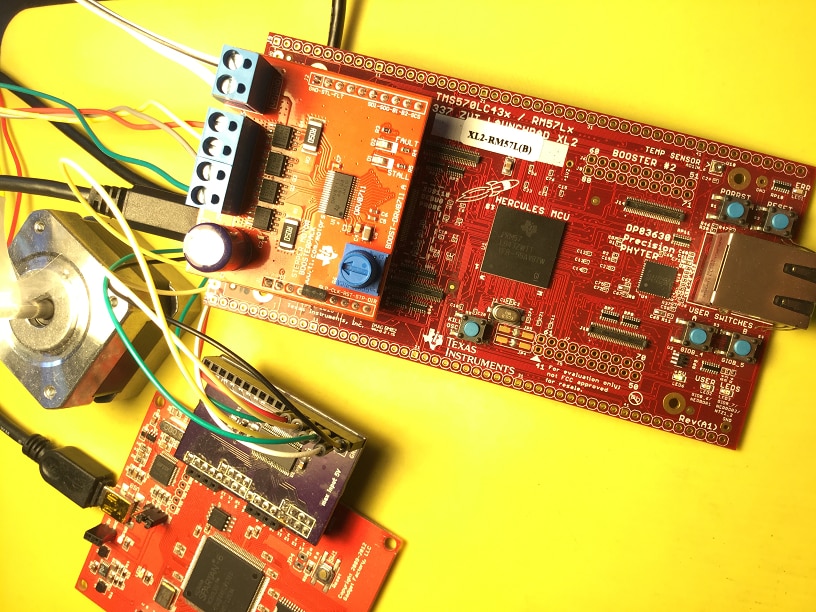
I got a freebie from TI almost a year ago. An unknown stepper motor, a driver board and a Hercules RM57 LaunchPad. The code to run the motor was expected to arrive too (it was an assignment for an internal) but that never materialised. In this blog series I'm trying to program the NHET module so that it sends the right signals to make the stepper step.
In the 6th blog I port the MSP40 SPI commands for the DRV8711 to the Hercules RM57 safety microcontroller.. |
This post shows that even with very different hardware, you can often reuse big chunks of code.
In this case, the DRV8711 register definitions serve me very well.
Big SPI differences between Hercules Controller and MSP430, Little Impact
SPI is SPI. In the example here where we use SPI to set the registers of the DRV8711, all logic to define the register values can be copied.
One of the examples is the DRV8711 Control register:
// CTRL Register
struct CTRL_Register
{
  uint16_t Address; // bits 14-12
  uint16_t DTIME; // bits 11-10
  uint16_t ISGAIN; // bits 9-8
  uint16_t EXSTALL; // bit 7
  uint16_t MODE; // bits 6-3
  uint16_t RSTEP; // bit 2
  uint16_t RDIR; // bit 1
  uint16_t ENBL; // bit 0
};
The choice has been made for readability, not code size. We're spending 8 integer locations to store info that needs to be contained in a 16 bit value.
Not efficient for code size, but I don't mind. It makes understanding and debugging the application easy.
You can always check the values of a particular subset of the register without having to think too much.
If you need the space later, this can be replaced by a single integer per register, and setter + getter functions that use masking, ANDing and ORing to set the right bits.
When setting the final value for communication, the different parts of the register get combined. I translated this part to fit everything in a single integer:
    uint32_t data;

    // Write CTRL Register
    data = REGWRITE | (G_CTRL_REG.Address << 12) | (G_CTRL_REG.DTIME << 10) | (G_CTRL_REG.ISGAIN << 8) |(G_CTRL_REG.EXSTALL << 7) | (G_CTRL_REG.MODE << 3) | (G_CTRL_REG.RSTEP << 2) | (G_CTRL_REG.RDIR << 1) | (G_CTRL_REG.ENBL);
    SPI_DRV8711_Write(data);
original code on the MSP430:
    unsigned char dataHi = 0x00;
    unsigned char dataLo = 0x00;


    // Write CTRL Register
    dataHi = REGWRITE | (G_CTRL_REG.Address << 4) | (G_CTRL_REG.DTIME << 2) | (G_CTRL_REG.ISGAIN);
    dataLo = (G_CTRL_REG.EXSTALL << 7) | (G_CTRL_REG.MODE << 3) | (G_CTRL_REG.RSTEP << 2) | (G_CTRL_REG.RDIR << 1) | (G_CTRL_REG.ENBL);
    SPI_DRV8711_ReadWrite(dataHi, dataLo);
With the Hercules, you get a GUI to configure the modules and registers. A nice solution that helps to master the (very complex!) peripherals of this family.
The GUI is non-intrusive and supports round-trip design. You can override the settings in code. If done properly, you can keep on using the GUI and the code changes interactively.
Here's how you set the SPI bit width and speed:
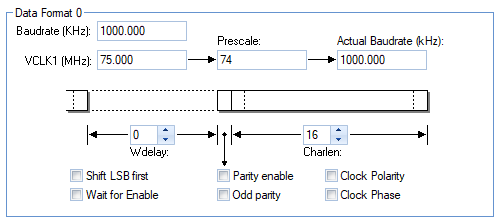
There's also a screen where you can fine-tune the timings within a SPI communication burst:

When performing the communications, these settings can be used to do unbuffered (upper part of screen capture) and buffered (lower part) SPI.
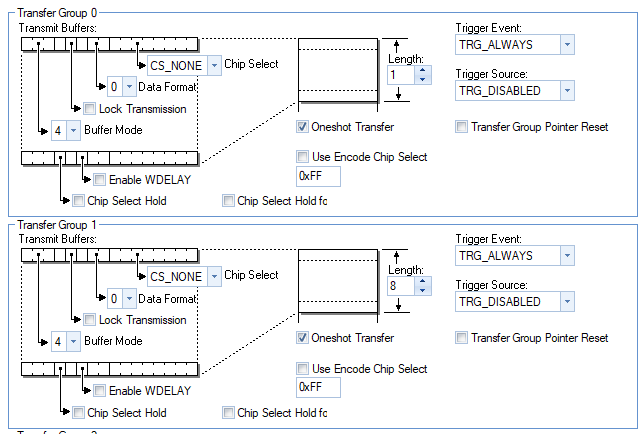
The upper part exchanges one 16-bit value (in our case, because we've defined a Data Format 0 with bit size ).
In the lower part, we can exchange 8 16-bit values in a single shot.
The Hercules off-loads the work to the SPI module.
The ARM controller can do different things in the meantime.
You can see that I haven't selected a SPI CHIP Select. That's because the Stepper Motor BoosterPack doesn't have it's CS pin on a SPI capable pin.
Don't ask me why. If only they moved it to the free pin above, it would be OK - that's a default CS pin for BoosterPacks. Don't call me. Call TI.
Solving Incompatible Chip Select
Easy (in our case. Less easy when dealing with a big chunk of buffered data. In that scenario I would change the hardware).
As told before, the CS pin on the boosterpack isn't matching a CS of the LaunchPad Standard. So we have to provide the CS ourselves.
The first thing to do is tell the SPI module to not set a CS.

From that moment on, the CS decision is up to your own firmware.
The DRV8711 CS matches the RM57 GIOB[2] pin.
So I have to do a few things
. First is to set this as a GIO output pin:
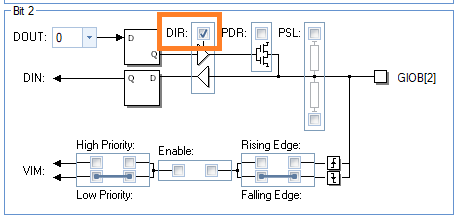
Once we've called gioInit(), this pin can be programmed.
The DRV8711, ignorant of what's common on SPI modules, expects the CS to be high when active.
void SPI_DRV8711_Write(uint16_t data) {
    gioSetBit(gioPORTB, 2, 1); // manual CS high
    mibspiSetData(mibspiREG3, 0, &data);
    mibspiTransfer(mibspiREG3, 0 );
    while(!(mibspiIsTransferComplete(mibspiREG3, 0))) {
    }
    gioSetBit(gioPORTB, 2, 0); // manual CS low
}
The code above bitbangs the CS high before ommunication, low after.
It works. The downside is that the ARM core needs to do the activity.
If the BoosterPack would be fully compatible, the controller would be free for any other activity once it informed the SPI module of the location and size of data ..
The while loop would be unnecessary. We'd just call the transfer module and go on doing things that matter...
Again, that's not an issue with the Hercules controller or the DRV8711 chip. It's because the way the BoosterPack routes it. Call TI.
In your own design, you'd route this DRV8711 pin to a MinSPI3 CS pin (there's 5 of them,so choice galore).
The excellent news is that everything works. I've replicated the code that initialises the DRV8711 from the MSP430, and the Logic Analyzer capture is fully compatible:
void WriteAllRegisters() {
    uint32_t data;

    // Write CTRL Register
    data = REGWRITE | (G_CTRL_REG.Address << 12) | (G_CTRL_REG.DTIME << 10) | (G_CTRL_REG.ISGAIN << 8) |(G_CTRL_REG.EXSTALL << 7) | (G_CTRL_REG.MODE << 3) | (G_CTRL_REG.RSTEP << 2) | (G_CTRL_REG.RDIR << 1) | (G_CTRL_REG.ENBL);
    SPI_DRV8711_Write(data);

    // Write TORQUE Register
    data = REGWRITE | (G_TORQUE_REG.Address << 12) | (G_TORQUE_REG.SIMPLTH << 8) | G_TORQUE_REG.TORQUE;
    SPI_DRV8711_Write(data);

    // Write OFF Register
    data = REGWRITE | (G_OFF_REG.Address << 12) | (G_OFF_REG.PWMMODE << 8) | G_OFF_REG.TOFF;
    SPI_DRV8711_Write(data);

    // Write BLANK Register
    data = REGWRITE | (G_BLANK_REG.Address << 12) | (G_BLANK_REG.ABT << 8) | G_BLANK_REG.TBLANK;
    SPI_DRV8711_Write(data);

    // Write DECAY Register
    data = REGWRITE | (G_DECAY_REG.Address << 12) | (G_DECAY_REG.DECMOD << 8) | G_DECAY_REG.TDECAY;
    SPI_DRV8711_Write(data);

    // Write STALL Register
    data = REGWRITE | (G_STALL_REG.Address << 12) | (G_STALL_REG.VDIV << 10) | (G_STALL_REG.SDCNT << 8) | G_STALL_REG.SDTHR;
    SPI_DRV8711_Write(data);

    // Write DRIVE Register
    data = REGWRITE | (G_DRIVE_REG.Address << 12) | (G_DRIVE_REG.IDRIVEP << 10) | (G_DRIVE_REG.IDRIVEN << 8) | (G_DRIVE_REG.TDRIVEP << 6) | (G_DRIVE_REG.TDRIVEN << 4) | (G_DRIVE_REG.OCPDEG << 2) | (G_DRIVE_REG.OCPTH);
    SPI_DRV8711_Write(data);

    // Write STATUS Register
    data = REGWRITE | (G_STATUS_REG.Address << 12) | (G_STATUS_REG.STDLAT << 7) | (G_STATUS_REG.STD << 6) | (G_STATUS_REG.UVLO << 5) | (G_STATUS_REG.BPDF << 4) | (G_STATUS_REG.APDF << 3) | (G_STATUS_REG.BOCP << 2) | (G_STATUS_REG.AOCP << 1) | (G_STATUS_REG.OTS);
    SPI_DRV8711_Write(data);
}
Protocol Analyser capture:

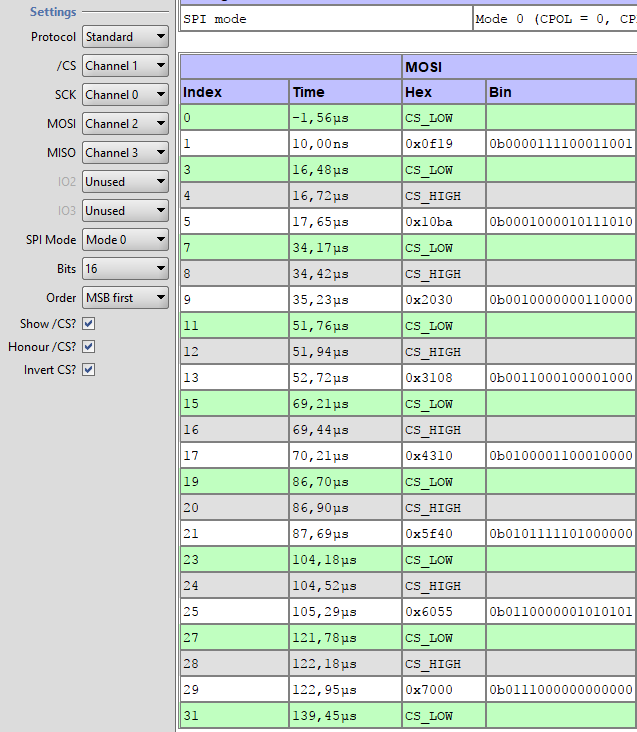
That's perfect for this application. There's room for optimisation, but let's only do that if needed. Any changes make comparison with the original MSP430 example more complex ..
For the mere mortal, this may seem to be a small step. For the down-to-earth ones: we can now focus on the core problem - creating a perfect PWM signal to drive the stepper.
Top Comments