element14 Community
element14 Community
    Register Log In
  • Site
  • Search
  • Log In Register
  • Community Hub
    Community Hub
    • What's New on element14
    • Feedback and Support
    • Benefits of Membership
    • Personal Blogs
    • Members Area
    • Achievement Levels
  • Learn
    Learn
    • Ask an Expert
    • eBooks
    • element14 presents
    • Learning Center
    • Tech Spotlight
    • STEM Academy
    • Webinars, Training and Events
    • Learning Groups
  • Technologies
    Technologies
    • 3D Printing
    • FPGA
    • Industrial Automation
    • Internet of Things
    • Power & Energy
    • Sensors
    • Technology Groups
  • Challenges & Projects
    Challenges & Projects
    • Design Challenges
    • element14 presents Projects
    • Project14
    • Arduino Projects
    • Raspberry Pi Projects
    • Project Groups
  • Products
    Products
    • Arduino
    • Avnet Boards Community
    • Dev Tools
    • Manufacturers
    • Multicomp Pro
    • Product Groups
    • Raspberry Pi
    • RoadTests & Reviews
  • Store
    Store
    • Visit Your Store
    • Choose another store...
      • Europe
      •  Austria (German)
      •  Belgium (Dutch, French)
      •  Bulgaria (Bulgarian)
      •  Czech Republic (Czech)
      •  Denmark (Danish)
      •  Estonia (Estonian)
      •  Finland (Finnish)
      •  France (French)
      •  Germany (German)
      •  Hungary (Hungarian)
      •  Ireland
      •  Israel
      •  Italy (Italian)
      •  Latvia (Latvian)
      •  
      •  Lithuania (Lithuanian)
      •  Netherlands (Dutch)
      •  Norway (Norwegian)
      •  Poland (Polish)
      •  Portugal (Portuguese)
      •  Romania (Romanian)
      •  Russia (Russian)
      •  Slovakia (Slovak)
      •  Slovenia (Slovenian)
      •  Spain (Spanish)
      •  Sweden (Swedish)
      •  Switzerland(German, French)
      •  Turkey (Turkish)
      •  United Kingdom
      • Asia Pacific
      •  Australia
      •  China
      •  Hong Kong
      •  India
      •  Korea (Korean)
      •  Malaysia
      •  New Zealand
      •  Philippines
      •  Singapore
      •  Taiwan
      •  Thailand (Thai)
      • Americas
      •  Brazil (Portuguese)
      •  Canada
      •  Mexico (Spanish)
      •  United States
      Can't find the country/region you're looking for? Visit our export site or find a local distributor.
  • Translate
  • Profile
  • Settings
Internet of Things
  • Technologies
  • More
Internet of Things
Blog Blockchain - Analyse the Infineon Android Demo App - part a: Detect Card
  • Blog
  • Forum
  • Documents
  • Quiz
  • Events
  • Polls
  • Members
  • Mentions
  • Sub-Groups
  • Tags
  • More
  • Cancel
  • New
Join Internet of Things to participate - click to join for free!
  • Share
  • More
  • Cancel
Group Actions
  • Group RSS
  • More
  • Cancel
Engagement
  • Author Author: Jan Cumps
  • Date Created: 15 Mar 2020 11:00 AM Date Created
  • Views 717 views
  • Likes 4 likes
  • Comments 1 comment
  • android
  • infineon
  • security2go
  • security_2go
  • rt
Related
Recommended

Blockchain - Analyse the Infineon Android Demo App - part a: Detect Card

Jan Cumps
Jan Cumps
15 Mar 2020

This post is part of the Infineon Blockchain Starter Kit road test.

Blockchain - outside of the bitcoin context - is new to me.

Follow along with me on this path to learn the technology....


Let's dive further into the example Android App "coinfinity". Look how it iteracts with the Infineon Security 2Go cards.

image


NFC on Android


Android has decent documentation: NFC Basics.

Rough summary: if your application has flagged that it uses the NFC subsystem, and you hold a card to the phone's NFC reader, Android will invoke a callback method in your application.

You can then react on that. The Android lingo is: Intent.


Requesting access to NFC is done in the manifest file:

    <uses-permission android:name="android.permission.NFC"/>
    <uses-permission android:name="android.permission.INTERNET"/>

    <uses-feature
            android:name="android.hardware.nfc"
            android:required="true"/>

    <uses-permission android:name="android.permission.WRITE_EXTERNAL_STORAGE"/>
    <uses-permission android:name="android.permission.READ_PHONE_STATE"/>
    <uses-permission android:name="android.permission.READ_EXTERNAL_STORAGE"/>


Here's the method (in MainActivity class) that will get called when NFC (or any other intent) is captured:

    /**
     * Called by Android systems whenever a new Intent is received. NFC tags are also
     * delivered via an Intent.
     *
     * @param intent
     */
    @Override
    protected void onNewIntent(Intent intent) {
        activityPaused = false; // onPause() gets called when a Intent gets dispatched by Android
        setIntent(intent);
        resolveIntent(intent);
    }


The stack frame, when a card is detected by the phone:

image


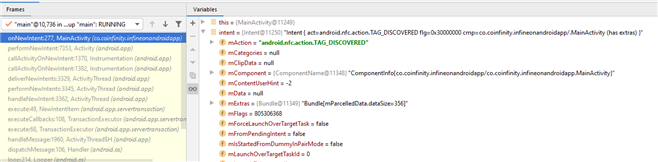
The top method, MainActivity.onNewIntent(), is in the app code. All the rest is standard Android application and event handling.

It shows how this detected event trickles through to a point where you can handle it in the code.

The right half of the image shows the intent's attributes. We got a "tag discovered" message. That makes sense because we just tapped a card on the phone.


The app code then calls Android's setIntent() - the usual first action in onNewIntent(). Then over to the app's own resolveIntent().

    /**
     * Will be called after card was hold to back of device.
     *
     * @param intent includes nfc extras
     */
    private void resolveIntent(Intent intent) {
        // Only handle NFC intents
        if (intent.getParcelableExtra(NfcAdapter.EXTRA_TAG) == null) {
            return;
        }

        Tag tag = intent.getParcelableExtra(NfcAdapter.EXTRA_TAG);
        UiUtils.logTagInfo(tag);
        IsoDep isoDep = IsoDep.get(tag);
        if (isoDep == null) {
            showToast(getString(R.string.wrong_card), this);
            return;
        }
        // now we have an IsoTag:

        // update UI
        displayOnUI(GuiState.PROGRESS_BAR);

        try {
            SharedPreferences pref = this.getSharedPreferences(PREFERENCE_FILENAME, Context.MODE_PRIVATE);
            pubKeyString = NfcUtils.readPublicKeyOrCreateIfNotExists(IsoTagWrapper.of(isoDep),
                    pref.getInt(KEY_INDEX_OF_CARD, 1)).getPublicKeyInHexWithoutPrefix();
            isoDep.close();
        } catch (IOException | NfcCardException e) {
            showToast(e.getMessage(), this);
            Log.e(TAG, "Exception while reading public key from card: ", e);
            resetGuiState();
            return;
        }
        Log.d(TAG, String.format("pubkey read from card: '%s'", pubKeyString));
        // use web3j to format this public key as ETH address
        ethAddress = Keys.toChecksumAddress(Keys.getAddress(pubKeyString));
        ethAddressView.setText(ethAddress);
        Log.d(TAG, String.format("ETH address: %s", ethAddress));
        qrCodeView.setImageBitmap(QrCodeGenerator.generateQrCode(ethAddress));
        holdCard.setText(R.string.card_found);
    }


This is the first time that a specific Infineon NFC class and logic is called.

First there's a test to see if this is an NFC event.

If yes, additional info is recovered from the context that's passed on by Android.

If all matches up, and it's confirmed this is an IsoTag type of card, we try to retrieve the public key (the one that matches the key index selected in the app).


image


Then an external library, web3j, is used to retrieve the etherium address (it's used for some other transactional functionality later).

The library dependency is documented in the project's (not the app's) Gradle build file:

dependencies {
    // ...
    implementation 'com.github.UnknownEnergy:web3j:android_with_erc20_contract-SNAPSHOT'
    // ...


That's then displayed on the app, both as a string and a QR code.


What To Look Up Next?


This is a good hook to start looking into the NfcUtils class, and see how the public key is actually retrieved from the card.

If you (like me) are new to apps, it's also a good starting point to see how an app works, how events are handled, and see some real code.


In the next post, I'm going to investigate how the card info is used when submitting a Blockchain transaction.


Related Blog
Blockchain - HyperLedger Fabric pt 1: post and search transactions on a distributed trusted ledger
Blockchain - Hyperledger Burrow: set up a distributed ledger
Blockchain - Get Some Crypto Currency on an Infineon Security 2Go Card
Blockchain - Debug the Infineon Demo App with Android Studio and Your Phone
Blockchain - Analyse the Infineon Android Demo App - part a: Detect Card
Blockchain - Analyse the Infineon Android Demo App - part b: Retrieve Ethereum Crypto Currency Balance
Blockchain - Analyse the Infineon Android Demo App - part c: Transaction, Move Crypto Currency to Another Account
Blockchain - Talk Directly to the Infineon 2Go Smart Cards API
Blockchain - Smart Contract Test
Road Test notepad: Infineon Blockchain Starter Kit
Infineon Blockchain Starter Kit - Review
Blockchain - HyperLedger Fabric pt 2: application using blockchain and smart contract
Blockchain - HyperLedger Fabric pt 3: web console
  • Sign in to reply

Top Comments

  • Jan Cumps
    Jan Cumps over 5 years ago +1
    an update on how the 3 action buttons are enabled or disabled: There's a thread running that regularly calls this method: public void updateEuroPrice() throws Exception { if (ethBalance == null) return;…
  • Jan Cumps
    Jan Cumps over 5 years ago

    an update on how the 3 action buttons are enabled or disabled:


    There's a thread running that regularly calls this method:


        public void updateEuroPrice() throws Exception {
            if (ethBalance == null)
                return;
    
    
            Log.d(TAG, "reading EUR/ETH price..");
            TransactionPriceBean transactionPriceBean = coinfinityClient.readEuroPriceFromApiSync("0", "0",
                    ethBalance.getEther().toString());
            Log.d(TAG, String.format("reading EUR/ETH price finished: %s", transactionPriceBean));
            if (transactionPriceBean != null && pubKeyString != null) {
                this.runOnUiThread(() -> {
                    balance.setText(String.format("%s%s", ethBalance.toString(),
                            String.format(Locale.ENGLISH, "\nEuro: %.2f", transactionPriceBean.getPriceInEuro())));
                    if (!sendEthBtn.isEnabled()) {
                        sendEthBtn.setEnabled(true);
                        sendErc20Btn.setEnabled(true);
                        votingBtn.setEnabled(true);
                    }
                    displayOnUI(GuiState.BALANCE_TEXT);
                });
            }
        }


    If it manages to contact the blockchain and has a known card id, the 3 function buttons are enabled:

    image

    • Cancel
    • Vote Up +1 Vote Down
    • Sign in to reply
    • More
    • Cancel
element14 Community

element14 is the first online community specifically for engineers. Connect with your peers and get expert answers to your questions.

  • Members
  • Learn
  • Technologies
  • Challenges & Projects
  • Products
  • Store
  • About Us
  • Feedback & Support
  • FAQs
  • Terms of Use
  • Privacy Policy
  • Legal and Copyright Notices
  • Sitemap
  • Cookies

An Avnet Company © 2025 Premier Farnell Limited. All Rights Reserved.

Premier Farnell Ltd, registered in England and Wales (no 00876412), registered office: Farnell House, Forge Lane, Leeds LS12 2NE.

ICP 备案号 10220084.

Follow element14

  • X
  • Facebook
  • linkedin
  • YouTube