


Table of Contents
- Introduction: What’s a Blog Checklist?
- Good Flow, Bad Flow?
- Value
- Fun to Read?
- Is the Content Appropriate?
- Is the Content Relevant?
- Use a Table of Contents
- Write an Introduction
- Write a Summary
- Make Use of the Editor Tools
- Photos
- Diagrams
- Source Code
- Circuit Diagrams
- Video
- Hyperlinks
- Don’t Forget the References
- Spell and Grammar Check
- Using AI Effectively
- Summary
Introduction: What’s a Blog Checklist?
Ever written a technical blog and then wondered if you’d included everything you needed to?
Here is a kind of checklist that you could glance over to confirm things when preparing blogs! I hope the list can be collaborative (Jan Cumps (jancumps),for instance, has already helped with the list). The sections are in no particular order. If you have additional suggestions, please add comments, so people can benefit from them. On to the list...!
Good Flow, Bad Flow?
Good flow doesn’t come naturally. It is usually created by good editing and knowing when to delete and simplify text if you can. You can do this in a word processor and then copy-paste the content into the blog online editor. It will preserve headings.
Here’s how not to do it: this bad flow is a wall of text, and after reading it, the user may have more questions than answers. It would have been better to have some photos, perhaps in context (e.g., on a board, and photos of the typical products they are used in. The text could then have been reduced a lot.
 image source: element14.com
Here’s an example of keeping it simple:

That’s it; people understand three points. Four or more can often be harder to follow, so sometimes it can be good to break up larger things into (say) three chunks and then if you need to, break one of those chunks into two or three pieces. This 3-points concept doesn’t always apply, for instance, if you’re providing a load of selections rather than steps.
Value
It’s good if your blog provides valuable content (And it is not binary. Try to avoid low value. The more value, the better!). Will readers walk away feeling they have learned a lot? It is possible to create value in many ways. Here are some examples:
1. Understand a topic and then explain it in a simple way
2. Place your findings (measurements for instance) in a table or chart to help people easily make decisions from it
3. Consider writing a step-by-step guide if one doesn’t already exist
4. Write your honest opinion, but based on evidence or measurements. An empty or non-technical opinion (e.g. “Windows sucks” is not worth a lot! This example also falls foul of the next section “Fun to Read”).
5. Make recommendations about what software or hardware features worked together
Fun to Read?
There are many ways to make a blog post fun or enjoyable to read without devaluing the content. Here are some ideas:
1. Hand-drawn illustrations/diagrams for a personal touch
2. Insert a little comment that reveals a bit about you; for instance, if an LED switches off in your circuit, then you could make a reference about turning to the Dark Side if sci-fi is what interests you.
3. Try to link things to current affairs; for instance, if you’re writing about FPGAs, then you could refer to how FPGAs were used for Bitcoin mining if that is in the news currently. This technique is easy; just google your topic and search for the latest news!
4. Express your passion; it could be as simple as using exclamation marks (in moderation) to reveal what aspects of the project were surprising and interesting to you.
5. Avoid negativity. And keep things focussed on the technology, not on personal issues. If something doesn’t work, then provide an alternative! Provide at least a load of interesting recommendations and next steps along with the postmortem if a project fails.
Incidentally, don't forget to give the blog a good title! One technique (there are others) is to split the title into two portions separated by a colon (:). For instance, a blog called Learning Python might be better named Python for Engineers: How I Learned It and Used It, where the stuff after the colon is effectively a secondary title read in conjunction with the first portion of the title. It's not always essential to do this. It's just one style.
Is the Content Appropriate?
People sign up to the website for engineering-related topics. They don’t sign up for politics or religion or social topics or sexism or inappropriate jokes.
There are many other rules. You should check the guidelines, especially relating to AI generated content, spam, adverts, copied material, and sponsored content.
It is also good to use common-sense. An empty blog, or a “placeholder” blog, is irritating to readers who may click on it without knowing it will be empty. If you are writing a blog to a time schedule, then the best way is to write and publish it comfortably in advance.
It’s not a very ‘team-player’ approach to try to hold off publishing until the very last day just so that others might not try to improve their blog to your level, but if you want to publish on the last day, then it is good to find a way to publish with meaningful content.
Is the Content Relevant?
There’s a line between writing content based on your interests and passion versus writing content to meet other people’s requirements. A classic example of the latter are PR (public relations) blogs, which are often not of interest to the writer who was tasked to write it. You can easily tell if someone was genuinely interested in what they have explored/engineered/written up, i.e., if they had passion in their work.
If you have to write content based on other people’s requirements, then at least make sure it is actually relevant to those requirements! In other words, if you have committed to meeting requirements, it’s not good to try to change the requirements unilaterally because it will be evident to the audience (who will be expecting to read content meeting the requirement) that the author went off on their own expedition. An example of this is if you’ve been given a topic to write about, and you write about something completely different because the “completely different” thing was the thing that actually interested you. Another example could be to focus on minor ancillary stuff (such as the look and feel of a project) and never get to the “meat” of the requirement.
The way to never get stuck in this situation is first to understand the requirement thoroughly and then either become interested in the requirement so that you have the drive to focus on it or, alternatively, pick a topic that has a very strong overlap with the requirement rather than a weak one, and then focus your blog almost entirely on that overlap.
Another slightly related point; if your blog or project is very niche, or you're a specialist in a new field, then it can be helpful to explain in the blog how the information might be relevant to other needs too (if that's the case). It's always good to explain in a simple way if possible, and hopefully, people will then be able to apply the information to their own requirements, i.e. making your content relevant to a lot more people.
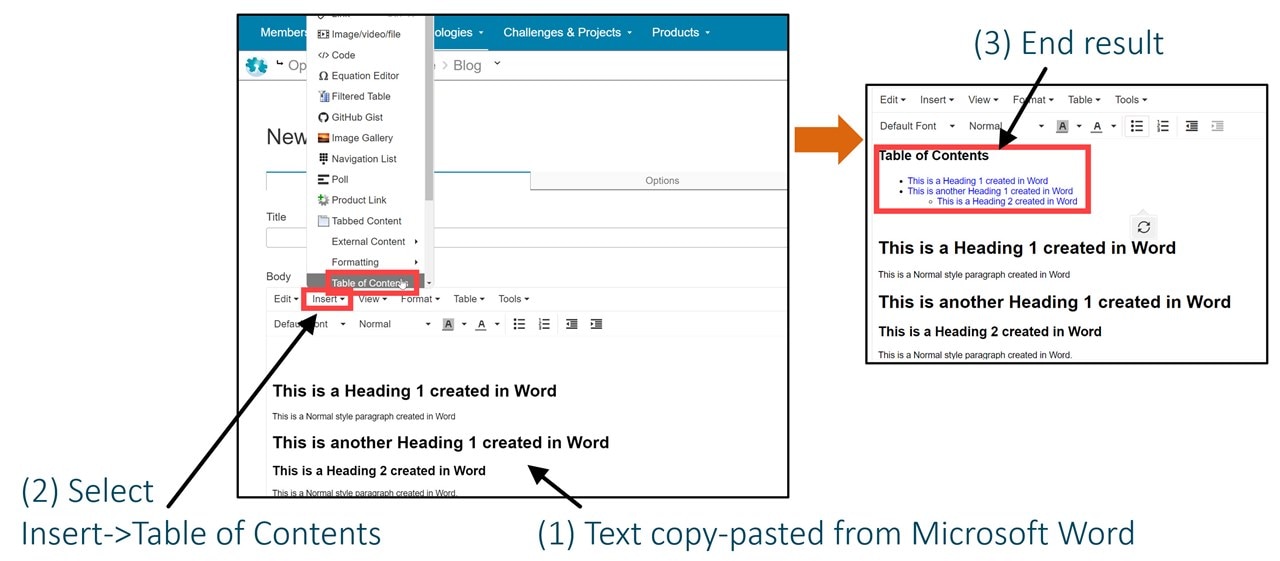
Use a Table of Contents
Provided you’ve used headings throughout your blog post, the Table of Contents (ToC) is easy to add by selecting it in the Editor toolbar.
Write an Introduction
Not everyone is a fan of introductions. However, if you use it correctly (for instance, when the rest of the blog has a level of complexity that is not immediately easy to dive into) it is an excellent way of explaining what the blog is about and what the blog will contain. That way, the reader is prepared for what will follow, without getting too lost. The example screenshot below shows a blog with an intro and a video (it could alternatively have been a photo) so that it’s clear what the blog is about.
 image source: element14.com
Write a Summary
Not everyone is a fan of summaries; many people don’t use them in blogs, but I think they should reconsider. Sometimes any ‘Conclusions’ section or similar, acts like a summary too. A summary is effectively a third chance to mention all your key points (you will have already mentioned some of them in the introductory paragraphs, as well as in the main body of the blog). If you use different wording, you can help different-language speakers understand what you mean, because they will get to try to follow what you mean three times in three different ways.
Here’s a nice summary that explained what the blog was about, and explained the problem and the main solution in just four sentences.

image source: element14.com
Make Use of the Editor Tools
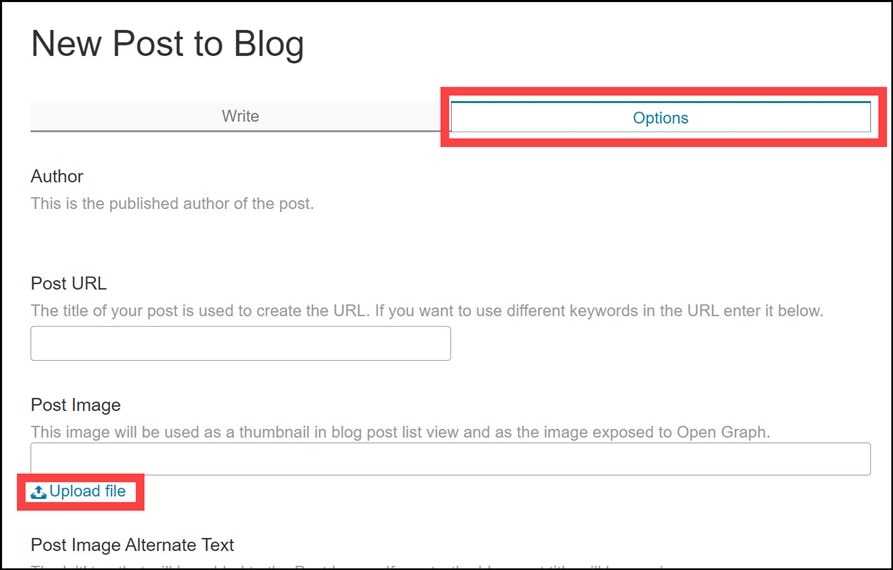
It is worth exploring the editor toolbar and seeing how to use things like headings, bullet points, and so on. Also, make use of the tags capability so that the blog is easier to find. Check out the Options tab at the top of the editor to add a banner image.
Photos
Well-focussed photos could be very helpful. You could direct the readers' attention to specific parts of the photo with arrows or other annotations. The example below would have been difficult to describe with just a plain photo and paragraphs of text. Instead, the arrows and annotations explain it all and also direct the reader to just the important parts of the image, which is important when there could be dozens of parts on a circuit board photo but you wish the reader to only look at specific portions of it.

image source: element14.com
Diagrams
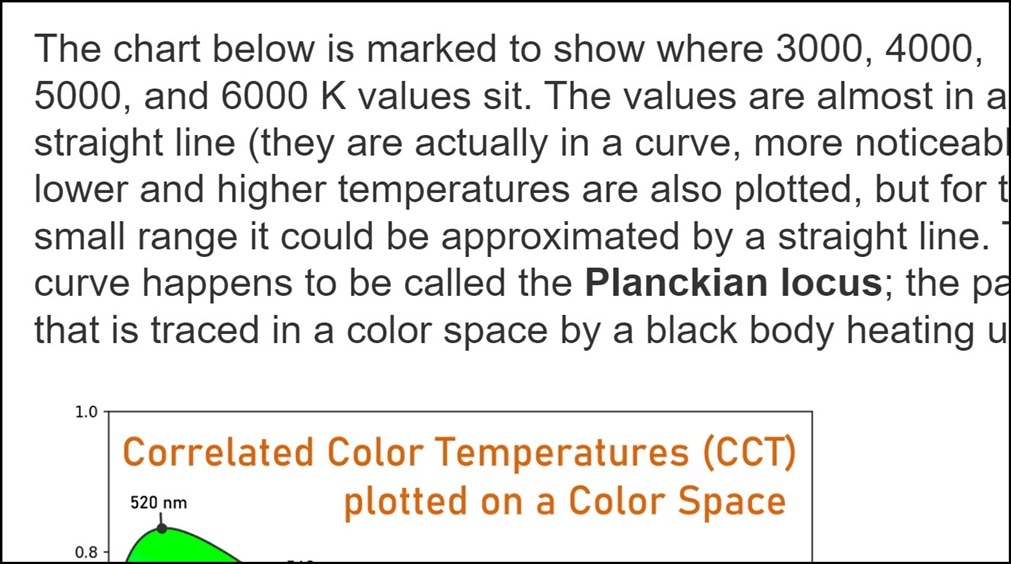
Clean simple diagrams are helpful. If the diagram needs to be complex, then consider two diagrams, the first one being high-level.
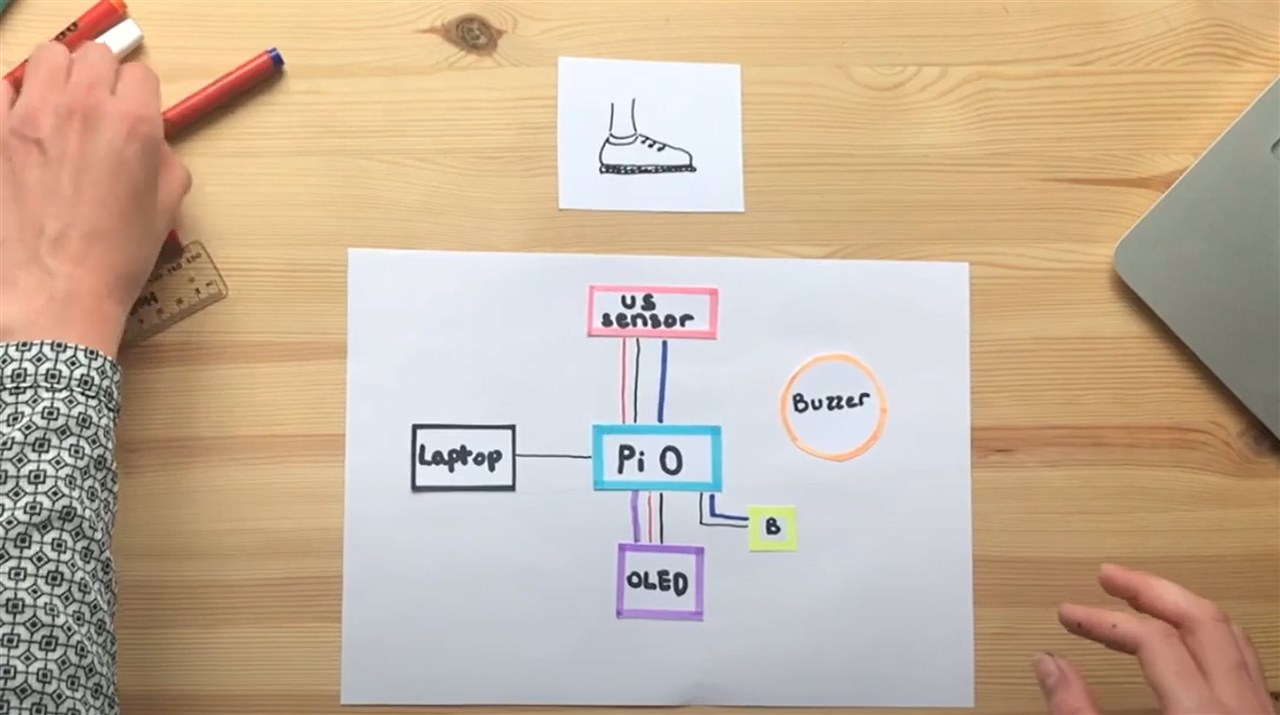
image source: element14.com
Here’s an example where the complexity is reduced with two diagrams. It would all have been complicated to follow if it wasn’t split up like this.
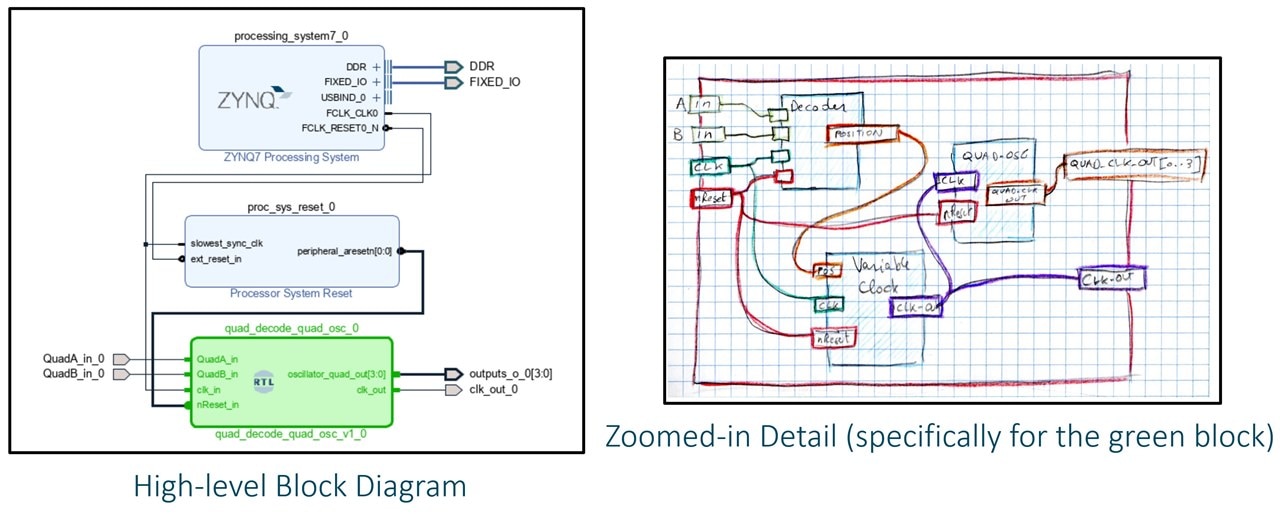
image source: element14.com
Source Code
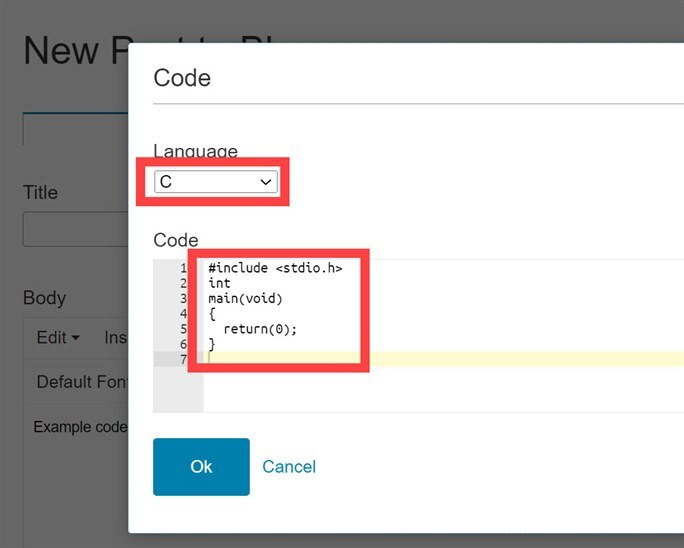
If you’re sharing code, then don’t forget to share it! GitHub is an excellent option, but you could also just zip up the code and attach it to the blog post (click on Insert->Images/Videos/Files from the Editor menu). Screenshots of code are not appropriate unless it’s just a small piece of code that is also shared properly as a readable file or embedded in the blog. Code is embedded by selecting Insert->Code from the editor menu. A pop-up window appears in which the language can be selected for syntax highlighting, and the code can be copy-pasted.
If you’re inserting short commands inline within your paragraphs of text, then you could consider distinguishing it by (say) making the text bold (by highlighting it and typing Ctrl-B) or by using the editor menu and selecting Format->Formats->Inline->Code as shown in the screenshot below.

Circuit Diagrams
KiCad is a good option for preparing circuit diagrams. Fritzing-style diagrams are often pretty awful but could be great for a project with very few connections. If the wiring looks like a rat's nest, then the project is probably unsuitable for documentation with Fritzing. Here’s a bad example:

image source: instructables
Video
If you’ve captured video with your mobile phone or whatever, it is easy to add audio, annotations, edit it, and so on, using a free video editor. DaVinci Resolve can do all this and has tons of help videos on YouTube. Or, use your favorite video editor! There are many video editor suggestions to explore.
There is plenty of good screen-grabbing and screen-recording software. For example, Snagit for Windows is pretty good. Also, check out the following tips for recording a screen and a camera.
Sometimes, it is perfectly fine to have shaky, simple video, even without speech, perhaps, provided the message is clear. If you don’t wish to record audio, consider inserting a text annotation or two within the video.
Long videos are tiresome because people may have better things to do than spend half an hour watching a single long video. Consider splitting it up into sections (YouTube has chapter capability for videos) or into separate videos, or edit it to reduce the unnecessary parts.
Good audio is more important than good video (this doesn't mean a perfect voice or perfect English, but good quality voice recording).
Music on top of speech usually stinks, by the way. If you’re using music, consider setting the volume completely to zero during speech.
Here’s a bad video:
Here’s a good video:
Hyperlinks
It is worth going through your blog post and adding hyperlinks everywhere that you think is helpful.
The wrong way to add a hyperlink is: Click here to learn about motor control.
The better way to add a hyperlink is: The motor control PDF guide contains lots of useful information to learn about.
Don’t Forget the References
If you’ve used material that doesn't belong to you, it must be credited to the author. Even then, it is unlikely acceptable unless it is fair use (e.g. a tiny snippet). It’s best to have your references at the point of use, rather than a separate References section at the end. You’re not writing a paper, you’re writing an electronic blog and technology allows for references and their links to be placed precisely where it makes sense for the reader, in context with what they are reading.
Spell and Grammar Check
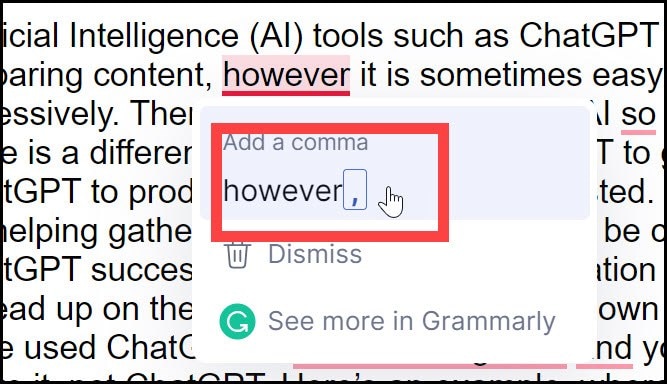
Spelling is low-hanging fruit because it is so easy to do. Grammar is usually more difficult. You could consider installing Grammarly in your web browser, which will do a spelling and grammar check, and make recommendations, each of which can be accepted with a single click. The free account of Grammarly is very good.
The problem with grammar, is that it is complex. It’s almost impossible to write with good grammar without help. Even native English speakers need to rely on professional editors when writing content for customers. Even if you think your grammar is excellent, it probably isn’t.
If you use a tool such as Grammarly, you’ll easily be able to push up your grammar quality to a decent level.
Also, don't forget to read your content, in case you spot anything on the second reading that could be improved for spellng/grammar or flow. It is easy to edit the blog post if you later spot mistakes you wish to correct.
Using AI Effectively
Artificial Intelligence (AI) tools such as ChatGPT can assist when preparing content. However, it is sometimes easy to tell when someone has used AI excessively. There are site rules regarding AI, so those need to be followed. Note that there is a difference between using ChatGPT to gather information versus using ChatGPT to produce output that is copy-pasted. ChatGPT can be extremely effective for helping gather information, which should be checked for accuracy. One way to use ChatGPT successfully is to ask it for information about a topic and then use its output to read up on the subject and prepare your own content. That way, you have used ChatGPT to gather information, and your content is still original because you wrote it, not ChatGPT. Here’s an example where a question was asked to ChatGPT in blue and the response in orange can be seen:

The output from ChatGPT never made it into a blog post. Instead, the information from there was researched, and then the following original content was created:
The benefit of doing this is that through your research, you will soon determine if the information obtained via ChatGPT was correct or not, and therefore, you have now added value.
Summary
It is worth keeping a mental checklist in the back of your mind when creating blog posts. Most of it is intuitive, but it can be easy to forget the obvious when in the zone or writing to a deadline. Perhaps your checklist will be different from this one, but nevertheless, hopefully, this blog post can provide some ideas, and if you have additional suggestions, please share them so that others can benefit from them, too.
Thanks for reading!

