


Remote Agriculture Solution
Blog Links:
#02: Components and Design Structure
#04: Setting up Arduino Nano 33 IOT
#08: Linking Everything to Arduino Nano 33 IOT
#09: Time to See the Work in Action
In this blog, we will set up the bot for automatic movement around the farm.
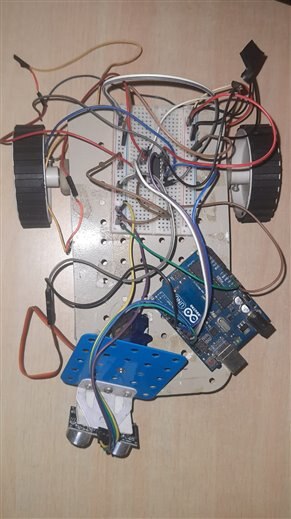
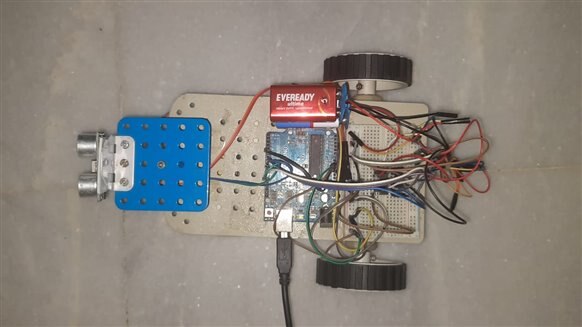
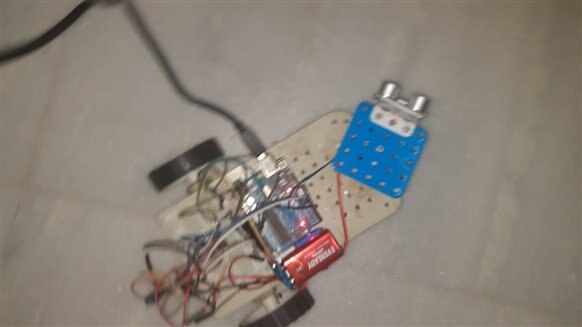
For this part of the project, I used an Ultrasonic sensor to measure distance. The bot moves around the farm and whenever detects an object it is able to find it's own path out. In this way, it can move around entire farm. The motors are controlled using Arduino and L293D IC. I had to use two batteries as my single battery didn't provide enough current to take the load of the bot. Further, the ultrasonic sensor is mounted on a Servo to allow it to measure distance across all directions and find the best path out. This makes it a simple yet fully autonomous bot.
Components:
1. Ultrasonic Sensor - HCSR04
2. DC Motors - 2
3. L293D IC
4. Servo Motor - 1
5. Arduino Uno(or any other version)
6. Wheels - 2
7. 9V Batteries - 2
Some chassis components, wires and breadboard.
Wiring:
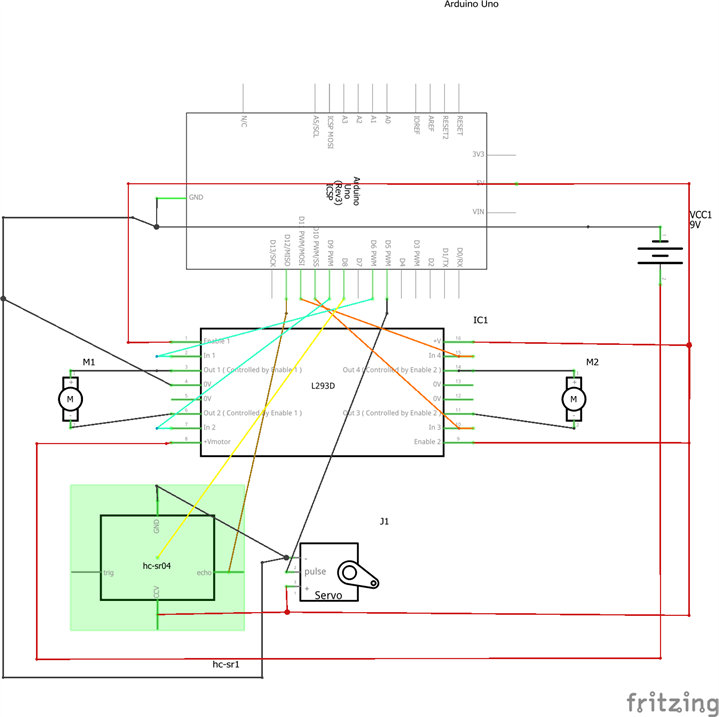
I set the enable1 and enable2 pins of L293D HIGH by wiring them to Arduino 5V, this made the motors run at full speed. The batteries powered the motors while the Arduino managed the control process and the ultrasonic sensor.
The ultrasonic sensor mounted on the servo moved around to find checkLeft and checkRight. Whenever the distance in front is less than 15cm, the bot will check both directions and turn wherever there is more space. Also, if checkLeft and checkRight both are less than 10cm, then the bot goes reverse and turns left to find another route. This can be changed according to your own requirements.
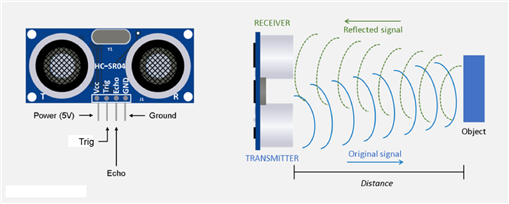
The ultrasonic sensor transmits a sound wave and calculates the time it takes for the signal to come back after getting reflected from an object. Therefore, we divided the time calculated from the sensor by 2 to calculate the distance.
We used this formula to convert duration to centimeters.
cm = (duration / 2) * 0.034;
Speed of sound = 340m/s = 0.034cm/μs
Distance = time*speed
Distance = (duration/2)*0.034 cm
The turnDelay was set to 1100 to ensure the bot made a complete 90 degree turn when calling left() and right() functions. This may be changed depending on different setup changes.
Breadboard:

Schematic:
Code:
You can see and download the code from this link
https://github.com/aaryan2134/Remote-Agriculture-Solution/tree/main/AgroBot_Autonomous_Motion
//Remote Agriculture Solution
// Autonomous Agro Bot
/*          Arduino based bot for automatic movement around the farm
  Dev: Aaryan Arora
  For Design For A Cause 2021
*/
//Libraries
#include <Servo.h>
#define TRIGGER_PIN1  8  // Arduino pin tied to trigger pin on the ultrasonic sensor.
#define ECHO_PIN1     12  // Arduino pin tied to echo pin on the ultrasonic sensor.


//Constants
const int motorA1 = 6;    //motor A positive (+) pin to pin 6 (PWM) (from L293D module!)
const int motorA2 = 9;        //motor A negative (-) pin to pin 9 (PWM)
const int motorB1 = 10;   //motor B positive (+) pin to pin 10 (PWM)
const int motorB2 = 11;   //motor B negative (-) pin to pin 11 (PWM)
Servo myservo;          //Create Servo object to control a servo
long duration, cm;
int TurnDelay = 1100;


//Variables
int distance;         //Variable to store distance from an object
int checkRight;       //To store right distance
int checkLeft;        //To store left distance
int pos = 90;         //Variable to store the servo position. By default at 90 degrees the sensor will 'look' forward


//declaring functions
void forward();
void backward();
void stop();
void left();
void right();
int ultraFront();


void setup()
{
  myservo.attach(5);      //Servo pin connected to pin 5
  myservo.write(pos);     // tell servo to go to position in variable 'pos'
  //Setting Motor control pins to output
  pinMode(motorA1, OUTPUT);
  pinMode(motorA2, OUTPUT);
  pinMode(motorB1, OUTPUT);
  pinMode(motorB2, OUTPUT);
  //Setting pins from Ultrasonic Sensor
  pinMode(TRIGGER_PIN1, OUTPUT);
  pinMode(ECHO_PIN1, INPUT);
}


void loop()
{


  //Read distance...
  distance = ultraFront();
  //Check for objects...
  if (distance > 15) {
    forward(); //All clear, move forward!
  }
  else if (distance <= 15) {
    stop(); //Object detected! Stop the robot and check left and right for the better way out!
    //Start scanning...
    for (pos = 0; pos < 180; pos += 1) { //goes from 0 degrees to 180 degrees
      myservo.write(pos);             //tell servo to go to position in variable 'pos'
      delay(10);                      //waits 10ms for the servo to reach the position
    }
    checkLeft = ultraFront();
    for (pos = 180; pos >= 0; pos -= 1) { //goes from 180 degrees to 0 degrees
      myservo.write(pos);             //tell servo to go to position in variable 'pos'
      delay(10);                      //waits 10ms for the servo to reach the position
    }
    checkRight = ultraFront();
    myservo.write(90);                   // Sensor "look" forward again
    //Finally, take the right decision, turn left or right?
    if (checkLeft <= 10 && checkRight <= 10) {
      backward(); //The route is closed... go back and then left(you can change to right as well depending on your choice and setup)
      delay(TurnDelay);
      left();
    }
    else if (checkLeft < checkRight) {
      right();
      delay(TurnDelay); // delay, change value if necessary to make robot turn.
    }
    else if (checkLeft > checkRight) {
      left();
      delay(TurnDelay); // delay, change value if necessary to make robot turn.
    }
  }
}


// functions for various type of motions
void forward() {
  digitalWrite(motorA1, HIGH);
  digitalWrite(motorA2, LOW);
  digitalWrite(motorB1, HIGH);
  digitalWrite(motorB2, LOW);
}
void backward() {
  digitalWrite(motorA1, LOW);
  digitalWrite(motorA2, HIGH);
  digitalWrite(motorB1, LOW);
  digitalWrite(motorB2, HIGH);
}
void right() {
  digitalWrite(motorA1, HIGH);
  digitalWrite(motorA2, LOW);
  digitalWrite(motorB1, LOW);
  digitalWrite(motorB2, HIGH);
}
void left() {
  digitalWrite(motorA1, LOW);
  digitalWrite(motorA2, HIGH);
  digitalWrite(motorB1, HIGH);
  digitalWrite(motorB2, LOW);
}


void stop() {
  digitalWrite(motorA1, LOW);
  digitalWrite(motorA2, LOW);
  digitalWrite(motorB1, LOW);
  digitalWrite(motorB2, LOW);
}


//for measuring distance using ultrasonic sensor
int ultraFront() {

  digitalWrite(TRIGGER_PIN1, LOW);
  delayMicroseconds(2);
  digitalWrite(TRIGGER_PIN1, HIGH);
  delayMicroseconds(10);
  digitalWrite(TRIGGER_PIN1, LOW);


  // Read the signal from the sensor: a HIGH pulse whose
  // duration is the time (in microseconds) from the sending
  // of the ping to the reception of its echo off of an object.
  pinMode(ECHO_PIN1, INPUT);
  duration = pulseIn(ECHO_PIN1, HIGH);

  // Convert the time into a distance
  cm = (duration / 2)*0.034;   // Multiply by 0.034
  return cm;
}
cm= (duration / 2) / 29.1;
Pictures:

Connect with Me:
Github - aaryan2134