element14 Community
element14 Community
    Register Log In
  • Site
  • Search
  • Log In Register
  • About Us
  • Community Hub
    Community Hub
    • What's New on element14
    • Feedback and Support
    • Benefits of Membership
    • Personal Blogs
    • Members Area
    • Achievement Levels
  • Learn
    Learn
    • Ask an Expert
    • eBooks
    • element14 presents
    • Learning Center
    • Tech Spotlight
    • STEM Academy
    • Webinars, Training and Events
    • Learning Groups
  • Technologies
    Technologies
    • 3D Printing
    • FPGA
    • Industrial Automation
    • Internet of Things
    • Power & Energy
    • Sensors
    • Technology Groups
  • Challenges & Projects
    Challenges & Projects
    • Design Challenges
    • element14 presents Projects
    • Project14
    • Arduino Projects
    • Raspberry Pi Projects
    • Project Groups
  • Products
    Products
    • Arduino
    • Avnet Boards Community
    • Dev Tools
    • Manufacturers
    • Multicomp Pro
    • Product Groups
    • Raspberry Pi
    • RoadTests & Reviews
  • Store
    Store
    • Visit Your Store
    • Choose another store...
      • Europe
      •  Austria (German)
      •  Belgium (Dutch, French)
      •  Bulgaria (Bulgarian)
      •  Czech Republic (Czech)
      •  Denmark (Danish)
      •  Estonia (Estonian)
      •  Finland (Finnish)
      •  France (French)
      •  Germany (German)
      •  Hungary (Hungarian)
      •  Ireland
      •  Israel
      •  Italy (Italian)
      •  Latvia (Latvian)
      •  
      •  Lithuania (Lithuanian)
      •  Netherlands (Dutch)
      •  Norway (Norwegian)
      •  Poland (Polish)
      •  Portugal (Portuguese)
      •  Romania (Romanian)
      •  Russia (Russian)
      •  Slovakia (Slovak)
      •  Slovenia (Slovenian)
      •  Spain (Spanish)
      •  Sweden (Swedish)
      •  Switzerland(German, French)
      •  Turkey (Turkish)
      •  United Kingdom
      • Asia Pacific
      •  Australia
      •  China
      •  Hong Kong
      •  India
      •  Korea (Korean)
      •  Malaysia
      •  New Zealand
      •  Philippines
      •  Singapore
      •  Taiwan
      •  Thailand (Thai)
      • Americas
      •  Brazil (Portuguese)
      •  Canada
      •  Mexico (Spanish)
      •  United States
      Can't find the country/region you're looking for? Visit our export site or find a local distributor.
  • Translate
  • Profile
  • Settings
In the Air Design Challenge
  • Challenges & Projects
  • Design Challenges
  • In the Air Design Challenge
  • More
  • Cancel
In the Air Design Challenge
Blog [AirCare] InTheAir - Week 16 bis: Fan Control with MSP430FR5969
  • Blog
  • Forum
  • Documents
  • Polls
  • Files
  • Events
  • Mentions
  • Sub-Groups
  • Tags
  • More
  • Cancel
  • New
  • Share
  • More
  • Cancel
Group Actions
  • Group RSS
  • More
  • Cancel
Engagement
  • Author Author: fvan
  • Date Created: 14 Feb 2015 3:43 PM Date Created
  • Views 760 views
  • Likes 3 likes
  • Comments 3 comments
  • eclipse_iot
  • mqtt
  • openhab
  • beaglebone_black
  • internet_of_things
  • in_the_air
  • texas_instruments
  • iot_sensor_nodes
  • cc3200
  • launchpad
Related
Recommended

[AirCare] InTheAir - Week 16 bis: Fan Control with MSP430FR5969

fvan
fvan
14 Feb 2015

Previous posts for this project:

  • [AirCare] InTheAir - Project Description
  • [AirCare] InTheAir - Week 1: Getting a Launchpad to Blink
  • [AirCare] InTheAir - Week 2: Preparing the Beaglebone Black
  • [AirCare] InTheAir - Week 3: Fuel Tank Testing
  • [AirCare] InTheAir - Week 4: Using the CC3200
  • [AirCare] InTheAir - Week 5: openHAB and MQTT
  • [AirCare] InTheAir - Week 6: Accessing Fuel Tank's Data
  • [AirCare] InTheAir - Week 7: Dust sensor
  • [AirCare] InTheAir - Week 8: MSP430FR5969 with Energia14
  • [AirCare] InTheAir - Week 11: CC3200, Energia and analogRead()
  • [AirCare] InTheAir - Week 12: Automatically starting some things
  • [AirCare] InTheAir - Week 13: GP2Y10 BoosterPack
  • [AirCare] InTheAir - Week 14: Ordering Parts and PCBs
  • [AirCare] InTheAir - Week 16: CNC Milling


  • Introduction
  • Plan A
  • Plan B
  • Control
  • Vote


Introduction


As I mentioned in my previous post, I've been trying to get the control of a dimmable power socket to work via the Launchpads. I moved on to plan B until I manage to spend more time to crack the code.

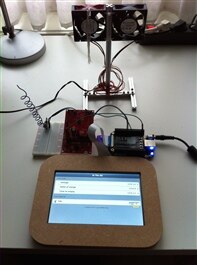
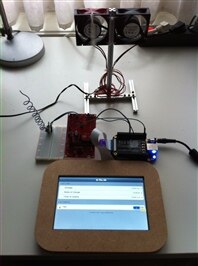
I then hooked up the Launchpad to the Beaglebone black over UART and configured openHAB in order to control the fan which will be in charge of filtering the air.


Plan A


Plan A sounded simple at first:

  • go to the hardware store
  • buy a remote controlled dimmable socket
  • analyze the signal
  • reproduce with Arduino/Launchpad


Going to the hardware store and finding a dimmable socket was the easy part.

imageimage


I underestimated the signal analysis and reproduction though ...


When analyzing the signal, I noticed there were different sequences being sent out to the 433MHz transmitter, as opposed to a single sequence repeated multiple times with the regular ON/OFF sockets.

I did my best to reproduce the signal, but haven't succeeded so far. I also searched for alternatives such as using an Arduino with 433MHz receiver and a sniffer sketch, but that didn't help either.


A lot of time was lost trying to figure this out and trying different things. I want to be able to crack the code as being able to control such dimmable sockets will certainly be useful for future projects, but I had to park it for now.


Plan B


OK, with Plan A temporarily set aside, it was time to move to Plan B: regular ON/OFF sockets without dimmer.


I have worked with those before, in the FMN challenge and managed to reproduce the sequence of pulses using an Arduino. Knowing that, it shouldn't be too different using a LaunchPad, right ? Well, I was wrong (a little bit).


void writeOne() {
  digitalWrite(pin,HIGH);
  delayMicroseconds(940);
  digitalWrite(pin,LOW);
  delayMicroseconds(300);
}

void writeZero() {
  digitalWrite(pin,HIGH);
  delayMicroseconds(290);
  digitalWrite(pin,LOW);
  delayMicroseconds(950);
}


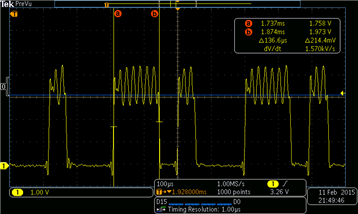
After loading the Arduino sketch from before onto the MSP430FR5969 Launchpad, nothing happened. The socket would not turn ON.

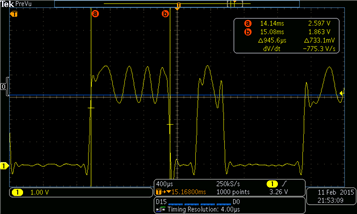
Booted the scope to have a look at the pulses and there they were. So why wasn't it working ?


Taking a closer look, the timing seemed completely off. A pulse that should have been HIGH for 0.940 ms only lasted about 0.140ms. What ?!

image


I searched the world wide web for answers and came to following post: http://e2e.ti.com/blogs_/b/msp430blog/archive/2015/01/20/using-the-msp-exp430fr5969-launchpad-at-16mhz-in-energia

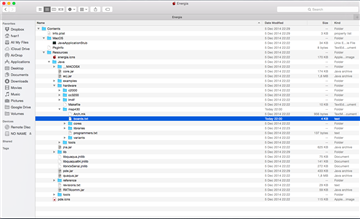
It is suggested that for timing critical application (which this one is), the Energia config needs to be adapted to have the MSP430FR5969 core run at 16MHz instead of 8MHz. This requires a small modification in the "boards.txt" file in the Energia installation folder.

imageimage


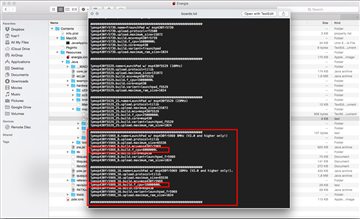
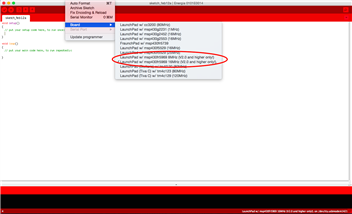
You can either uncomment the 16MHz and comment out the 8MHz or, duplicate the board definition, give it a different name and have one at 8MHz and the other at 16MHz. After making the changes, I restarted Energia and had two MSP430FR5969 to choose from. After uploading the sketch using the 16MHz variant, the timing was correct and my socket could be turned ON and OFF.


imageimage


Control

image

The control the fan, I have a 433MHz transmitter module attached to the MSP430FR5969 which in turn is controlled by OpenHAB on the Beaglebone Black over UART.


This is the connection diagram between the MSP430 and the BBB:

MSP430FR5969Beaglebone Black
Ext Power VCCP9-3 (3.3V)
GNDJ1-1 (GND)
P2.6 (UART1 RX)J1-5 (UART0 TX)
P2.5 (UART1 TX)J1-4 (UART0 RX)


image Note: Don't forget to set the "Power Select" jumper to "External".


I then proceeded to configure openHAB with the serial binding, just like I did in the Forget Me Not Challenge: [CaTS] ForgetMeNot - Week 4: Arduino-OpenHAB communication


The only difference, is that instead of /dev/ttyACM0, it should be /dev/ttyO0.


With everything configured, it was now possible to turn the power socket ON and OFF from OpenHAB. This will later be triggered automatically by a rule, depending on the measured amount of dust.

I've used a small fan for testing, but will be using a bigger one with a filter attached to it, for the final setup.


imageimageimage


The pieces are finally coming together, and with only two weeks remaining in the challenge I'm glad things are starting to work.


Vote


Your vote counts! If you like my project or anyone else's, don't forget to vote for it! Community Choice Poll - In the Air Challenge

  • Sign in to reply

Top Comments

  • mcb1
    mcb1 over 10 years ago +1
    Frederick Nice to see failures in original plans ... and the alternative. This guy 'cheated' and used the original remote. http://www.penguintutor.com/electronics/simple-homeautomation-raspberrypi Mar…
  • fvan
    fvan over 10 years ago in reply to mcb1 +1
    Hi Mark, that was the second alternative. But as I still want to use the remote for further testing, I decided not to use it. With only two weeks left, it's all about getting things to work together now…
  • fvan
    fvan over 10 years ago in reply to mcb1

    Hi Mark,


    that was the second alternative. But as I still want to use the remote for further testing, I decided not to use it.

    With only two weeks left, it's all about getting things to work together now.


    Frederick

    • Cancel
    • Vote Up +1 Vote Down
    • Sign in to reply
    • More
    • Cancel
  • mcb1
    mcb1 over 10 years ago

    Frederick

    Nice to see failures in original plans ... and the alternative.


    This guy 'cheated' and used the original remote.

    http://www.penguintutor.com/electronics/simple-homeautomation-raspberrypi


    Mark

    • Cancel
    • Vote Up +1 Vote Down
    • Sign in to reply
    • More
    • Cancel
  • ipv1
    ipv1 over 10 years ago

    Dunno if this is useful but if you are trying to control the speed of a fan you might consider looking up scr based ac motor control. The concept is similar to pwm but uses an scr to cut part of the AC voltage to lower motor speeds image

    • Cancel
    • Vote Up 0 Vote Down
    • Sign in to reply
    • More
    • Cancel
element14 Community

element14 is the first online community specifically for engineers. Connect with your peers and get expert answers to your questions.

  • Members
  • Learn
  • Technologies
  • Challenges & Projects
  • Products
  • Store
  • About Us
  • Feedback & Support
  • FAQs
  • Terms of Use
  • Privacy Policy
  • Legal and Copyright Notices
  • Sitemap
  • Cookies

An Avnet Company © 2025 Premier Farnell Limited. All Rights Reserved.

Premier Farnell Ltd, registered in England and Wales (no 00876412), registered office: Farnell House, Forge Lane, Leeds LS12 2NE.

ICP 备案号 10220084.

Follow element14

  • X
  • Facebook
  • linkedin
  • YouTube